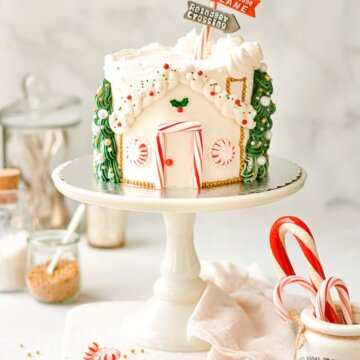
Santa's Workshop Christmas Cake
A fun and festive Christmas cake decorated like Santa's workshop, using buttercream, candy and sprinkles.
All recipes on Curly Girl Kitchen are developed for high altitude at 5,280 feet. See FAQs for adjusting to higher or lower elevations.
Ingredients
- 1 - 3 or 4 layer cake, filled and frosted
- 2 cups Perfect American Buttercream
- green gel food coloring
- candy canes and peppermint candies
- sprinkles and sugar pearls, in a variety of colors and sizes
- piping bags
- piping tips, #s 199, 12, 22
Instructions
- CAKESo you can use absolutely any flavor of cake that you like, frosted with white/vanilla buttercream. Mine is a Red Velvet Cake. I wouldn't recommend using a cream cheese buttercream for the decorating.Photographed here is a 6-inch 3-layer cake (using 1/2 my recipe for red velvet cake). To be honest, this design works better with a taller cake, and I wish I'd added a 4th layer so that the roof of the house was higher and more dramatic. So a smaller cake pan size with a taller height looks best. If you bake your cake in 8 or 9 inch pans, you'll have a hard time doing this design since your cake won't be tall enough.I frosted the cake with my Perfect American Buttercream, and used about 1 1/2 - 2 cups for the decorating. Once your cake is frosted, you can immediately begin decorating.
- DOORCut or break pieces of candy canes, and place on the cake for the door. Use a large sugar pearl for the doorknob.
- WINDOWSPress two peppermint candies on either side of the door for your windows.Place small sugar pearls around the candies (using tweezers if you need to).
- HOUSEUse a toothpick to lightly trace the outline of your house. Place small sugar pearls along the outline to form the edges of the house and chimney.
- ROOFFit a piping bag with a couple and tip #199. Fill with white buttercream, and pipe swirls along the roof's edge.
- SMOKE PUFFSSwitch to tip #12, and pipe white buttercream along the top of the cake to look like puffs of smoke floating out of the chimney.
- TREESSqueeze most of the buttercream out of the bag, but leave a little inside. Switch to tip #22.Tint 1 cup of the buttercream to your desired shade of green, and fill the piping bag with green buttercream. (Leaving some of the white buttercream in the bag creates a more realistic mix of colors, like snow on branches.)Starting at the bottom of the cake, pipe the tree branches, working from the bottom to the top.
- ORNAMENTSFinish your design by decorating the trees (and the edge of the roof) with various sizes and colors of sugar pearls and sprinkles.
- TOPPERFor the candy cane topper, I actually found the little sugar street signs at a local craft store. Since I didn't intend for them to be eaten, I used hot glue to glue them onto a wrapped candy cane. For an edible topper, you would need to unwrap the candy can and use stiff royal icing to adhere the signs to the candy cane.You could also make a very cute (non-edible) topper by making street signs from cardstock and glueing them to a candy cane.
Notes
Leftover cake should be stored in an airtight container or cake carrier at room temperature for up to 3 days. The cake can also be frozen (fully decorated) for 3-6 months.
Tried this recipe?Let us know how it was!
https://curlygirlkitchen.com/