How To Crumb Coat and Frost a Layer Cake
A comprehensive post with step-by-step photos showing you how to crumb coat a cake. From start to finish, you'll learn how to stack, fill, crumb coat and frost a layer cake for beautiful, professional results in your home kitchen.
All recipes on Curly Girl Kitchen are developed for high altitude at 5,280 feet. See FAQs for adjusting to higher or lower elevations.
Equipment
- Icing Spatula
- Bench Scraper
- Cake Decorating Turntable
- Nonslip Pad
Ingredients
- 3 8-inch or 6-inch cake layers, baked and cooled
- 4-5 cups buttercream
Instructions
Getting Started
- Make sure your cakes are completely cooled before you frost them. Any warmth will melt the buttercream. If the cakes have a domed top, level them slightly with a sharp knife (no need to cut off too much) so you have flat, level cakes for stacking.
- Whip your buttercream, and keep the bowl covered with plastic wrap until needed, so it doesn't crust over. If your kitchen is warm, pop the bowl in the refrigerator for a few minutes to keep the buttercream cool.
- Read this post on Perfect American Buttercream for recipes, variations, tips and best practices. You'll need about 3-4 cups of buttercream for a three-layer 6-inch cake, and 4-5 cups of buttercream for a three-layer 8-inch cake.
- Get your cake decorating turntable ready by placing a nonslip pad on top, and a cake board on the pad.
Stack and Fill
- Begin by placing one layer of cake on your cake board. It can be helpful to place the cake bottom-side-up for a flat, clean surface area. Add a dollop of buttercream on top (about 1/2 cup for a 6-inch cake and 3/4 cup for an 8-inch cake).
- Using your icing spatula, spread the buttercream from the center of the cake towards the edges, making the buttercream as level as possible. You want to try to avoid touching the cake directly with your spatula, as it can pull at the cake and make it tear or crumble.
- Stack the next cake layer on top, making sure it's centered and level. Repeat with another layer of buttercream.
- Continue stacking and filling your cake layers until you've added the last cake layer on top.
Crumb Coat
- Add a dollop of buttercream on top. Use your icing spatula to spread it out into a very thin layer on top of the cake, pushing excess buttercream over the edges. Spread the buttercream very thinly around the sides of the cake, adding more buttercream as needed, until all bare spots are covered.
- Take your bench scraper, hold it at a 45-degree angle to the side of the cake, and sweep it around the side as you spin the turntable. Scrape any excess crumb-filled frosting off the bench scraper and into a small bowl (not back into your bowl of clean buttercream).
- If there are gaps, or uneven areas, add some buttercream to that spot (using what you scraped off), and smooth it out again with the bench scraper. Use your bench scraper or icing spatula to smooth the top of the cake, too.
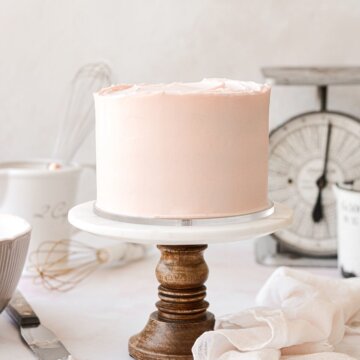
- Your cake is now covered in a crumb coat. It should be very thin, so that you can see the cake through the buttercream. Spin the cake around, and check that it's level and standing straight up on all sides. If it seems to be leaning to one side, use your bench scraper to gently push it straight, then smooth the sides again.
- Refrigerate the cake for at least 30 minutes, until the crumb coat is chilled, and no longer feels sticky. If it's a warm day, and your buttercream was warm and soft to begin with, you may need to chill the crumb coat for 45-60 minutes.
- Cover the bowl of remaining buttercream with plastic wrap so it doesn't crust over. If your kitchen is warm (hotter than 72 degrees Fahrenheit), place it in the refrigerator to keep it cool.
- While you're waiting, make yourself a fresh cup of coffee, and decide how you want to decorate your cake.
Final Coat
- After chilling the crumb coat, it's time to finish frosting your cake. If you're doing a piped design, like on this Chai Tea Cake, you can fill a piping bag with buttercream and pipe it directly onto your crumb coat.
- With your cake on your turntable, dollop some buttercream on top of the cake, and spread it out towards the edges. Get more buttercream on your icing spatula and frost the sides of the cake. Be sure to use enough. Too little buttercream, and your spatula can dig into your crumb coat, making it difficult to frost a clean final coat.
- Once you've covered the cake, you can use the icing spatula to swoop and swirl the buttercream, giving it a simple, natural design.
- For a smooth finish, take your bench scraper, hold it at a 45-degree angle to the side of the cake, and sweep it around the side as you spin the turntable. The goal here is to smooth the buttercream, but not to remove very much of it. Use a light hand so you don't scrape off too much. If any of the cake is showing through then the frosting isn't thick enough, and you need to add a little more. If there are any gaps or holes in the buttercream, add a little more, and smooth it again with the bench scraper. A perfectly smooth coat of buttercream takes practice, so don't worry if yours isn't perfect the first time.
Finishing Touches
- Once you're happy with how the sides of the cake look, you can smooth out the top, if you like. Simply take your icing spatula or bench scraper, and sweep it across the top of the cake, starting at the edge and moving towards the center of the cake. Personally, I like the textured edge and top to contrast the smooth sides, so I don't smooth the tops of my cakes.
- Another really easy decorating technique that doesn't require much skill or finesse is to drag your icing spatula around the sides of the cake, working from the bottom edge to the top. You can see an example on this Strawberry Almond Cake. This technique is quick and easy to do, and always looks pretty.
- If you have any extra buttercream, you can use it to pipe some decorative swirls on top of the cake, or scrape it into a freezer bag, label it, and freeze it for another project.
- Lastly, don't forget to take a paper towel or tissue and wipe the edge of the cake board clean around the bottom of the cake.
Tried this recipe?Let us know how it was!
https://curlygirlkitchen.com/