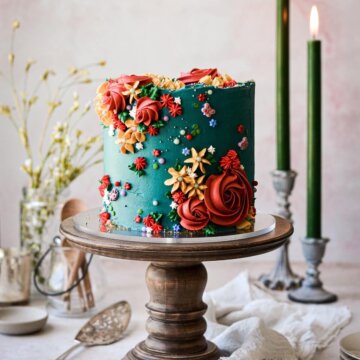
Turquoise Floral Cake
This turquoise floral cake with piped buttercream flowers features vivid colors of deep turquoise blue, rich reds, forest green, and marigold yellow, with little pops of blue and lavender. A scattering of sugar pearls, butterfly sprinkles and nonpareils add a touch of whimsy.
All recipes on Curly Girl Kitchen are developed for high altitude at 5,280 feet. See FAQs for adjusting to higher or lower elevations.
Ingredients
- 1 6-inch 3-Layer Cake, any flavor, frosted and well chilled
- 3 cups Vanilla Buttercream
- Gel Food Coloring (super red, regal purple, soft pink, lemon yellow, warm brown, navy blue, turquoise, electric green, leaf green)
- Piping Tips (1M, 2D, 22, 73, 352)
- Couplers and 12-Inch Piping Bags
- Icing Spatula and Bench Scraper
Instructions
Getting Started
- Begin by getting your cake layers assembled, filled, and frosted as smoothly as you can, then well chilled. I frosted my cake with plain white vanilla buttercream. You can use any cake recipe you like, but I recommend using my Perfect American Buttercream recipe. Be sure to also read my comprehensive post on How to Stack, Fill, Crumb Coat and Frost a Layer Cake. I assembled my cake with three 6-inch cake layers.
- You'll need to chill the cake for at least several hours before you begin decorating, to ensure the frosting is firm and cold. I frosted my cake at night, so I could chill it overnight and decorate it the next morning.
- You should also plan and sketch your cake design. I find that my decorated cakes turn out much better when I draw a sketch of most of the details I want to incorporate. In my sketch, you'll see that I had planned on adding some cupcakes on top, but decided against using them in the end.
Mix the Buttercream Colors
- You'll need about 1 1/4 cups of buttercream for the turquoise base coat, with the remaining 1 3/4 cups divided between various shades of red, yellow, green and white. You might have to adjust the gel colors a little from my suggestions, until you're happy with the final colors.TIP: I'd suggest mixing your colors several hours before (or the night before) you're going to decorate your cake, since the colors will deepen and darken over time.
- For the deep turquoise, begin by adding a few drops of "navy blue" to get a medium deep blue color. Next add a few drops of "turquoise" and a very small amount of "electric green".This will be the base coat of buttercream.
- For the bright red, add "super red" until you have a vivid red color.This will be for the small red star flowers.
- For the rosy red, add "super red" until you have a vivid red color. Add a drop of "regal purple" and a few drops of "soft pink" to soften the red into a duskier hue.This will be for the larger rosettes, and you'll need more buttercream for this color, since the rosettes are bigger than the other flowers.
- For the yellow, add "lemon yellow" for a sunny yellow color. Now add "warm brown", a small amount at a time, to deepen the color into a mustard yellow or marigold.This will be for the yellow drop flowers.
- For the white, simply reserve a small amount of buttercream to keep white.This will be for the small white star flowers.
- For the green, take 2 tablespoons of the turquoise buttercream. Add a drop or two of "leaf green" for a deep green color.This will be for the leaves.
Frost the Cake with Turquoise Buttercream
- Take your chilled cake, which should be completely covered in a cold base coat of buttercream.
- Frost the cake all over with the turquoise buttercream, and lightly sweep it smooth with your bench scraper. You'll only need a thin layer of turquoise to cover the cake, and you'll find that it smooths over the chilled base coat beautifully. You can even leave it a bit textured, if you like. For tips on that technique, see my textured watercolor buttercream cake.
Add the Sprinkles
- While it might seem to make more sense to add the sprinkles after you've decorated the cake with all your buttercream flowers, there's a good reason for adding the sprinkles first. Tiny sprinkles like sparkling sugar and nonpareils will only stick to a freshly frosted cake. Once the buttercream begins to crust over, which will happen in a few minutes, those tiny sprinkles simply will not stick, and they'll just bounce right off the surface of the buttercream. This is why it will be so helpful for you to have a sketch of your cake to reference, so you'll know exactly where you want to add sprinkles, and where you want to leave space for piping the flowers.
- So first, add the nonpareils and gold sparkling sugar. There's no magic method to doing this; I simply pinch them between my fingers and toss them against the side of the cake, hoping that they stick in the general area that I want them. They're too tiny to try to apply with cake decorating tweezers.
- Now add your sugar pearls and other sprinkles. These you can apply with tweezers, or carefully press them on with your fingers.
Chill the Cake
- Return the cake to the refrigerator so you can chill and firm up the turquoise coat of buttercream.
- You need a chilled, crusted surface of buttercream before you begin piping on the flowers, so let the cake chill for about 1 hour.
Pipe the Flowers
- Fit a piping bag with Tip #1M, and fill with the rosy red buttercream. Pipe the large and medium sized rosettes.
- Fit a piping bag with Tip #2D, and fill with the marigold yellow buttercream. Pipe the drop flowers.
- Fit a piping bag with a coupler and Tip #22, and fill with the bright red buttercream. Pipe the small red star flowers.
- Fit a piping bag with a coupler and Tip #73, and fill with the white buttercream. Pipe the small white star flowers.
- Fit a piping bag with a coupler and Tip #352, and fill with the green buttercream. Pipe the leaves.I don't like to go overboard with the leaves - just enough to add depth and interest, but not so many that they take over your cake design.
- As a finishing touch, use tweezers to place sugar pearls in the center of each of the yellow drop flowers, and press a few more sprinkles onto the cake as desired, to complete the design.
Tried this recipe?Let us know how it was!
https://curlygirlkitchen.com/