Buttercream Christmas Tree Cake Tutorial
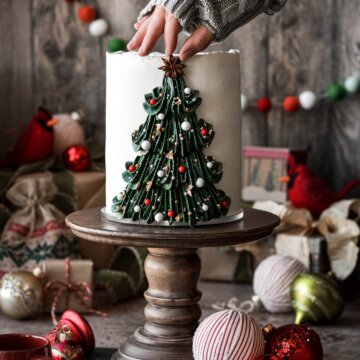
Today’s tutorial post includes detailed step-by-step photos to teach you everything you need to know to create your own cake decorated with a piped buttercream Christmas tree, sprinkle lights and ornaments, and topped with a star.
All recipes on Curly Girl Kitchen are developed for high altitude at 5,280 feet. See FAQs for adjusting to higher or lower elevations.
Equipment
- 4 6-inch Round Cake Pans
- 1 Disposable Piping Bag
- Piping Tip #1M
- Wax Paper
- Mini Star Shaped Cutter (1 inch)
Ingredients
- 1 recipe Chocolate Cake
- 5x recipe Perfect American Buttercream
- Sugar Pearls, Sprinkles and Nonpareils (variety of shapes and Christmas colors)
- Gold and/or Silver Sparkling Sugar
- Star Anise
- Gel Food Coloring “forest green”, “electric green”, “turquoise”, “leaf green”, and “super black”
Instructions
Bake and Cool the Cake
- Prepare the chocolate cake batter as instructed, and bake in four 6-inch cake pans.
- After baking your cake, cool the cake layers completely before assembling and frosting your cake.
- If you're making the 4-layer cake option, it can be helpful to wrap the cake layers individually in plastic wrap and chill them in the refrigerator, then stack and fill the chilled cake layers.
Make the Buttercream
- Make 5x the recipe for Perfect American Buttercream. For a white buttercream, use half butter and half vegetable shortening.
- You can make the buttercream in advance, and refrigerate it in an airtight container for up to 1 week, or freeze it for up to 3-6 months. Let the buttercream come to room temperature, and if necessary, re-whip it for several minutes with your mixer.
Fill and Frost the Cake
- Once you’ve baked and cooled your cake layers, and made your buttercream, you can get started on the decorating. Stack and fill your cake layers with buttercream, then frost your cake all over with a thin crumb coat of buttercream.
- Chill your crumb-coated cake for 30 minutes, then frost all over with a final coat of buttercream, saving the extra buttercream for the tree. You can smooth out the buttercream on the sides of the cake, or leave it swirly, whatever you like.
- Once your cake is frosted, chill it in the refrigerator for 30-60 minutes before piping your Christmas tree.
Make a Cake Decorating Template
- I highly recommend making yourself a template to use as a guide when you start piping on the buttercream for the tree. You’ll find the whole decorating process so much easier if you know exactly where to put your piping tip before you begin.
- To make a template, simply measure the height of your cake, then cut a piece of wax paper that same height. Now cut the wax paper in the shape of a triangle, to resemble the general shape of your Christmas tree. Hold the paper against the cake, and use a toothpick or sharp knife to lightly scratch the outline onto your buttercream.
- Lastly, scratch horizontal lines across the triangle to divide the tree into 3 or 4 sections. Since my cake is tall, I knew that I wanted 4 sections of branches. If you’re decorating a shorter 3-layer cake, you may only want 3 sections, or you can do 4 shorter sections. It’s totally up to you, depending on how you want your tree to look.
- Return the cake to the refrigerator until you’re ready to start the decorating.
Make a Buttercream Star
- For the star, spread a small amount of buttercream (about a tablespoon) onto a piece of wax paper. The buttercream should be about 1/4 inch thick or slightly thinner. Sprinkle with sparkling sugar, and press it gently into the buttercream. Freeze the buttercream on the wax paper for about 10-15 minutes, until firm.
- Use a mini star cutter (about 1 inch wide) to cut a star from the frozen buttercream. If you don’t have a star cutter, you can just use a knife to cut a star shape. Keep the star in the freezer until you’re ready to place it on your cake.
- When your tree is done, you can carefully lift the frozen star off the wax paper with a small offset spatula, and press it onto your cake.
- In the end, I decided not to use my buttercream star, and I used a star anise instead. Either option looks really pretty on top of the cake.
Color the Buttercream Green
- It can be a little tricky to get a deep, woodsy green color with food coloring, but the key is to use several different colors until you’re happy with the shade. There are so many shades of green gel food coloring available, but I’ll just explain how I achieved this shade with the colors I have on hand. All of my gel colors are the AmeriColor brand.
- With my bowl of extra buttercream, I started by adding a few drops of Forest Green. You would think from the name that it would make a deep green buttercream, but it doesn’t. Then I added a few drops of Super Black to darken it a little. Be careful with the black, as too much can make your frosting gray. From there, I added a touch of Electric Green and a small dab of Turquoise and Leaf Green. Then I just kept adding a bit more of each as needed until I was pleased with the shade of green. If you search online, there are many articles that can guide you on how to combine food colors to get the specific shade you’re after. I think that gel food coloring is very hard to measure, since some are thicker and some are thinner, so a “drop” to me might be something different to you.
- Remember that you can always add more color, but you can’t take it out if you add too much.
- Also note that buttercream darkens as it sits. So if you think it isn’t dark enough, let it sit (covered) for 30 minutes if you have the time to spare, then come back and check the color.
Pipe the Buttercream Christmas Tree
- To pipe the Christmas tree, fit a piping bag with tip #1M, and fill with buttercream.
- If you need to, practice your piping first on a piece of wax paper. Then you can scrape the buttercream back into the bowl and use it again. There are only two styles you need to master for today’s cake.
- First, practice piping a “shell”. A shell involves first pushing the piping tip forward slightly, and then pulling it back in the opposite direction. This will create a rounded look for the bottom of the branches. You’ll be piping this shape in a vertical line, from the bottom of the cake, upwards.
- Then, practice the “swoops” shown in the next image. This is sort of like a shell, but with a little swoop off to the side, before piping upwards. I used this shape for the outer branches on my cake, to give it a prettier shape.
- Start at the bottom of the cake, and pipe a vertical shell in the center, from the bottom edge, up to the first horizontal line on your template.
- Then pipe 1-2 more shells on either side of the middle one, to start filling in your template. To finish the bottom row, pipe a swoopy shell on each side. On the left of your Christmas tree, swoop from the left towards the right. On the right side of your tree, swoop from the right towards the left.
- Now pipe the branches on the 2nd, 3rd and 4th sections, always working your way from the middle to the edge. The top branch of the tree should be the last branch you pipe.
- 4-Layer Cake Option. Note that on my cake, which is a 7-inch tall, 4-layer cake, I have 4 sections of branches. The bottom section has 7 piped branches, the next has 5 branches, the next has 4 branches, and the top has 2 branches.
- 3-Layer Cake Option. For a shorter 3-layer cake, you may only need 3 sections of branches, or you could also do 4 shorter sections. This will mean that you’ll be piping fewer branches. Your bottom section might only have 5 branches, the middle section might only have 3-4 branches, and the top section will have 2 branches.
Decorate With Sprinkles
- Before the buttercream crusts over, decorate the Christmas tree with sugar pearls and sprinkle “ornaments”.
- I like to start by tossing some gold or silver sparkling sugar at the tree. There’s no real technique here – I just toss it and see where it lands. Then I’ll do the same with some nonpareils in red, green and white.
- Next, you can use your fingers or a pair of tweezers to individually place medium and large sugar pearls. I even had some edible gold leaf on hand that I’ve been saving for a special project, and this seemed like the perfect cake to use it on.
- Lastly, place your star on top.
Tried this recipe?Let us know how it was!
https://curlygirlkitchen.com/