Easy Homemade Salt Dough Christmas Ornaments with Cookie Stamps
Make the most beautiful homemade salt dough ornaments with this easy recipe and assorted Christmas cookie stamps.
All recipes on Curly Girl Kitchen are developed for high altitude at 5,280 feet. See FAQs for adjusting to higher or lower elevations.
Equipment
- Assorted Christmas Cookie Cutters
- Assorted Christmas Cookie Stamps
- Round Cookie Cutter or Biscuit Cutter (with a diameter equal to the diameter of your cookie stamps)
- Rolling Pin
- Disposable Drinking Straw
- Small Craft Brush
- Mod Podge (Matte)
- Extra Fine White Glitter
- Baking Sheets, Cooling Racks & Silpat Baking Mats
- Thick Twine
- Decorative Beads
Ingredients
- 2 cups all-purpose flour (plus extra for rolling the dough)
- ¾ cup table salt
- ¾ - 1 cup warm water
Instructions
Make the Salt Dough
- In a bowl, combine the flour and salt. Stir in the water until the dough is moistened, but not too wet or sticky.
- Knead the dough on a clean work surface for several minutes until smooth.
Cut the Ornaments
- For cutout ornaments using cookie cutters, lightly flour your counter and the top of the dough to keep it from sticking, and roll out the dough to about 1/4 inch thick. Cut as many ornaments as you can, and place the cut ornaments on a baking sheet lined with a silpat baking mat. Note: If you'll be stamping names or words on the ornaments using letter embossers, do this immediately before the surface of the dough starts to dry. Stamped words look best if you first press the letter embossers on an ink pad (like one used for rubber stamps), before pressing them into the dough.
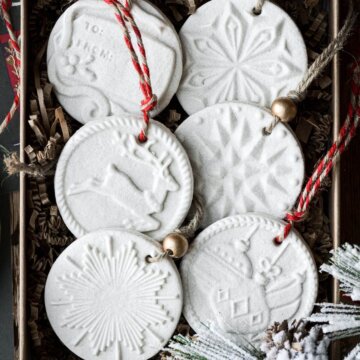
- For stamped ornaments using cookie stamps, roll a ball of dough (about 2 tablespoons) smooth between your hands, and lightly dust the dough ball with flour. Flour your cookie stamps.Press the stamp straight down onto the ball of dough, until the dough spreads out just past the edges of the stamp. Lift the cookie stamp off the dough, and use a round cookie cutter or biscuit cutter to cut out the pressed ornament and remove the uneven edges. Place the ornaments on a baking sheet lined with a silpat baking mat.Note: Originally, I said to place the ornaments on a baking sheet lined with parchment paper. However, sometimes the paper can wrinkle from the moisture in the ornaments, creating ripples and wrinkles on the ornaments themselves (which you can see a little in my gold-painted ornaments). A silpat will not do this. You may also be able to get away without the silpat, and just place the ornaments on a baking sheet.
- Don't forget to poke the holes for the twine! A disposable plastic drinking straw or paper straw works well for this task.
Dry the Ornaments
- Let the ornaments dry for 3-4 hours on the baking sheet until the top of the dough looks dry and porous. Turn the ornaments over, and let dry until the bottom of the dough looks dry and porous.Now place the ornaments on a cooling rack, and let them sit until completely hard and dry. Don't rush to place them on the cooling rack if they're still damp, since the cooling rack will leave indentations on the dough if it's still soft and pliable.Fully drying the ornaments could take anywhere from 2-7 days depending on their size and thickness. They need to remain on the cooling rack so that the air can circulate around all sides and thoroughly dry them out.
- Another option for drying your ornaments is to dry them in the oven at very low heat. Preheat your oven to its lowest setting (usually 175-200 F), and dry the ornaments in the oven, turning them every 30-60 minutes, until dry. Be careful not to use too high of heat, or they can turn brown. While this option is faster, personally I feel like the ornaments look better in the end when dried slowly at room temperature.
Seal the Dough and Add Glitter
- If there are any rough, uneven edges or corners, lightly sand them with a piece of fine grit sandpaper, or even an emory board.
- Using a small craft brush, brush a thin layer of matte Mod Podge over the tops, bottoms and sides of the ornaments (let one side dry before flipping them over to do the other side).
- Once the Mod Podge is completely dry, brush the tops of the ornaments with a second thin layer of Mod Podge. Immediately sprinkle with the extra fine white glitter. Let dry completely.
- This step will really make the ornaments beautiful. The Mod Podge fills in some of the porous texture and smooths out the dough, while the glitter makes them shimmer and sparkle.
- If you're going to be painting your ornaments, you can skip the glitter and paint them at this point.
Finish with Twine
- Cut lengths of twine, about 10-12 inches per ornament. You don't want to use thin "baker's twine", but rather a heavier, thicker twine will look nicer. Insert the twine through the holes in the ornaments, and tie the twine, adding decorative beads if you like. You could also use thin ribbon instead of twine.
- Hang the ornaments on your tree.
Tried this recipe?Let us know how it was!
https://curlygirlkitchen.com/