High Altitude Neapolitan Cake
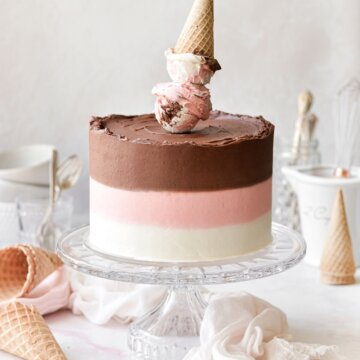
A whimsical Neapolitan cake, with layers of vanilla, chocolate and strawberry cake, with striped buttercream, and an ice cream cone cake topper.
All recipes on Curly Girl Kitchen are developed for high altitude at 5,280 feet. See FAQs for adjusting to higher or lower elevations.
Equipment
- Stand Mixer with Paddle Attachment
- 8-inch cake pans (x3)
Ingredients
Vanilla Cake and Buttercream
- ½ recipe Vanilla Cake
- ½ recipe Vanilla Buttercream
Strawberry Cake and Buttercream
- ½ recipe Strawberry Cake
- ½ recipe Strawberry Buttercream
- 3-4 drops red or pink gel food coloring
Chocolate Cake and Buttercream
- ½ recipe Chocolate Cake
- ½ recipe Chocolate Buttercream
Instructions
Cake
- Preheat the oven to 350 F, and spray the bottoms of three 8-inch cake pans with non-stick spray.
- Prepare 1/2 recipe Vanilla Cake.
- Prepare 1/2 recipe Strawberry Cake. Add red or pink gel food coloring for desired shade of pink.
- Prepare 1/2 recipe Chocolate Cake.
- Bake the cakes for about 28-30 minutes on the center oven rack, until a cake tester comes out clean. Set the pans on a cooling rack, covered loosely with a clean kitchen towel, and cool completely.
- If making the cakes in advance, cool until slightly warm, then turn the cakes out and wrap well in plastic wrap. Keep at room temperature for up to 1 day, or freeze for up to 3-6 months.
Buttercream
- Prepare 1/2 recipe Vanilla Buttercream.
- Prepare 1/2 recipe Strawberry Buttercream.
- Prepare 1/2 recipe Chocolate Buttercream.
- Cover each bowl of buttercream with plastic wrap, until needed.
Assembly
- If the tops of the cakes are domed or uneven, carefully trim off the domed portion for a flat surface.
- Place the vanilla cake on a cake board. Frost the top of the vanilla cake with a layer of vanilla buttercream, between 1//8-1/4 inch thick. Frost the sides of the cake with a thin coat of vanilla buttercream.
- Place the strawberry cake on the vanilla cake. Frost the top of the strawberry cake with a layer of strawberry buttercream, between 1//8-1/4 inch thick. Frost the sides of the cake with a thin coat of strawberry buttercream.
- Place the chocolate cake on the strawberry cake. Frost the top of the chocolate cake with a layer of chocolate buttercream, between 1//8-1/4 inch thick. Frost the sides of the cake with a thin coat of chocolate buttercream.
- Take a bench scraper and drag it around the sides of the cake, to smooth the sides out and scrape off any excess frosting. Place the cake in the refrigerator for 30 minutes to chill and set the crumb coat.
- For the final, "pretty" coat of buttercream, you can either use an icing spatula (which I did), or use separate piping bags for each color. Piping bags will give you cleaner, sharper lines between each color, but as you can see, if you're careful with an icing spatula, you can also keep it nice and neat.
- Use your icing spatula to spread vanilla buttercream along the bottom edge, trying to keep it neat, filling in the bottom third of the cake all the way around. Repeat with the strawberry buttercream, and then chocolate, frosting the sides and top with chocolate. If you see any gaps, go ahead and dab on some more frosting to fill in the gaps.
- Now, take your bench scraper again, hold it at about a 45-degree angle to the cake and lightly sweep it around the sides of the cake on a continuous motion – this is where it is extremely beneficial to decorate your cake on a turntable so that you can turn it with one hand while you smooth the buttercream with the other. Without a turntable, this step will be difficult for you. You are not trying to remove much frosting, so use a light hand – you are simply smoothing out any air bubbles and blending the colors together. Sweep around the cake several times, scraping the excess frosting off the bench scraper and into a bowl. Wipe the bench scraper clean with a paper towel each time around, and keep smoothing until you’re satisfied with the result. Smooth out the top. If you don't have perfectly smooth lines, don't worry. This technique takes some practice.
Ice Cream Cone Topper
- To make the ice cream cone topper, you'll need a sugar cone and the excess frosting that you scraped into a bowl.
- Position the ice cream cone in something, like a small jar, so that it's held upright. Chill the bowl of extra buttercream for a few minutes in the refrigerator, then use an ice cream scoop with a release lever to scoop the frosting, just like you would scoop ice cream. Release the scoop of buttercream onto the ice cream cone. Repeat with a second scoop.
- Set the ice cream cone in the refrigerator to completely chill and firm up.
- To place the topper on your cake, insert a wooden skewer into the chilled ice cream scoops, until it reaches the bottom of the sugar cone. Turn it upside down, poke the skewer into the cake, and push it down to center it on top of the cake.
Tried this recipe?Let us know how it was!
https://curlygirlkitchen.com/