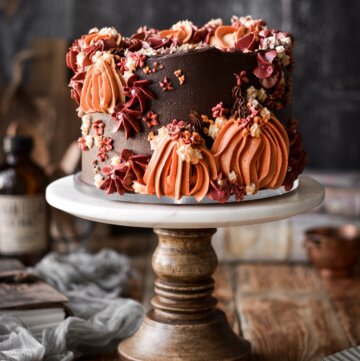
Autumn Cake with Buttercream Pumpkins and Flowers
A cake decorating tutorial for an Autumn cake with buttercream pumpkins and flowers.
All recipes on Curly Girl Kitchen are developed for high altitude at 5,280 feet. See FAQs for adjusting to higher or lower elevations.

Equipment
- Stand Mixer with Paddle Attachment
- Disposable 12 Inch Piping Bags
- Disposable 16 Inch Piping Bags
- Couplers and Piping Tips (1M, 13, 16, 22, 73, 225, 352, and other small flower tips as needed)
Ingredients
- 1 Layer Cake, frosted with chocolate buttercream
- ½ cup Chocolate Buttercream (extra)
- 1 ½ cups Vanilla Buttercream
- Gel Food Coloring (Super Red, Super Black, Warm Brown, Chocolate Brown, Orange, Lemon Yellow)
- Small Sugar Pearls
Instructions
Bake the Cake
- Start by baking your cake - any flavor will do, as long as it goes with chocolate buttercream. I used 1/2 the recipe for my Brown Butter Pumpkin Cake, which I baked in two 6-inch cake pans. This is a petite cake that will serve 8 people.If you don't want such a small cake, make the full cake recipe and divide it between two or three 8-inch cake pans for 16 servings.
- Cool the cake completely before assembling and frosting.
Make the Chocolate Buttercream
- For a two-layer 6-inch cake, make 1/2 my recipe for Chocolate Buttercream.For an 8-inch cake, make the full recipe for chocolate buttercream.
- Fill and frost the cooled cake with the chocolate buttercream. Be sure to reserve 1/2 cup of the chocolate buttercream to use later for the decorating.For tips on frosting cakes, see this post: How to Stack, Fill, Crumb Coat and Frost Layer Cakes.
- Chill the cake completely, so the chocolate frosting is firm and cold before you begin decorating.
Make the Vanilla Buttercream
- Make 2x my recipe for Vanilla Buttercream. This will be more than you'll need for a 6-inch cake, but it will provide enough for decorating an 8-inch cake, too.
- Note that any buttercream you don't use, you can freeze in freezer bags for future cakes.
Color the Vanilla Buttercream
- Decide what color palette you want for your cake. I wanted rich, moody fall colors in browns, reds, pinks and oranges. To make these colors, you'll need gel food coloring in Super Red, Super Black, Lemon Yellow and Orange (I use the Americolor brand).
- To add warmth and to deepen the colors so that they're not too bright or pastel, you have to add brown or black, but just a little. I used my extra 1/2 cup of leftover chocolate buttercream, and added small dabs of that to each of my colors, which gives them such a nice warmth and depth.You could also do the same thing by adding Chocolate Brown or Warm Brown food coloring. When adding the darker colors to a bowl of light pink or yellow buttercream, go slowly. Just add a tiny bit of the brown or black, and see how you like it, then adjust from there.
- Divide the vanilla buttercream between 5-6 small bowls, and start mixing your colors. These are the colors I made:Dark Pinkish Red: Super Red + Super Black + Chocolate ButtercreamMedium Pink: Super Red + Chocolate ButtercreamOrange: Lemon Yellow + Orange + Chocolate ButtercreamYellowish Beige: Lemon Yellow + Chocolate ButtercreamLight Brown: Just add Chocolate Buttercream to the VanillaWhite: Don't forget to leave some of the vanilla buttercream uncolored! The white adds a nice contrast to the design.
Decorating Prep
- First, if you're new to cake decorating, or you just need a refresher, I highly recommend reading this post: How to Use Piping Bags, Piping Tips and Couplers. I used the "double bag" method with my piping bags, by placing 12 inch bags with the colored buttercream inside larger 16-inch bags fitted with couplers and piping tips.
- Next, organize your piping tips and couplers. For tip 1M, you won't need a coupler, but you'll need couplers to change out all your other smaller piping tips. For the pumpkins and drop flowers, you'll be using tip 1M.For the pumpkin stems, you'll use tip 16.For the smaller flowers, you can use small star tips or small flower tips, such as 13, 22, 73, and 225, or any other small flower tips you want to try if you have a master piping tip set.If you want to add leaves, you'll need tip 352.If you want to add some vines, you'll need a small round tip, like 2 or 3.
- Lastly, practice first. Before piping onto your cake, I always recommend practicing first on some wax paper, to make sure you like how your flowers look, and you understand how the piping tips work. When you're done practicing, you can scrape the buttercream back into the bowl and use it again.
Pipe the Pumpkins
- For the pumpkins, I combined the orange buttercream and the yellowish beige buttercream in one piping bag, to give them a little more variegation in color.
- Using tip 1M, pipe your pumpkins in several groupings on the side and top of the cake. See the next few photos that demonstrate how to create the pumpkins - be sure to start at the bottom and pipe upwards in a vertical movement.
- Then use some chocolate buttercream or medium brown buttercream and tip 16 to pipe some squiggly stems on the pumpkins.
- If you decide to add some curly vines, you should do some of them now, and then a few more after adding all your flowers.
Add the Drop Flowers
- With tip 1M and the dark pinkish red buttercream, pipe some drop flowers around the pumpkins.
- Then carefully place a small sugar pearl in the center of the flowers.
Add the Small Flowers
- Now you can add lots of little flowers in various colors. I mostly used tips 225 and 73 for these, with flowers in shades of medium pink, light brown, orange and white.
- These flowers look really pretty if you arrange them in groupings on and around the pumpkins, like a flowery pumpkin patch.
- Now you're done, unless you decide to add a few leaves to your design.
 https://curlygirlkitchen.com/