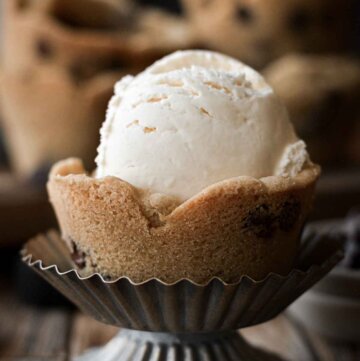
High Altitude Chocolate Chip Cookie Cups for Ice Cream
Soft and chewy chocolate chip cookies, baked in the shape of cups, so they can be filled with ice cream, candy or other treats.
All recipes on Curly Girl Kitchen are developed for high altitude at 5,280 feet. See FAQs for adjusting to higher or lower elevations.

Equipment
- 2 Jumbo Muffin Pan (12 cups)
Ingredients
- ¾ cup unsalted butter, melted
- ½ cup granulated sugar
- ½ cup light or dark brown sugar, lightly packed
- 1 ½ tsp vanilla extract
- 1 large egg
- 1 large egg yolk (save the extra white for another use)
- 2 ⅔ cups all-purpose flour, fluffed, spooned and leveled
- 1 ½ tsp corn starch
- ¾ tsp baking soda
- ¾ tsp coarse Kosher salt (if using table salt, use half the amount)
- ¾ cup semi sweet chocolate chips
Instructions
Make the Dough
- In a bowl, whisk together the melted butter with the granulated sugar and brown sugar, until well combined. Add the vanilla, egg and egg yolk, and whisk until smooth.
- In a separate bowl, combine the flour, corn starch, baking soda and salt. Add the dry ingredients to the wet ingredients, and use a spatula to stir everything together into a dough. Stir in the chocolate chips.
- Divide the dough into 12 equal portions, about 1/4 cup of dough each. Roll each portion into a ball between your hands, then press between your hands into a disk.
Shape the Cookie Cups
- Spray the inside of a jumbo muffin pan with non-stick baking spray. Most jumbo muffin pans only have six cups, so you'll have to work in two batches if you only have one pan. Cover the remaining cookie dough and let it sit at room temperature until needed.
- Press the dough into the cups, pressing it about halfway up the sides of the cups. Now, you'll need to weigh the dough down, so that it maintains its cup shape, and doesn't just fill up the cup as it bakes.
- To do this, I wrapped a square of non-stick parchment/baking paper around the bottom of six half-pint glass jam jars (which are oven safe), then I pressed the jars into the dough. Instead of parchment paper, you can also use aluminum foil, but you'll need to spray the foil with non-stick baking spray. If you don't have jam jars, you can press greased foil into the cups, then fill the foil with ceramic pie weights or dried beans.
Bake the Cookie Cups
- Preheat the oven to 350 F, and position a rack in the center of the oven. Place the muffin pan in the freezer to chill for a few minutes, just while preheating the oven.
- Bake the cookie cups for 12 minutes. After 12 minutes, remove the pan from the oven, and remove the glass jam jars (or scoop out the dried beans/pie weights). Do NOT remove the parchment paper or foil. The cookies may have puffed a little on the bottom, pushing the jars up, and the dough will also have puffed up the sides of the cups. Use a spoon to gently press the dough back down on in places where it puffed too much.
- Return the pan to the oven and bake the cookies for an additional 4-5 minutes, until the cookies are golden brown around the sides. They will still be soft on the bottom, but will set up as they cool.
- Cool the cookies in the pan for 30 minutes, then carefully remove the paper or foil. Cool the cookies in the pan for another 30 minutes, or until completely cooled.
- Gently slide a knife around the side of the cookie cups, give them a twist to release them from the pan, then carefully remove the cookies from the pan.
Notes
Store leftover cookie cups in an airtight container at room temperature for up to 3 days, or in the freezer for up to 3-6 months.
 https://curlygirlkitchen.com/