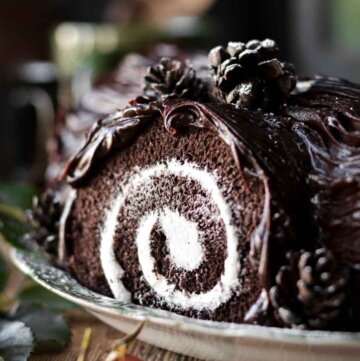
High Altitude Yule Log Cake (Bûche de Noël)
A traditional yule log cake or Bûche de Noël, made with soft chocolate chiffon cake (sponge cake), filled with vanilla buttercream, and frosted with rich chocolate ganache.
All recipes on Curly Girl Kitchen are developed for high altitude at 5,280 feet. See FAQs for adjusting to higher or lower elevations.

Equipment
- Stand Mixer with Whisk Attachment
- Rimmed Half-Sheet Pan (13x18 inches)
Ingredients
Chocolate Ganache
- ¾ cup semi-sweet chocolate chips
- ¾ cup (6 oz) heavy whipping cream
Chocolate Cake
- 1 cup cake flour, fluffed, spooned and leveled
- 5 tbsp unsweetened Dutch processed cocoa powder
- ½ cup granulated sugar
- 1 tsp baking powder
- ½ tsp coarse Kosher salt (if using table salt, use half the amount)
- 4 large egg yolks
- ⅓ cup water
- ⅓ cup vegetable oil
- 2 tsp vanilla extract
- 4 large egg whites, room temperature
- ¼ tsp cream of tartar
Vanilla Buttercream
- 2x recipe American Buttercream
Instructions
Getting Ready
- About an hour before you plan to bake your cake, separate your eggs while they're cold from the fridge. Eggs are easiest to separate when they're cold, but room temperature egg whites whip more quickly and easily. Separate all the yolks and whites, then let them warm up to room temperature for about an hour. Note: You don't want any trace of egg yolk in the whites, so if one of the yolks breaks while you're separating the eggs, set that one aside and use it for scrambled eggs or another baking project. When you separate an egg, I recommend letting the white fall into a separate small bowl first, then pour it into your mixing bowl. That way, you won't ruin the entire bowl of egg whites if one of the yolks breaks.
- Soak a cotton ball in a little white distilled vinegar, and wipe clean the bowl and whisk attachment that you'll be using to whip the egg whites. This ensures that they're free of fat or grease, which can prevent the egg whites from whipping.
- Line a rimmed half sheet pan (13x18 inches) with a sheet of parchment paper. I like to snip the corners of the paper so that it neatly covers the bottom of the pan and up the rimmed sides. Lightly spray the paper with non-stick baking spray.
Ganache
- Make the ganache first, as it needs time to cool and thicken before you can use it on the cake.
- In a saucepan, combine the chocolate chips and cream. Over medium low heat, warm the mixture, stirring frequently with a rubber spatula, until the chocolate chips are nearly melted.
- Remove from the heat and stir until smooth. Pour the ganache into a bowl, and let cool and thicken at room temperature for several hours.
Baking the Cake
- Preheat the oven to 325 F, and position a rack in the center of the oven
- In a bowl, sift together the flour, cocoa powder, sugar, baking powder and salt.
- In a separate bowl, whisk together the egg yolks, water, oil and vanilla for about 30-60 seconds, until frothy. Add the flour mixture and whisk until well combined, then set the chocolate batter aside until needed.
- Pour the egg whites into the bowl of your stand mixer, and add the cream of tartar. Using the whisk attachment, whip the egg whites on medium high speed, to soft peaks. This should take about 3 minutes.
- Add 1/3 of the whipped egg whites to the cake batter, gently folding them in until completely incorporated. Fold in another 1/3 of the egg whites, then fold in the last 1/3 of the egg whites, until you have a fluffy, airy batter with no visible white streaks. The batter needs to be evenly mixed so that your cake crumb is uniform throughout.
- Pour the batter into the prepared baking sheet. Tilt the baking sheet so the batter spreads evenly into all four corners, then bang it on the counter a few times to pop any air bubbles.
- Bake the cake for about 15-18 minutes, until the center springs back when gently touched.
Rolling the Cake
- Gently slide the hot cake (still on the parchment paper), off the baking sheet and onto a large cooling rack (or just your kitchen counter). Let cool for five minutes to let some of the steam escape.
- Lightly dust the top of the warm cake with cocoa powder. Lay a second sheet of parchment paper on top of the cake, and roll the cake up (from one end to the other), between the two sheets of paper.
- Let the cake cool completely in its rolled up position. To speed up the cooling, I set the cake log on a pan, and set it in the refrigerator until cooled.
Buttercream Filling
- Gently unroll the cooled cake, and remove the top sheet of parchment paper.
- Evenly spread the buttercream over the cake, all the way to the edges.
- Now roll the cake up again. As you go, the cake should peel right off the bottom sheet of parchment paper.
- You should now have a rolled up log of cake, measuring about 13 inches long. Cut a 2-3 inch piece off one end of the cake, cutting it at a slight angle if you like. Then set the cake log on a serving plate, with the smaller piece arranged on the side of the log, like a cut branch.
Ganache, and Decorating
- If the ganache is sufficiently cooled and thickened, use an icing spatula to frost the cake, leaving the cut ends unfrosted. The ganache is smooth and silky, and it's easy to add bark-like texture, either with the spatula, or with the tines of a fork.
- To finish, you can decorate your cake any way you like, with sprigs of rosemary, sugared cranberries, pine cones, meringue mushrooms, shaved chocolate shards, or a simple dusting of powdered sugar. I snipped a few leaves and rose hips from my rose bush to place around my cake, along with a few small pine cones.
Video
Notes
Store leftover cake in an airtight container at room temperature for up to 3 days.
 https://curlygirlkitchen.com/
