
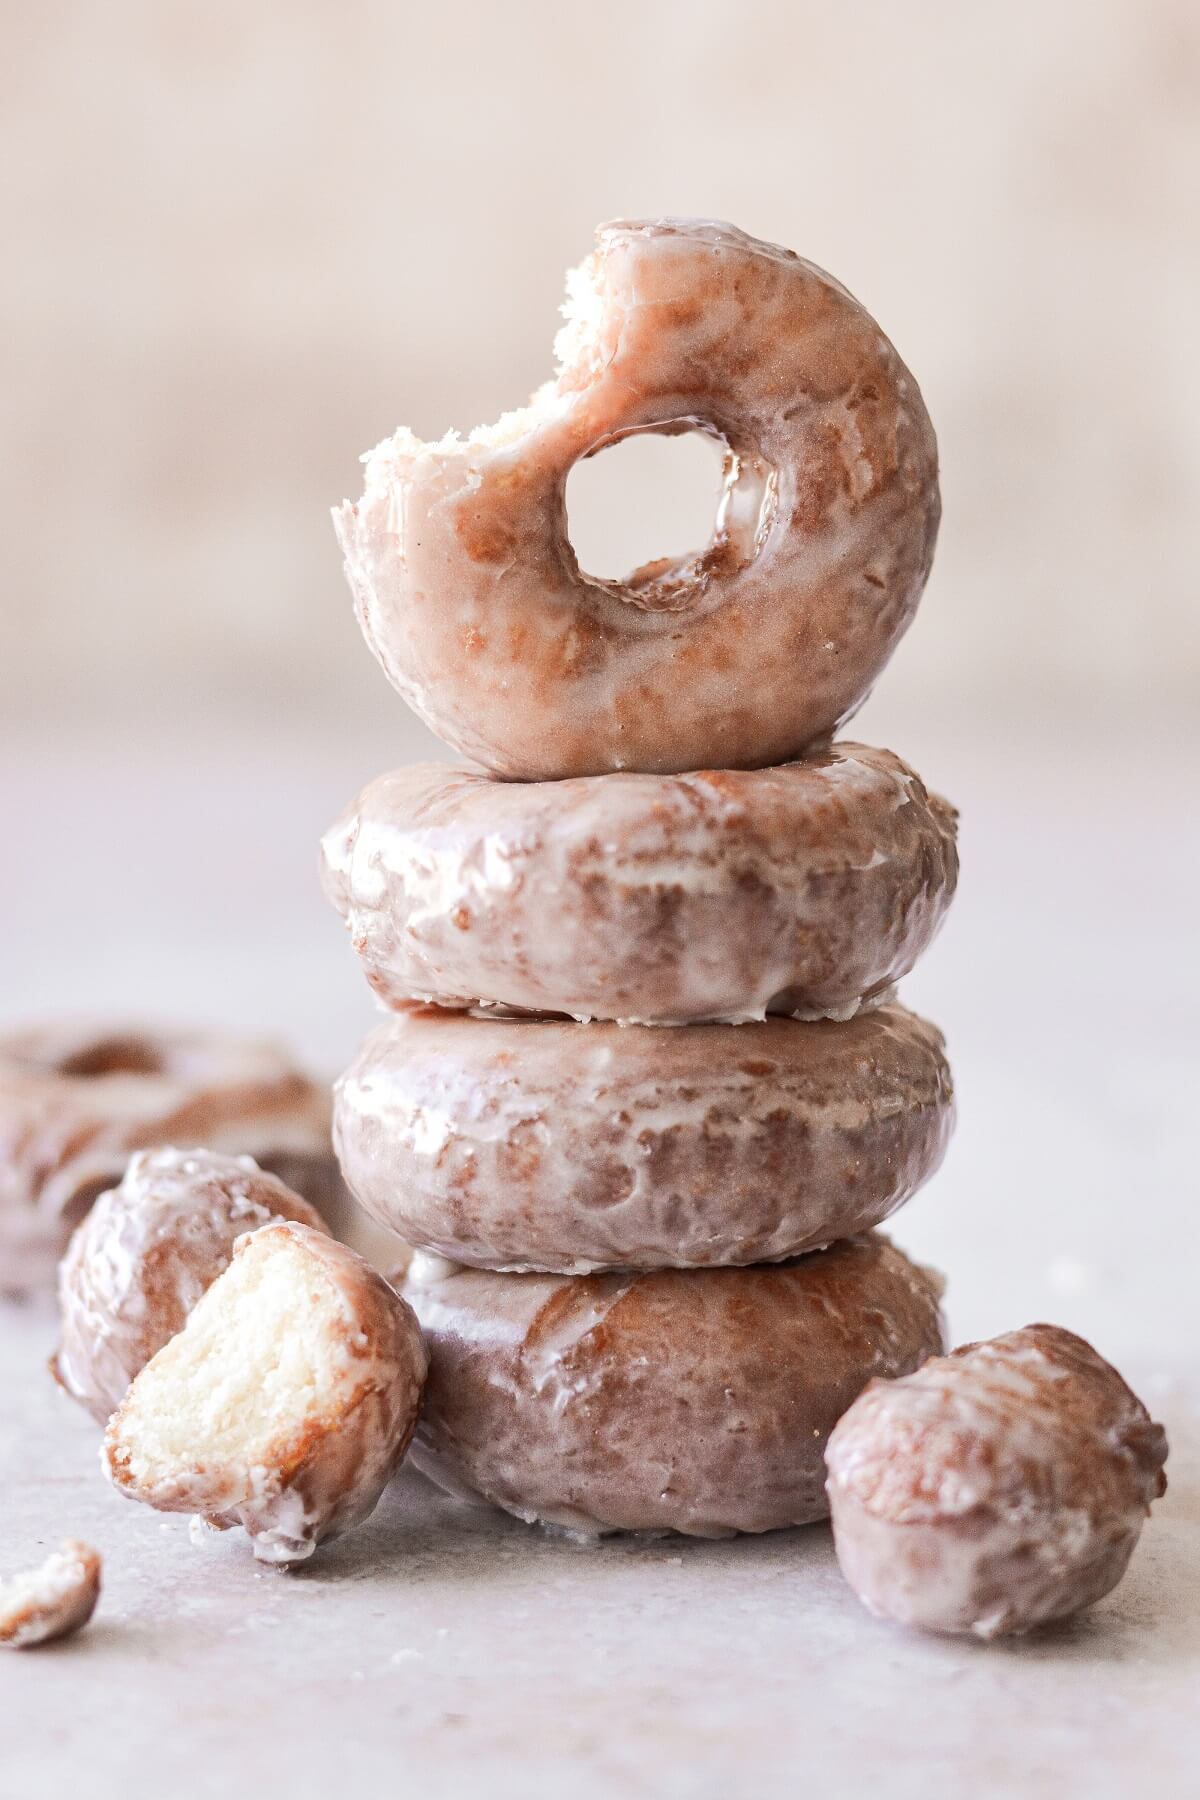
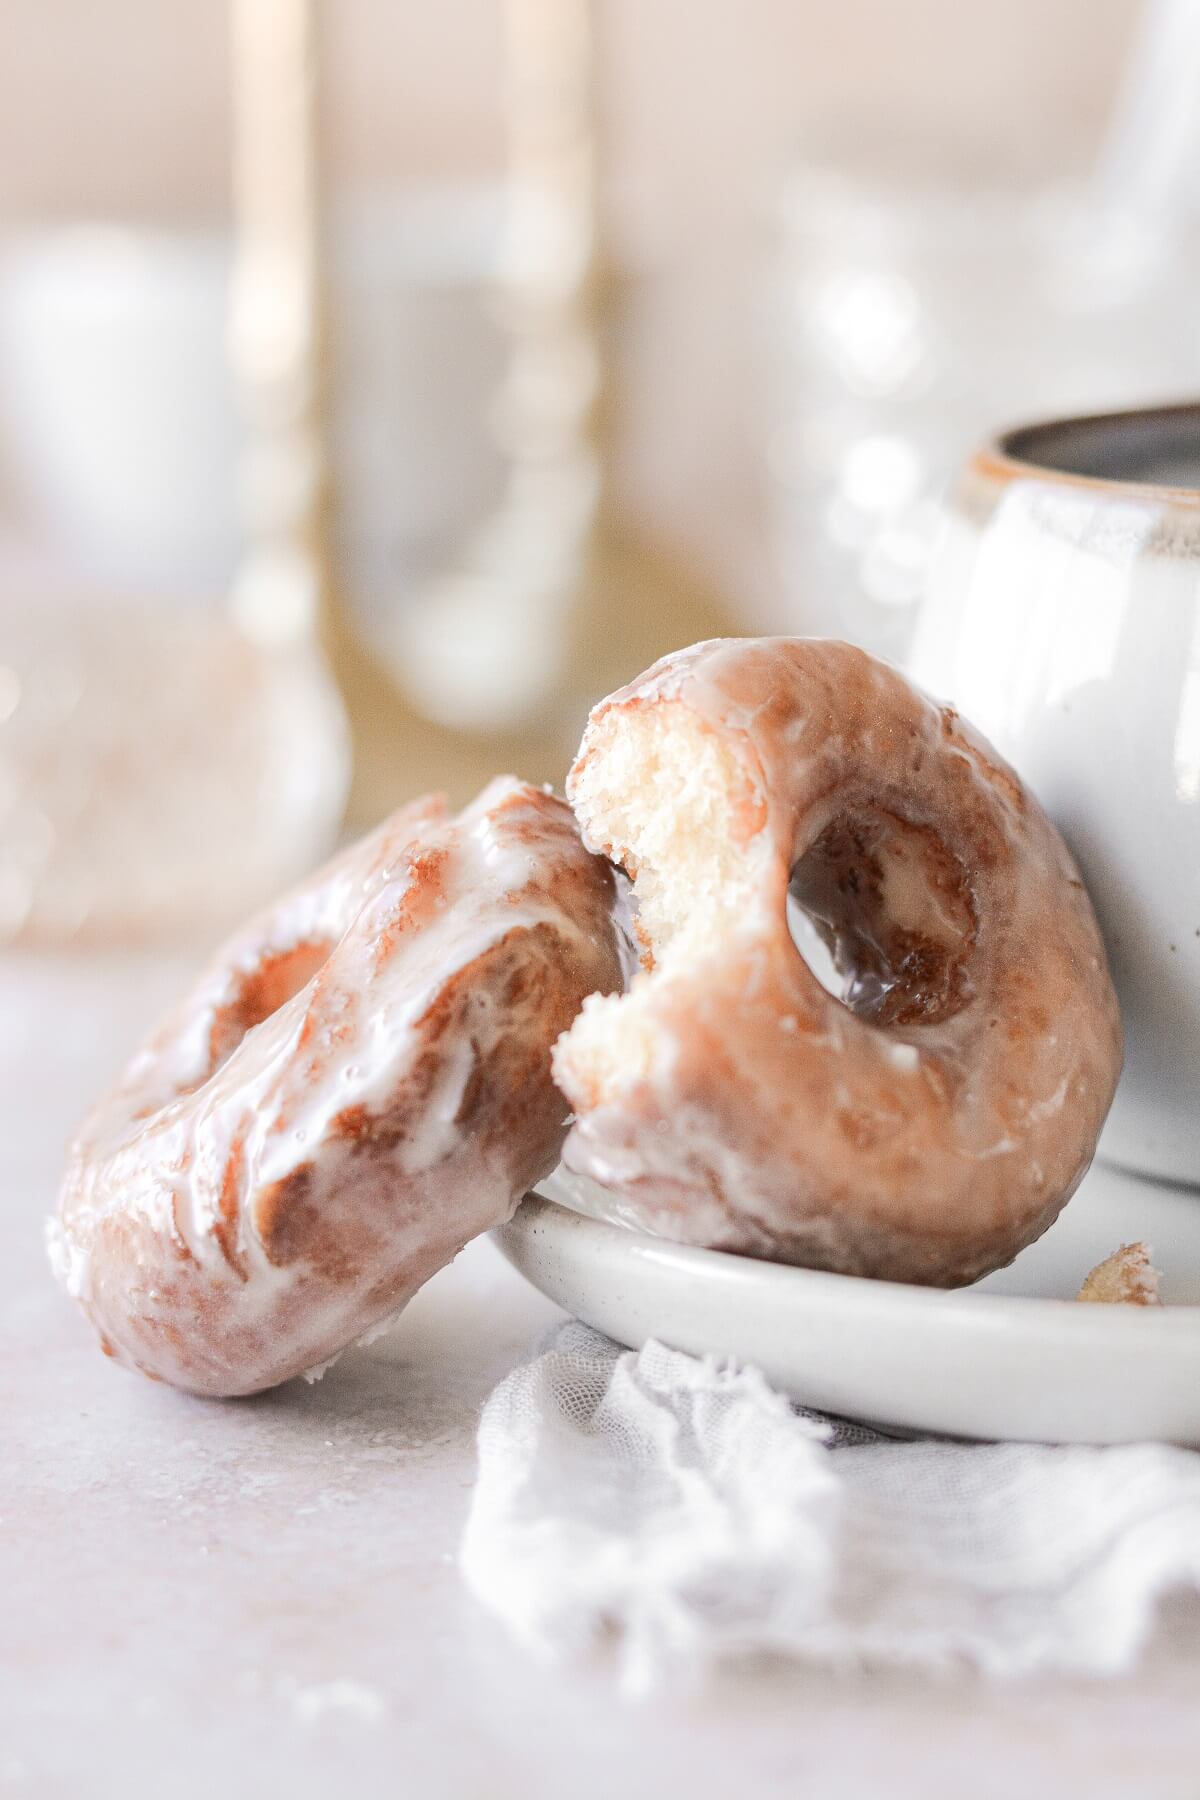
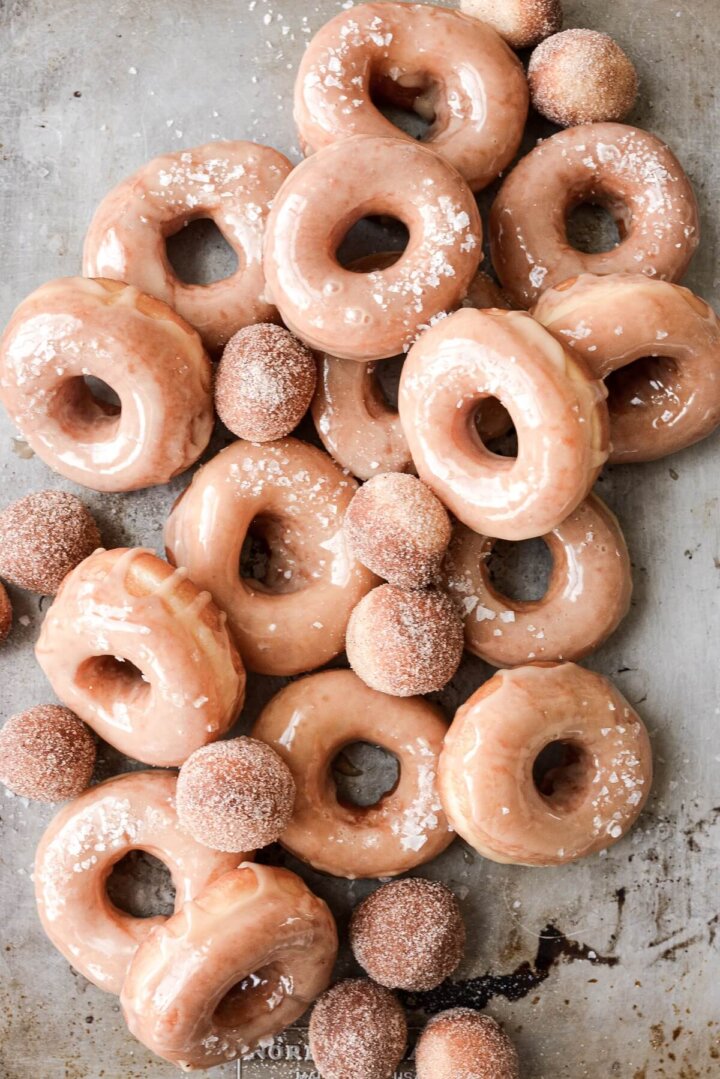
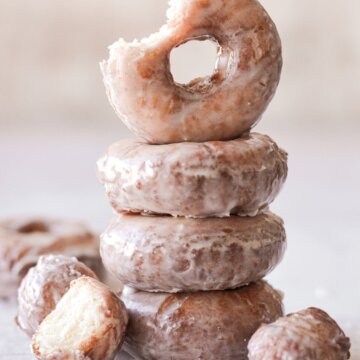
Making homemade doughnuts at high altitude has never been easier – or more delicious – than these old fashioned sour cream cake doughnuts! They’re soft and fluffy inside with a slightly crisp exterior that’s coated in vanilla icing. This is a doughnut that really gets me. The tender cake, the golden brown crust, the sugary glaze – it all works together so perfectly. If given a choice between a raised yeast doughnut and a sour cream cake doughnut, I’ll pick one of these every single time.
Looking for more breakfast recipes? You might also like these double chocolate muffins, apple butter cinnamon rolls with maple icing, and almond cream cheese scones.
This site contains affiliate links. As an Amazon associate, I earn from qualifying purchases. This means that I may make a small commission if you purchase a product using those links. This in no way affects my opinion of those products and services. All opinions expressed on this site are my own.
Why You’ll Love These Doughnuts
Soft for Days. With yeast raised doughnuts, you pretty much have to eat them the same day you make them, because they get stale quickly. But these old fashioned sour cream cake doughnuts stay soft for at least a few days. After 2 days, they were still just as fantastic as they were the day I fried them!
Easy to Make. Yes, you have to deal with boiling hot oil, but if you’re new to deep-frying, it’s really not so scary. And the dough comes together so quickly and easily.
A Perfect Weekend Project. Homemade doughnuts are so fun to make on a relaxing weekend. You can even get the dough made on Friday night, let it chill overnight, and fry your doughnuts in the morning.
High Altitude Tested. I develop all the recipes on my site for Denver’s altitude of 5,280 feet. If you’re at a lower or higher elevation, please see my FAQs for guidance on adjusting recipes for your altitude.

How is a Cake Doughnut Different From a Yeast Doughnut?
A yeast doughnut is, of course, made with yeasted dough, somewhat similar to brioche dough or cinnamon roll dough. The dough needs to proof (or rise) before it’s rolled out, cut into doughnut shapes, proofed again, and then fried. They’re puffy, light, a little chewy, and not very sweet on their own. The flavor and sweetness comes from the icing, filling, or both. You can cut them into ring doughnuts (with holes cut out of the center), or leave the centers in, to be filled with any variety of fillings like custard, cream or jam.
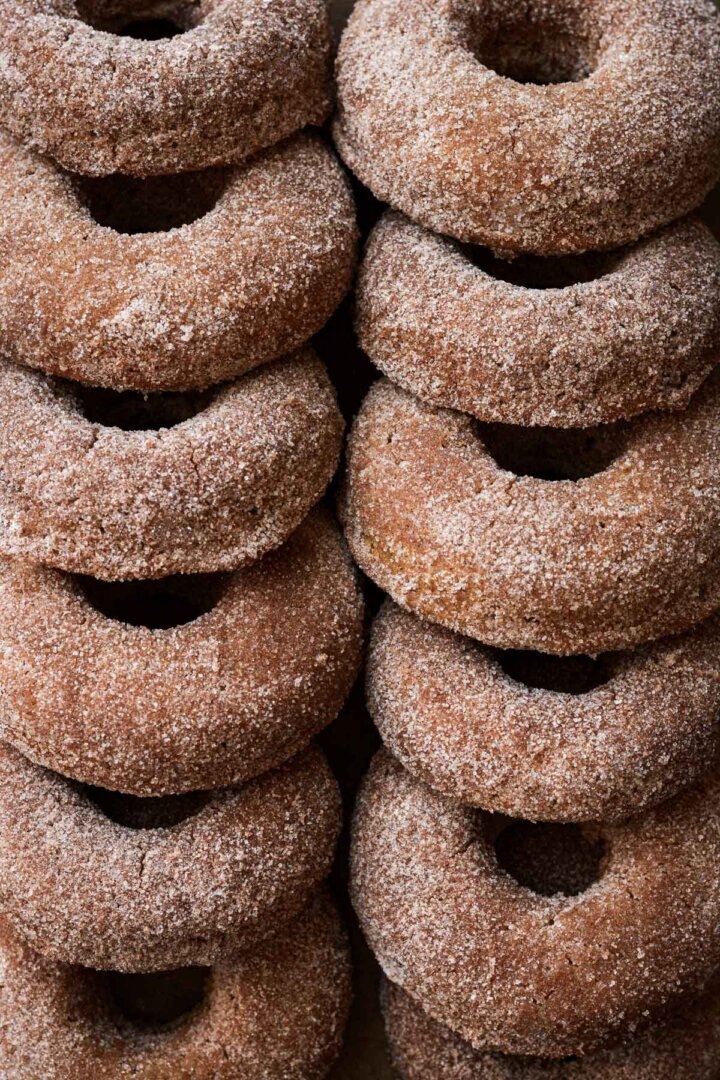
A cake doughnut is made from a very thick, sweetened cake batter leavened with baking powder or baking soda, and it’s thick enough to be rolled out and cut. The doughnuts are fried, so the exterior is golden brown and a little crisp, coated in a sugary glaze, while inside the doughnut is dense but incredibly tender, fluffy and cake like. Old fashioned cake doughnuts will have a cracked, craggy surface, while yeast doughnuts have a much smoother appearance.
Don’t confuse old fashioned sour cream cake doughnuts with baked cake doughnuts. Baked cake doughnuts are made from a much wetter cake batter, spooned or piped into a doughnut pan and then baked. They essentially taste like a muffin that’s shaped like a doughnut.

Tools and Equipment
- Electric Mixer (Stand or Hand-Held). You’ll be beating softened butter with egg yolks and sugar, so you’ll need an electric mixer for this step. Unless you have an incredibly strong arm with a whisk.
- Large Heavy Bottomed Saucepan. For frying the doughnuts.
- Skimmer. For removing the doughnuts from the hot oil.
- Instant Read Thermometer. An absolute must for checking the temperature of the frying oil.
- Large Baking Sheets + Parchment Paper. For resting and chilling the cut doughnuts.
- Cooling Racks. For draining the doughnuts after they’ve been fried and glazed..
- Rolling Pin and Doughnut Cutter. If you don’t have a doughnut cutter, you can use biscuit cutters, one large and one small for cutting out the center. You need to use something with a sharp edge that can cut cleanly through the dough.
- Mixing Bowls, Measuring Cups, Measuring Spoons.
See the recipe card at the end of the post for the full ingredients list and instructions.
Ingredients
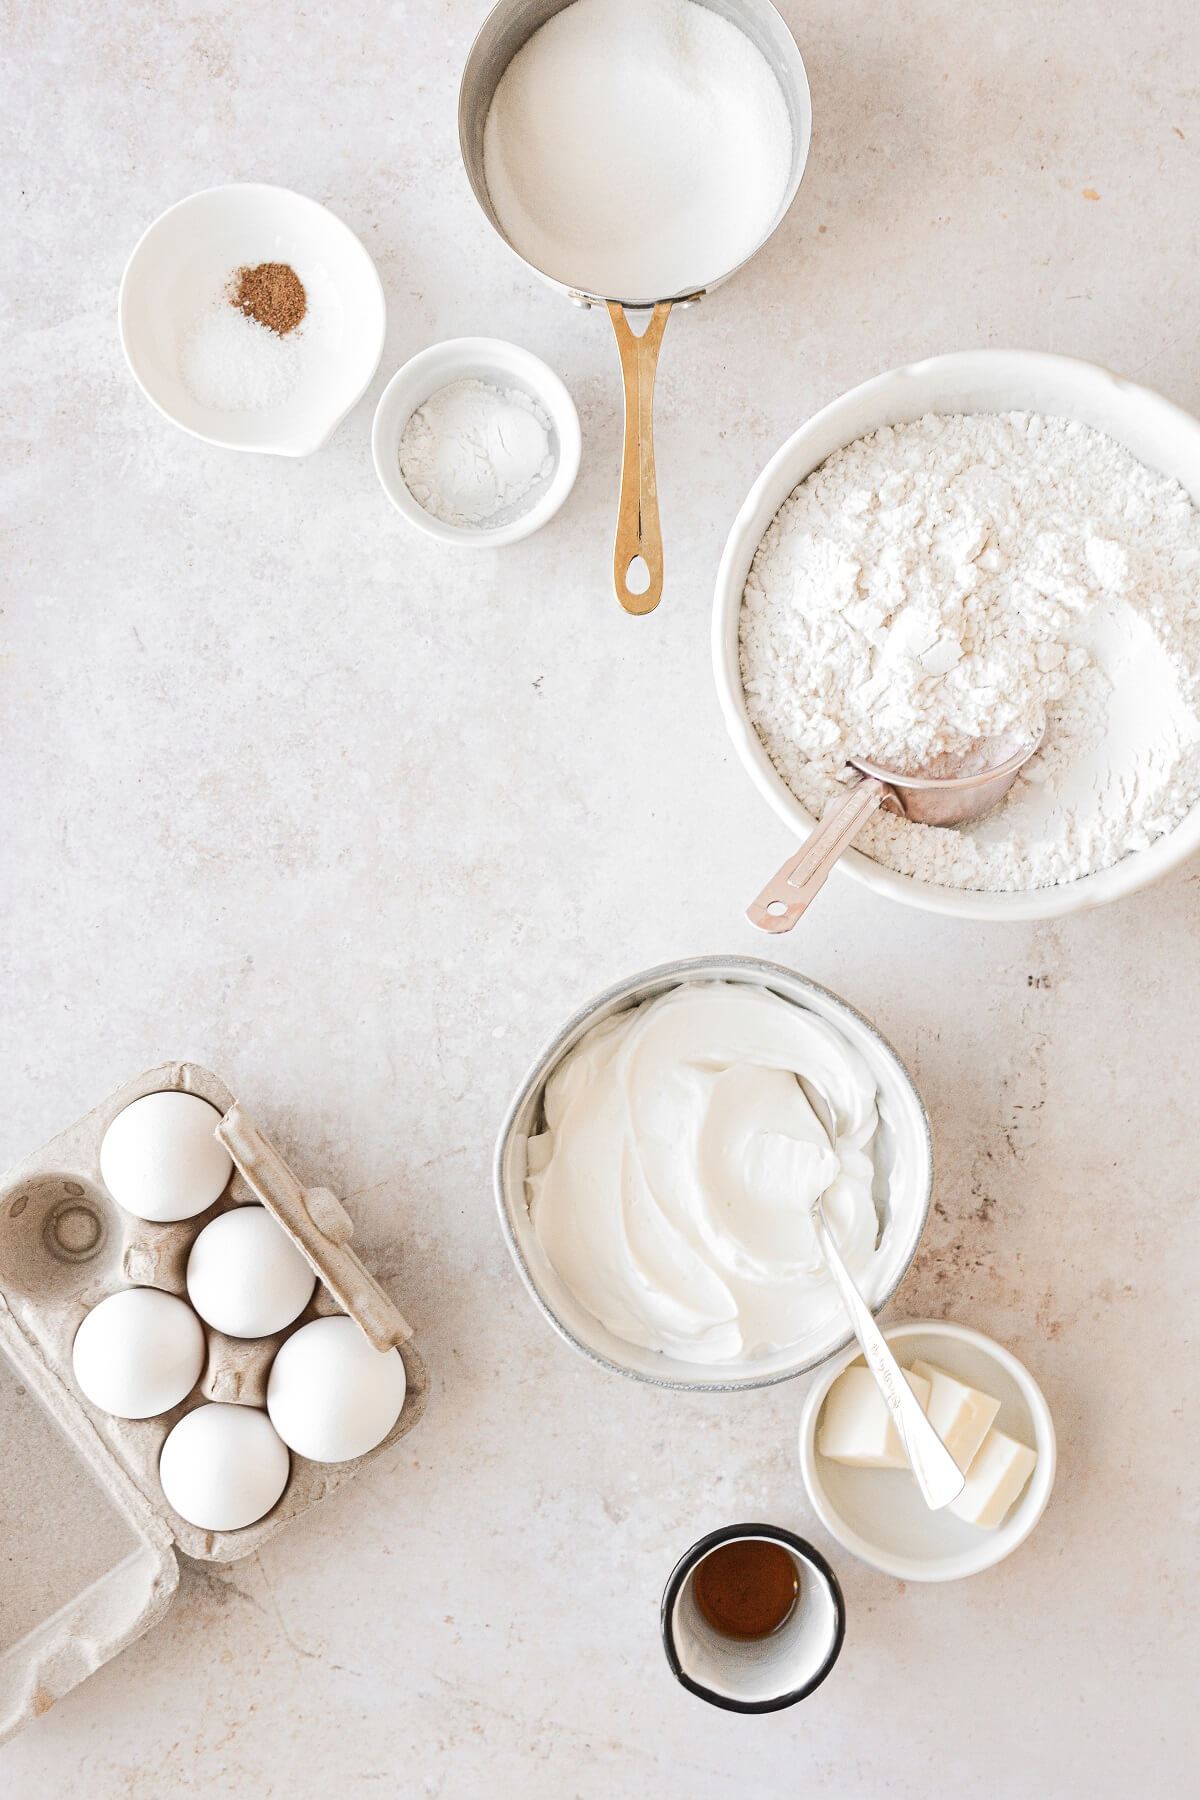
Doughnuts
- Sugar. Granulated sugar adds sweetness and moisture.
- Butter. Gives the doughnuts a rich, buttery flavor.
- Egg Yolks. The fat in the egg yolks makes the doughnuts tender and rich.
- Sour Cream. This recipe uses a LOT of sour cream. The fat contributes to the tender texture and rich flavor, and the sour cream helps to thicken the cake batter into a thick, sticky dough.
- Vanilla Extract. Adds flavor.
- Flour. For the lightest texture, use cake flour, not all-purpose flour.
- Baking Powder. Leavening agent.
- Salt. Balances the sweetness.
- Spices. A little nutmeg or cardamom adds a delicious depth of flavor.
- Vegetable Oil. For frying the doughnuts.
Icing
- Powdered Sugar. Sweetens and thickens the icing.
- Salt. Balances the sweetness.
- Milk. Use whole milk for the best results and flavor in the icing.
- Vanilla Extract. Adds flavor.
Instructions
Make the doughnut dough.
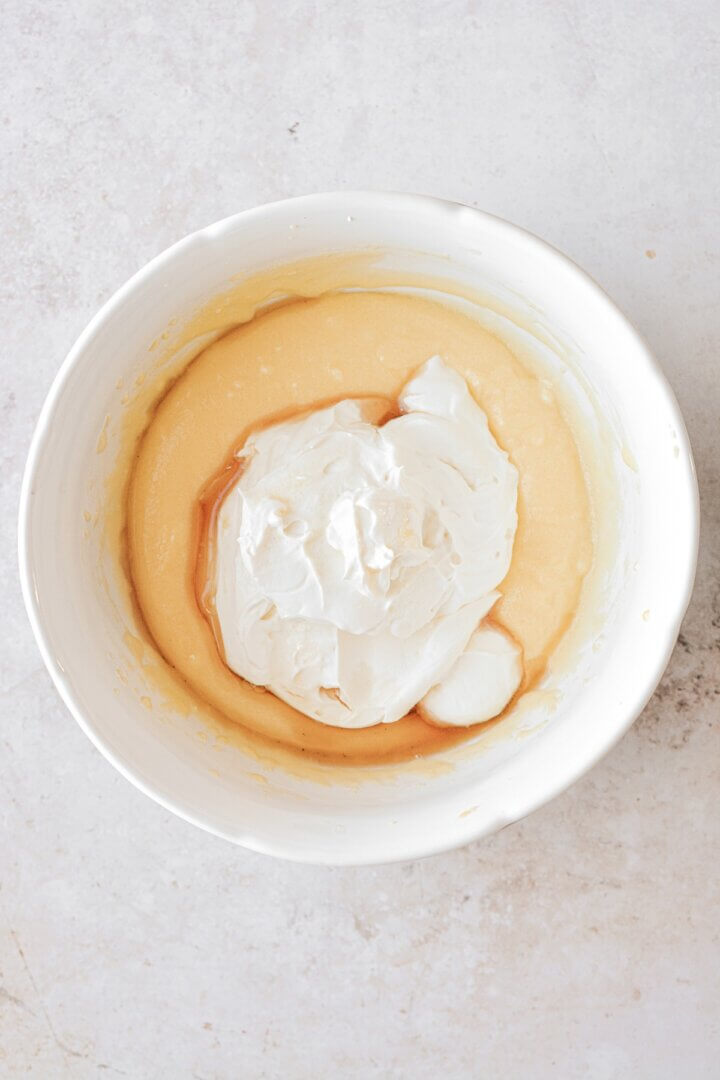
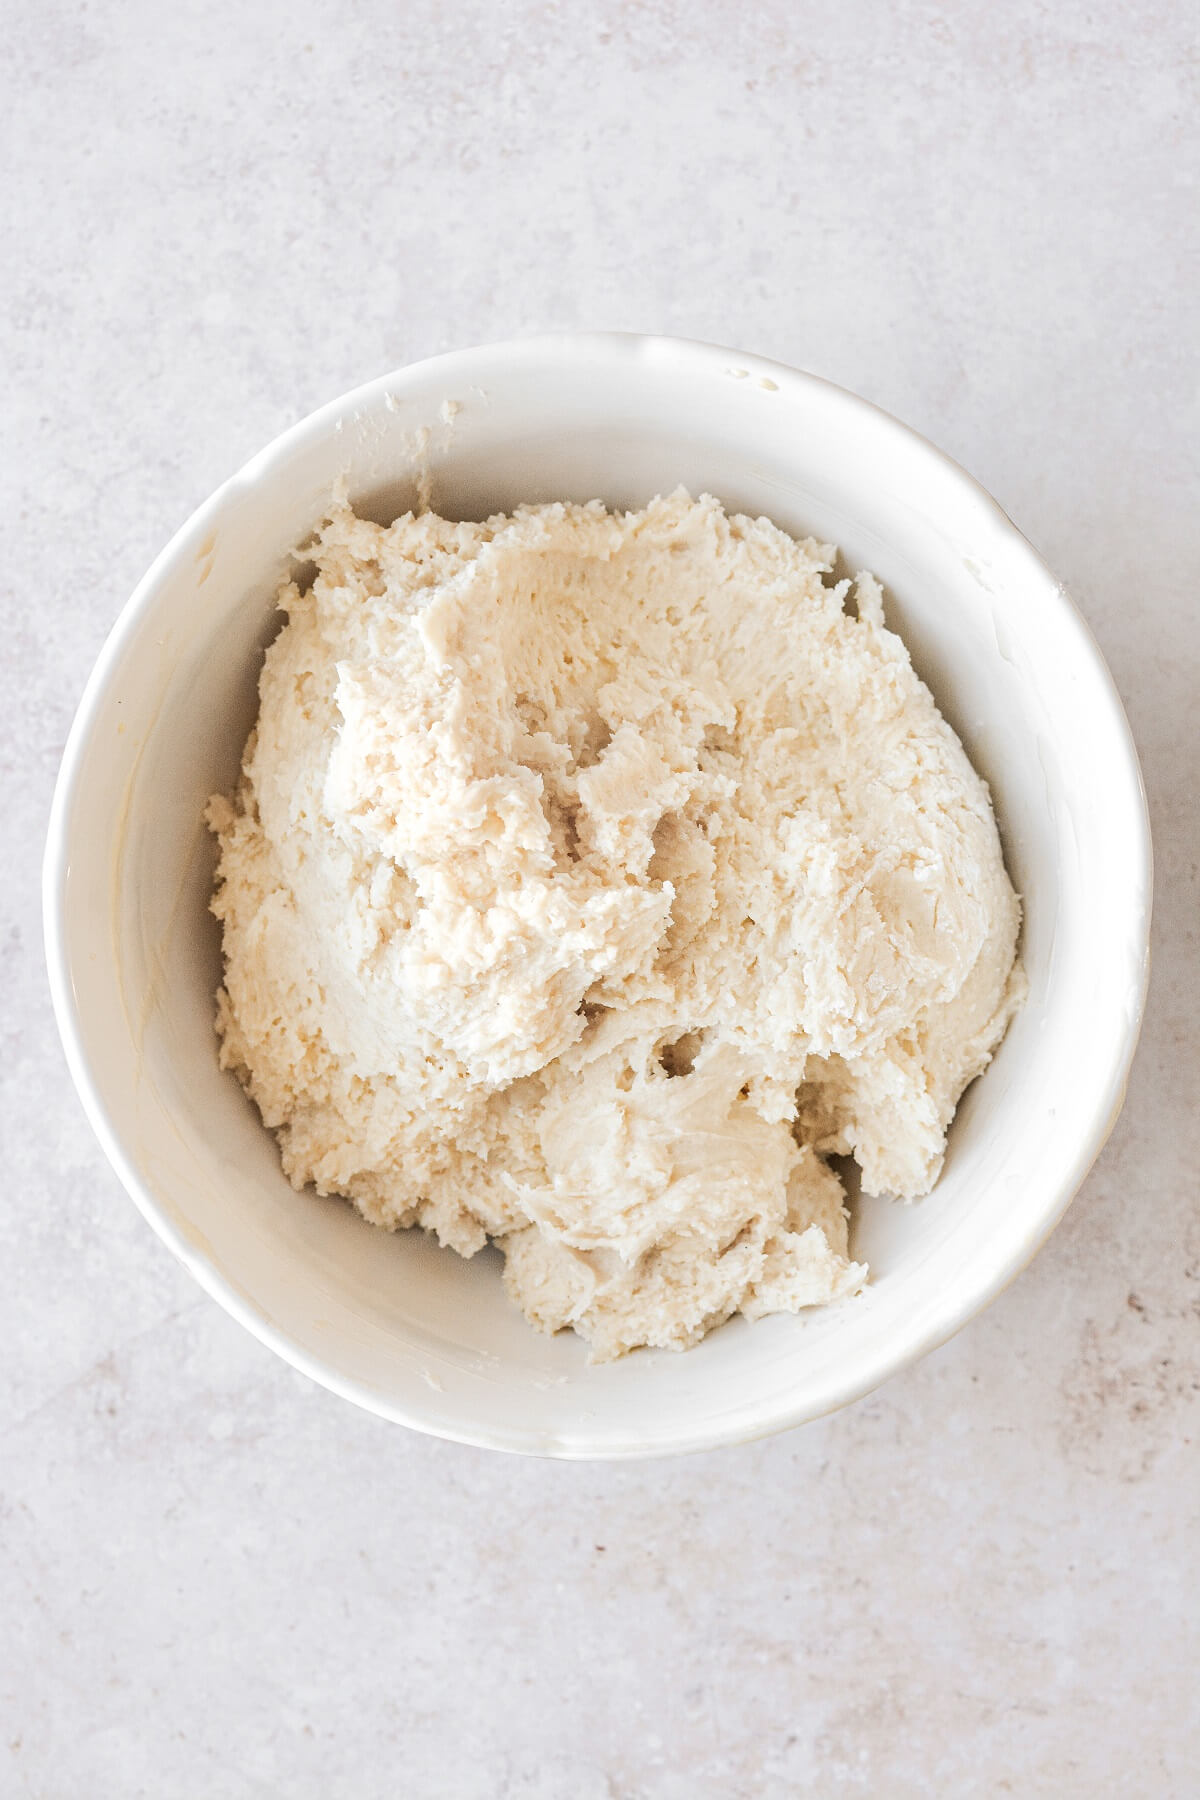
- In a large bowl, use an electric mixer to beat the sugar, butter and egg yolks for 2 minutes until smooth. Scrape the bowl down and beat in the sour cream and vanilla until smooth.


TIP: When measuring the flour, either weigh out 20 ounces, or be sure to use the “spoon and sweep” method for measuring the flour. Do not use the measuring cup to scoop the flour, which will pack too much in, resulting in a drier doughnut.
- In a separate bowl, sift together the flour, baking powder and salt.
- Add the dry ingredients to the wet and use a spoon or spatula to stir together into a thick, sticky dough. Cover the bowl with plastic wrap and refrigerate for 1 hour.
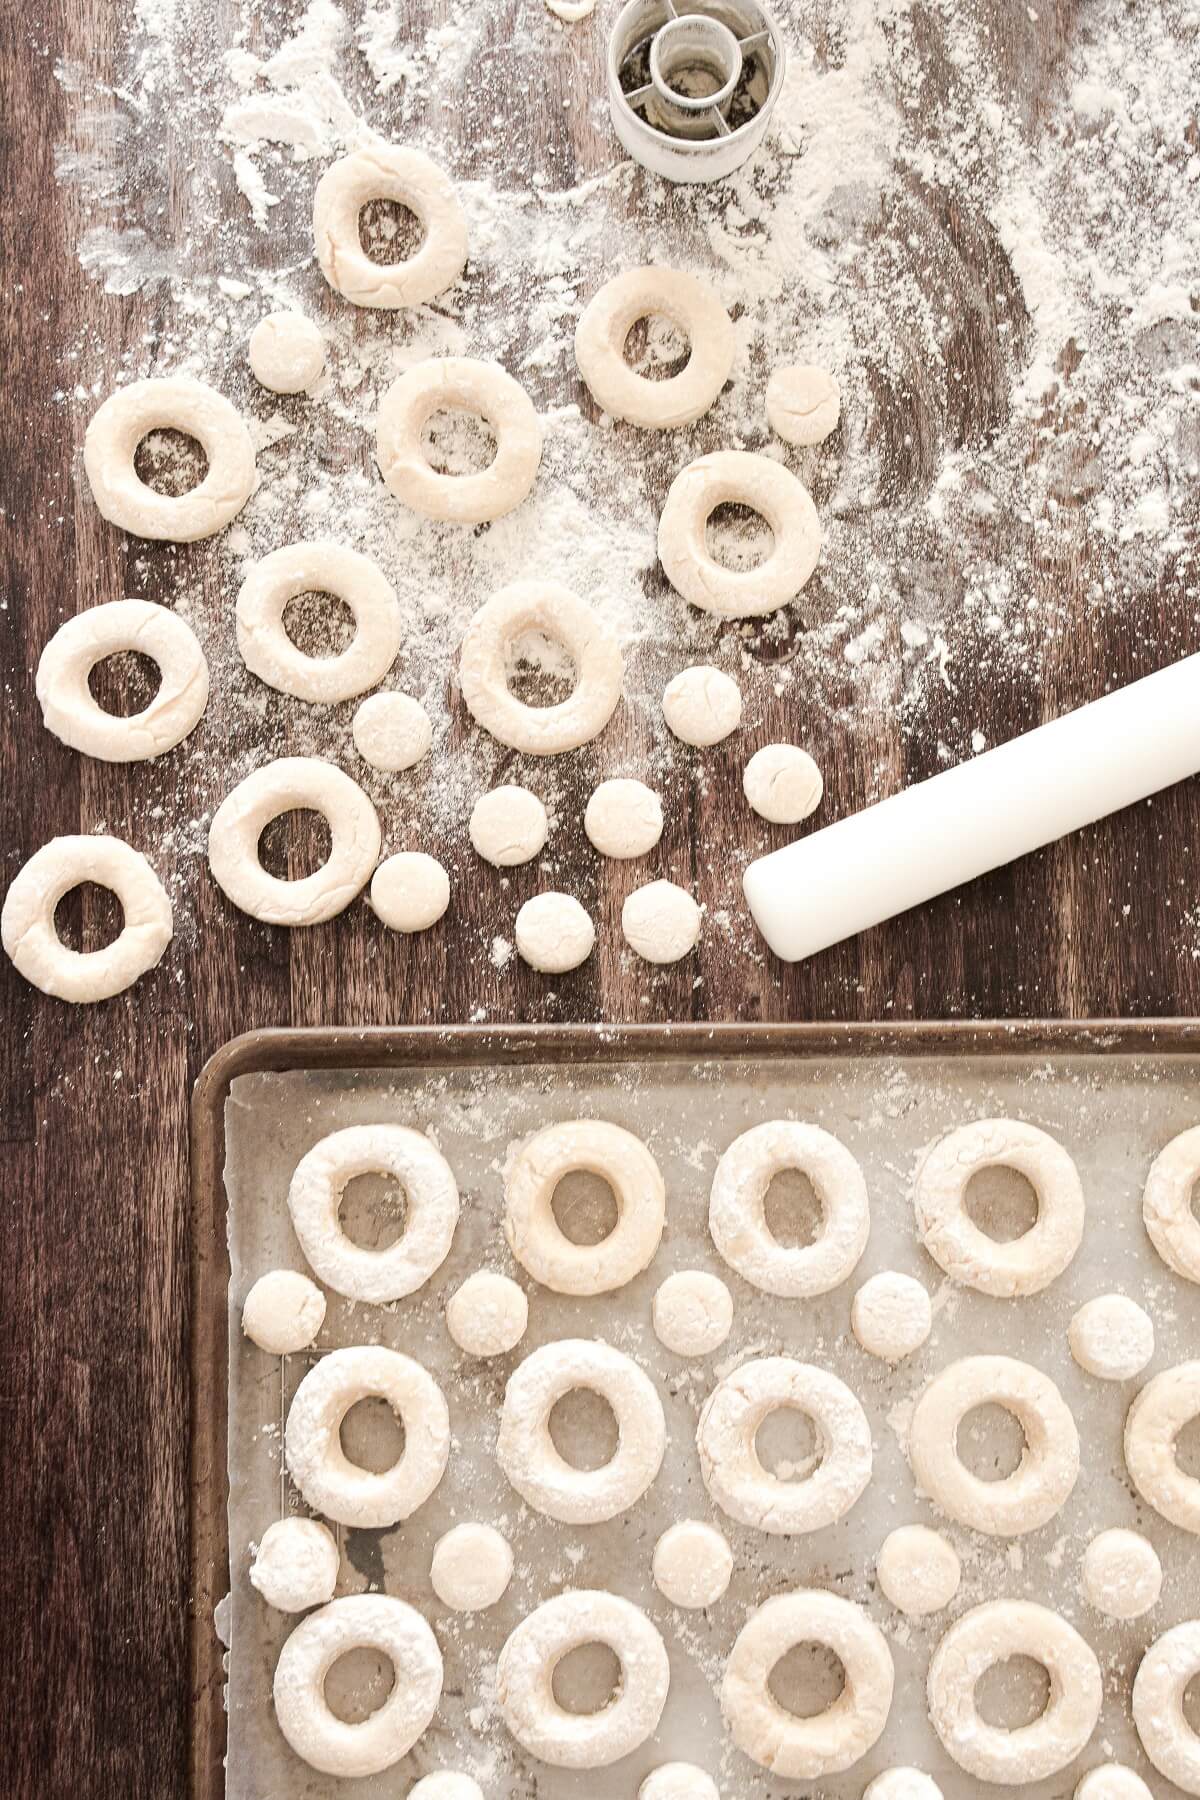
TIP: This is an extremely sticky dough, so don’t be afraid to use enough flour on the doughnut cutter to keep it from sticking. You may have to shake the cutter to get the cut doughnuts and holes to fall out.
Cut the doughnuts.
- Line two large baking sheets with parchment paper.
- Dust your counter generously with flour, scrape the chilled dough onto the flour, and flour the top of the dough as well. Use your hands or a rolling pin to roll the dough out to about 1/2 inch thick.
- Grease a doughnut cutter with non-stick baking spray (or butter or shortening), then dip it in flour, so the flour sticks. Cut as many doughnuts and holes as you can, dipping the cutter in flour between each cut. Gather and press together all the scraps, roll them out again, and continue cutting doughnuts. You should be able to get about 2 dozen doughnuts and holes.
- Place all of the doughnuts and holes on the parchment lined baking sheet. Set the baking sheets in the refrigerator to chill the cut doughnuts for 30 minutes.
TIP: If you like, you can complete all the steps up to this point, cover the baking sheets with plastic wrap, refrigerate the cut doughnuts overnight, and fry the doughnuts in the morning.
TIP: If your oil is too cold, the doughnuts will absorb oil and end up tasting greasy. If it’s too hot, they’ll brown too quickly. It’s better to heat the oil fairly slowly to maintain a steady temperature, and to check it frequently throughout the frying process, so you can adjust the temperature as needed. Note that when you first drop the doughnuts in, the temperature of the oil will also drop, so just keep checking to try to maintain a steady temperature.
Fry the doughnuts
- While the doughnuts are chilling, you can start heating the oil over medium heat. Pour the oil into a large, heavy-bottomed saucepan. I used a saucepan that’s about 12 inches wide and 5 inches deep. You need to use enough oil, both so that the doughnuts “float” on the oil while frying, as well as to help maintain a steady temperature, which you can’t do with too little oil. Heat the oil to between 350-360 degrees Fahrenheit, checking the temperature with an instant read thermometer.
- Place a cooling rack over a large baking sheet for draining the doughnuts.
- When you’re ready to start frying, fry the doughnuts in batches, about 4-5 doughnuts at a time. Carefully lower them into the oil; they will initially sink to the bottom of the pan for a few seconds. When they rise to the surface, fry them for 30 seconds. Flip them over (I like to use chopsticks for flipping doughnuts) and fry for about 1 minute, then flip them again and fry for 1 more minute. Again, the temperature of your oil is important. These cooking times may vary if your oil is hotter or colder. The fried doughnuts should be a medium golden brown color all over. Use your judgement if they seem to be getting too dark, and go ahead and scoop them out of the oil.
- Use your skimmer to transfer the doughnuts to the cooling rack to drain, and continue frying the remainder of the doughnuts and holes. The holes may not need to fry for quite as long.
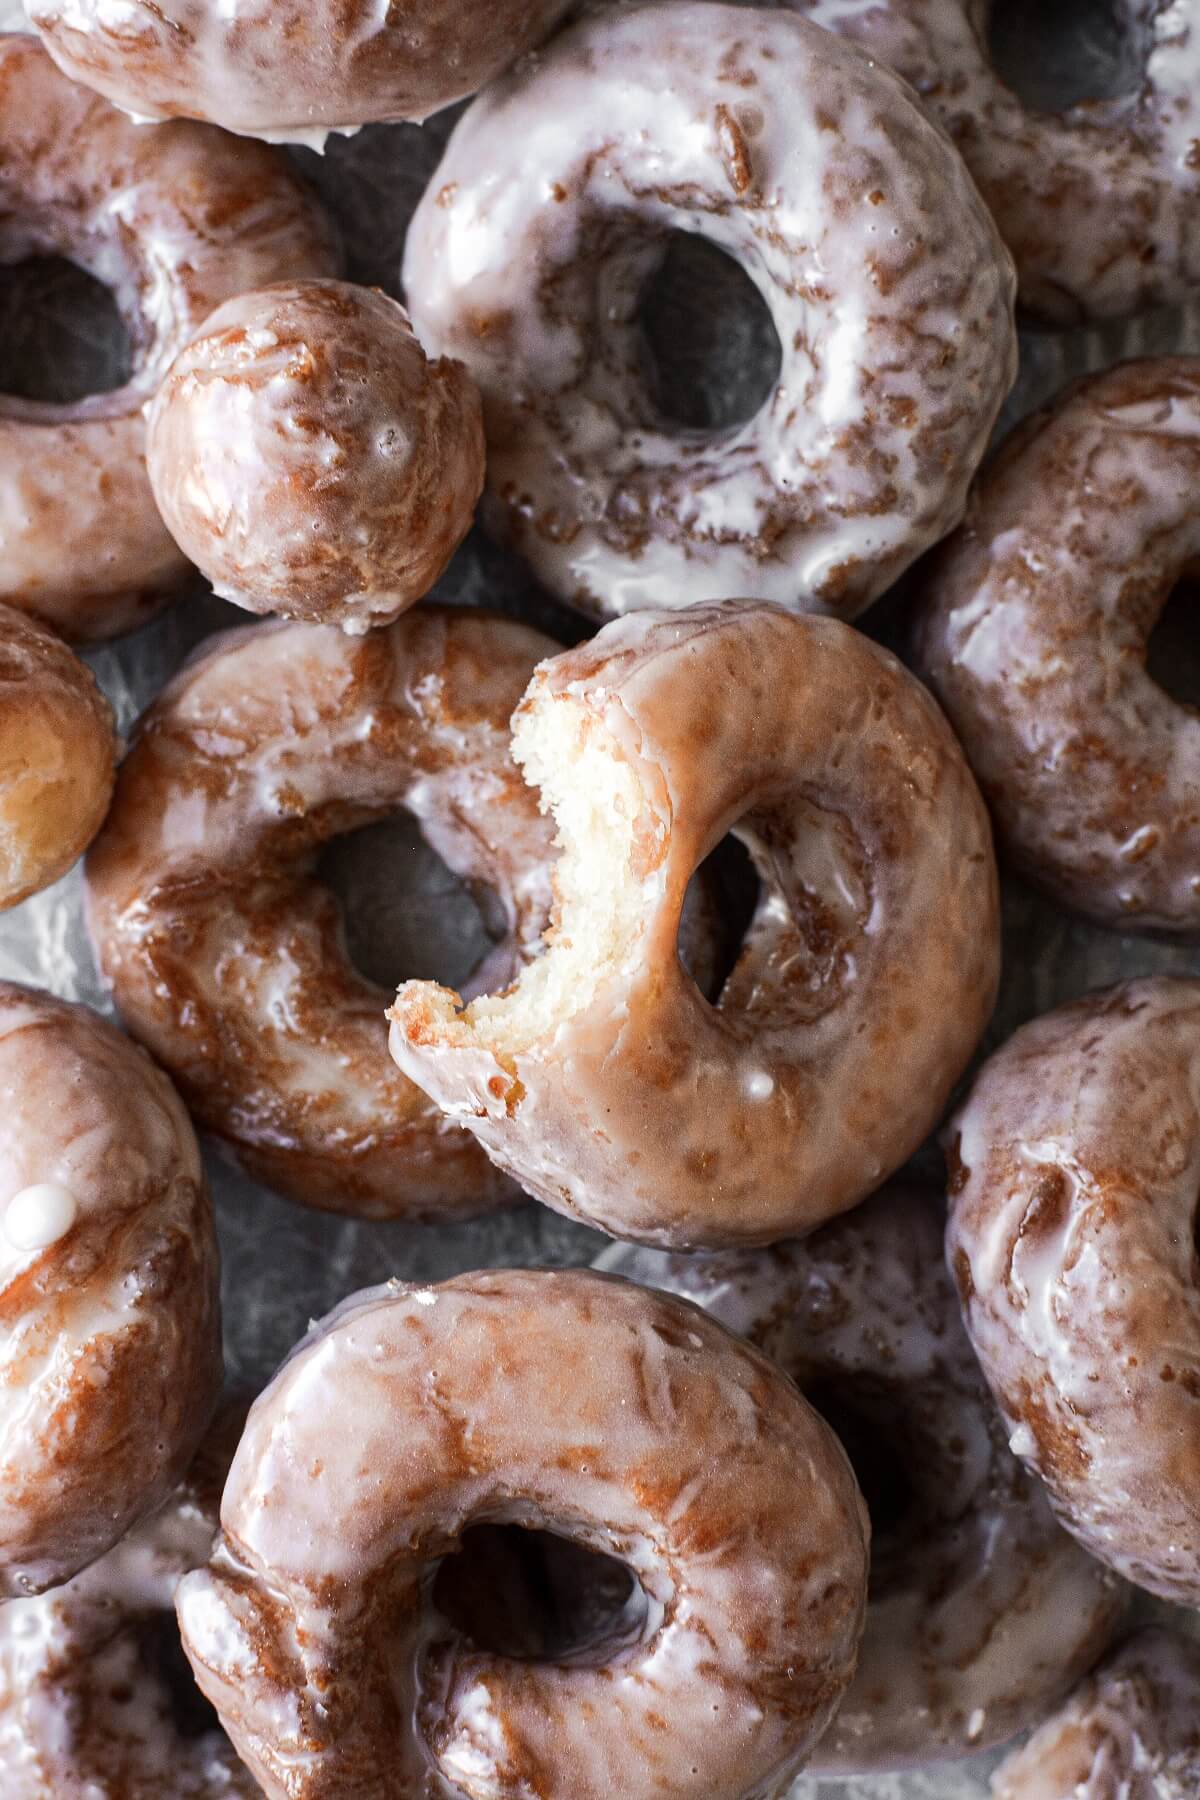
- You may see cracks and other uneven areas on the surface of your doughnuts, and this is completely normal for sour cream cake doughnuts. The cracks are perfect for soaking up the sweet glaze.
Dip the doughnuts in icing.
- In a bowl, whisk together all of the icing ingredients until smooth. This may seem like a LOT of icing, but some of it will end up dripping off the doughnuts after you dip them.
- While the doughnuts are still hot, dip them in the icing, thoroughly coating both sides. Lightly shake off the excess, then place on a cooling rack to set.
- The icing will set in just a few minutes, and you can enjoy the doughnuts right away.
Be sure to read all of my BAKING FAQs where I discuss ingredients, substitutions and common baking questions, so that you can be successful in your own baking!
Frequently Asked Questions
Can I bake these instead of frying them?
No, you won’t get good results from baking this dough. I recommend you use a baked cake doughnut recipe instead.
What size doughnut cutter do you use?
Mine is 2 1/2 inches, so I can get about 2 dozen doughnuts from this recipe. If your cutter is larger, you’ll get fewer doughnuts.
Will fat free or light sour cream work?
I don’t recommend it. You need the fat and flavor of full-fat sour cream for a tender and delicious doughnut.
Can I cut the recipe in half?
Of course. But if you’re going to make the effort of frying doughnuts, I say, make LOTS. You can always share some fresh doughnuts with your family, friends and neighbors.
Can I make the dough the night before?
Yes, after making the dough and cutting the doughnuts, you can place the cut doughnuts on baking sheets lined with parchment paper. Cover them with plastic wrap and refrigerate overnight, then fry the doughnuts in the morning.
How long do the doughnuts stay fresh?
Unlike yeast doughnuts which become stale after just one day, homemade sour cream cake doughnuts stay soft and delicious for at least 2 days, maybe even longer. But ours didn’t last long enough to check them on the third day.
You Might Also Like

Please check out my Amazon Shop for a curated collection of some of my favorite cake pans from trusted brands, baking tools, ingredients, pretty things and fashion finds. I recommend products that I buy and use every day!
Did you love today’s recipe? Please rate the recipe and let me know in the comments what you thought! Also, be sure to follow Curly Girl Kitchen on Instagram, and tag me when you try one of my recipes so I can see all your delicious creations!
High Altitude Old-Fashioned Sour Cream Cake Doughnuts
All recipes on Curly Girl Kitchen are developed for high altitude at 5,280 feet. See FAQs for adjusting to higher or lower elevations.

Equipment
- Electric Mixer (Stand or Hand-Held)
- Large Heavy Bottomed Saucepan, for frying
- Skimmer
- Instant Read Thermometer
- Large Baking Sheets + Parchment Paper
- Cooling Racks
- Rolling Pin and Doughnut Cutter
- Mixing Bowls, Measuring Cups, Measuring Spoons
Ingredients
Doughnuts
- 1 ¼ cups granulated sugar
- 3 tbsp unsalted butter, softened to room temperature
- 5 large egg yolks (save the whites for another use)
- 1 ½ cups full-fat sour cream
- 2 tsp vanilla extract
- 4 ¾ cups (20 oz) cake flour, spooned and leveled (plus extra for rolling)
- 3 ½ tsp baking powder
- 1 tsp coarse Kosher salt (if using table salt, use half the amount)
- ¼ tsp ground nutmeg or cardamom, optional
- 2 qts vegetable oil, for frying
Icing
- 4 cups powdered sugar
- ½ tsp coarse Kosher salt (if using table salt, use half the amount)
- ¾ cup whole milk
- 2 tsp vanilla extract
Instructions
Making the Doughnut Dough
- In a large bowl, use an electric mixer to beat the sugar, butter and egg yolks for 2 minutes until smooth. Scrape the bowl down and beat in the sour cream and vanilla until smooth.
- In a separate bowl, sift together the flour, baking powder and salt.When measuring the flour, either weigh out 20 ounces, or be sure to use the "spoon and sweep" method for measuring the flour. Do not use the measuring cup to scoop the flour, which will pack too much in, resulting in a drier doughnut.
- Add the dry ingredients to the wet and use a spoon or spatula to stir together into a thick, sticky dough. Cover the bowl with plastic wrap and refrigerate for 1 hour.
- Line two large baking sheets with parchment paper.
- Dust your counter generously with flour, scrape the chilled dough onto the flour, and flour the top of the dough as well. Use your hands or a rolling pin to roll the dough out to about 1/2 inch thick.
- Grease a doughnut cutter with non-stick baking spray (or butter or shortening), then dip it in flour, so the flour sticks. Cut as many doughnuts and holes as you can, dipping the cutter in flour between each cut. Gather and press together all the scraps, roll them out again, and continue cutting doughnuts. You should be able to get about 2 dozen doughnuts and holes.Note, this is an extremely sticky dough, so don't be afraid to use enough flour on the doughnut cutter to keep it from sticking. You may have to shake the cutter to get the cut doughnuts and holes to fall out.
- Place all of the doughnuts and holes on the parchment lined baking sheet. Set the baking sheets in the refrigerator to chill the cut doughnuts for 30 minutes.If you like, you can complete all the steps up to this one, cover the baking sheets with plastic wrap, refrigerate the cut doughnuts overnight, and fry the doughnuts in the morning.
Frying the Doughnuts
- While the doughnuts are chilling, you can start heating the oil over medium heat. Pour the oil into a large, heavy-bottomed saucepan. I used a saucepan that's about 12 inches wide and 5 inches deep. You need to use enough oil, both so that the doughnuts "float" on the oil while frying, as well as to help maintain a steady temperature, which you can't do with too little oil. Heat the oil to between 350-360 degrees Fahrenheit, checking the temperature with an instant read thermometer.If your oil is too cold, the doughnuts will absorb oil and end up tasting greasy. If it's too hot, they'll brown too quickly. It's better to heat the oil fairly slowly to maintain a steady temperature, and to check it frequently throughout the frying process, so you can adjust the temperature as needed. Note that when you first drop the doughnuts in, the temperature of the oil will also drop, so just keep checking to try to maintain a steady temperature.
- Place a cooling rack over a large baking sheet for draining the doughnuts.
- When you're ready to start frying, fry the doughnuts in batches, about 4-5 doughnuts at a time. Carefully lower them into the oil; they will initially sink to the bottom of the pan for a few seconds. When they rise to the surface, fry them for 30 seconds. Flip them over (I like to use chopsticks for flipping doughnuts) and fry for about 1 minute, then flip them again and fry for 1 more minute.Again, the temperature of your oil is important. These cooking times may vary if your oil is hotter or colder. The fried doughnuts should be a medium golden brown color all over. Use your judgement if they seem to be getting too dark, and go ahead and scoop them out of the oil.
- Use your skimmer to transfer the doughnuts to the cooling rack to drain, and continue frying the remainder of the doughnuts and holes. The holes may not need to fry for quite as long.
- You may see cracks and other uneven areas on the surface of your doughnuts, and this is completely normal for sour cream cake doughnuts. The cracks are perfect for soaking up the sweet glaze.
Dip in Icing
- In a bowl, whisk together all of the icing ingredients until smooth. This may seem like a LOT of icing, but some of it will end up dripping off the doughnuts after you dip them.
- While the doughnuts are still hot, dip them in the icing, thoroughly coating both sides. Lightly shake off the excess, then place on a cooling rack to set.
- The icing will set in just a few minutes, and you can enjoy the doughnuts right away.
Notes
 https://curlygirlkitchen.com/
I can’t wait to try these! Would cinnamon pair well with the sour cream and nutmeg?