
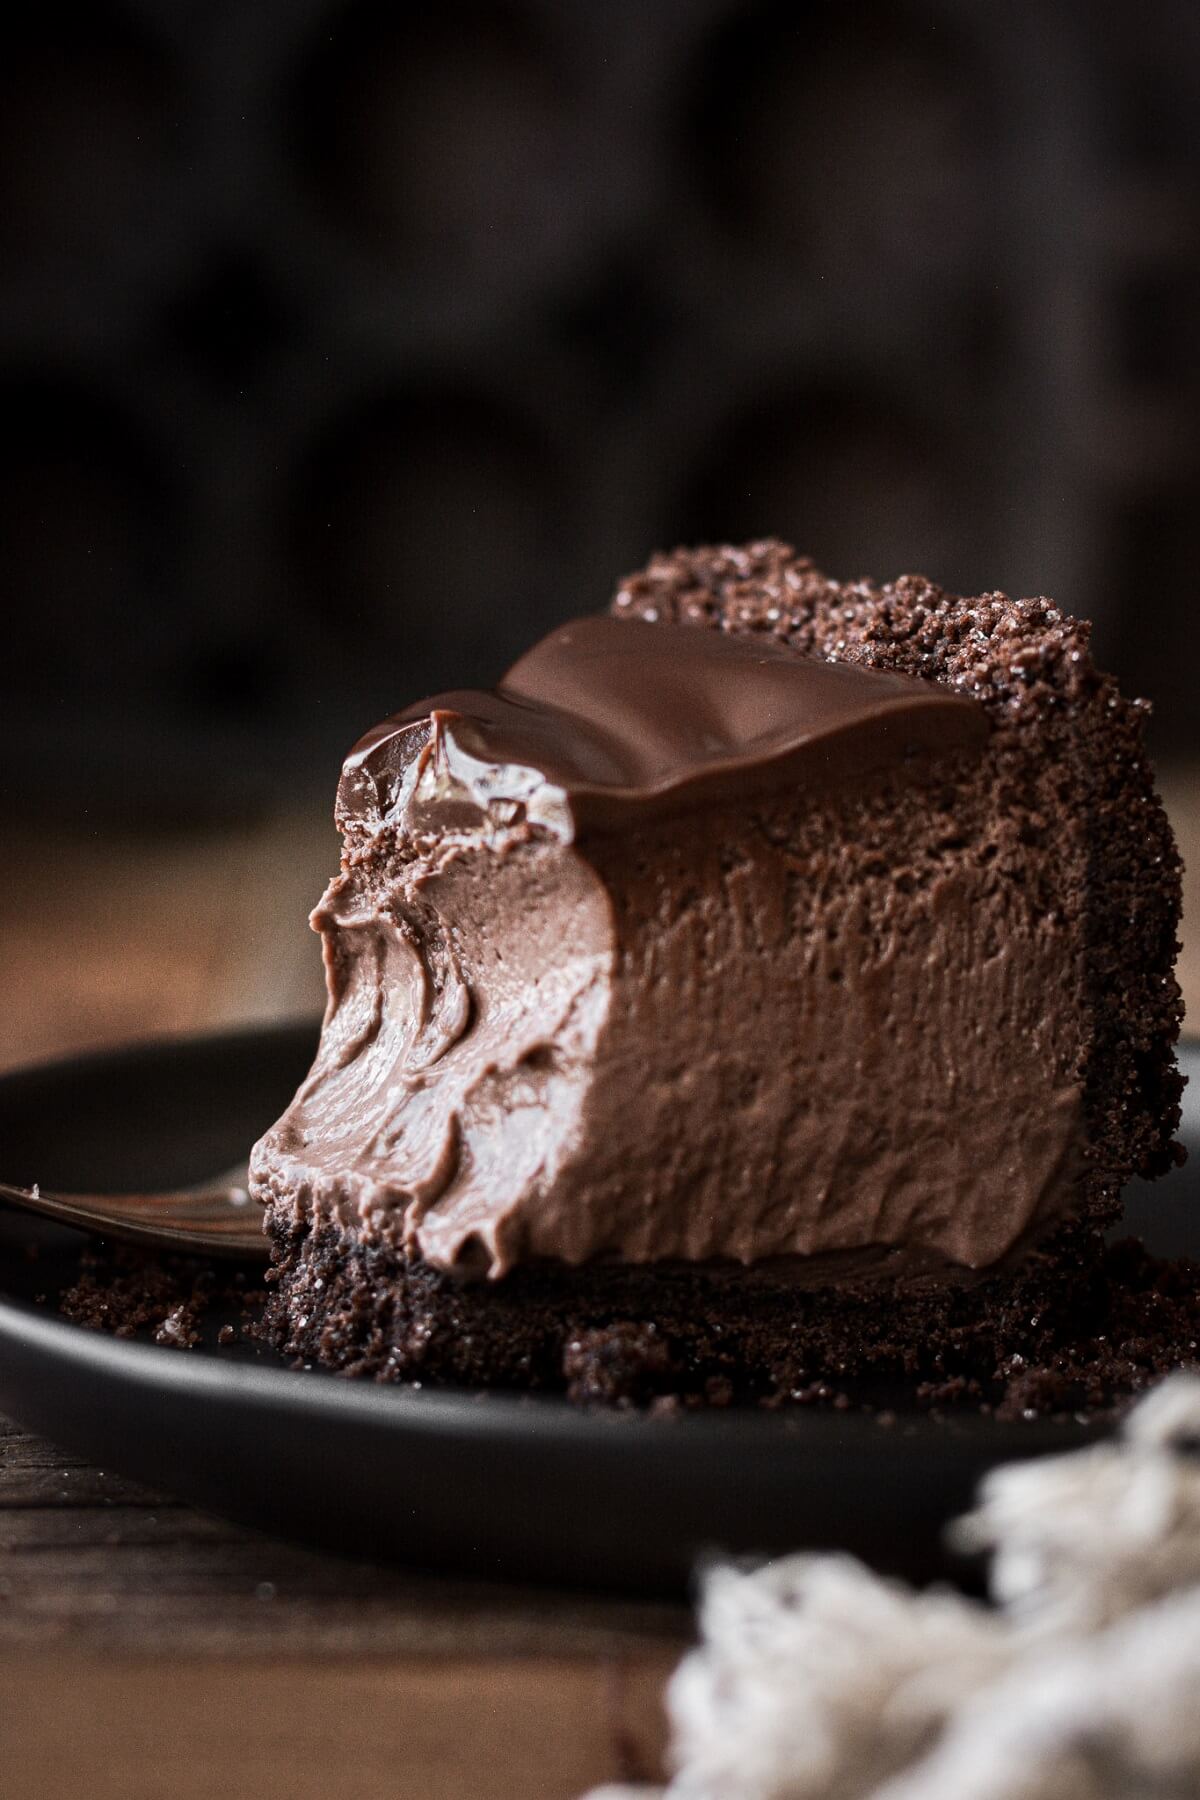
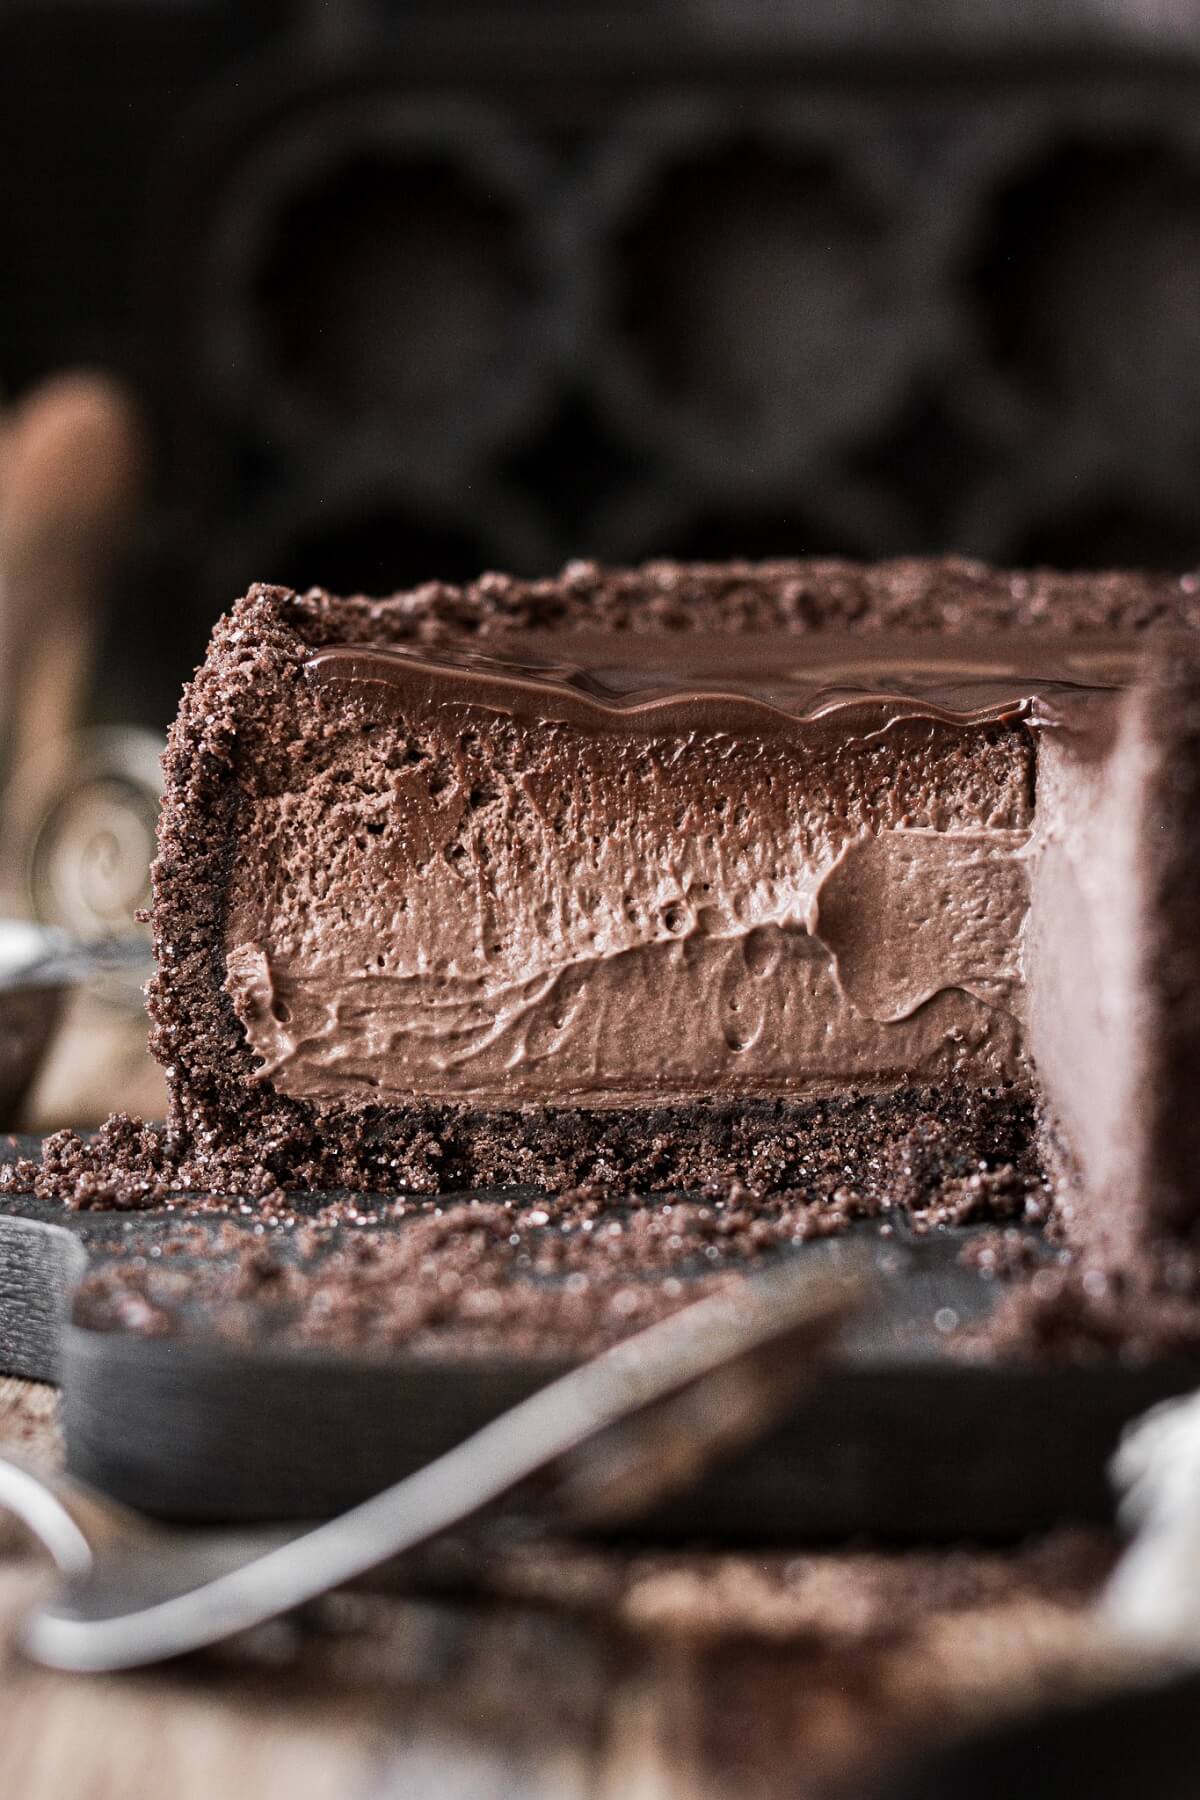
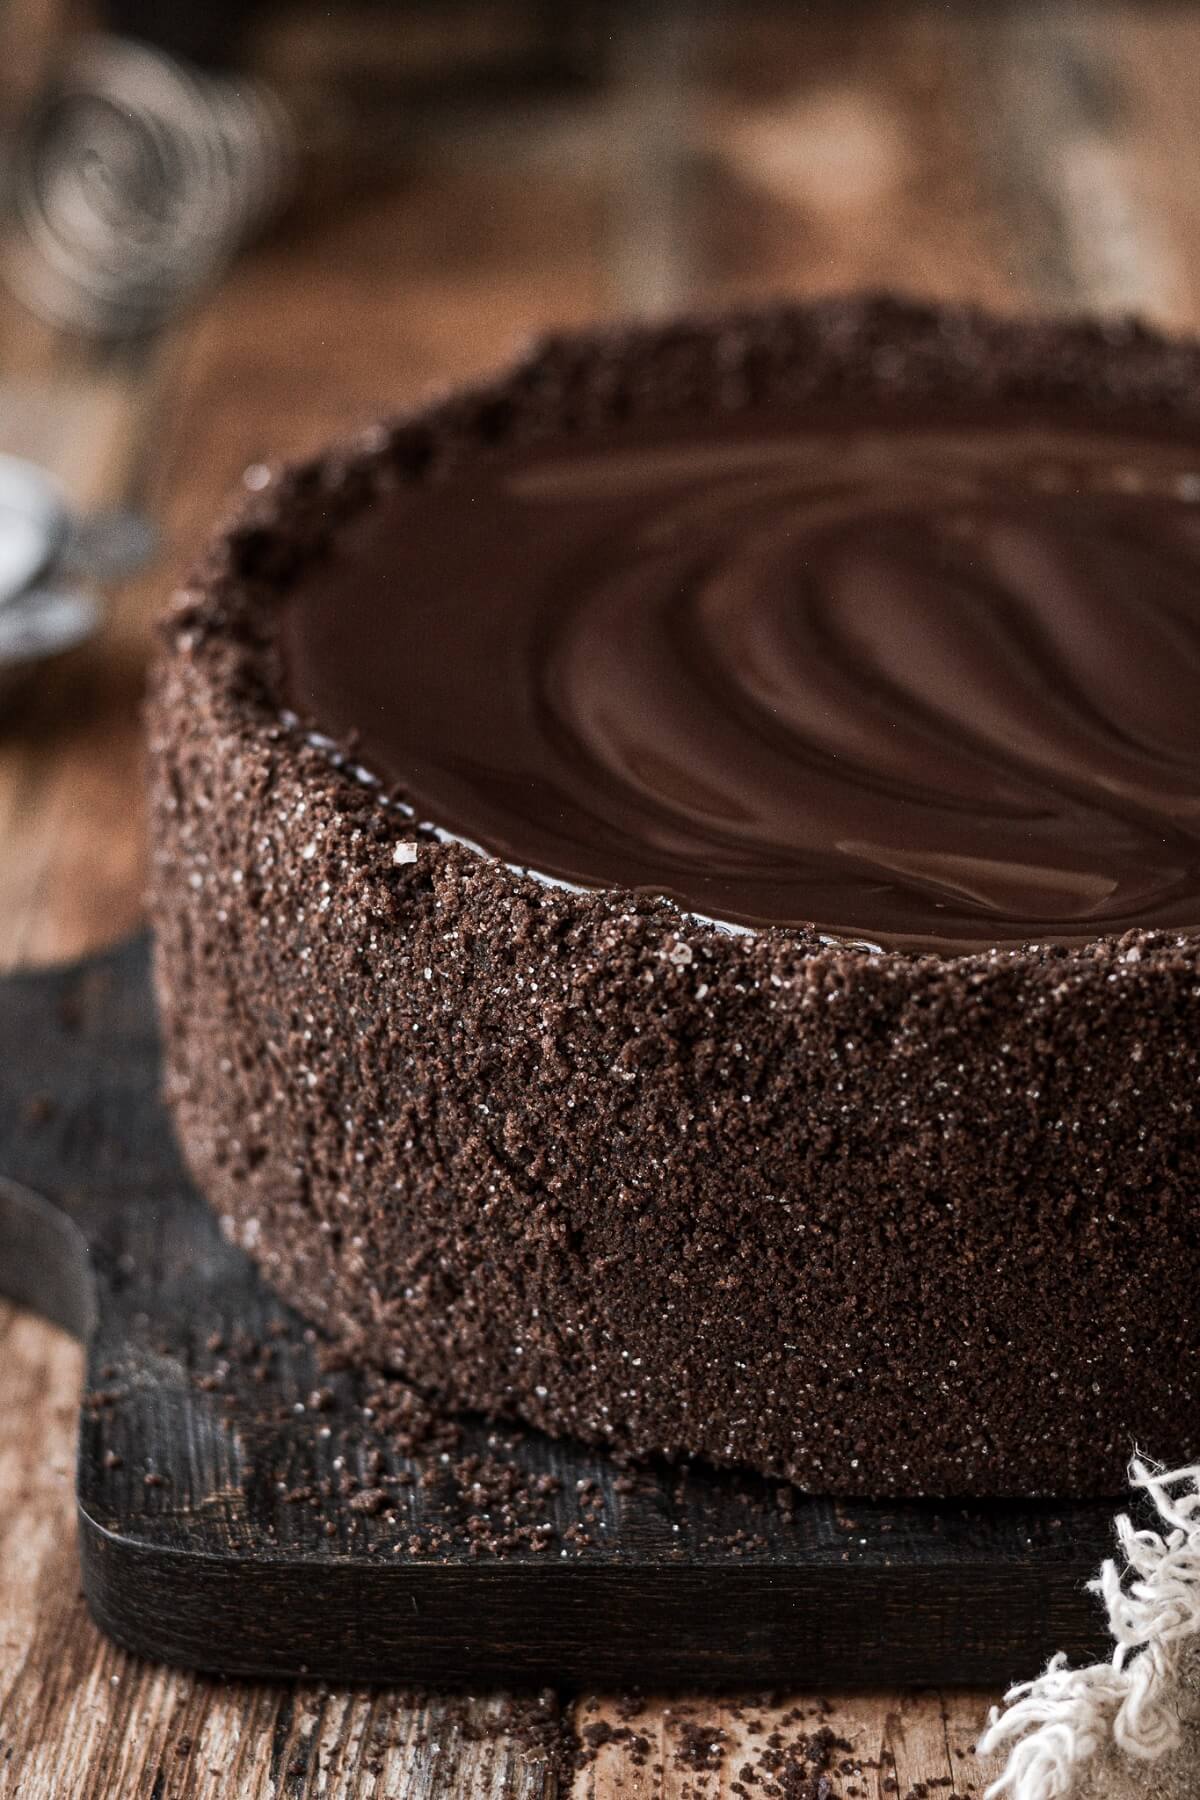
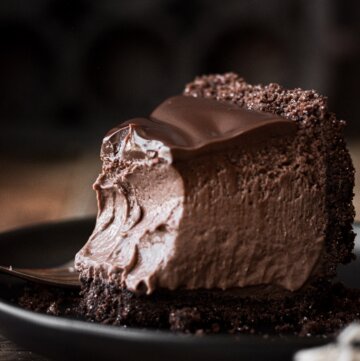
A high altitude tested triple chocolate cheesecake recipe, with a silky chocolate cream cheese filling, chocolate graham cracker crust, and chocolate ganache. With a few best practices, this perfectly creamy chocolate cheesecake bakes beautifully at high altitude, with no sinking and no cracking.
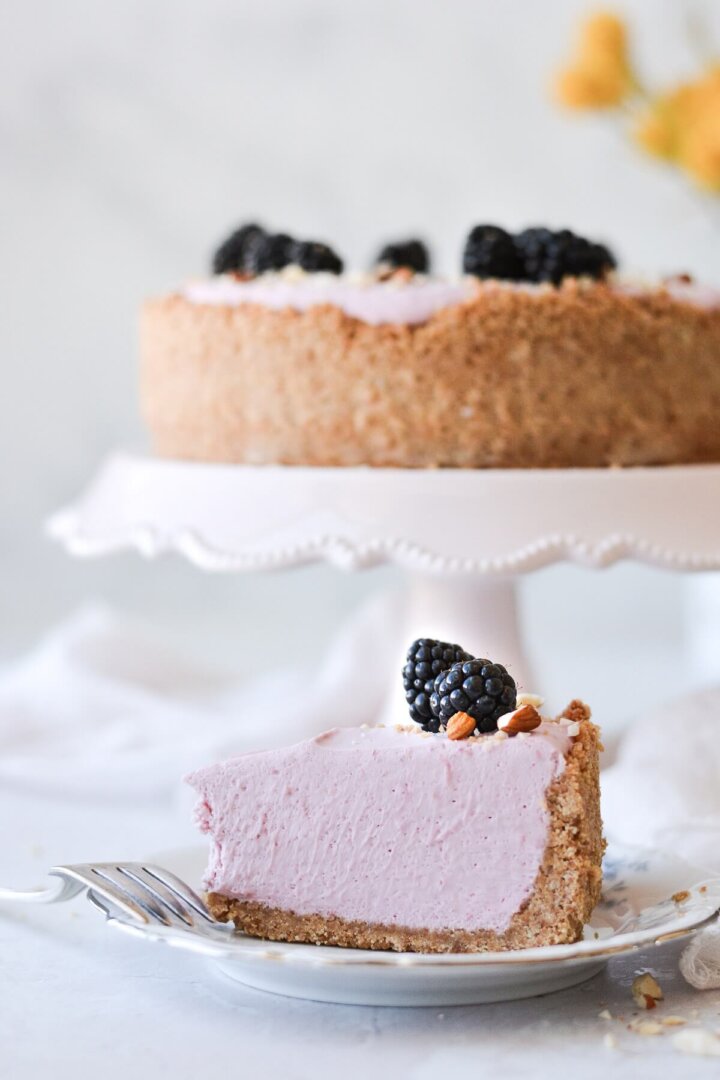
And don’t miss my perfect, high altitude vanilla bean cheesecake recipe, too!
This site contains affiliate links. As an Amazon associate, I earn from qualifying purchases. This means that I may make a small commission if you purchase a product using those links. This in no way affects my opinion of those products and services. All opinions expressed on this site are my own.
Why You’ll Love This Recipe
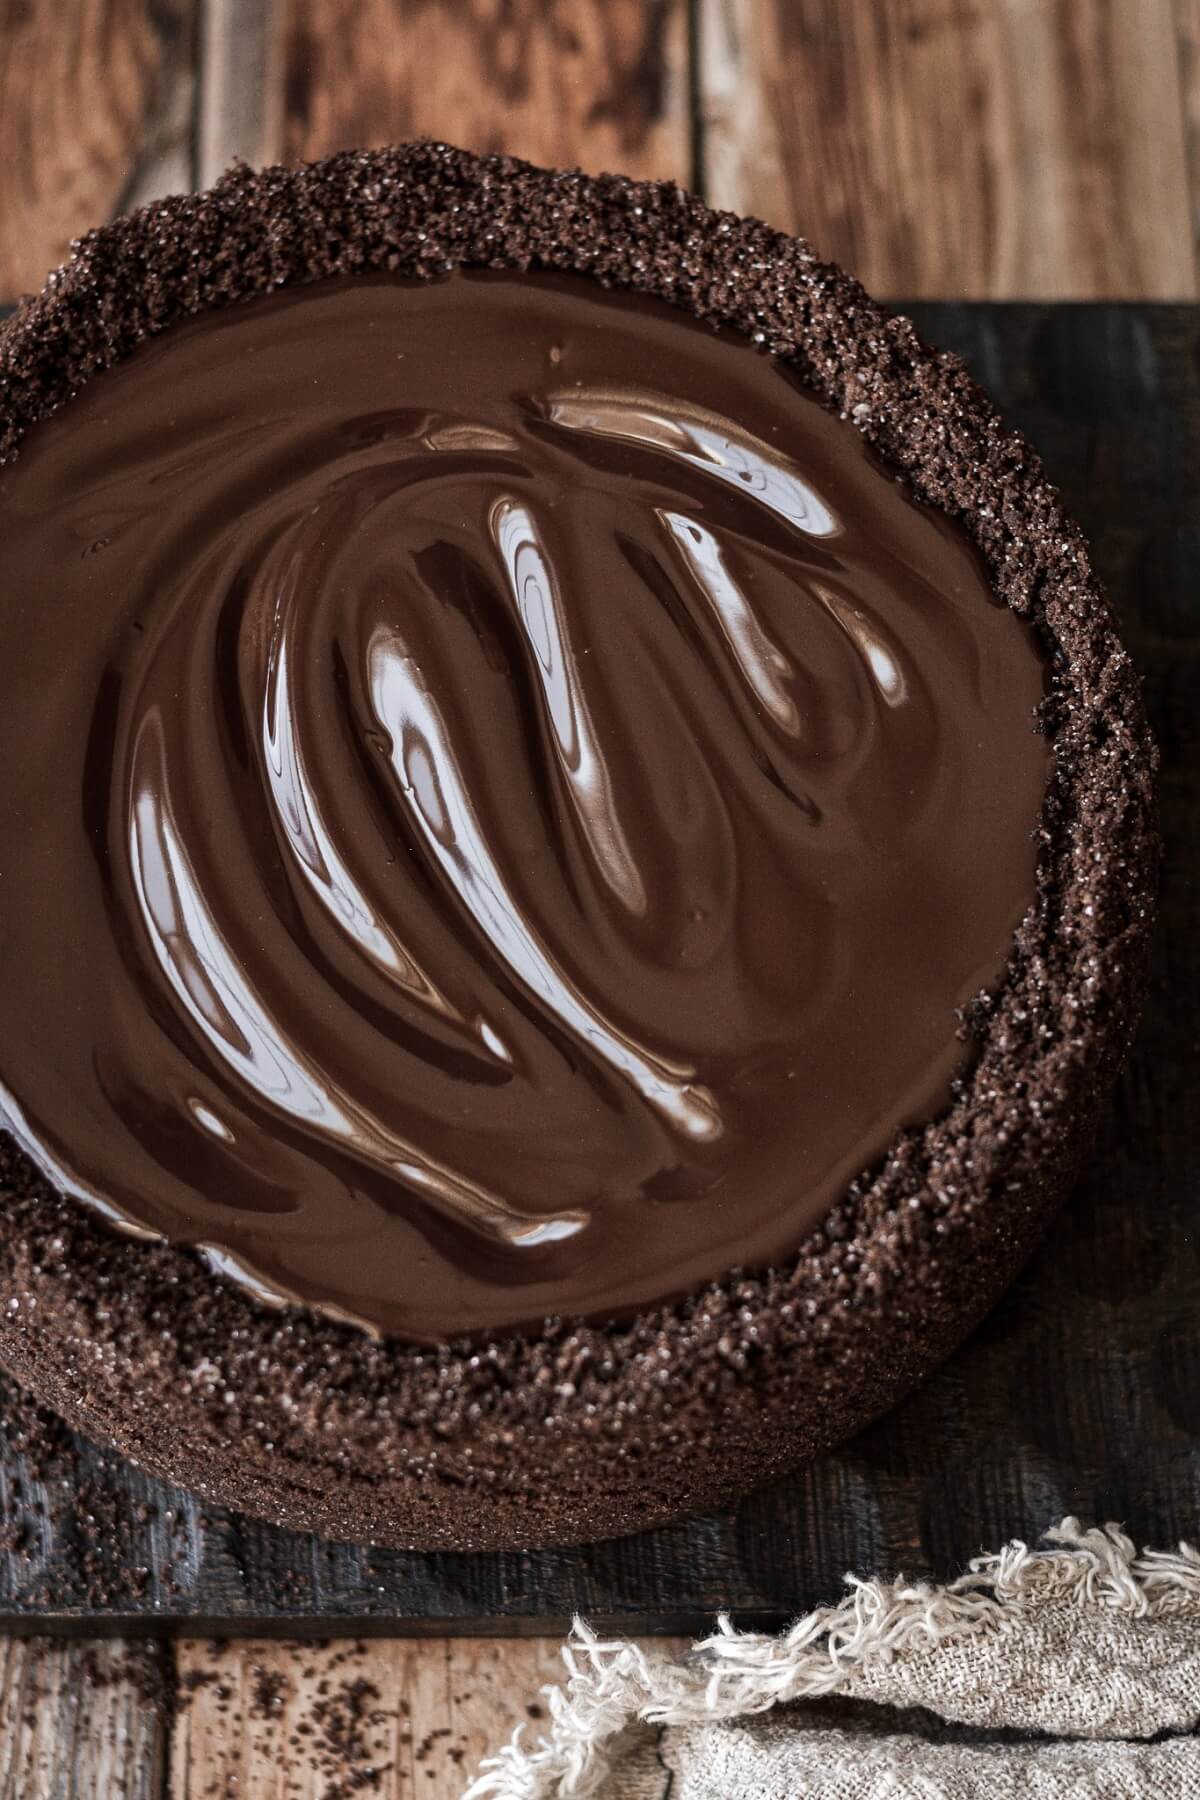
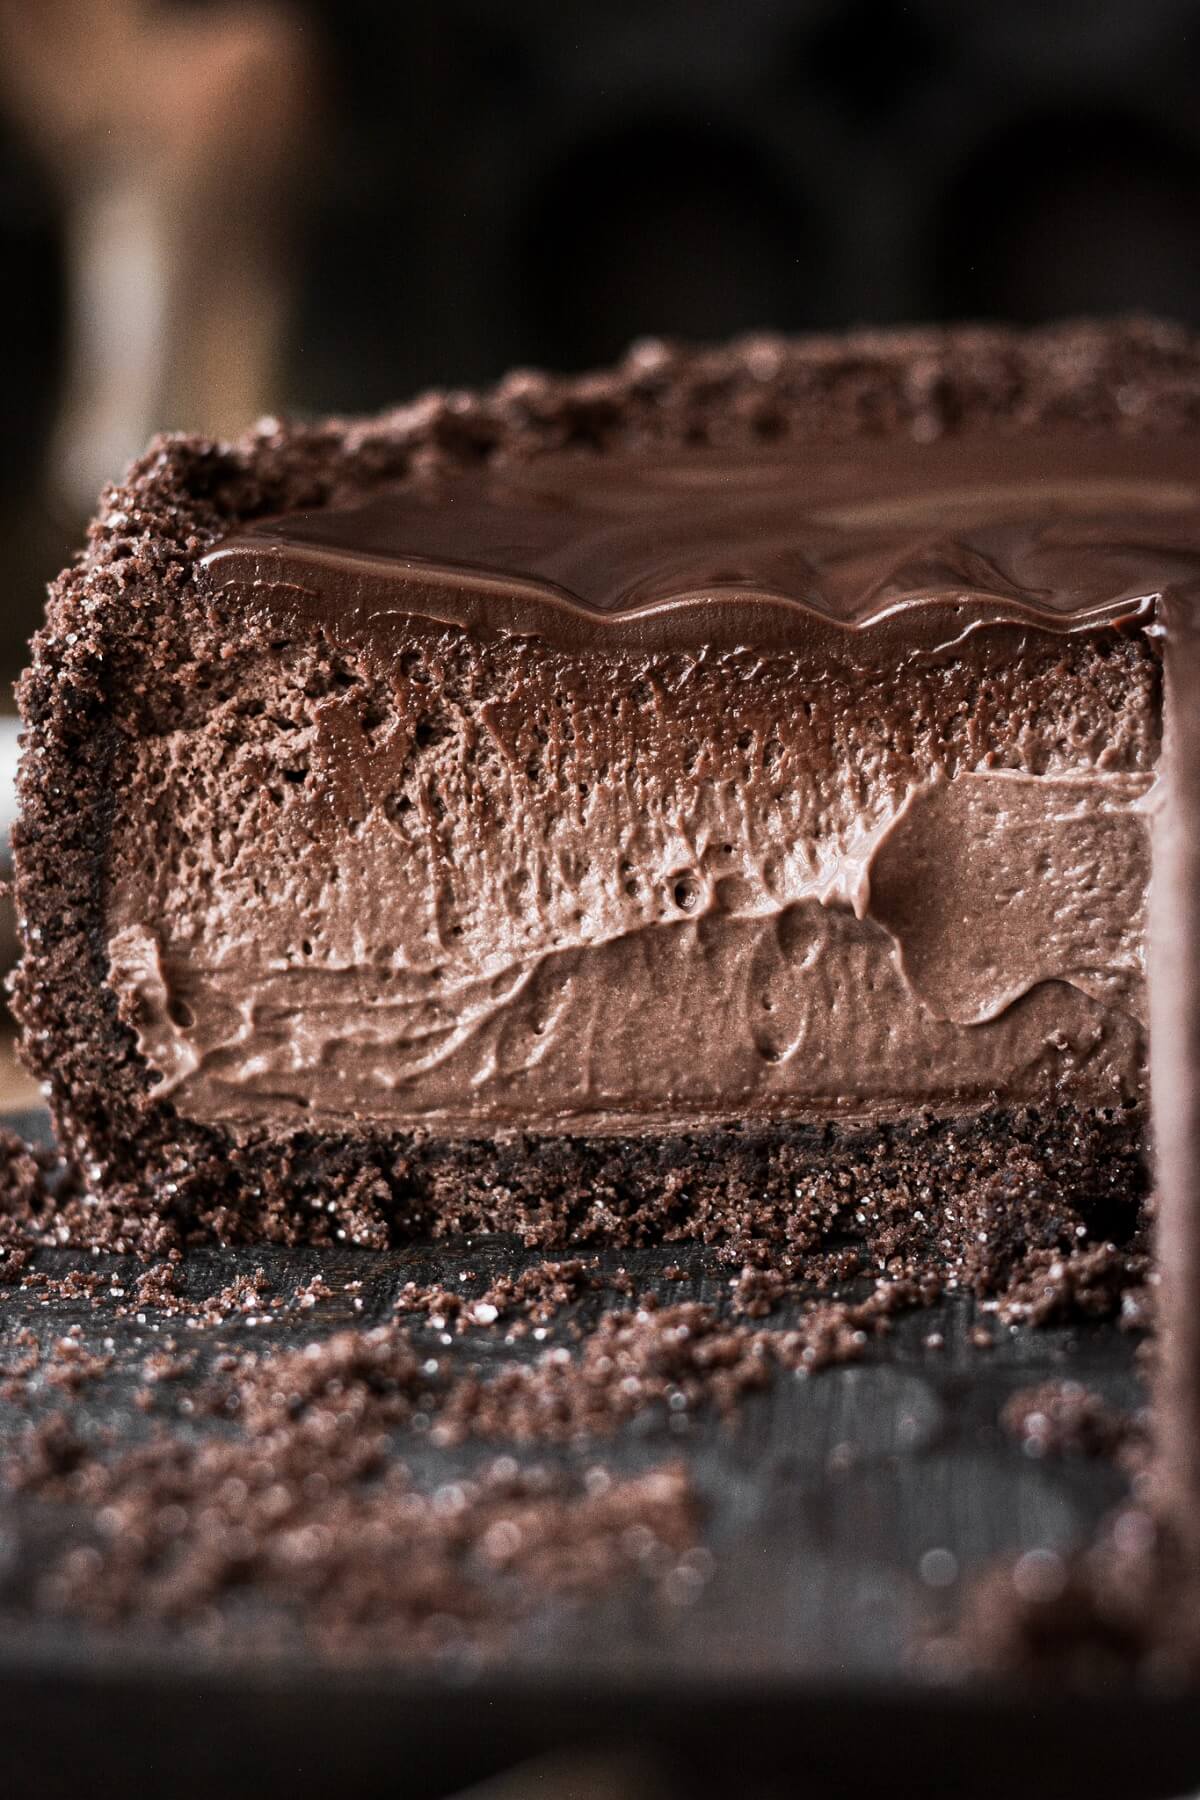
For Chocolate Lovers. With Dutch processed cocoa powder in the creamy cheesecake filling, a chocolate graham cracker crust and rich chocolate ganache topping, this triple chocolate cheesecake is a chocolate lover’s dream.
No Sinking and No Cracking. The same tips that I recommend for my creamy vanilla cheesecake apply to today’s chocolate cheesecake recipe. By following these practices, your cheesecake will bake beautifully without sinking or cracking.
High Altitude Tested. I develop all the recipes on my site for Denver’s altitude of 5,280 feet. If you’re at a lower or higher elevation, please see my FAQs for guidance on adjusting recipes for your altitude.
See the recipe card at the end of the post for the full ingredients list and instructions.
Ingredients
- Chocolate Graham Crackers. If you don’t want to make a chocolate crust, you can use regular graham crackers, too, like the honey or cinnamon flavored. You could even use Oreos or chocolate sandwich cookies (without the cream filling).
- Sugar. You’ll need granulated sugar to sweeten the filling and the crust.
- Salt. Balances the sweetness and enhances the flavor of the cheesecake.
- Unsalted Butter. Moistens the crust and binds it together.
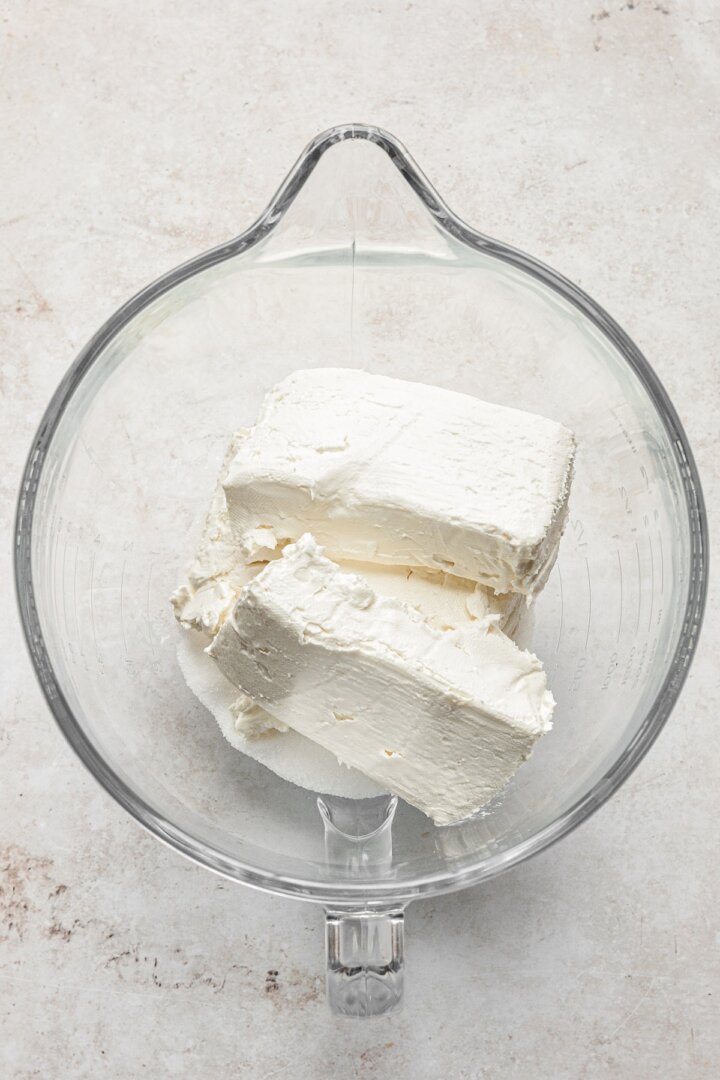
- Cream Cheese. You’ll need to use blocks of full fat cream cheese, not tubs of cream cheese “spread”.
- Cocoa Powder. I prefer a dark, Dutch-processed cocoa powder for baking. Be sure to sift it first, to remove any lumps.
- Eggs. The eggs add richness to the filling, as well as structure. Vanilla cheesecake filling is essentially a “custard”, and eggs are important to the structure, helping it to set as it chills.
- Heavy Whipping Cream. Adds richness, and helps to lighten the filling a bit, so it’s not quite as dense as a New York cheesecake, which is heavier on the cream cheese. If you want a little more of a tangy flavor, you can replace up to half of the heavy whipping cream with full fat sour cream. You’ll also need a little cream for the chocolate ganache topping.
- Vanilla Extract. Flavor.
- Dark Chocolate. Chop up a bar of good quality chocolate for the ganache. You won’t get as good of results if you use chocolate chips.
Tools and Equipment
- Stand Mixer with Paddle Attachment. You could probably get away with a hand mixer, but personally, I wouldn’t use one for this recipe. You’ll need a mixer to beat the cream cheese with the sugar, for a perfectly smooth filling.
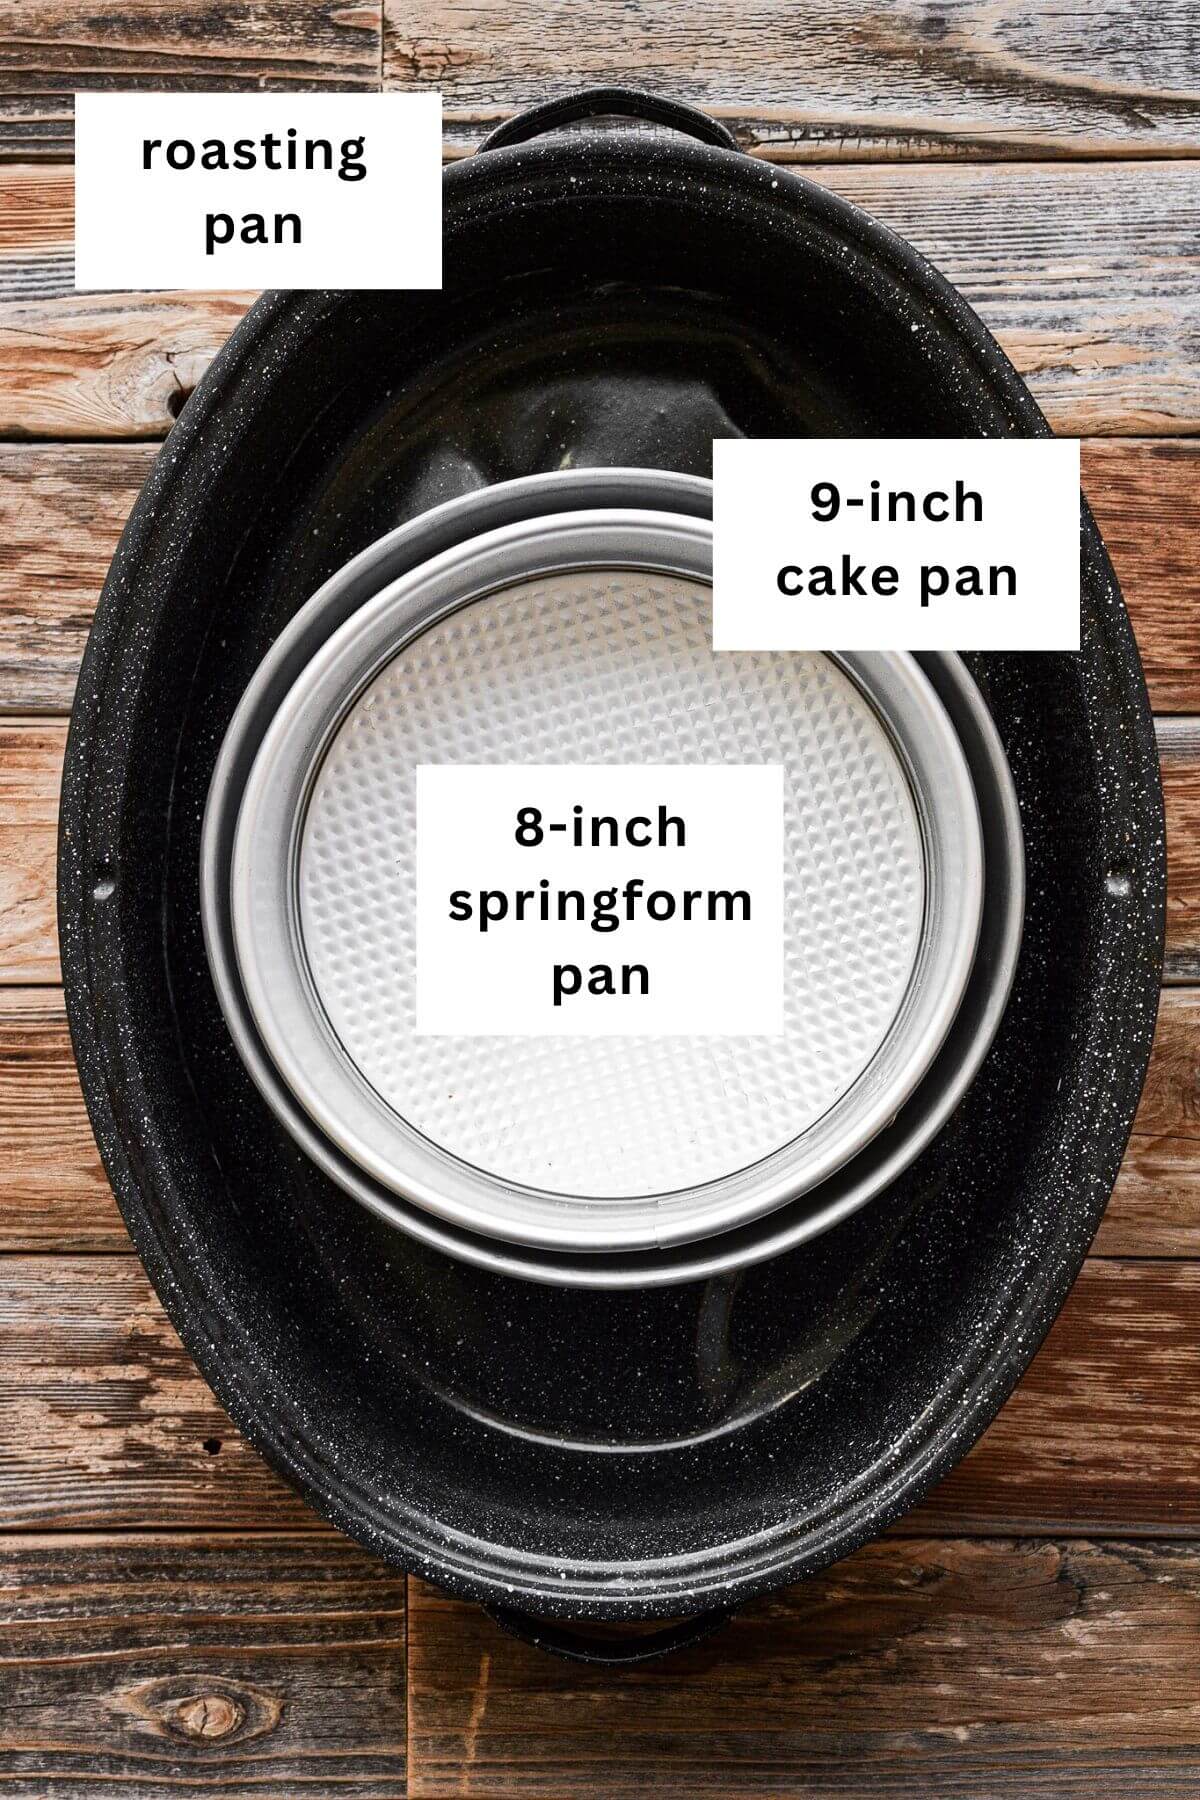
- Large Roasting Pan. This will hold the boiling water for the water bath.
- 8-Inch Springform Pan. Your pan will need to have a depth of 3 inches, since a 2 inch depth will not be tall enough for the volume of batter. A springform pan allows you to release the sides of the pan to unmold the cheesecake, something you cannot do with a traditional cake pan.
- 9 Inch Round Cake Pan (OR wide, heavy duty aluminum foil). Even if your springform pan says it’s “leakproof”, don’t trust the claim. Springform pans are notorious for leaking, and nothing will ruin your cheesecake faster than water from the water bath soaking into the crust. I found it easiest to simply set my springform pan into a 9 inch round cake pan. The cake pan insulates and protects the springform pan from the water. You can also wrap the springform pan in foil. But if you use foil, you need several layers of wide, heavy duty foil. Just a tiny tear in the foil can let water in and will ruin your chocolate cheesecake.
Instructions
Getting Ready
- Preheat the oven to 300 F, and position a rack in the center of the oven. Bring some water to a boil.
- Lightly spray the bottom and sides of an 8-inch springform pan with a 3-inch depth with non-stick baking spray. Line the bottom of the pan with a circle of parchment paper.
- You’ll need a 9-inch round cake pan with a 3-inch depth to set the springform pan inside of, to act as a barrier and to keep the water from leaking into the cheesecake. If you don’t have a 9-inch round cake pan, wrap the bottom and sides of the springform pan with several layers of wide, heavy duty aluminum foil. The foil needs to be wide enough to reach all the way up to the top edge of the springform pan on all sides, to prevent water from leaking in and ruining the crust.
- You’ll also need a large roasting pan, to set the other pans inside of.
Make the Graham Cracker Crust
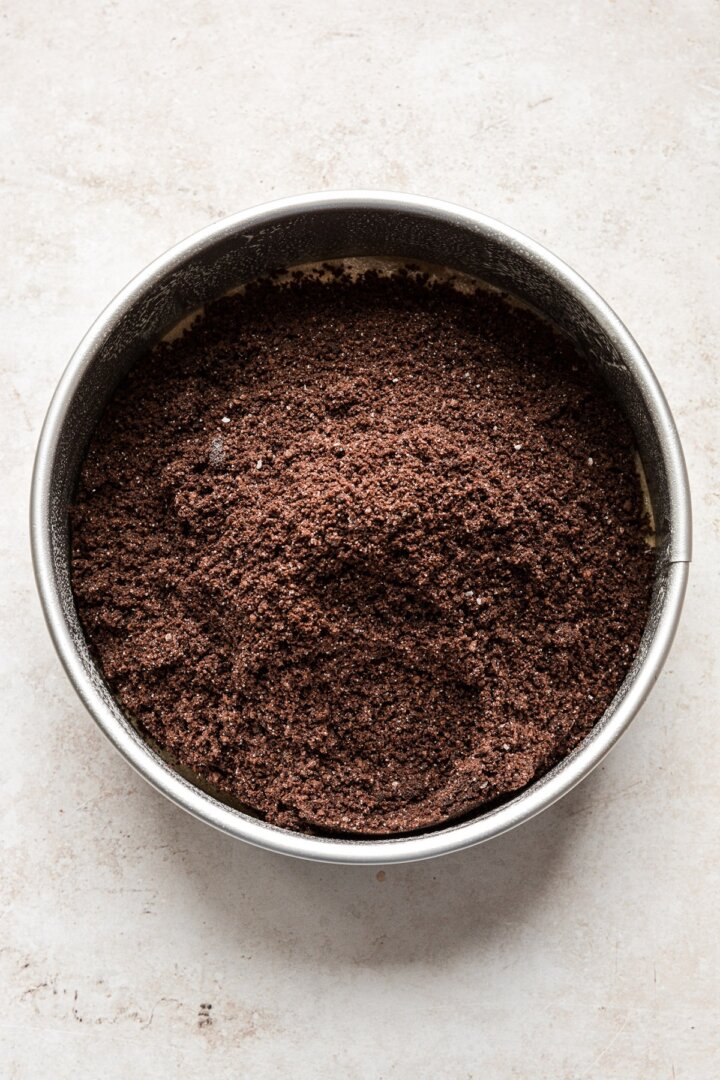
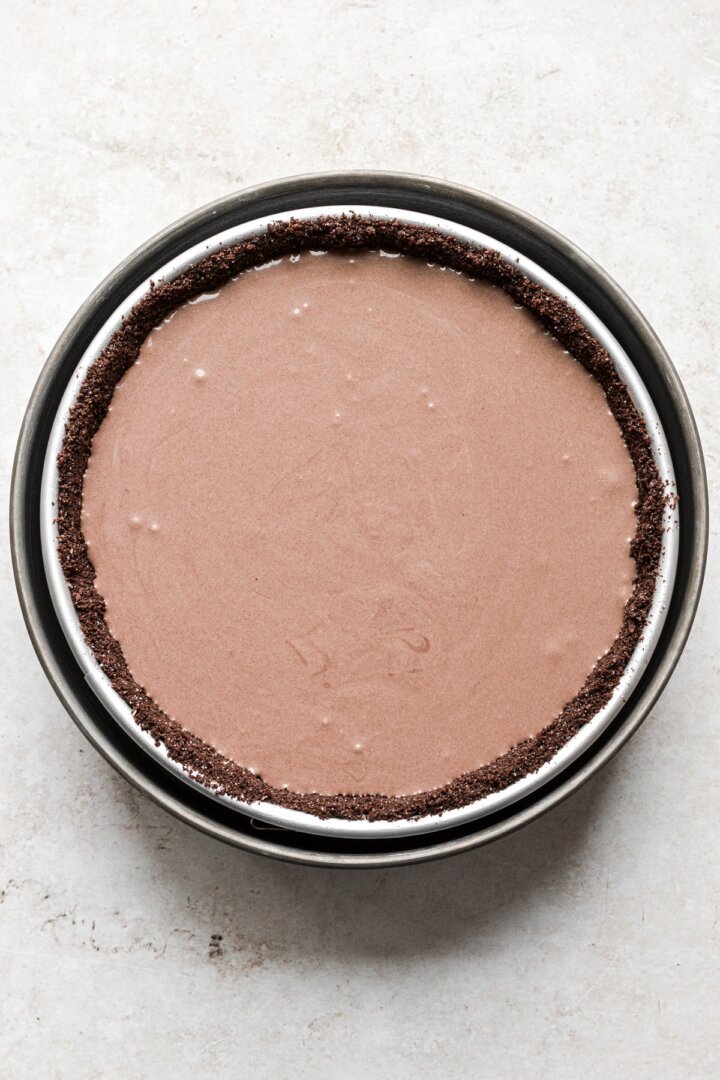
- In a bowl, combine the crushed graham crackers, sugar and salt. Add the melted butter and stir until evenly moistened.
- Dump the crumbs into the prepared springform pan. Press the crumbs in a firm, even layer against the bottom and up the sides of the pan, nearly to the top. Set aside.

Make the Cheesecake Filling
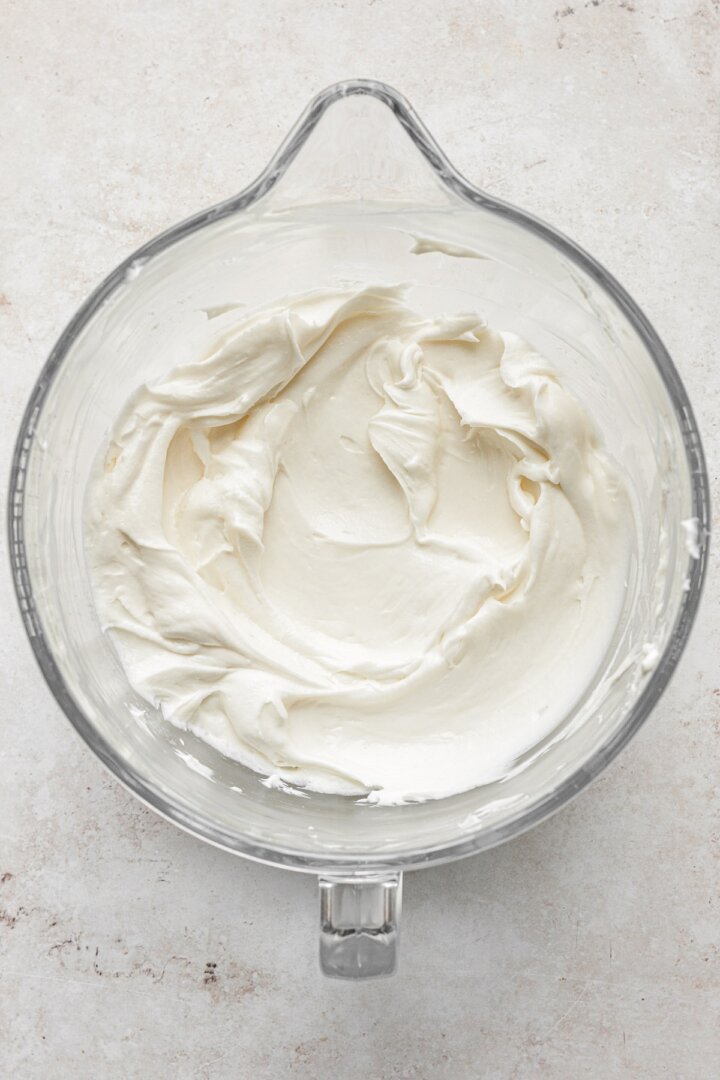
- In the bowl of your stand mixer fitted with the paddle attachment, beat the softened cream cheese with the sugar for 3 minutes, on medium speed. Scrape the bowl down.
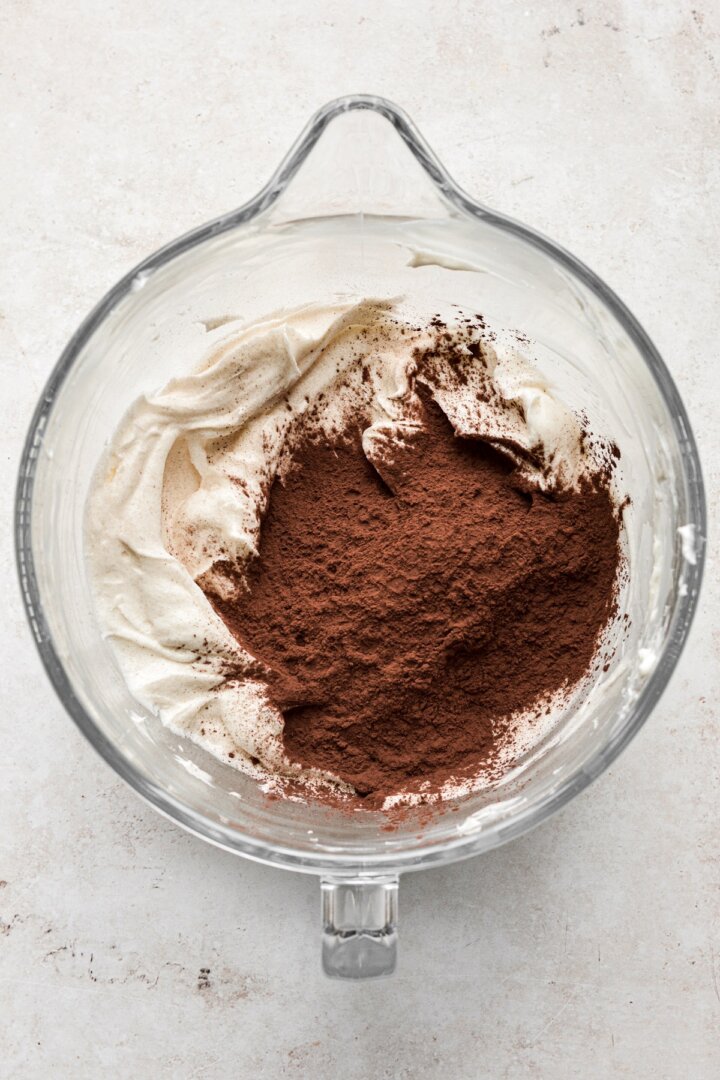
- Add the sifted cocoa powder and mix until smooth.
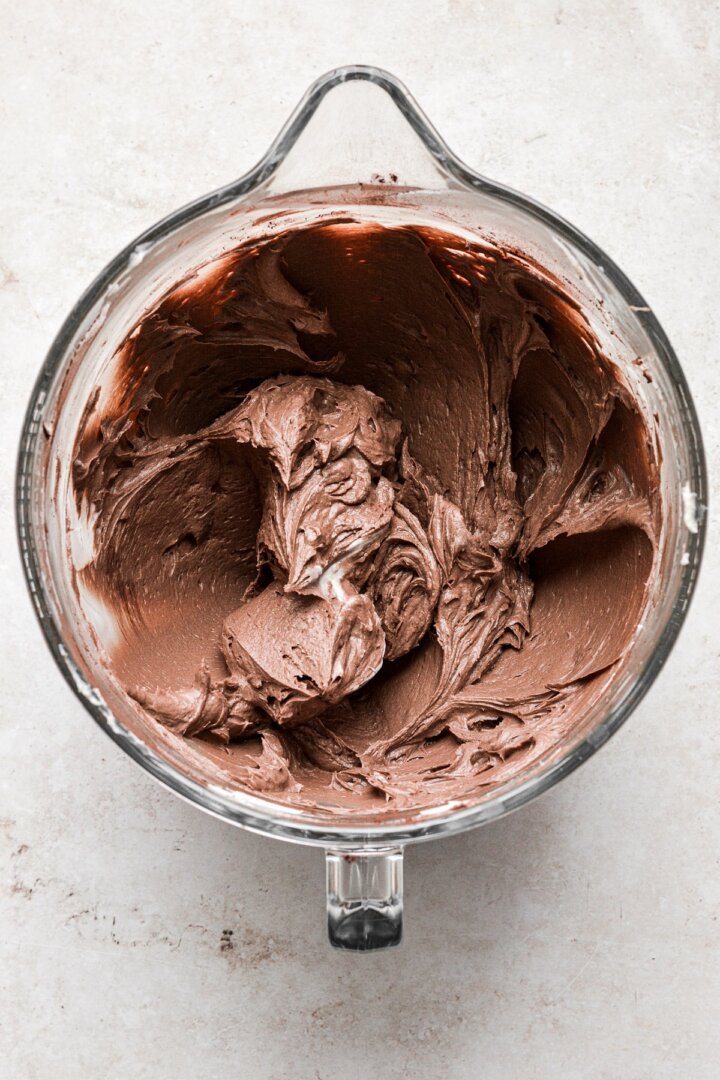
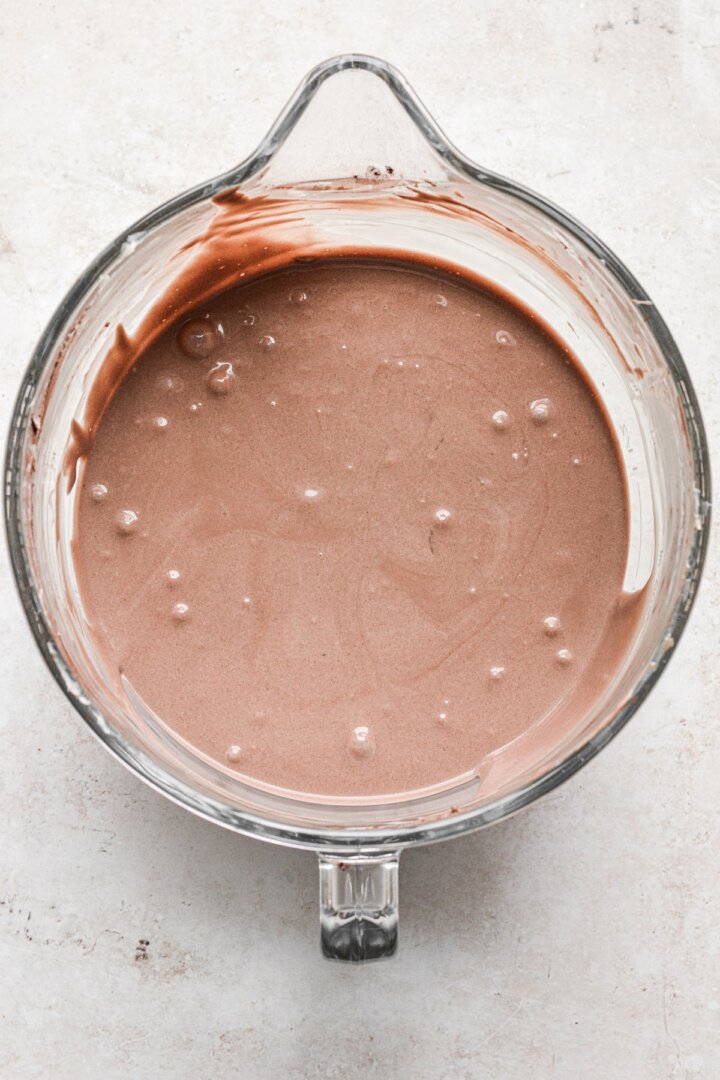
- Beat in the eggs on medium low speed, one at a time, mixing each for 10 seconds before adding the next. Scrape the bowl down and make sure the mixture is perfectly smooth, with no lumps of cream cheese.
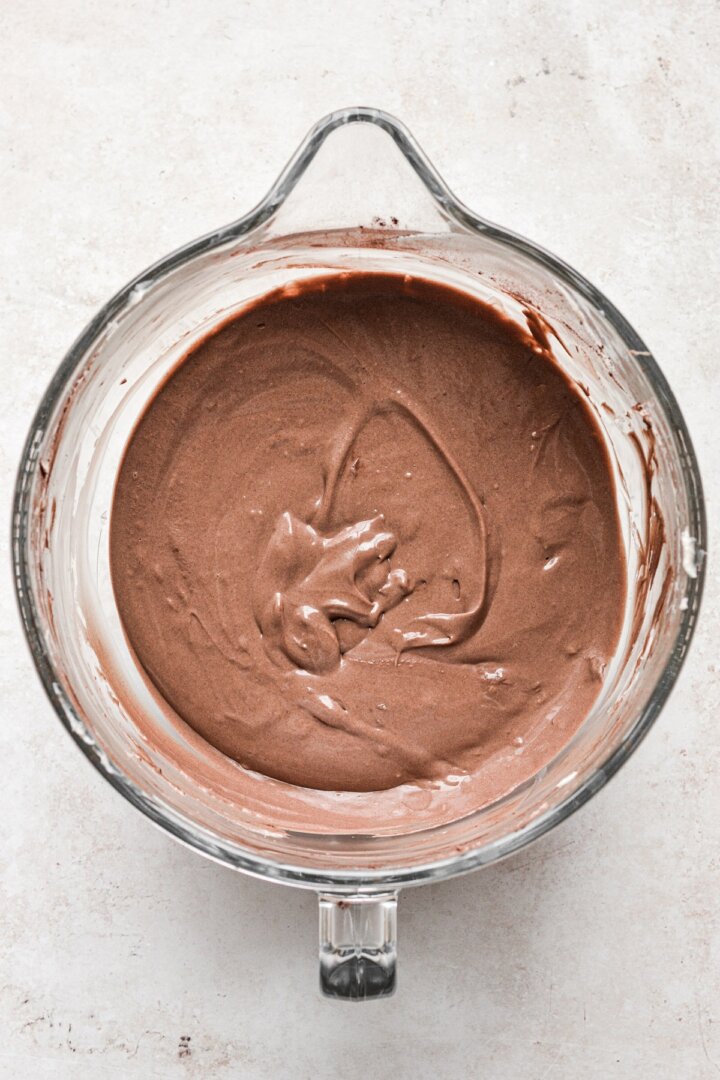
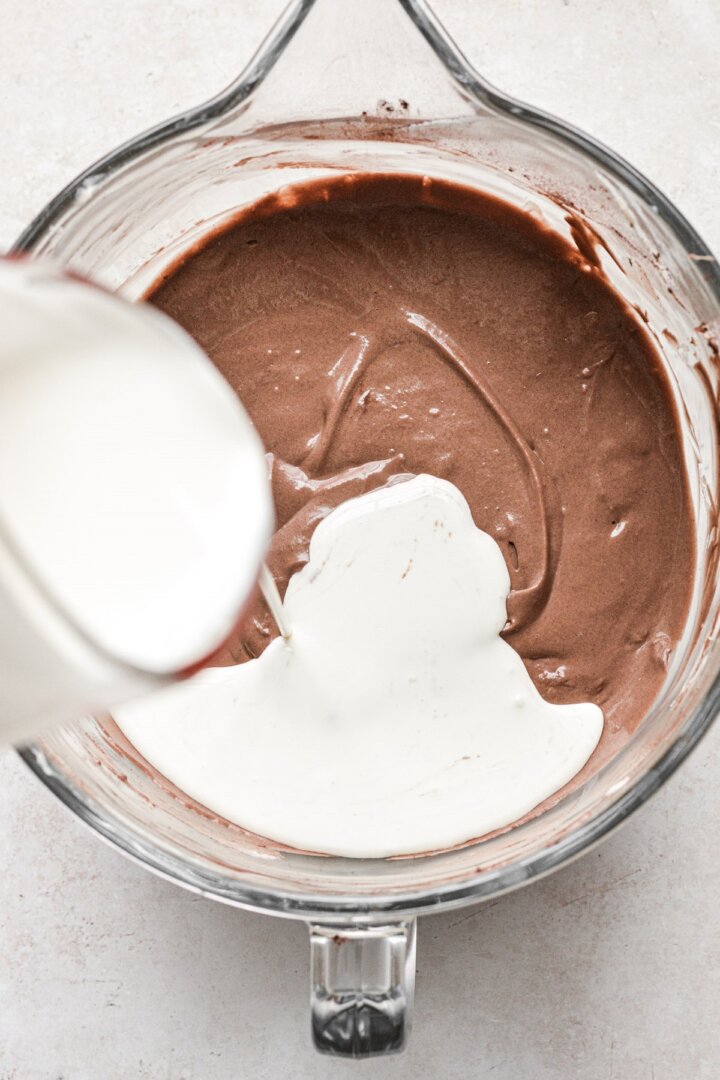
- Add the cream and the vanilla extract, and mix just until smooth and combined.
- Pour the batter into the crust in your springform pan. Lightly tap the pan against the counter, then use a toothpick to pop any air bubbles that rise to the surface.
- Set the springform pan inside the cake pan, then set both pans inside the roasting pan. Add boiling water to the roasting pan, so that it comes halfway up the side of the cake pan. Take care not to pour any water into the cake pan or the cheesecake.
Bake the Cheesecake
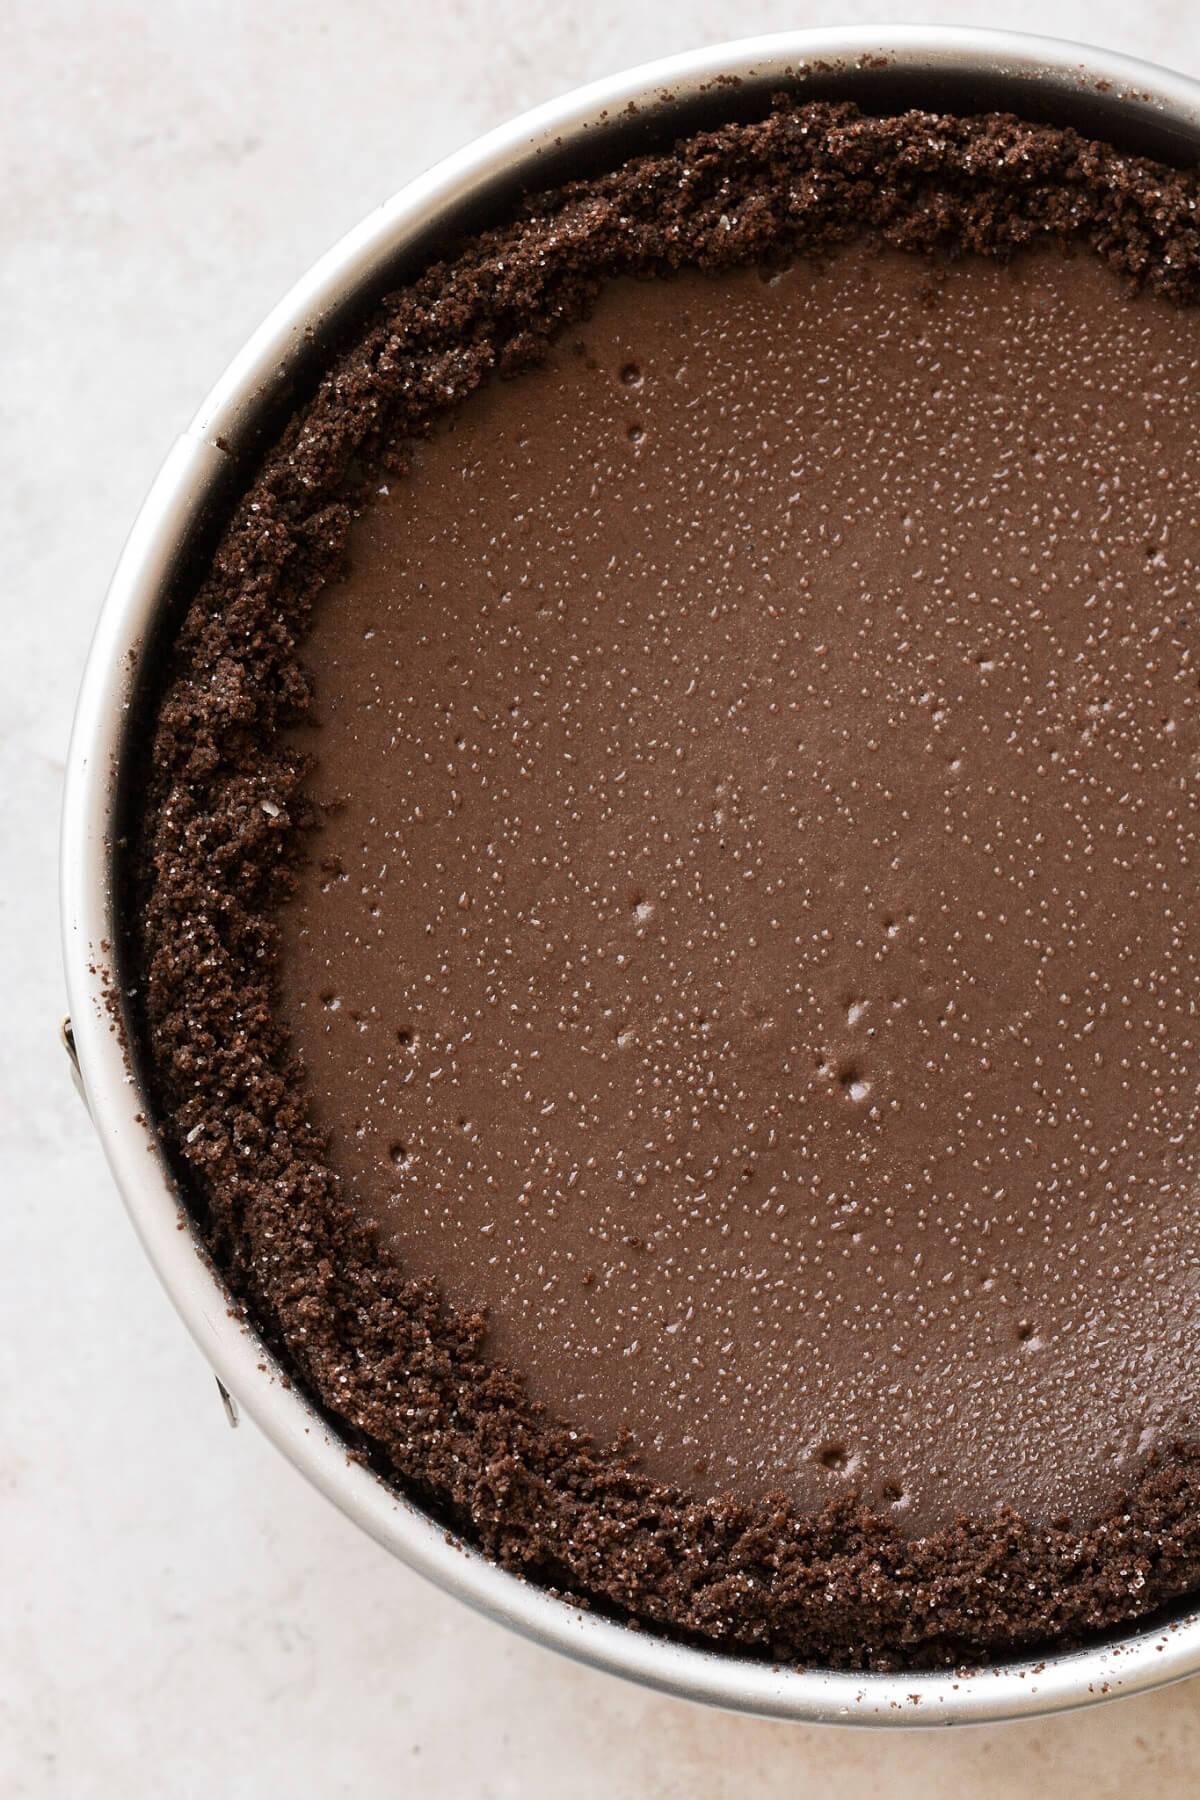
- Bake the cheesecake on the center oven rack for 80-90 minutes. Resist the urge to open the oven door to check on the cheesecake until it’s baked for at least an hour. At around 80 minutes, the top of the cheesecake should look more matte than shiny, and if you give the pan a slight shake, the edges should appear to be set while the center will still be wobbly.
- Baker’s Note: I baked my cheesecake for just 80 minutes, resulting in a very creamy texture. See this video of what my cheesecake looked like at 80 minutes. For a firmer set, continue baking the cheesecake for another 10-20 minutes.
- Turn the oven off, close the oven door again, and leave the cheesecake in the steamy oven for another 60 minutes to gradually cool down and finish baking.
- Take the cheesecake out of the oven, remove the pan from the water bath, and set it on a cooling rack. The center of the cheesecake will still be a bit wobbly. See this video of what my cheesecake looked like at this point.
- Take a sharp knife and run it around the sides of the pan to loosen the crust from the pan. It’s important to do this, because as the cheesecake cools, it can shrink a little. Loosening the crust from the pan will help to prevent the cheesecake from cracking as it cools and shrinks.
- Let the cheesecake cool at room temperature for 2 hours. (In the next photo, my cheesecake just has a little condensation on top from the refrigerator.)
Chill the Cheesecake
- Now set the cheesecake in the refrigerator to let it chill for 5-6 hours before serving.
- Since cheesecake needs so long to cool and chill, you should bake it first thing in the morning, if you’re planning on serving it that same evening. Otherwise, you can bake it in the afternoon/evening, then let it chill overnight.
Make the Ganache
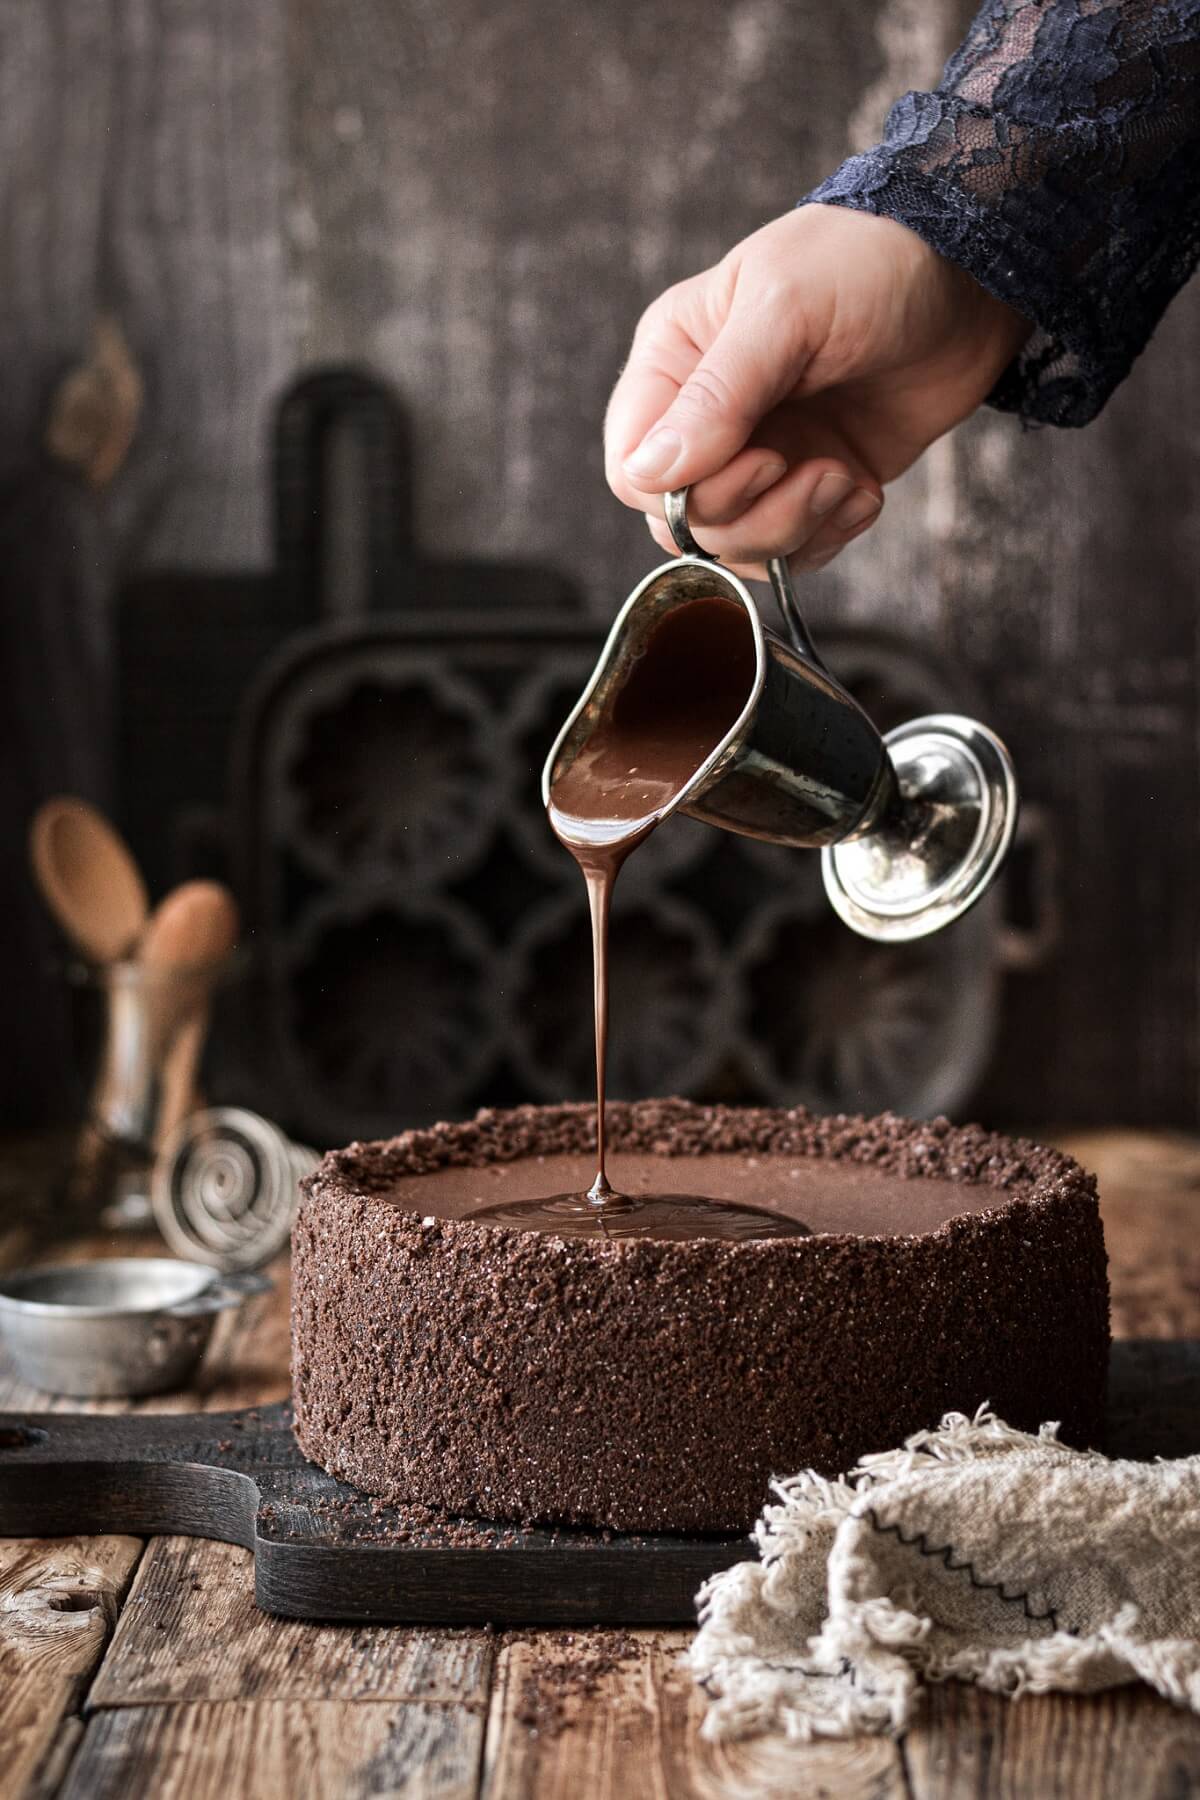
- Pour the cream into a saucepan and warm it over medium low heat, just until it’s beginning to simmer around the edges. Add the chocolate, and stir until smooth. Remove from the heat.
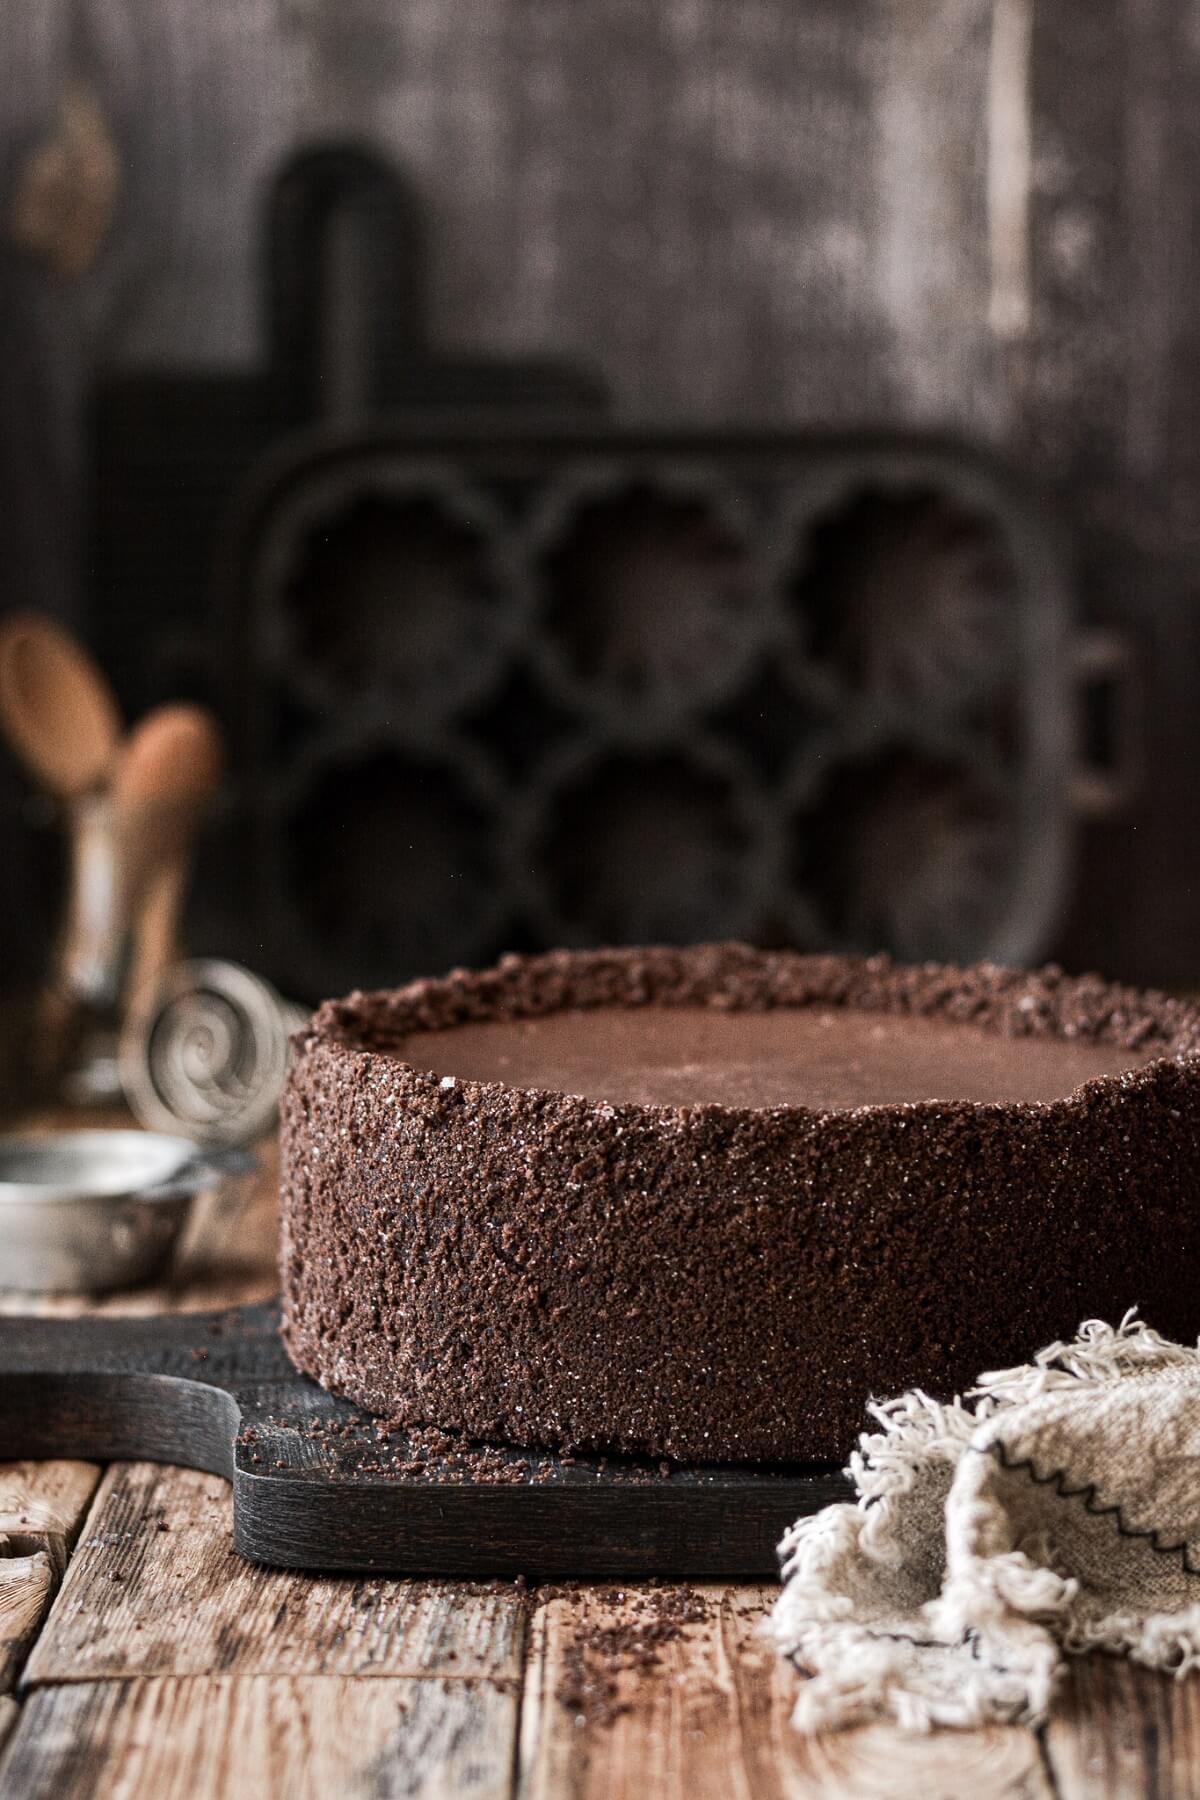
- Pour the ganache on top of the chilled cheesecake. Let the ganache cool and set for several minutes.
Serve the Cheesecake
- Loosen the collar from the pan to unmold the cheesecake from the pan. If you lined the bottom of the pan with parchment paper, it should be easy to slide a cake lifter or spatula gently between the paper and the pan, in order to transfer the cheesecake to a serving plate.
- Serve the cheesecake with your favorite toppings, on the side, or right on top.
Tips for Perfectly Baked Cheesecake
This classic triple chocolate cheesecake recipe will bake beautifully if you follow a few best practices. These are my best tips for avoiding cracks, sinking, browning, and uneven baking in your baked chocolate cheesecake.
- Room Temperature Ingredients. Your cream cheese needs to be softened to room temperature to ensure a smooth and creamy filling that doesn’t contain lumps. The eggs, too, shouldn’t be cold from the fridge. Let them sit out for a bit so that they easily emulsify with the cheesecake batter.
- Use a Water Bath. A water bath, or a bain-marie, is a method of cooking that provides slow, gentle, consistent heat when baking delicate custards, pots de creme and cheesecakes. To bake a cheesecake in a water bath, your cheesecake pan will need to be insulated and protected either with aluminum foil or another cake pan, then placed into a large roasting pan. The roasting pan is filled with boiling water, then the whole setup is placed into the oven. The hot water creates steam in the oven, keeping the cheesecake moist, and allowing it to cook slowly and evenly.
- Don’t Over-Mix the Batter. If you beat in too much air, the cheesecake can rise too quickly and then collapse. The batter really only needs a few minutes of mixing, just to ensure it’s smooth.
- Don’t Over-Bake the Cheesecake. Expect your cheesecake to still be wobbly in the center after baking for the time stated in the recipe card. It will continue to set up as it cools and chills. An over-baked cheesecake can be dry, dense and crumbly, instead of soft, light and creamy.
- Let the Cheesecake Cool Gradually. By avoiding sudden temperature changes, you can prevent cracking in your cheesecake. This is why it’s important to let the cheesecake sit in the oven in the water bath after baking, then cool at room temperature for a while, and then, finally, chill in the refrigerator. You would never want to place a hot cheesecake directly into a cold environment.
Be sure to read all of my BAKING FAQs where I discuss ingredients, substitutions and common baking questions, so that you can be successful in your own baking!
Frequently Asked Questions
What springform pan did you use?
I used a Wilton pan, probably purchased locally at Michaels. It’s 8 inches in diameter with a 3 inch depth. This Fat Daddio Aluminum Springform Pan has the same interior dimensions, although it has a wider base that will not fit inside a 9-inch cake pan, so it would need to be wrapped with foil, or placed inside a larger cake pan.
I’m also intrigued by this cheesecake pan, which does not have a spring release, but rather just a removable bottom to push the cheesecake up and out of the pan.
Will this recipe work in a 9 inch springform pan?
A 9 inch springform pan will work just fine, although your baked cheesecake won’t be as tall.
How long can cheesecake be refrigerated?
You can refrigerate your leftover chocolate cheesecake for about 3 days, although it will probably still taste great for longer than that. We left this in the refrigerator while we were gone on vacation, and 5 days after baking, it was still fantastic.
Can baked vanilla be frozen?
Cheesecake freezes extremely well. You can freeze the entire cheesecake, or individual slices, wrapped in several layers of plastic wrap, for up to 3-6 months. Let thaw overnight in the refrigerator.
You Might Also Like
Please check out my Amazon Shop for a curated collection of some of my favorite cake pans from trusted brands, baking tools, ingredients, pretty things and fashion finds. I recommend products that I buy and use every day!
Did you love today’s recipe? Please rate the recipe and let me know in the comments what you thought! Also, be sure to follow Curly Girl Kitchen on Instagram, and tag me when you try one of my recipes so I can see all your delicious creations!
High Altitude Triple Chocolate Cheesecake
All recipes on Curly Girl Kitchen are developed for high altitude at 5,280 feet. See FAQs for adjusting to higher or lower elevations.

Equipment
- Stand Mixer with Paddle Attachment
- Large Roasting Pan
- 9 Inch Round Cake Pan (OR wide, heavy duty aluminum foil)
Ingredients
Crust
- 2 cups finely crushed chocolate graham cracker crumbs (about 9 oz / 17 full graham cracker "sheets")
- 2 tbsp granulated sugar
- ¾ tsp coarse Kosher salt (if using table salt, use half the amount)
- ½ cup unsalted butter, melted
Filling
- 1 ½ lbs (3 blocks) full fat cream cheese, softened to room temperature
- 1 cup + 2 tbsp granulated sugar
- ½ cup unsweetened Dutch-processed cocoa powder, sifted to remove lumps
- 3 large eggs, room temperature
- 1 cup cold heavy whipping cream
- 1 tbsp vanilla extract
Ganache
- 2 oz heavy whipping cream
- 2 oz good quality dark chocolate, finely chopped
Instructions
Getting Ready
- Preheat the oven to 300 F, and position a rack in the center of the oven. Bring some water to a boil.
- Lightly spray the bottom and sides of an 8-inch springform pan with a 3-inch depth with non-stick baking spray. Line the bottom of the pan with a circle of parchment paper.
- You'll need a 9-inch round cake pan with a 3-inch depth to set the springform pan inside of, to act as a barrier and to keep the water from leaking into the cheesecake. If you don't have a 9-inch round cake pan, wrap the bottom and sides of the springform pan with several layers of wide, heavy duty aluminum foil. The foil needs to be wide enough to reach all the way up to the top edge of the springform pan on all sides, to prevent water from leaking in and ruining the crust.
- You'll also need a large roasting pan, to set the other pans inside of.
Make the Graham Cracker Crust
- In a bowl, combine the crushed graham crackers, sugar and salt. Add the melted butter and stir until evenly moistened.
- Dump the crumbs into the prepared springform pan. Press the crumbs in a firm, even layer against the bottom and up the sides of the pan, nearly to the top. Set aside.
Make the Cheesecake Filling
- In the bowl of your stand mixer fitted with the paddle attachment, beat the softened cream cheese with the sugar for 3 minutes, on medium speed. Scrape the bowl down.
- Add the sifted cocoa powder and mix until smooth.
- Beat in the eggs on medium low speed, one at a time, mixing each for 10 seconds before adding the next. Scrape the bowl down and make sure the mixture is perfectly smooth, with no lumps of cream cheese.
- Add the cream and the vanilla extract, and mix just until smooth and combined.
- Pour the batter into the crust in your springform pan. Lightly tap the pan against the counter, then use a toothpick to pop any air bubbles that rise to the surface.
- Set the springform pan inside the cake pan, then set both pans inside the roasting pan. Add boiling water to the roasting pan, so that it comes halfway up the side of the cake pan. Take care not to pour any water into the cake pan or the cheesecake.
Bake the Cheesecake
- Bake the cheesecake on the center oven rack for 80-90 minutes. Resist the urge to open the oven door to check on the cheesecake until it's baked for at least an hour. At around 80 minutes, the top of the cheesecake should look more matte than shiny, and if you give the pan a slight shake, the edges should appear to be set while the center will still be wobbly.Baker's Note: I baked my cheesecake for just 80 minutes, resulting in a very creamy texture. See this video of what my cheesecake looked like at 80 minutes. For a firmer set, continue baking the cheesecake for another 10-20 minutes.
- Turn the oven off, close the oven door again, and leave the cheesecake in the steamy oven for another 60 minutes to gradually cool down and finish baking.
- Take the cheesecake out of the oven, remove the pan from the water bath, and set it on a cooling rack. The center of the cheesecake will still be a bit wobbly. See this video of what my cheesecake looked like at this point.Take a sharp knife and run it around the sides of the pan to loosen the crust from the pan. It's important to do this, because as the cheesecake cools, it can shrink a little. Loosening the crust from the pan will help to prevent the cheesecake from cracking as it cools and shrinks.
- Let the cheesecake cool at room temperature for 2 hours.
Chill the Cheesecake
- Now set the cheesecake in the refrigerator to let it chill for 5-6 hours before serving.
- Since cheesecake needs so long to cool and chill, you should bake it first thing in the morning, if you're planning on serving it that same evening. Otherwise, you can bake it in the afternoon/evening, then let it chill overnight.
Make the Ganache
- Pour the cream into a saucepan and warm it over medium low heat, just until it's beginning to simmer around the edges. Add the chocolate, and stir until smooth. Remove from the heat.
- Pour the ganache on top of the chilled cheesecake. Let the ganache cool and set for several minutes.
Serve the Cheesecake
- Loosen the collar from the pan to unmold the cheesecake from the pan. If you lined the bottom of the pan with parchment paper, it should be easy to slide a cake lifter or spatula gently between the paper and the pan, in order to transfer the cheesecake to a serving plate.
- Serve the cheesecake with your favorite toppings, on the side, or right on top.
 https://curlygirlkitchen.com/
I live at sea level and followed the recipe to the letter. This is the best, most delicious, creamiest, cheesecake I’ve ever had. Full of chocolate flavour and with a light yet rich, creamy texture this cake is impossible to resist. The only thing I might change the next time I make it is the amount of butter in the crust. There was quite a lot that had seeped into the second pan so perhaps less butter is more in this case. Regardless, a superb cheesecake! Highly recommend!
I live in South Denver. My daughter asked for chocolate cheesecake for her birthday and I had never made one at elevation. I followed the directions to the tee. Came out perfectly – delicious and beautiful. She wanted a slightly more firm cheese cake so I baked it for 90 minutes. We used honey graham crackers to lighten up on the chocolate. This is a keeper!
This cheesecake is a chocoholic’s dream!