
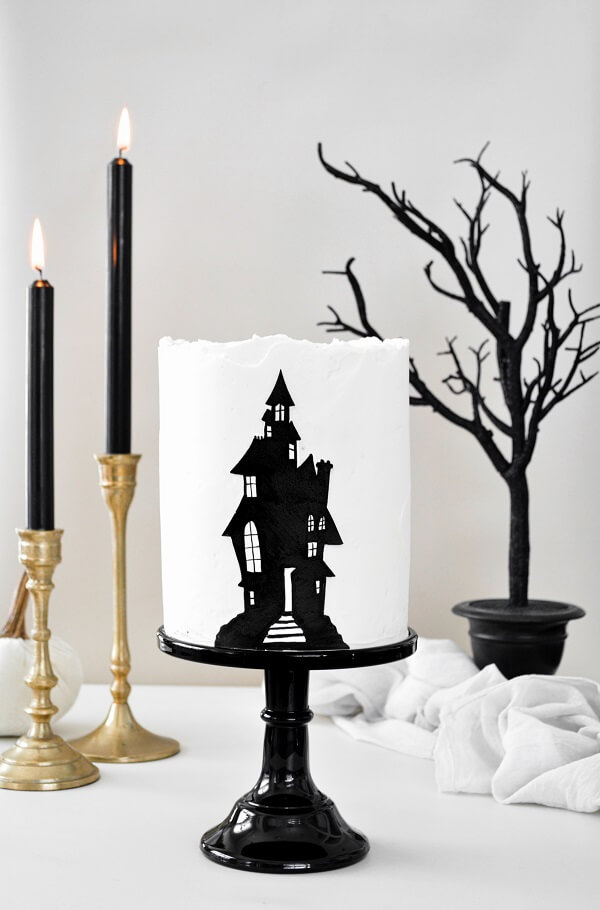
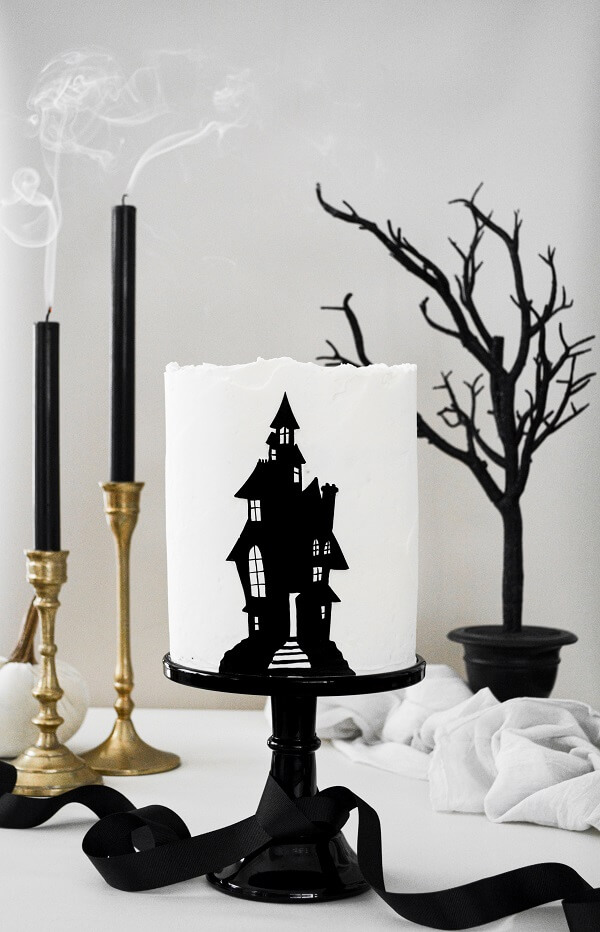
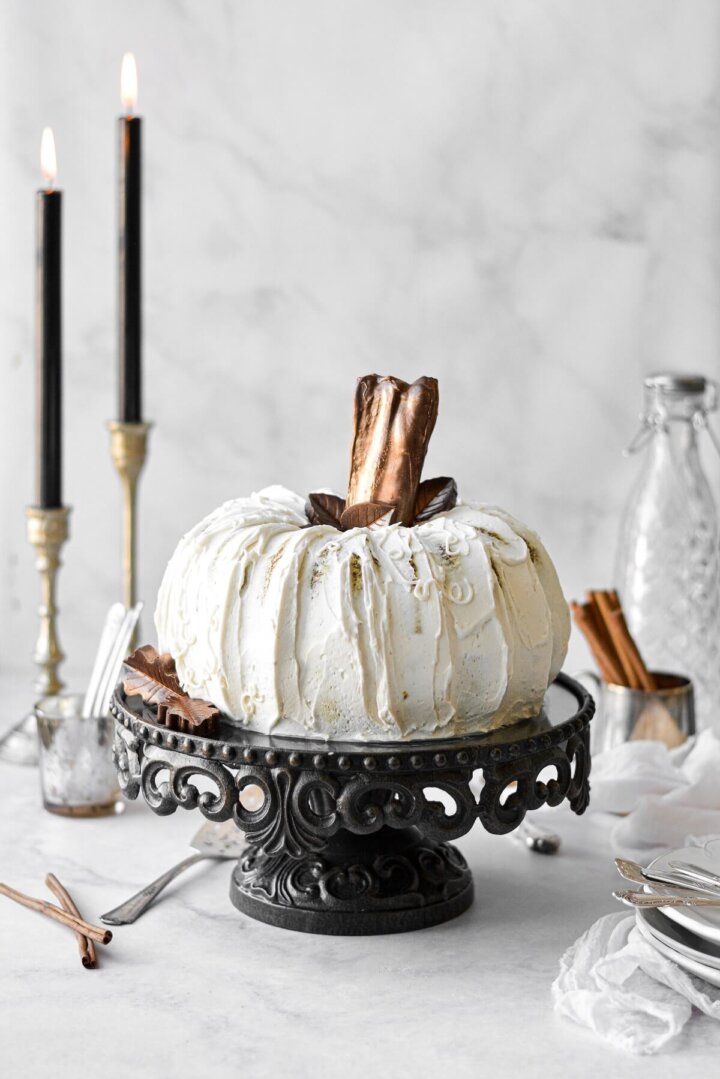
When you bake and decorate cakes as much as I do, it’s really difficult to narrow down a dozen or more ideas into just one design for a holiday. I wish I could see all my ideas come to life. But with budget and time constraints, I’m left choosing just one. So for this year’s Halloween cake, I decided to make an updated Haunted House Cake.
This site contains affiliate links. As an Amazon associate, I earn from qualifying purchases. This means that I may make a small commission if you purchase a product using those links. This in no way affects my opinion of those products and services. All opinions expressed on this site are my own.
Halloween Cakes
Now, I’m not a person who really enjoys Halloween all that much. I’m not into scary or gorey things, and it’s just not my holiday. (That said, I love watching The Walking Dead, and I’ve been a fan of the show for years.) But I do love any excuse to make a cute holiday cake! So most of my fall and Halloween cakes have been more cute than creepy. Which is just the way I like it!
You might remember that I’ve done a few haunted house cakes over the years. My first was orange and black, one of my early creations that I tried to do in all buttercream. Admittedly, it was pretty sloppy looking. The next year I cut black fondant into the silhouette of a haunted house to press against the side of a cake. I finished that design with a few black birds and black paper roses. It was much better than my first try, but I still wanted to make a design that looked more polished.
Using Edible Sugar Sheets
Edible sugar sheets are an interesting product that are ideal for cake decorating. They are also sometimes called edible paper, icing sheets or frosting sheets. They’re made of layers of icing that are pressed thinly onto plastic backing sheets. (The backing sheets are peeled off before decorating your cake. Edible ink made from food coloring can be printed or drawn onto sugar sheets. They can be cut into any shape and pressed onto a cake, or wrapped around it completely.
Sugar sheets shouldn’t be confused with wafer paper or rice paper, which is a starch-based edible material made from potato or rice starches. Wafer paper is very thin and delicate, whereas sugar sheets are thicker and sturdier.
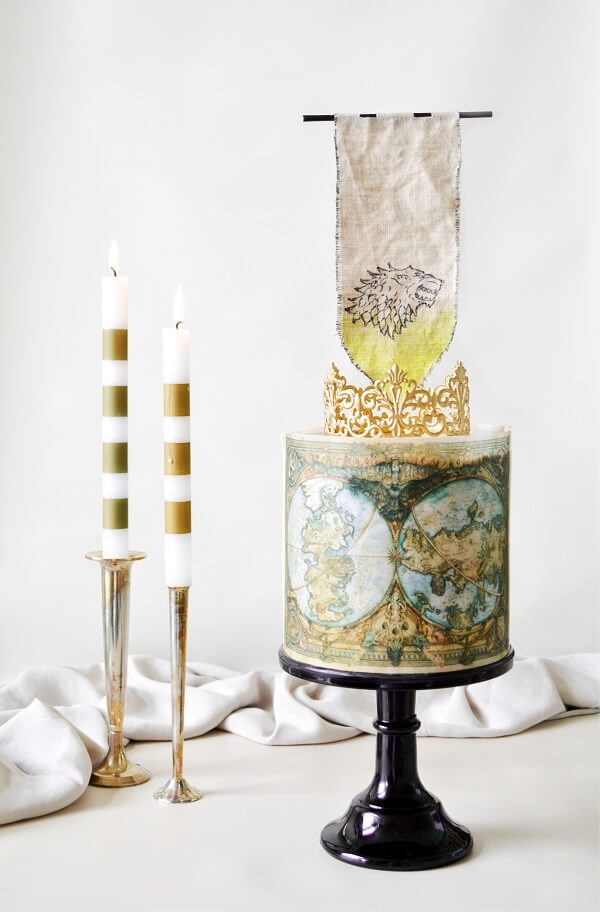
An example of a cake that’s completely wrapped in a sugar sheet is this Game of Thrones Cake I made, which is another show that my husband and I just loved.
Instructions
Bake, Frost and Chill the Cake
For my Halloween cake, I wanted it to be really tall to best showcase a towering, spooky haunted house. I used this recipe for chocolate cake, baking it into three six-inch cake pans, and then splitting each cake for a total of six layers. The cake is moist and tender, but sturdy enough to be stacked tall. The buttercream is my perfect buttercream recipe (x4). For the buttercream, I added a little vanilla and almond extracts for flavor, and used half butter / half shortening for a bright white color.
If you need to transport the cake, I’d definitely suggest adding a supportive cardboard circle halfway up, with some wooden dowels for support. And I always recommend only transporting cakes while they’re cold. But I was just making the cake to photograph and serve at home, so I didn’t put any supports in mine. My finished cake measured about 7 1/2 inches tall (which is very tall for a 6-inch diameter). Since it’s so tall, be sure to chill it well to stabilize the structure. You also need the buttercream to be cold and firm before applying your sugar sheet haunted house.
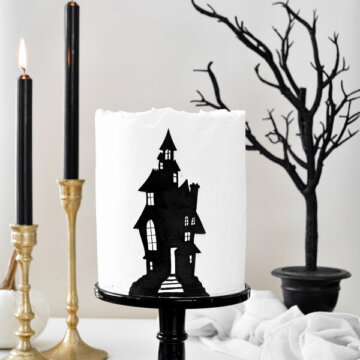
Draw and Cut the Haunted House
I still had a pack of Wilton White Sugar Sheets from another project, and decided to use those for my haunted house. It really couldn’t have been easier to do. All you need is a sugar sheet and an edible black food coloring marker. Either draw the image onto your sugar sheet free-hand, or place a printed image underneath to trace it. After drawing your design, carefully cut it out with sharp scissors. Keep your cut design in a plastic ziplock bag to keep it from getting too dry, until you’re ready to place it on your cake. You can make the sugar sheet haunted house several days in advance.
There are also pre-dyed Wilton Black Sugar Sheets available, and I’ve listed a few pros and cons to using those, vs the white ones. Considering the pros and cons, I think the white sheets are the best choice.
Pros and Cons to Black or White Sugar Sheets
- Pros: use them to draw on any design or color using edible markers; easy to draw on fine details like the windows
- Cons: the coloring lines from the edible black marker will be visible when you look at it up close
- Pros: already black, so you don’t have to worry about marker lines on your design
- Cons: intricate details, like the windows, would be difficult to cut out using a razor or knife
Decorating
I had chilled my cake overnight, so the buttercream was crusted over when I was ready to decorate with my haunted house, and sugar sheets won’t stick to buttercream that’s crusted over. The simple solution to this is to save a bit of your buttercream, use a pastry brush, and lightly brush it onto the back of your sugar sheet decoration. Then you can gently press it onto the side of your cake and it will stick perfectly.
Be sure to read all of my BAKING FAQs where I discuss ingredients, substitutions and common questions with cake making, so that you can be successful in your own baking! I also suggest reading these comprehensive posts on making Perfect American Buttercream, How to Stack, Fill, Crumb Coat and Frost Layer Cakes and How to Use Piping Bags.
You Might Also Like

Please check out my Amazon Shop for a curated collection of some of my favorite cake pans from trusted brands, baking tools, ingredients, pretty things and fashion finds. I recommend products that I buy and use every day!
Did you love today’s recipe? Please rate the recipe and let me know in the comments what you thought! Also, be sure to follow Curly Girl Kitchen on Instagram, and tag me when you try one of my recipes so I can see all your delicious creations!
Haunted House Cake
All recipes on Curly Girl Kitchen are developed for high altitude at 5,280 feet. See FAQs for adjusting to higher or lower elevations.

Ingredients
- 1 baked cake
- 1 batch white buttercream
- edible white or black sugar sheets
- edible black food coloring markers
- scissors
Instructions
Bake the Cake
- Bake and cool the cake. For a tall cake like the one pictured, bake the batter in three 6 inch pans. Once cool, split them in half for a total of 6 layers.
Make the Buttercream
- Prepare the buttercream. You'll need 4x the recipe, made with half butter and half shortening for a very white buttercream.
Assemble the Cake
- Stack, fill and frost the cake, making the buttercream as smooth as possible.
- If you'll be transporting the cake, then you'll need to use a cardboard cake circle and wooden dowels for support halfway up as you assemble the cake, as well as a central dowel all the way through the cake layers.
- Chill the frosted cake thoroughly.
Make the Haunted House
- Make your haunted house design using the sugar sheets.
- After cutting out your design, keep it stored flat, inside a plastic ziplock bag to keep it from getting dry and brittle.
Decorate the Cake
- Take your chilled cake out of the refrigerator.
- Remove the plastic backing from your haunted house sugar decoration. Brush a little buttercream on the back side of the decoration, then position it on the front of the cake. Gently but firmly press the decoration onto the cake.
Serving and Storing
- Since the cake was chilled, let it come to room temperature for several hours before serving, since room temperature cake is much better than cold cake.
- Since the cake is so tall, you may want to only cut halfway down the cake, slice it all around, and then cut the bottom half into slices.
- Although the sugar sheet is technically edible, it's not a very pleasant texture (like eating paper). Personally, I remove the paper before cutting and serving the cake.
- Leftover cake should be stored in an airtight container for up to 3 days.
 https://curlygirlkitchen.com/
Leave a Reply