
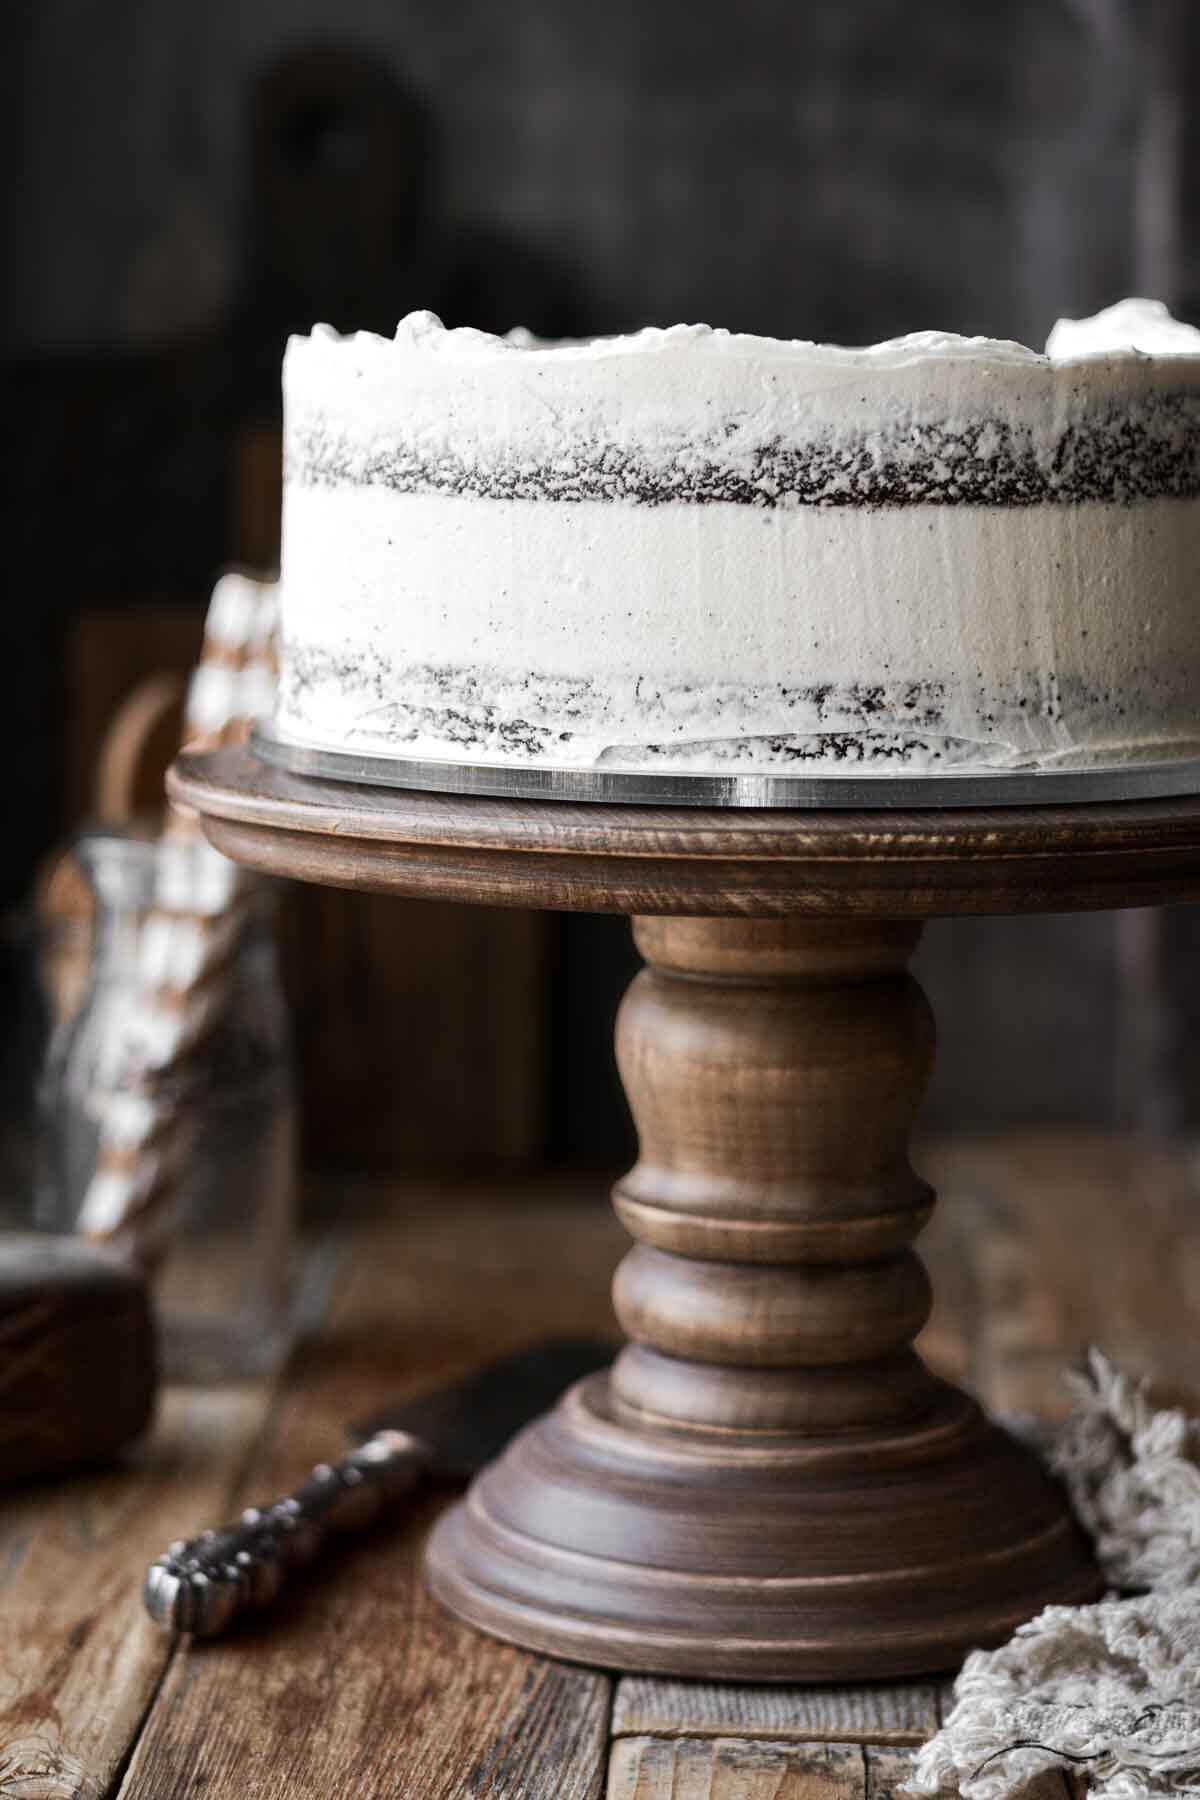
This rich and decadent high altitude brownie cake has three layers of the best ever, soft and chewy fudge brownies, frosted with fluffy vanilla buttercream. When you want a celebration cake for a special occasion, but you really love fudge brownies, a dark chocolate fudge brownie cake is the perfect dessert.
You might also love this snickerdoodle cookie cake, chocolate chip cookie birthday cake, and sugar cookie layer cake with chocolate buttercream.
This site contains affiliate links. As an Amazon associate, I earn from qualifying purchases. This means that I may make a small commission if you purchase a product using those links. This in no way affects my opinion of those products and services. All opinions expressed on this site are my own.
Why You’ll Love This Recipe
Perfectly Fudgy. The brownie layers are rich, dark and fudgy. With their dense texture, these fudge brownies stay soft, moist and chewy for days after baking.
Not Too Sweet. Dutch-processed cocoa powder and melted dark chocolate gives these brownies a rich and complex chocolate flavor that’s not too sweet.
Reader Favorite Recipe. The brownies in today’s cake are based on my perfect high altitude fudge brownies. I simply scaled the recipe up to bake it in three cake pans.
High Altitude Tested. I develop all the recipes on my site for Denver’s altitude of 5,280 feet. If you’re at a lower or higher elevation, please see my FAQs for guidance on adjusting recipes for your altitude.

See the recipe card at the end of the post for the full ingredients list and instructions.
Ingredients
- Unsalted Butter.
- Granulated Sugar.
- Chocolate Chips. The chocolate chips you use will affect the sweetness of the brownies. I always use semi-sweet chocolate chips, around 55% cacao.
- Vanilla Extract.
- Eggs.
- Cocoa Powder. Use the best quality cocoa powder you can splurge on. I love Cacao Barry Extra Brute.
- All Purpose Flour.
- Salt.
- Buttercream. Any flavor of buttercream is delicious with brownies, but I went with plain and simple vanilla buttercream.

Instructions
Brownies
- Preheat the oven to 325 F. Spray the bottom and sides of three 8-inch round cake pans with non-stick baking spray. Line the pans with circles of parchment paper, and spray the paper, too.
- In a large saucepan, melt the butter and sugar over medium heat. Once it begins to bubble hard enough that you can’t stir down the bubbles, cook for two minutes. TIP: If you have an instant read digital thermometer, check the temperature. You want the butter and sugar mixture to reach between between 230-235 degrees Fahrenheit, which will help get the shiny crackly top on the brownies.
- Remove from the heat and use a wooden spoon to stir in the chocolate chips and vanilla until melted and shiny; the mixture will be grainy. Let cool for 10 minutes.


- Beat in the eggs, one at a time, until the mixture comes together into a smooth batter.
- In a bowl, sift together the cocoa powder, flour, salt and espresso powder. Add the dry ingredients to the batter and mix just until no dry streaks remain. The batter will be thick but spreadable.


- Divide the batter evenly between the prepared pans, spreading it out with a small offset spatula. Bake on the center oven rack for exactly 20 minutes.
- Cool the brownies in the pans for one hour. Use a sharp knife to loosen the edges from the pans, then turn the brownies out onto a cooling rack. Cool completely before frosting. I recommend setting the cooling rack with the brownies in the refrigerator to speed up the cooling process and help them set, so you can assemble the cake.


Buttercream and Cake Assembly
- Make 3x the recipe for Vanilla Buttercream.
- When the brownies have cooled completely, peel the parchment paper off the bottoms before assembling the cake. The brownie layers are fairly thin, about 3/4-1 inch tall, so the assembled cake will not be very tall.
- Set one brownie layer on a cake pedestal or serving plate. Frost the top of the brownie with a layer of buttercream. Repeat with the second and third layers.
- Frost the cake all over with buttercream. I left a thin “crumb coat” as my final layer, to let the brownies show through, but there’s enough buttercream to cover the cake completely.


Be sure to read all of my BAKING FAQs where I discuss ingredients, substitutions and common baking questions, so that you can be successful in your own baking!
Frequently Asked Questions
Store leftover brownie cake in an airtight container for up to 3 days, or wrap well and freeze to enjoy later.
Since the brownie layers are more dense than the frosting, it’s normal for the buttercream to squish out a bit when you slice the cake. Use a sharp, non-serrated knife to cut the cake, wiping it clean in between slices.
You Might Also Like


Please check out my Amazon Shop for a curated collection of some of my favorite cake pans from trusted brands, baking tools, ingredients, pretty things and fashion finds. I recommend products that I buy and use every day!
Did you love today’s recipe? Please rate the recipe and let me know in the comments what you thought! Also, be sure to follow Curly Girl Kitchen on Instagram, and tag me when you try one of my recipes so I can see all your delicious creations!

High Altitude Brownie Cake
All recipes on Curly Girl Kitchen are developed for high altitude at 5,280 feet. See FAQs for adjusting to higher or lower elevations.

Equipment
- 8 inch round cake pans (x3)
- Stand Mixer with Paddle Attachment
Ingredients
Brownies
- 1 cup unsalted butter
- 2 cups granulated sugar
- 1 cup dark or semi-sweet chocolate chips
- 4 tsp vanilla extract
- 4 large eggs
- 1 ⅓ cups unsweetened Dutch processed cocoa powder
- ⅔ cup all-purpose flour, fluffed, spooned and leveled
- ½ tsp coarse Kosher salt (if using table salt, use half the amount)
- 1 tbsp espresso powder (optional)
Buttercream
- 3x recipe Vanilla Buttercream
Instructions
Brownies
- Preheat the oven to 325 F. Spray the bottom and sides of three 8-inch round cake pans with non-stick baking spray. Line the pans with circles of parchment paper, and spray the paper, too.
- In a large saucepan, melt the butter and sugar over medium heat. Once it begins to bubble hard enough that you can't stir down the bubbles, cook for two minutes.TIP: If you have an instant read digital thermometer, check the temperature. You want the butter and sugar mixture to reach between between 230-235 degrees Fahrenheit, which will help get the shiny crackly top on the brownies.
- Remove from the heat and use a wooden spoon to stir in the chocolate chips and vanilla until melted and shiny; the mixture will be grainy. Let cool for 10 minutes.
- Beat in the eggs, one at a time, until the mixture comes together into a smooth batter.
- In a bowl, sift together the cocoa powder, flour, salt and espresso powder. Add the dry ingredients to the batter and mix just until no dry streaks remain. The batter will be thick but spreadable.
- Divide the batter evenly between the prepared pans, spreading it out with a small offset spatula. Bake on the center oven rack for exactly 20 minutes.
- Cool the brownies in the pans for one hour. Use a sharp knife to loosen the edges from the pans, then turn the brownies out onto a cooling rack. Cool completely before frosting. I recommend setting the cooling rack with the brownies in the refrigerator to speed up the cooling process and help them set, so you can assemble the cake.
Buttercream and Cake Assembly
- Make 3x the recipe for Vanilla Buttercream.
- When the brownies have cooled completely, peel the parchment paper off the bottoms before assembling the cake. The brownie layers are fairly thin, about 3/4-1 inch tall, so the assembled cake will not be very tall.
- Set one brownie layer on a cake pedestal or serving plate. Frost the top of the brownie with a layer of buttercream. Repeat with the second and third layers.
- Frost the cake all over with buttercream. I left a thin "crumb coat" as my final layer, to let the brownies show through, but there's enough buttercream to cover the cake completely.
Notes
 https://curlygirlkitchen.com/
Leave a Reply