
These high altitude olive oil brownies are incredibly moist, dense, fudgy, chewy, and deep-dark-chocolatey. Made with oil instead of butter, they are dairy free, but not vegan.
You might also love these high altitude recipes for old fashioned fudge nut bars, chocolate chip skillet cookie, and coconut lemon bars.

This site contains affiliate links. As an Amazon associate, I earn from qualifying purchases. This means that I may make a small commission if you purchase a product using those links. This in no way affects my opinion of those products and services. All opinions expressed on this site are my own.
Why You’ll Love This Recipe
Fudgy and Moist. Fudge brownies made with oil instead of butter are so incredibly soft, chewy, fudgy and moist, even days after baking. And you can make these ahead of time, too. I actually prefer to bake them at night, then let them cool and set up overnight to serve the next day.
Based on a Reader Favorite Recipe. My recipe for perfect fudge brownies really can’t be improved upon. But I did want to create a dairy free option with no milk or butter in them, for those who are looking for a reliable, high altitude dairy free brownie recipe. You’ll find that the ingredients are very similar, but with a different preparation method for mixing up the brownie batter. The end result is a brownie that is almost identical in texture and flavor to the original one, but with oil instead of butter.
High Altitude Tested. I develop all the recipes on my site for Denver’s altitude of 5,280 feet. If you’re at a lower or higher elevation, please see my FAQs for guidance on adjusting recipes for your altitude.

See the recipe card at the end of the post for the full ingredients list and instructions.
Ingredients
- Oil. I realize these are named “olive oil brownies”, but you don’t have to use olive oil. Keep in mind that some olive oils can be very strong in flavor, which will certainly affect the flavor of the brownies. For a more neutral flavor, you can just use vegetable oil.
- Chocolate Chips. The chocolate chips are melted first, then mixed into the brownie batter, which contributes to the fudgy texture. I use the Kirkland brand from Costco, which are semi sweet chocolate chips.
- Cocoa Powder. For the best flavor and a rich, deep, dark color, use unsweetened Dutch processed cocoa powder, the best quality that you want to splurge on. I use and prefer Cacao Barry Extra Brute for my baking.

Instructions
- Preheat the oven to 325 F, and position a rack in the center of the oven. Line a 9×9 inch baking pan with parchment paper. The paper ensures easy release of the brownies, and helps with cutting them cleanly.
- Using an electric mixer (stand or hand-held), beat together the oil, sugar, eggs and vanilla for 5 minutes on medium speed until well-aerated. If you don’t have a mixer, you can use a whisk and beat the mixture by hand, but this will be pretty tiring.
- Add the melted chocolate and whisk until smooth. The best way to melt the chocolate is either to use a double boiler, or in the microwave, for about 2 1/2 – 4 minutes on 50% power, stirring until smooth and melted.
- In a separate bowl, sift together the cocoa powder, flour, espresso powder and salt. Add the dry ingredients to the batter, and use a spatula to stir everything together until combined. Spread the batter into the prepared pan.


- Bake the brownies for 30 minutes, until the edges and center appear set. Place the pan on a cooling rack and let cool completely before cutting.
- If you rush cutting the brownies, they’ll have the gooey texture of under-cooked brownie batter. You really need to let them cool and set for at least 6 hours, but personally, I like to bake them at night, then let them cool and set up overnight (12 hours) before cutting.
- To cut the brownies, lift them out of the pan using the paper, and set them on a cutting board. Use a sharp non-serrated knife, wiping the blade clean in between cuts.


Be sure to read all of my BAKING FAQs where I discuss ingredients, substitutions and common baking questions, so that you can be successful in your own baking!
Frequently Asked Questions
Store leftover brownies in an airtight container at room temperature for up to 3 days, or in the freezer for up to 3-6 months.
With no dairy (butter or milk products) in these brownies, this is a dairy free recipe, but it is not vegan since it contains eggs. Eggs are not considered a dairy/milk product. Be sure to check the ingredients on your chocolate chips and use a dairy-free product if dairy is a concern.
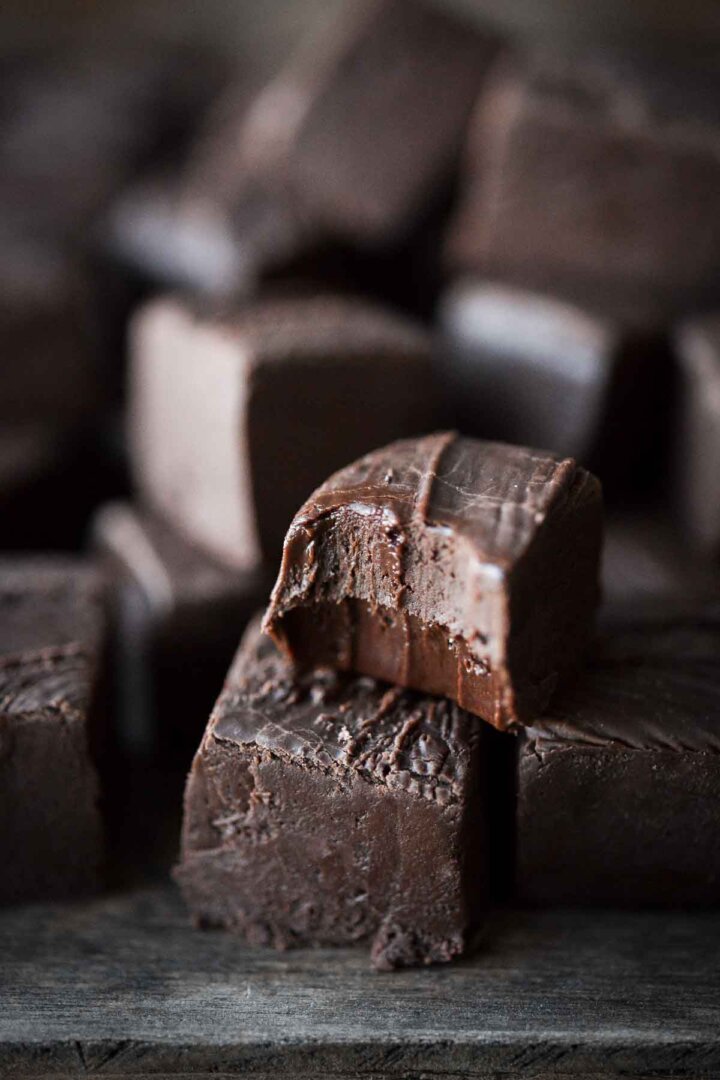
You need to wait quite a while for fudge brownies to fully cool and set. If you cut them too soon, they’ll have a gooey, under-baked texture (which may be what you prefer), but for neat squares, they need at least 6 hours. I prefer to let them cool overnight. The very first photo in today’s post shows these brownies cut with a silicone spatula after just 4 hours, and you can see that they’re still very soft and gooey. The rest of the photos show the brownies cut after cooling overnight. They’re just as moist and chewy, but the slices are much cleaner and the texture is perfectly set up.
You Might Also Like


Please check out my Amazon Shop for a curated collection of some of my favorite cake pans from trusted brands, baking tools, ingredients, pretty things and fashion finds. I recommend products that I buy and use every day!
Did you love today’s recipe? Please rate the recipe and let me know in the comments what you thought! Also, be sure to follow Curly Girl Kitchen on Instagram, and tag me when you try one of my recipes so I can see all your delicious creations!

High Altitude Olive Oil Fudge Brownies (Dairy Free)
All recipes on Curly Girl Kitchen are developed for high altitude at 5,280 feet. See FAQs for adjusting to higher or lower elevations.

Equipment
- Electric Mixer (Stand or Hand-Held)
Ingredients
- ¾ cup olive oil or vegetable oil (choose an oil with a neutral flavor)
- 2 cups granulated sugar
- 4 large eggs
- 4 tsp vanilla extract
- 1 cup (6 1/2 oz) semi-sweet chocolate chips, melted (use dairy free chocolate chips if dairy is not tolerated)
- 1 ⅓ cups unsweetened Dutch processed cocoa powder
- ⅔ cup all-purpose flour, fluffed, spooned and leveled
- 4 tsp instant espresso powder or instant coffee
- ½ tsp coarse Kosher salt (if using table salt, use half the amount)
Instructions
- Preheat the oven to 325 F, and position a rack in the center of the oven. Line a 9×9 inch baking pan with parchment paper. The paper ensures easy release of the brownies, and helps with cutting them cleanly.
- Using an electric mixer (stand or hand-held), beat together the oil, sugar, eggs and vanilla for 5 minutes on medium speed until well-aerated. If you don't have a mixer, you can use a whisk and beat the mixture by hand, but this will be pretty tiring.
- Add the melted chocolate and whisk until smooth. The best way to melt the chocolate is either to use a double boiler, or in the microwave, for about 2 1/2 – 4 minutes on 50% power, stirring until smooth and melted.
- In a separate bowl, sift together the cocoa powder, flour, espresso powder and salt. Add the dry ingredients to the batter, and use a spatula to stir everything together until combined. Spread the batter into the prepared pan.
- Bake the brownies for 30 minutes, until the edges and center appear set. Place the pan on a cooling rack and let cool completely before cutting.
- If you rush cutting the brownies, they'll have the gooey texture of under-cooked brownie batter. You really need to let them cool and set for at least 6 hours, but personally, I like to bake them at night, then let them cool and set up overnight (12 hours) before cutting.
- To cut the brownies, lift them out of the pan using the paper, and set them on a cutting board. Use a sharp non-serrated knife, wiping the blade clean in between cuts.
Notes
 https://curlygirlkitchen.com/
I live in Nairobi which is about 6000 feet in elevation. These brownies had a very nice texture–chewy and fudgy, but not excessively so. I will make them again. However, 4 tsp of instant coffee is far too much; I wonder if it’s a typo. It gave the brownies an oddly bitter unpleasant aftertaste. I wish I had trusted my gut and reduced to 1 tsp. ATK recommends 1.5 tsp instant coffee for 9×13 pan of brownies.
I’m glad you liked them! I always make them with this amount of espresso powder, but some people may not like the coffee flavor to be as pronounced, so it can certainly be reduced or left out altogether.
What chocolate chips do you use since kirkland discontinued theirs?
I still buy their brand at my local Costco.
Hi there,
Do you think I could use coconut oil instead of olive oil?
You can use liquid coconut oil, which is not the same thing as solid coconut oil that’s been melted.