
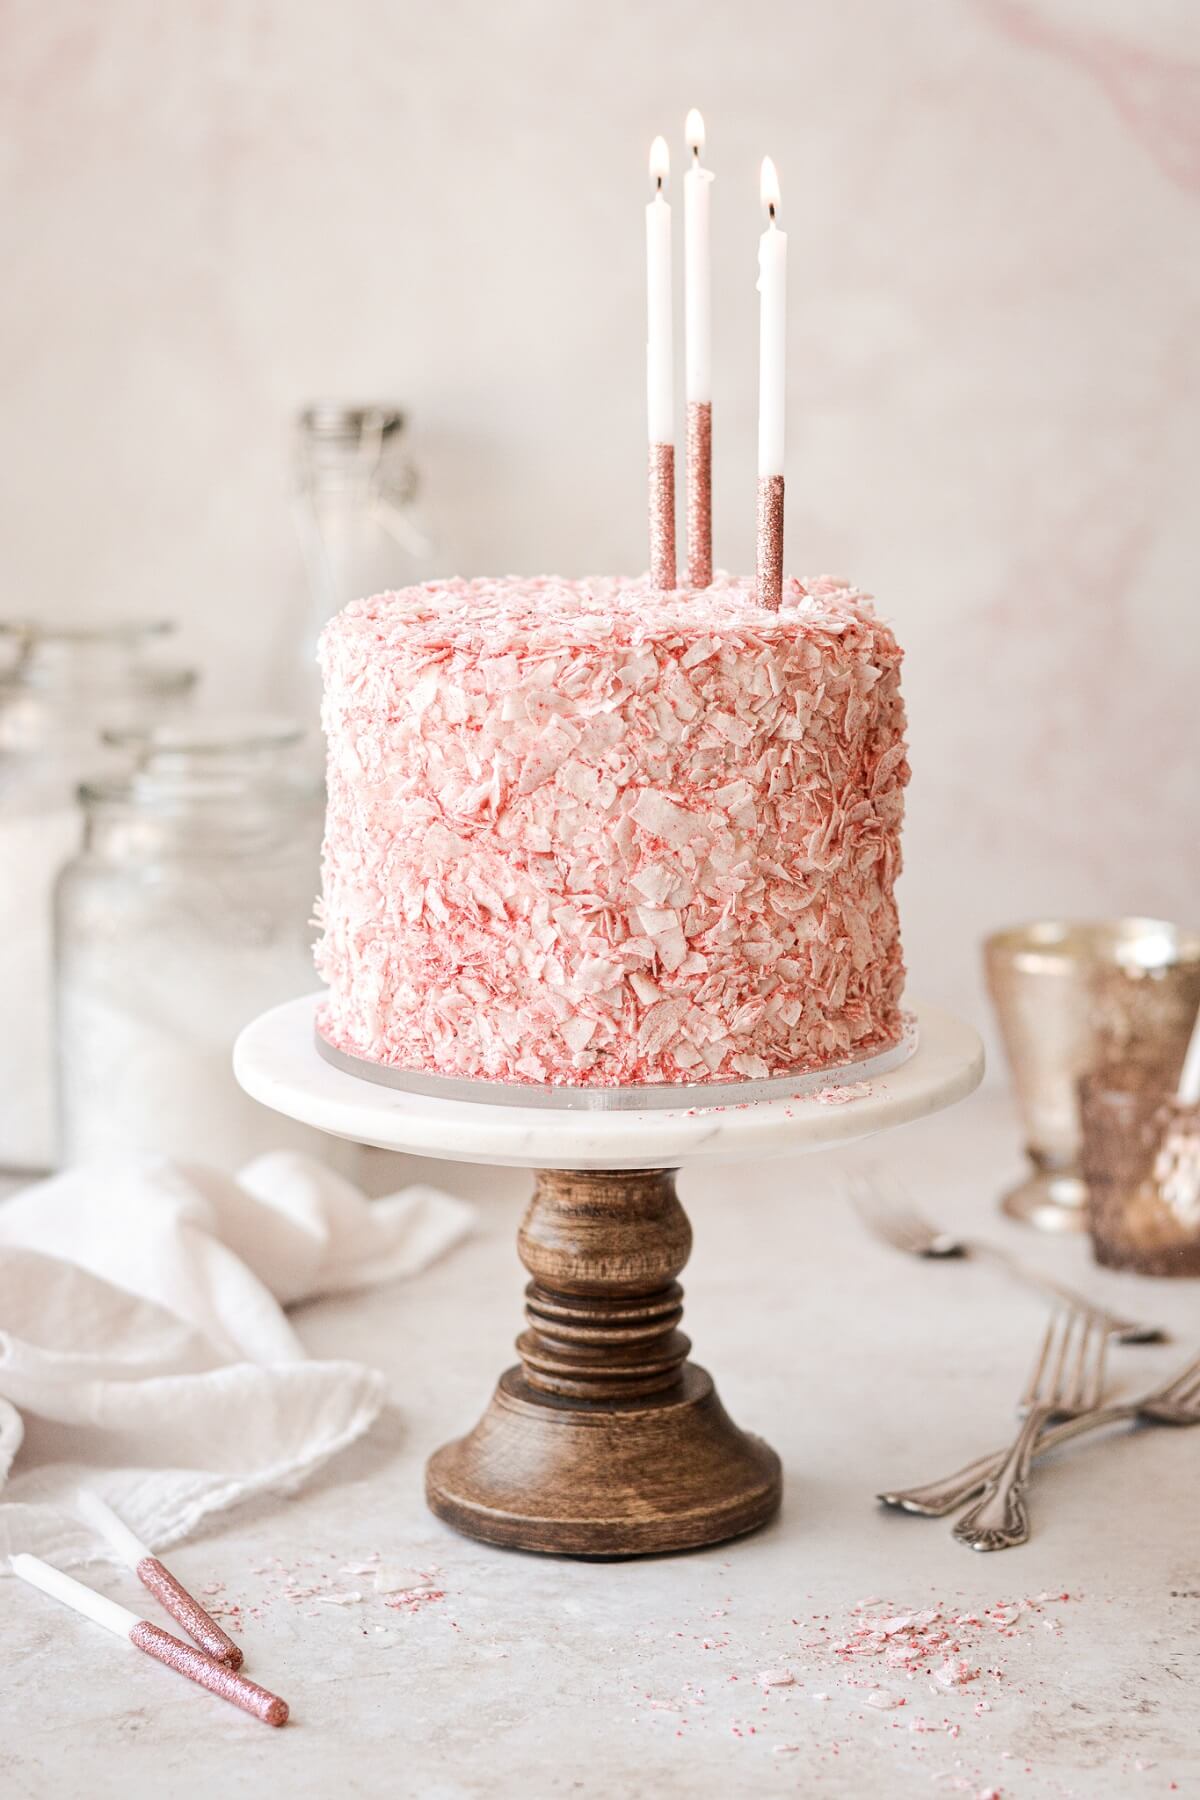
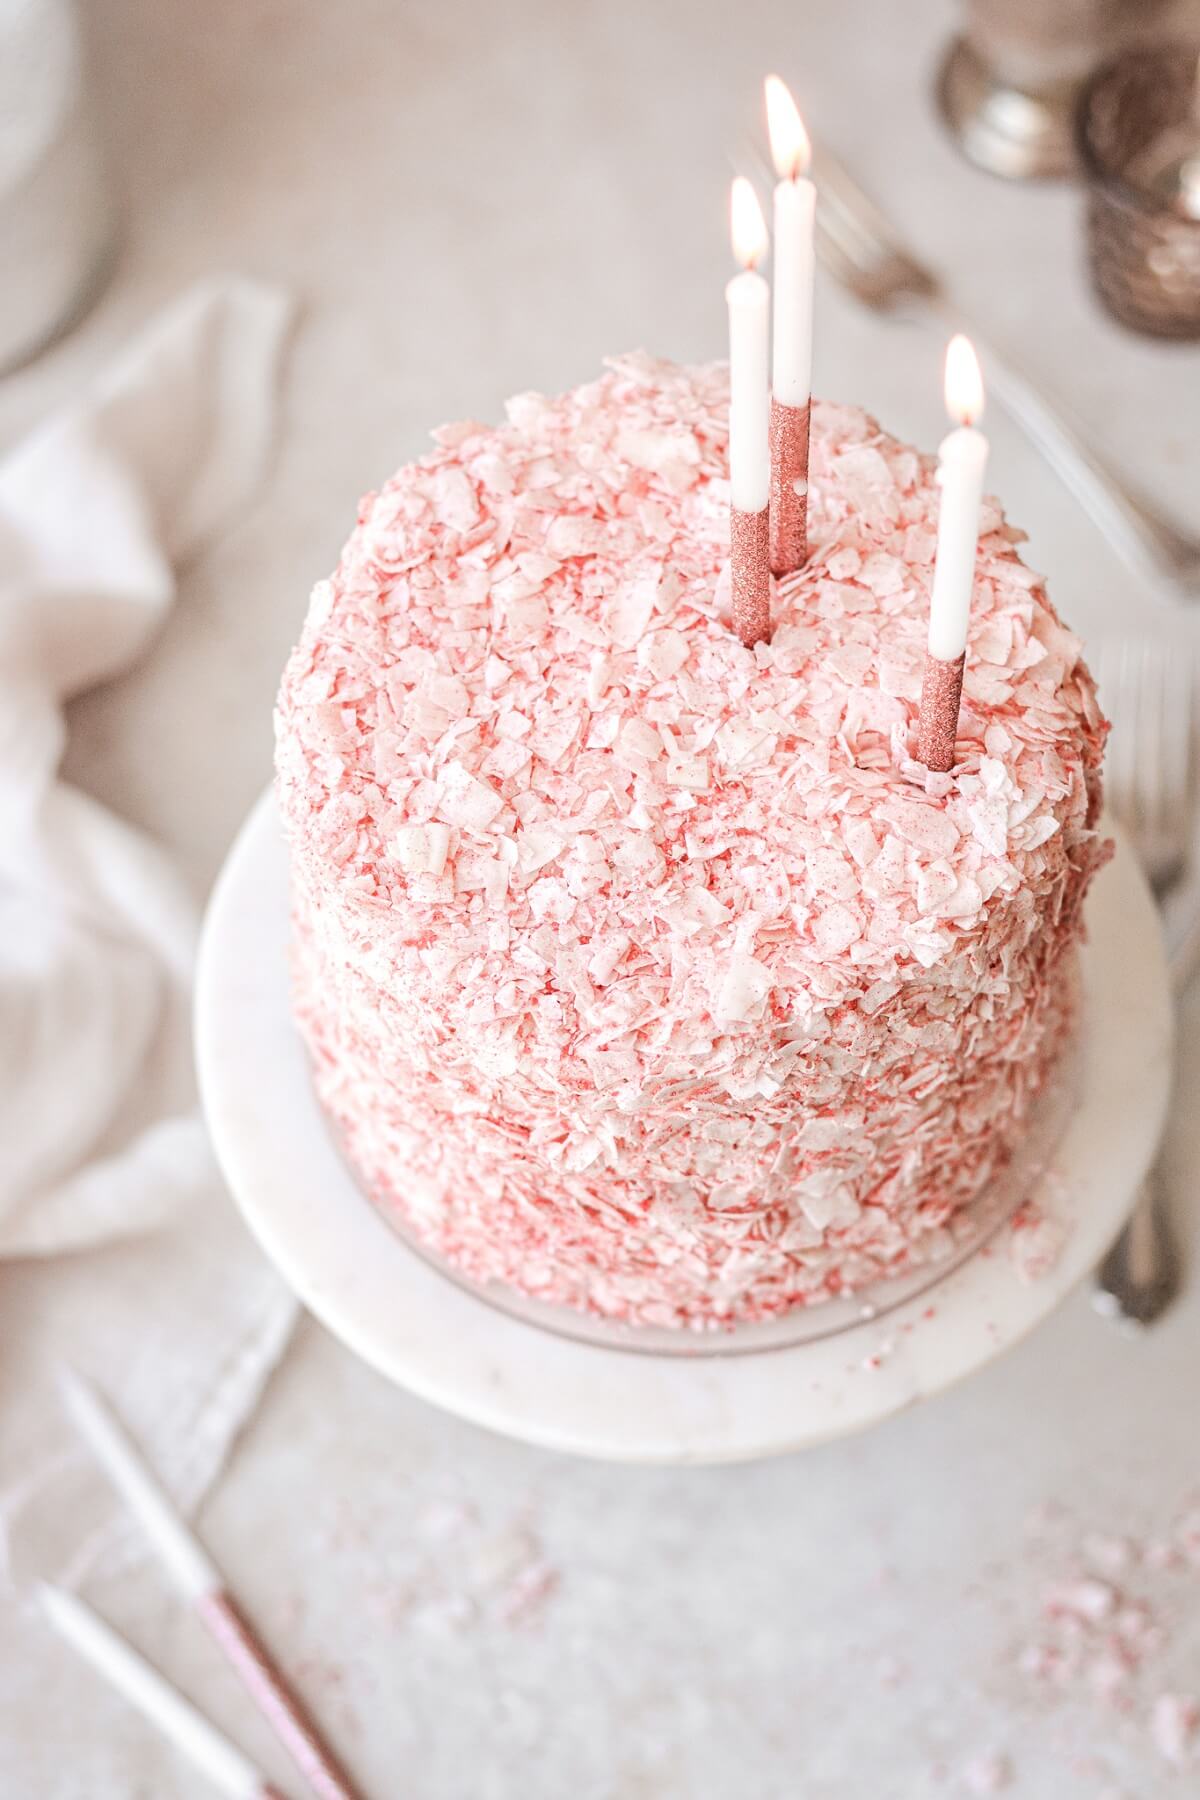
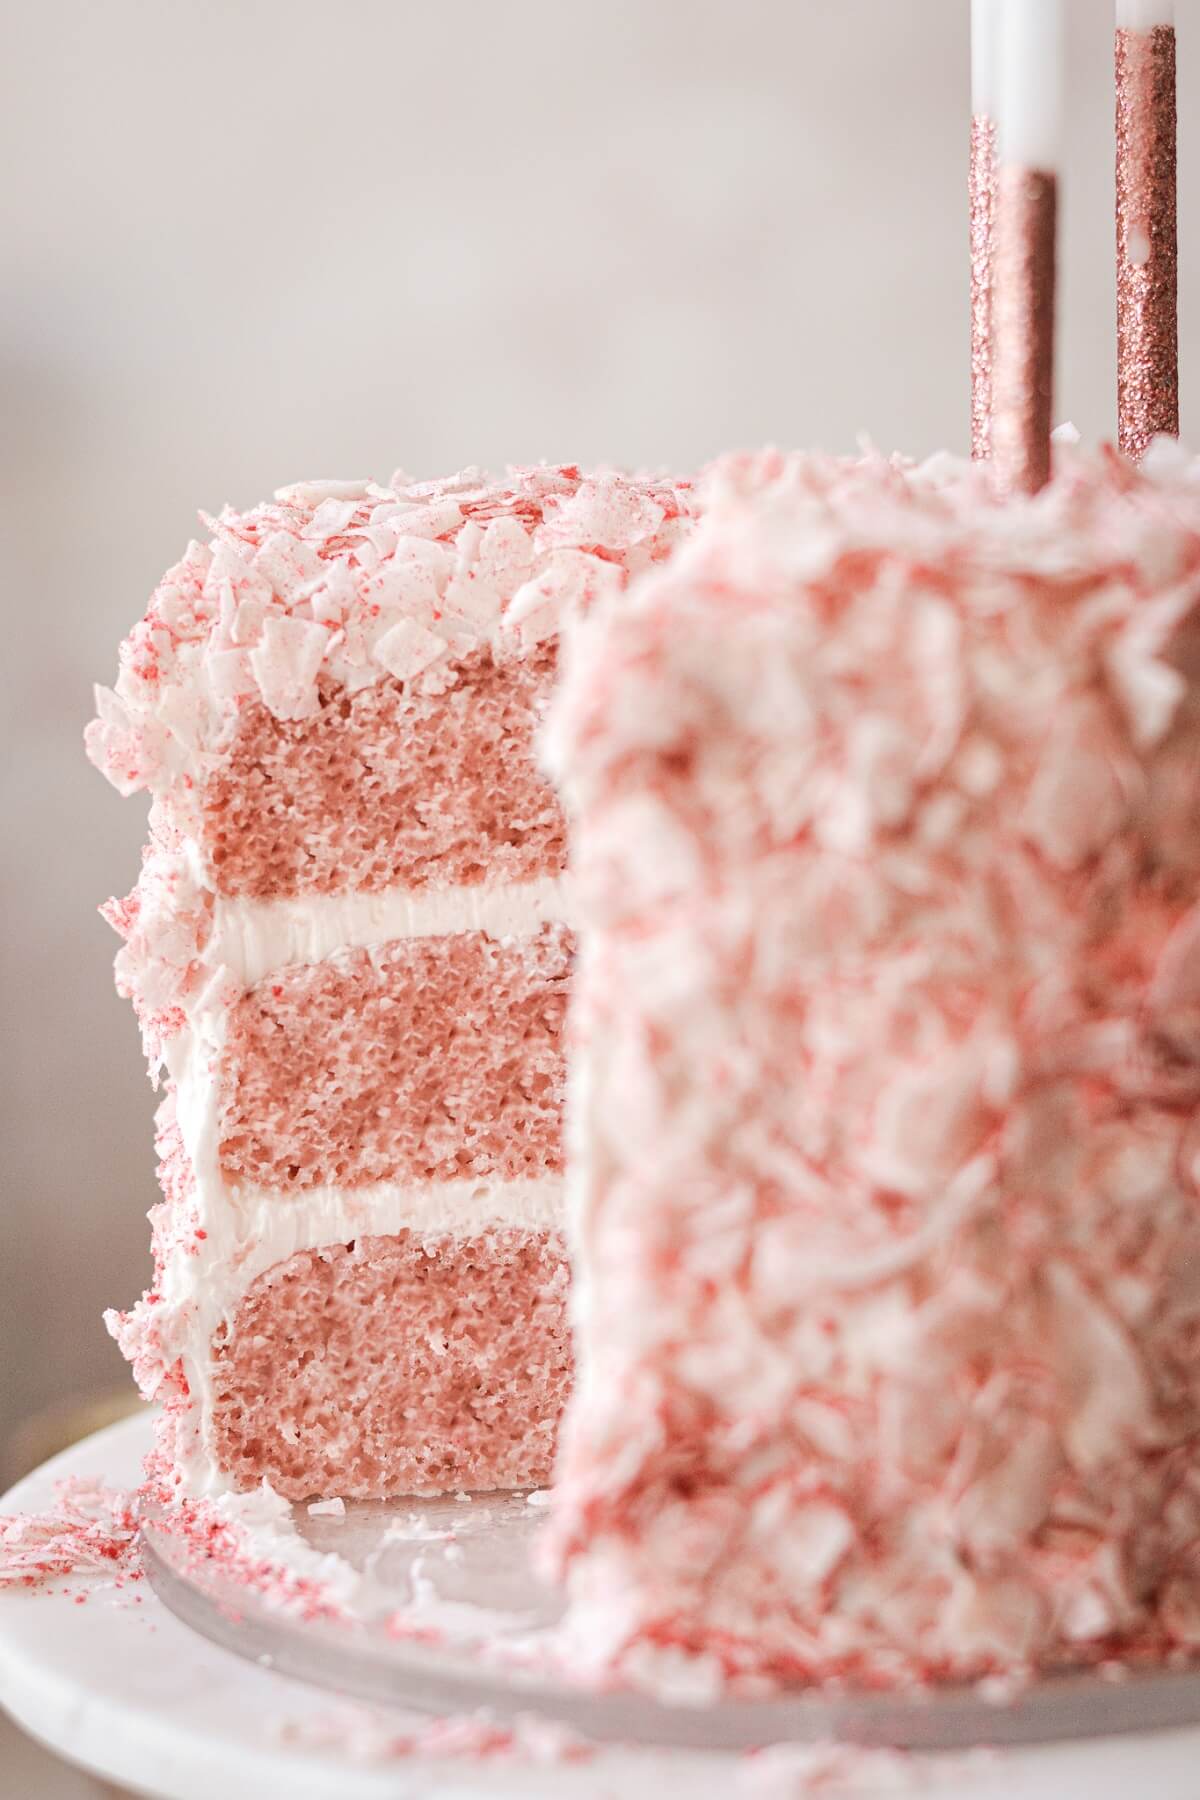
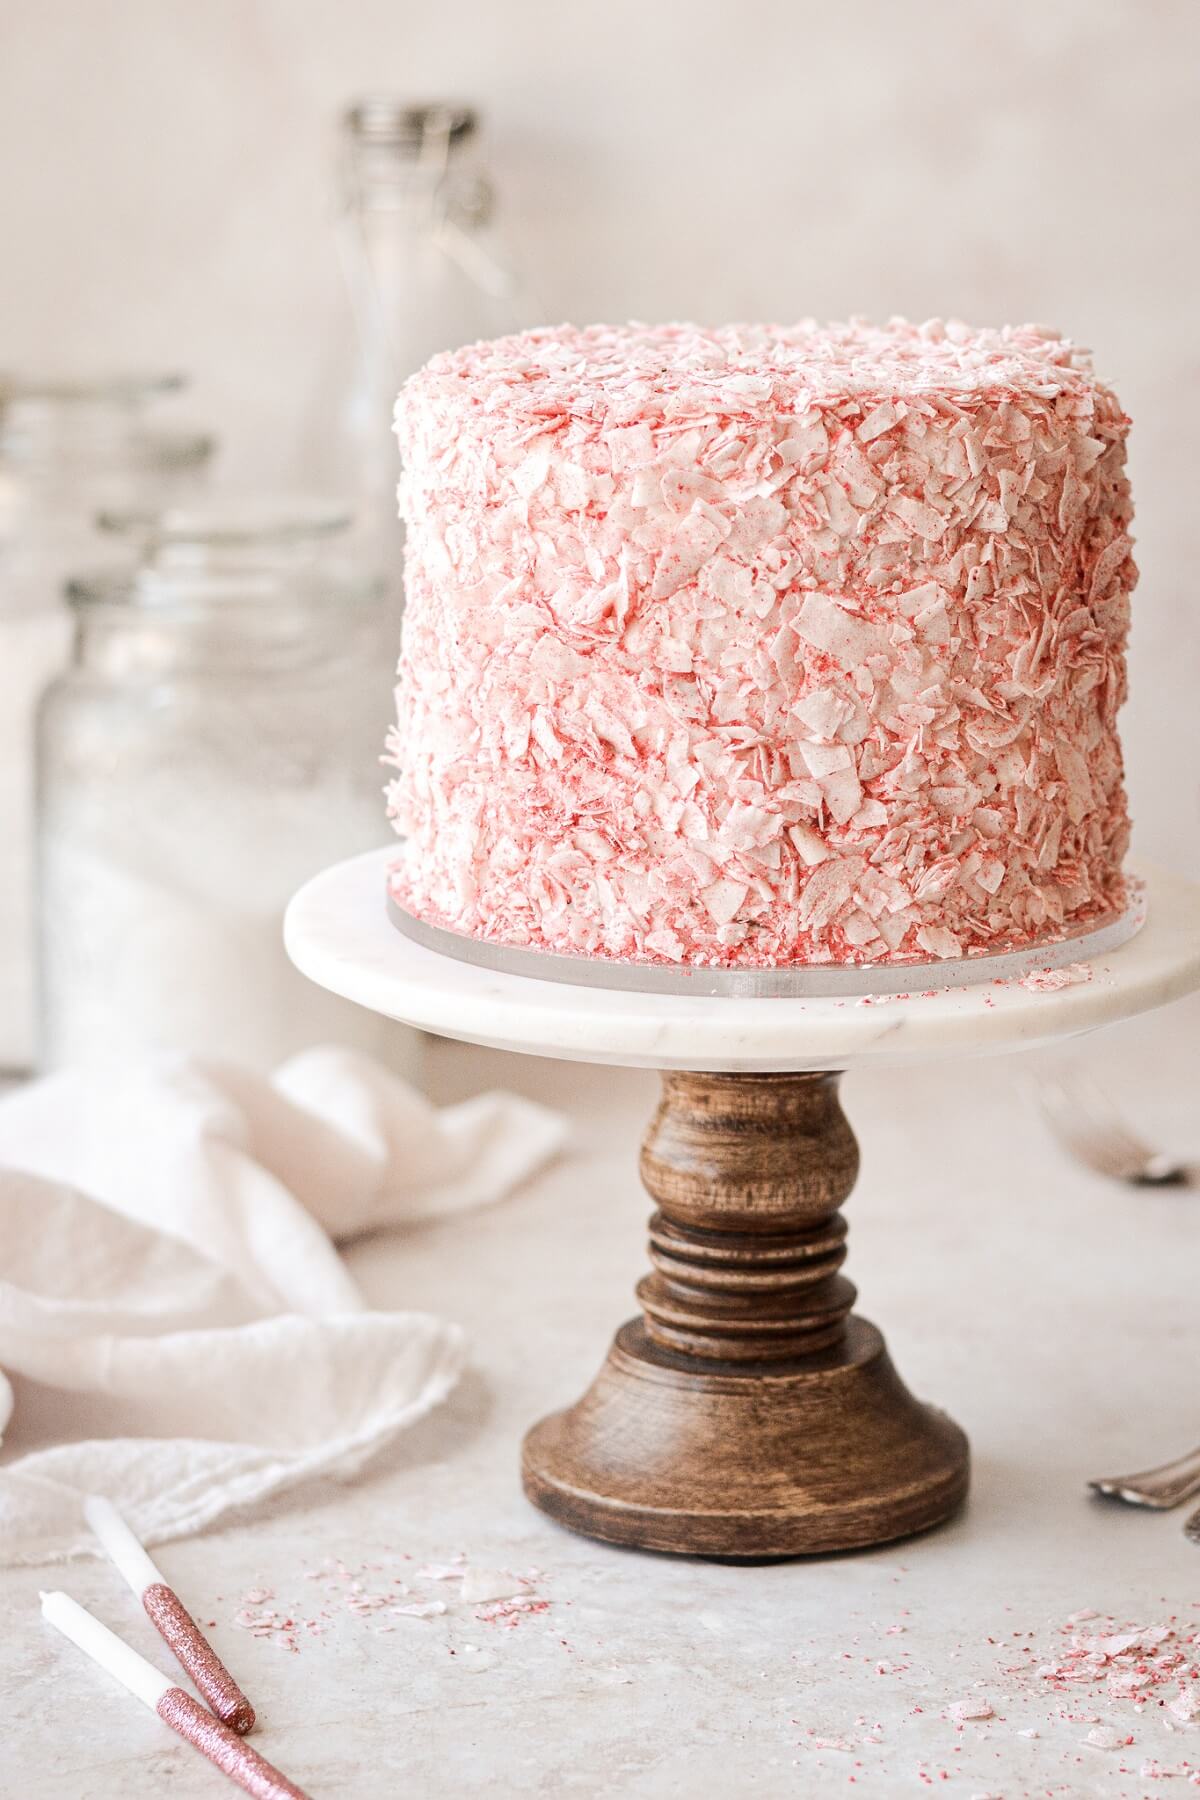
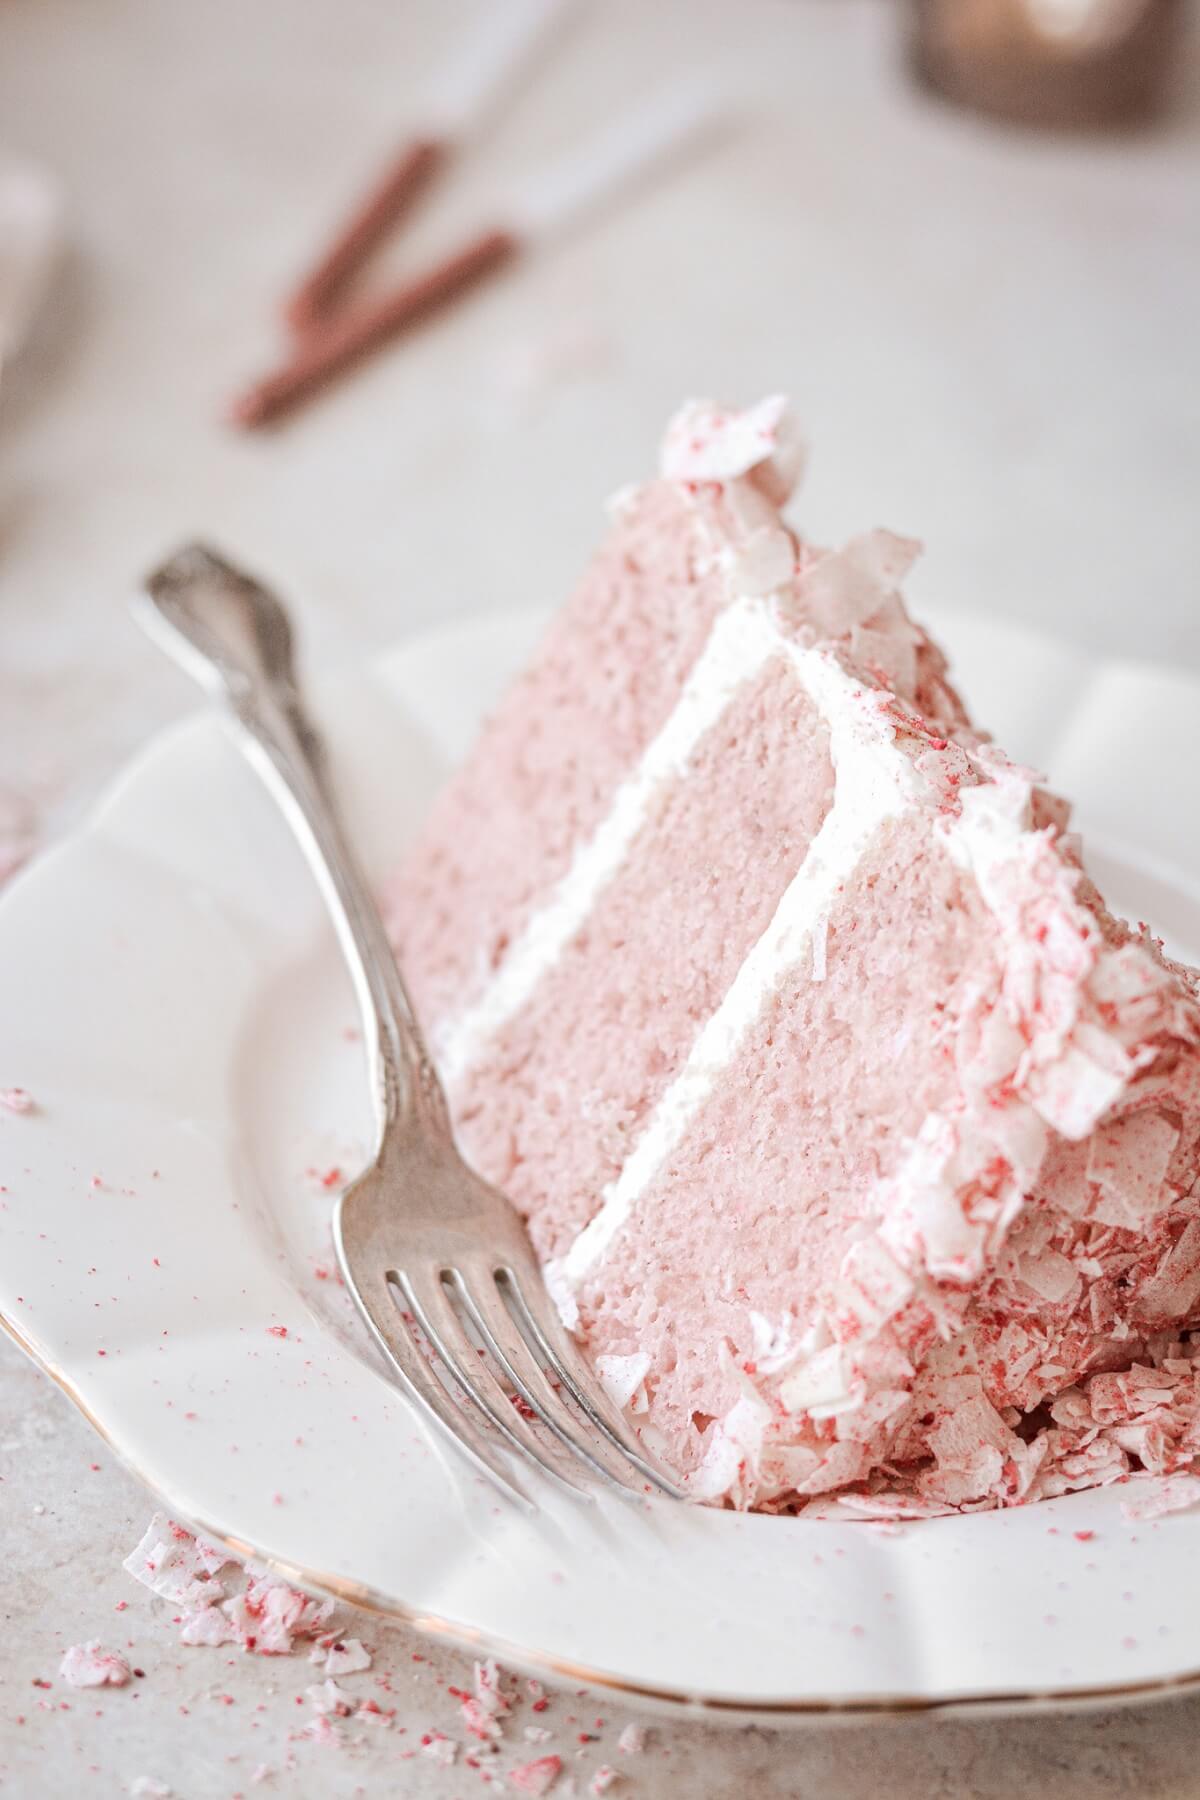
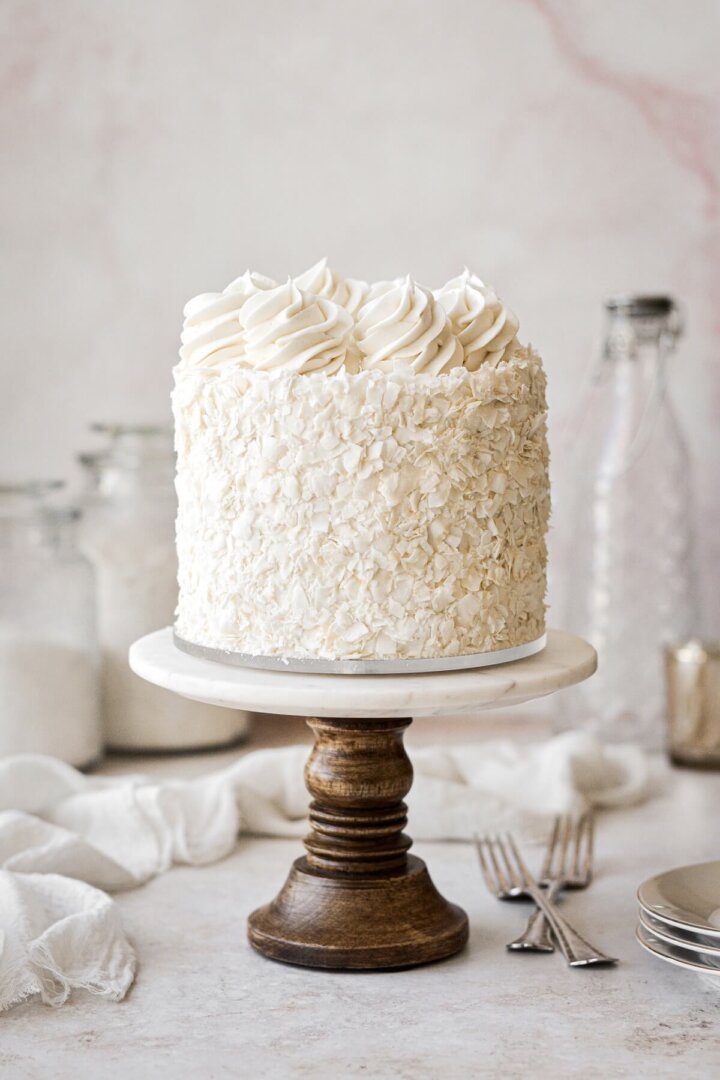
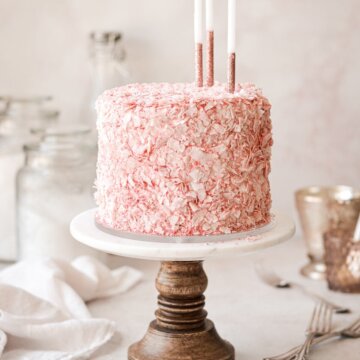
Today’s high altitude strawberry coconut cake starts with an easy, moist and fluffy strawberry cake made with fresh strawberries, frosted with coconut buttercream and covered in pink strawberry coconut. You’ll love the layers of pretty pink strawberry cake, fluffy frosting and crunchy coconut. Freeze dried strawberries tint the coconut a lovely pink, and add even more strawberry flavor to this delicious cake.
You might also love these chocolate coconut cream filled cupcakes, coconut cream pie, mini strawberry shortcakes, and strawberry vanilla bean ice cream.
This site contains affiliate links. As an Amazon associate, I earn from qualifying purchases. This means that I may make a small commission if you purchase a product using those links. This in no way affects my opinion of those products and services. All opinions expressed on this site are my own.
Why You’ll Love This Recipe
So Fluffy and Moist. I’ve worked hard to perfect my high altitude strawberry cake recipe, to ensure that it’s fluffy, moist and full of fresh strawberry flavor. This is a recipe I’ve tested no less than a dozen times over the last couple of years, and I just love it.
Perfect Flavors and Textures. The combination of the bright strawberries and sweet coconut buttercream is just delicious, and you’ll love the crunch of the coconut contrasted with the soft, tender strawberry cake.
Perfected for High Altitude. I test and develop all of my recipes at Denver’s altitude of 5,280 feet, so home bakers can rest assured of consistent, reliable results when baking at high altitude.

See the recipe card at the end of the post for the full ingredients list and instructions.
Ingredients
Strawberry Reduction
- Strawberries. You can use either fresh or frozen strawberries for the reduction. By simmering the strawberries, you’ll be cooking off some of the water for a more concentrated strawberry flavor in your cake.
Cake
- Whole Milk. Adds moisture and fat for a tender, flavorful cake crumb.
- Lemon Juice. The acidity in the lemon juice enhances the flavor of the strawberries and also makes the cake more tender.
- Strawberry Reduction. The strawberry reduction gives the cake its strawberry flavor.
- Eggs + Egg Whites. Gives the cake strength and structure.
- Vegetable Oil. Makes the cake moist, light and fluffy.
- Vanilla Extract. Flavor.
- Cake Flour. Flour gives a cake structure, and the lower protein content of cake flour makes a softer, fluffier cake than if you used all-purpose flour.
- Sugar. Granulated sugar adds sweetness and moisture.
- Baking Powder. Leavening agent to help the cake rise.
- Salt. Enhances flavor and balances sweetness.
Buttercream
- Butter. I use unsalted butter in my buttercream, but you can certainly use salted butter and omit the extra salt. Be sure your butter is completely softened to room temperature.
- Coconut Cream. Adds a rich coconut flavor to the buttercream and a creamy texture.
- Vanilla + Coconut Extracts. Flavor.
- Powdered Sugar. Sweetens and thickens the buttercream.
- Meringue Powder. Adds stability and improves texture.
- Salt. Balances the sweetness.
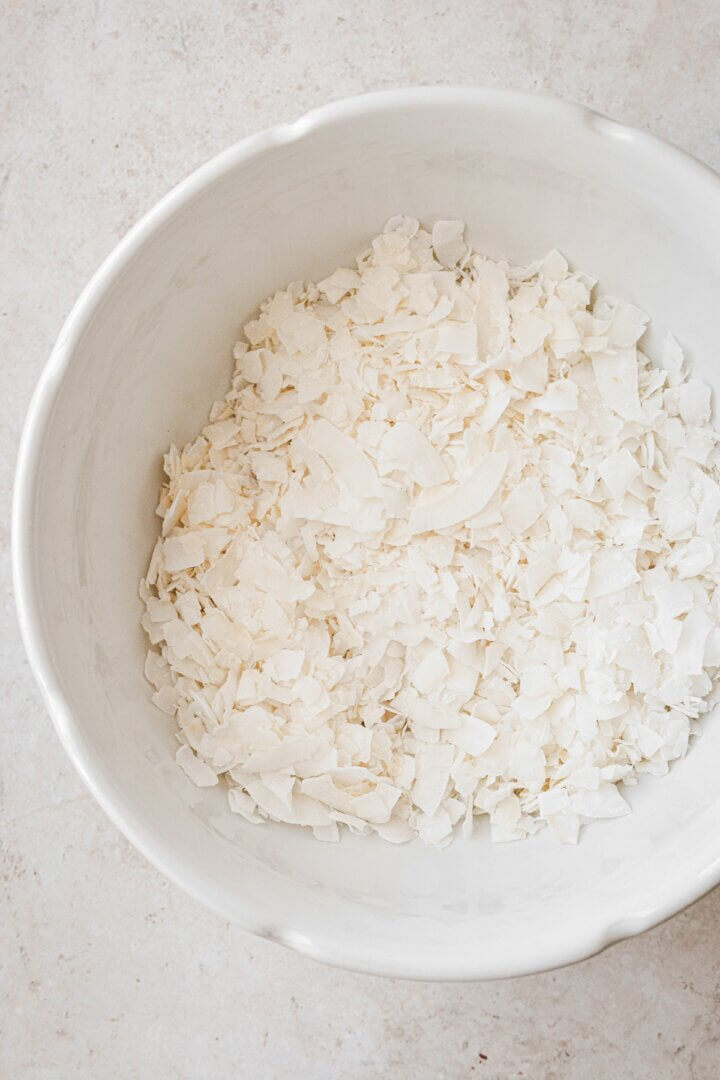
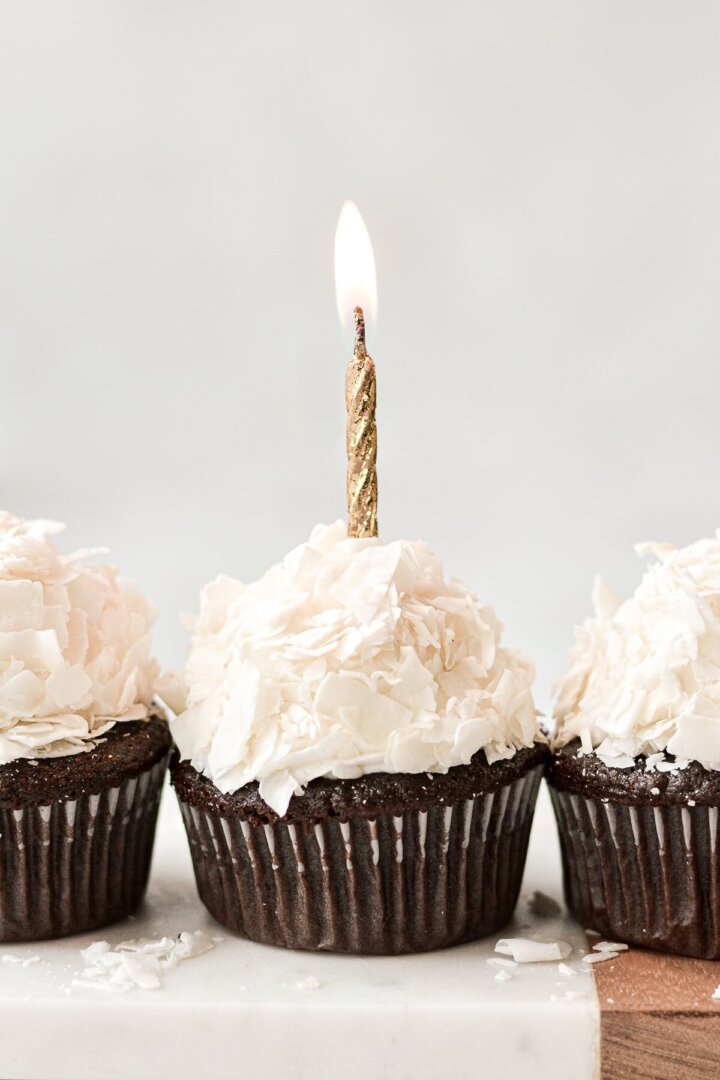
- Coconut Flakes. Natural coconut has a nice crunch and doesn’t contain added sugar, keeping your buttercream from ending up too sweet. If you prefer sweetened shredded coconut, you can certainly use that.
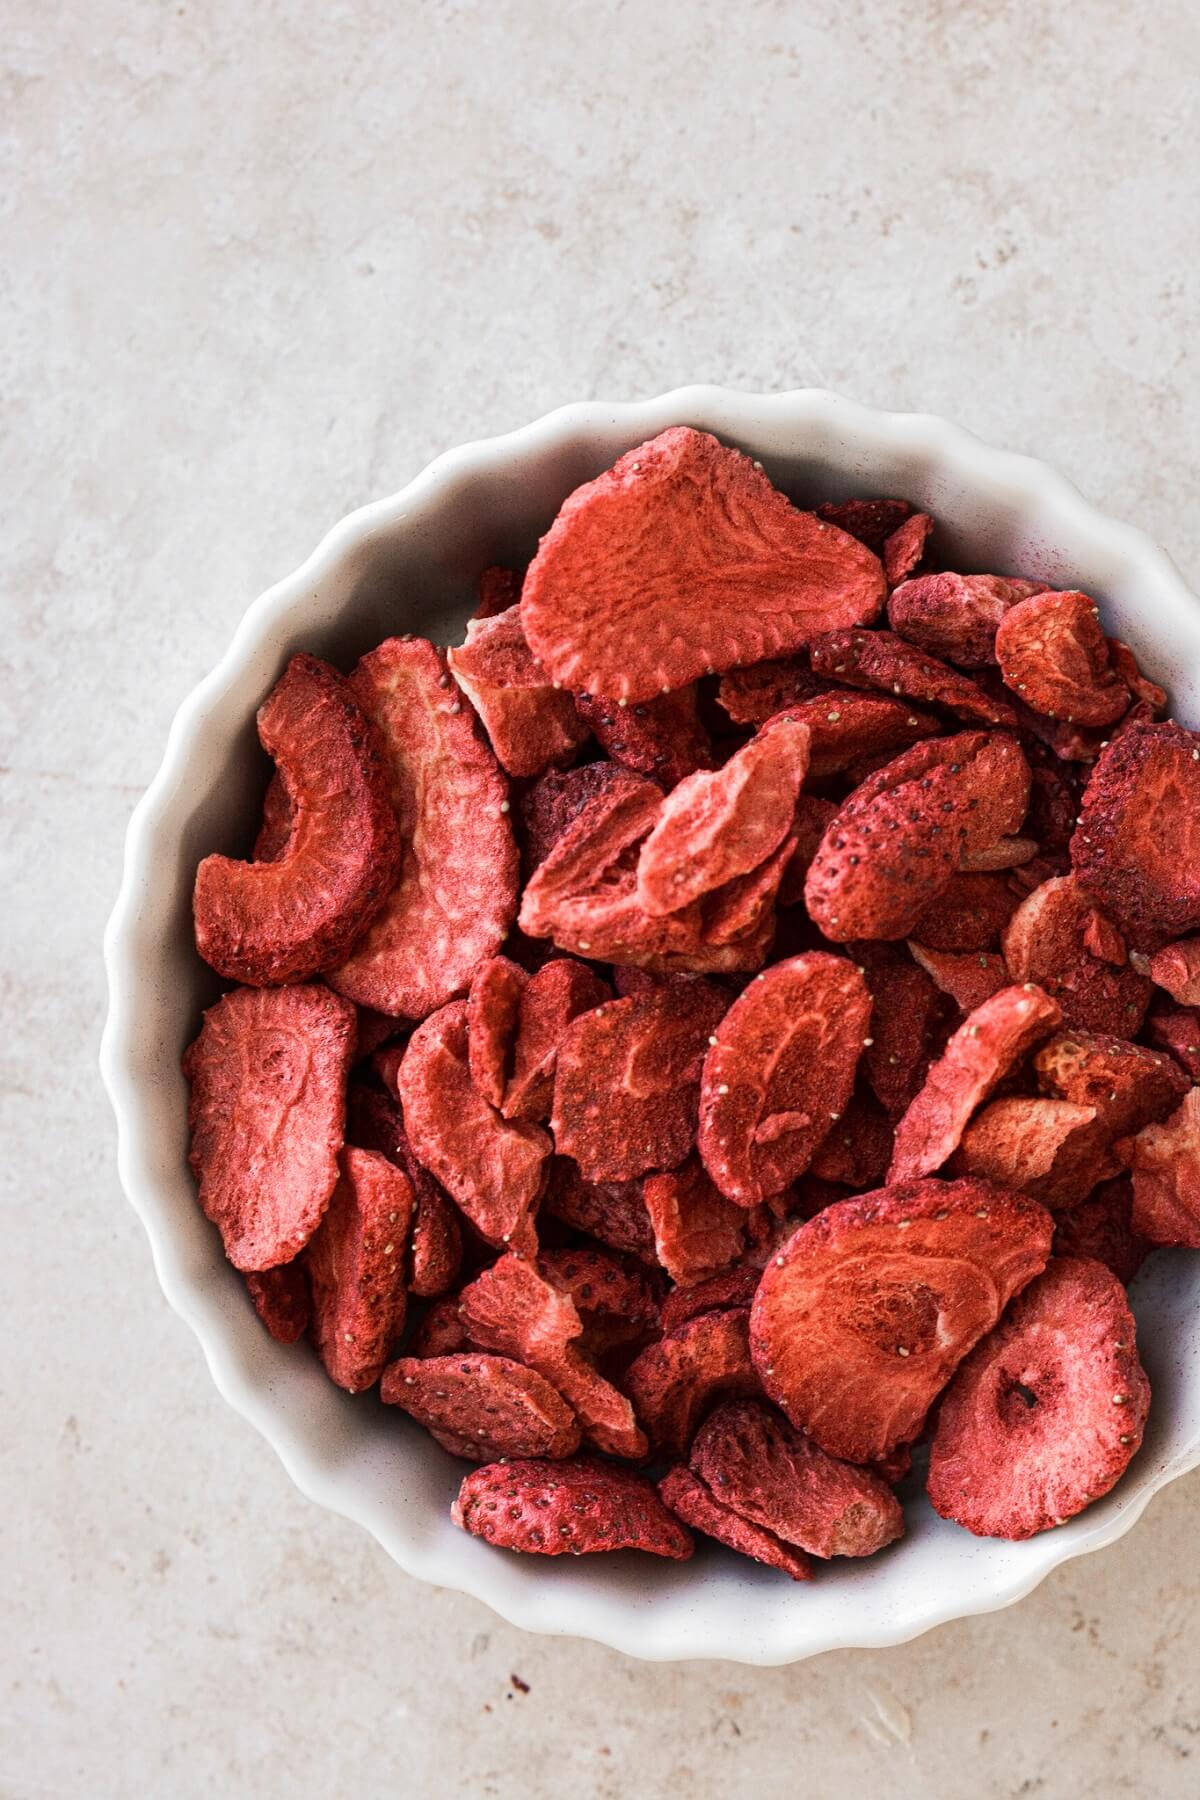
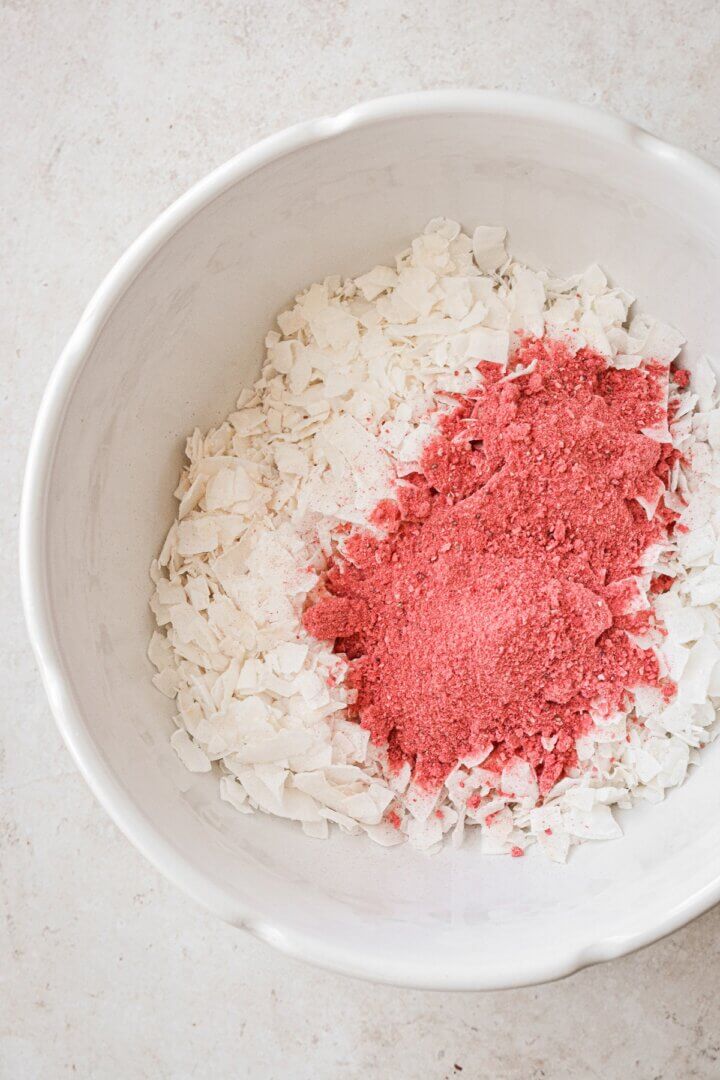
- Freeze Dried Strawberry Powder. The freeze dried strawberry powder (finely crushed freeze dried strawberries) adds another punch of strawberry flavor and tints the coconut a pretty pink color.
Instructions
Strawberry Reduction
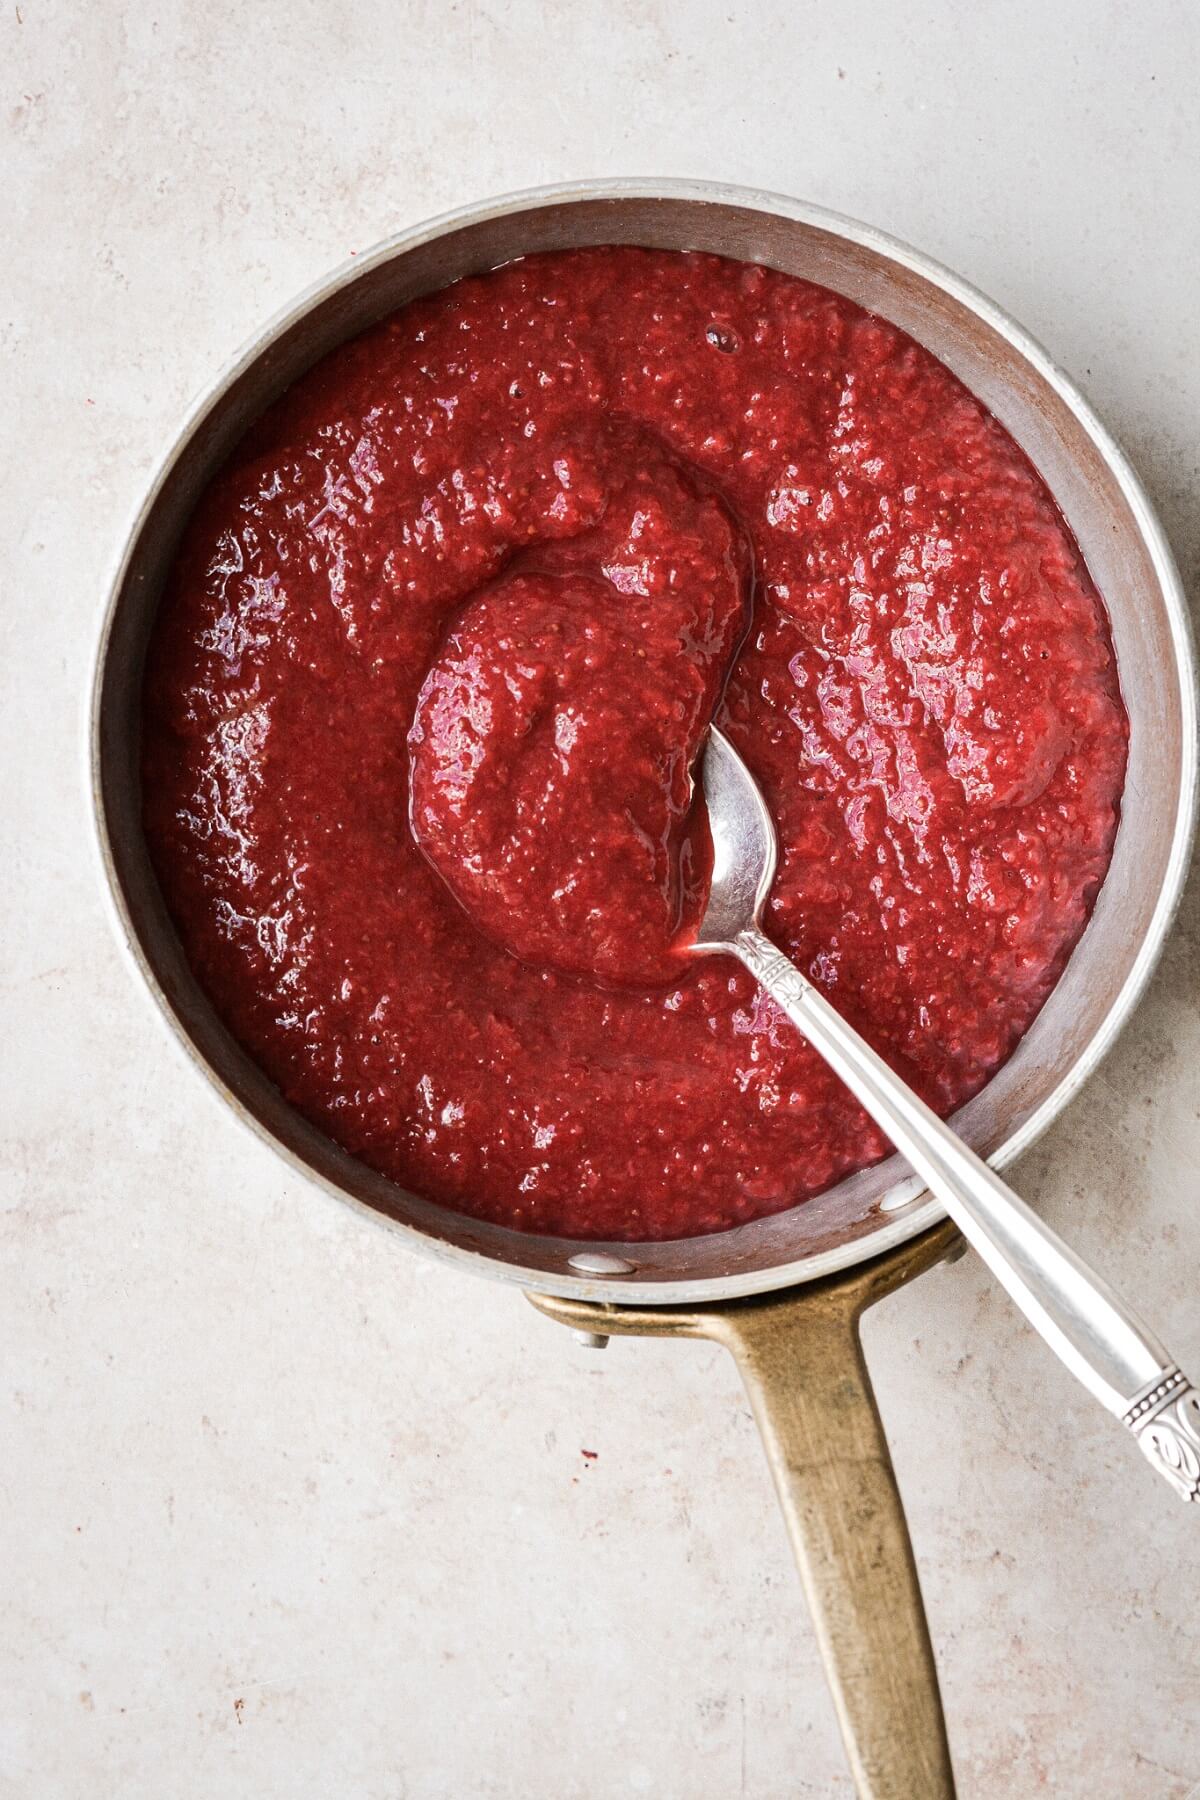
- Wash and hull the strawberries, then use a small food processor to puree the strawberries.
- Scrape the pureed strawberries into a small saucepan. Over medium low heat, simmer the strawberries, stirring frequently to keep them from sticking to the bottom of the pan, until reduced to 1/2 cup. This may take up to 30 minutes.
- Once reduced, transfer the strawberry reduction to a container, cool to room temperature, then refrigerate until needed. You can make the reduction up to 2 days in advance. You’ll be using the strawberry reduction in the cake.
Strawberry Cake
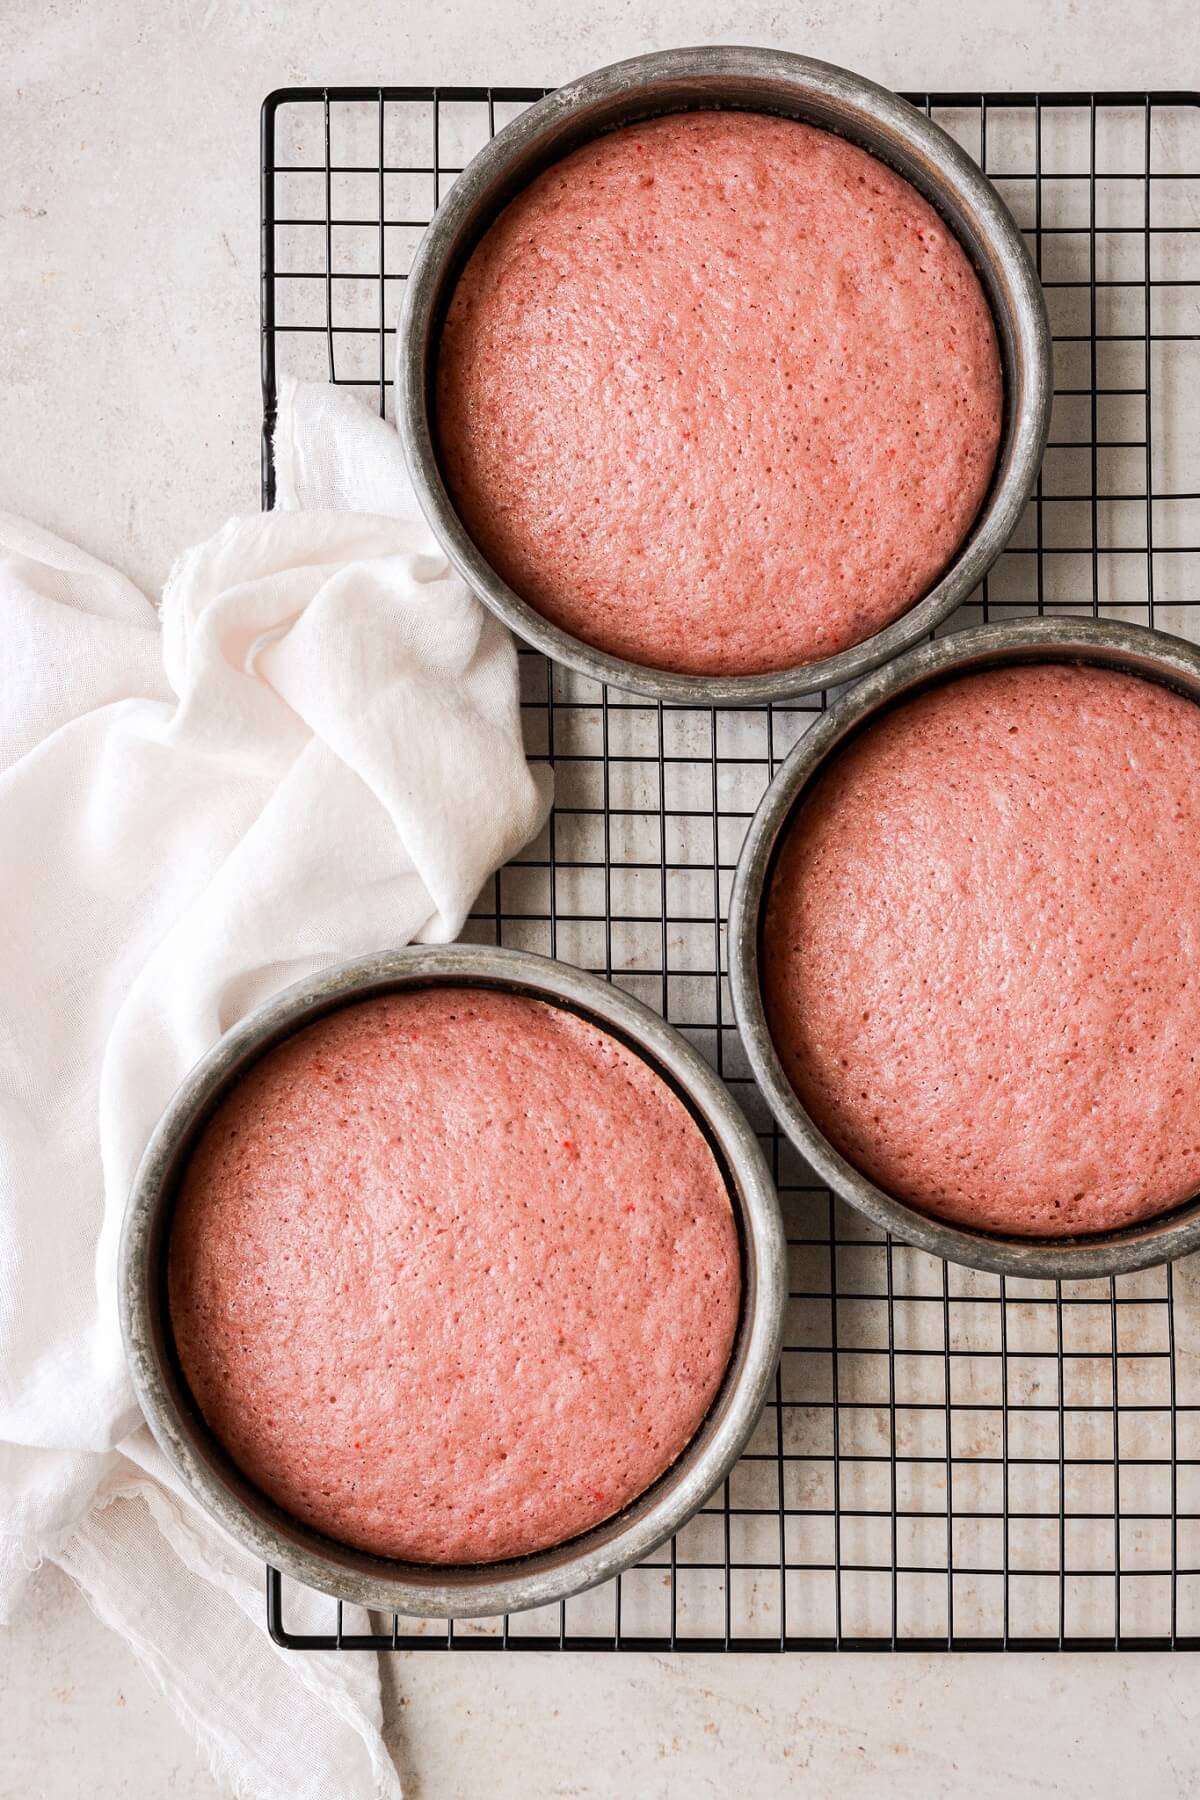
- Preheat the oven to 350 F, and position a rack in the center of the oven. Spray the bottoms of three 8-inch round cake pans with non-stick baking spray. If making half the recipe for a smaller cake, use three 6-inch round cake pans.
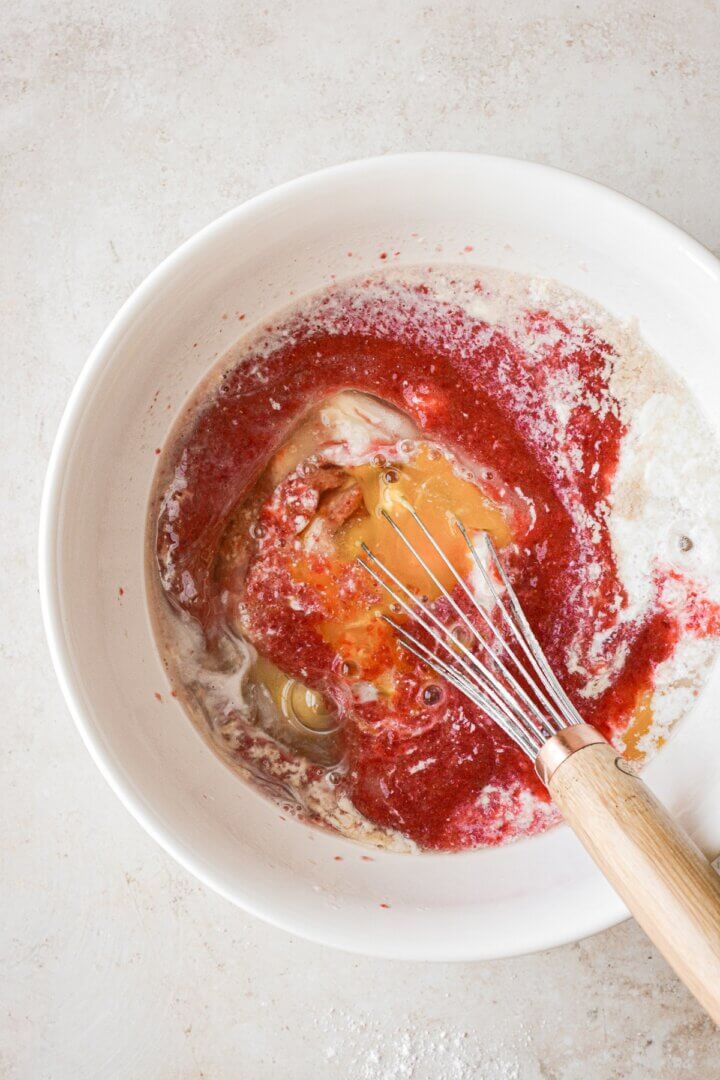
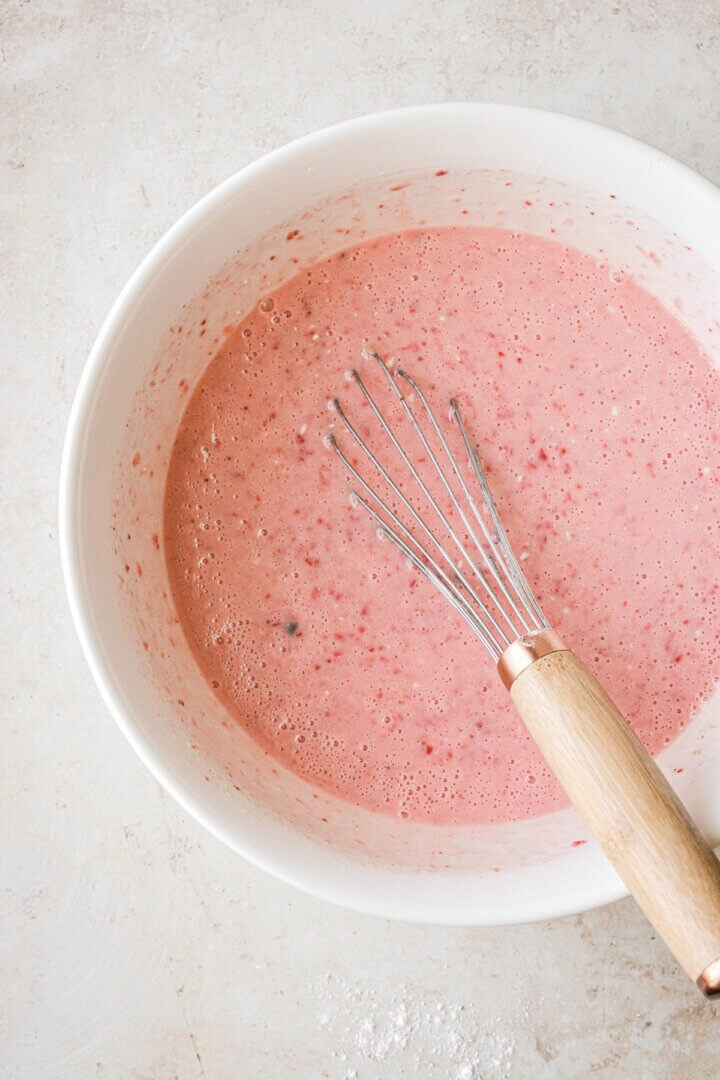
- In a large bowl, whisk together the milk, lemon juice, 1/2 cup strawberry reduction, eggs, egg whites, vegetable oil, and vanilla extract until well combined. Whisk in the food coloring, if using. I added 2 small drops super red gel food coloring; without the food coloring, the cakes will be a paler pinkish tan color.
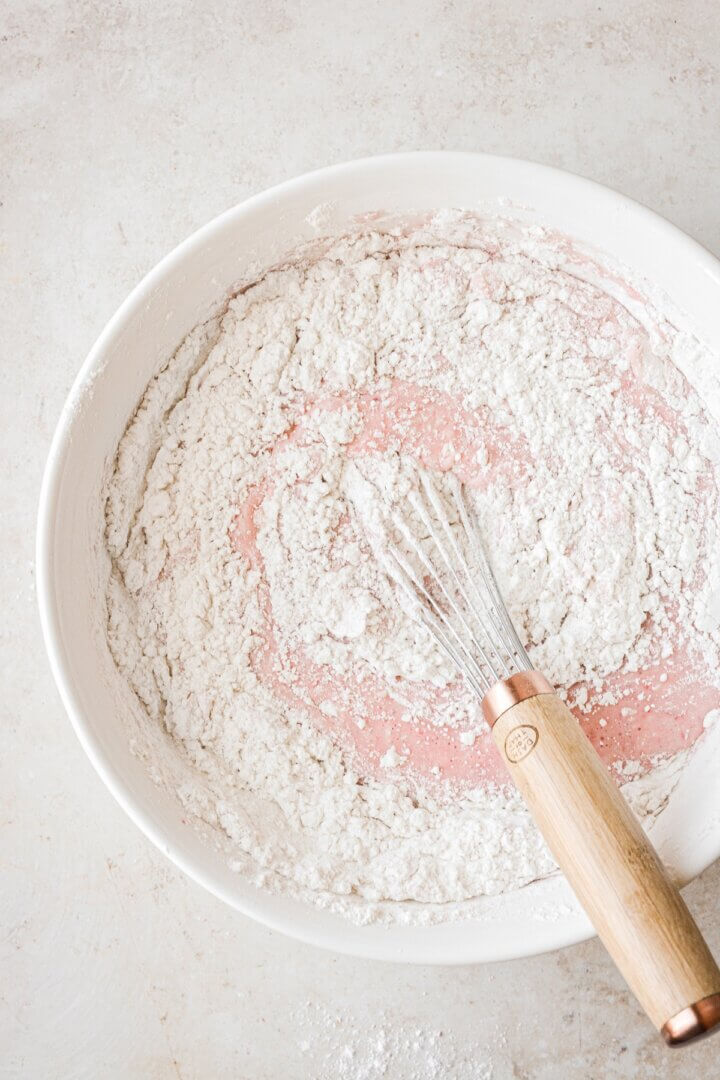
- In a separate bowl, sift together the flour, sugar, baking powder and salt, then whisk until everything is evenly distributed. Add the dry ingredients to the wet ingredients, and whisk for about 10-15 seconds, until combined.
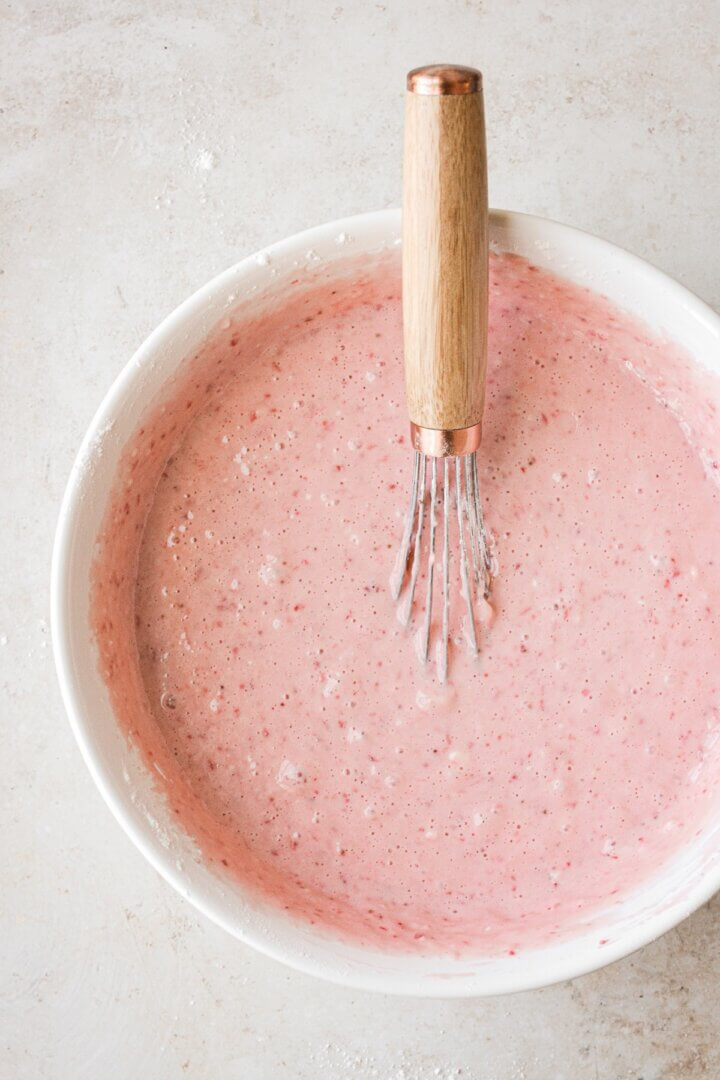
- Divide the batter between the pans, then bang the pans on the counter a few times to pop any large air bubbles.
- Bake the cakes until the tops spring back when gently touched, or a cake tester or toothpick comes out clean, about 21-25 minutes for three 8-inch cakes, and about 18-20 minutes for three 6-inch cakes.
- Set the pans on a cooling rack, cover loosely with a clean kitchen towel, and cool completely before frosting.
Coconut Buttercream
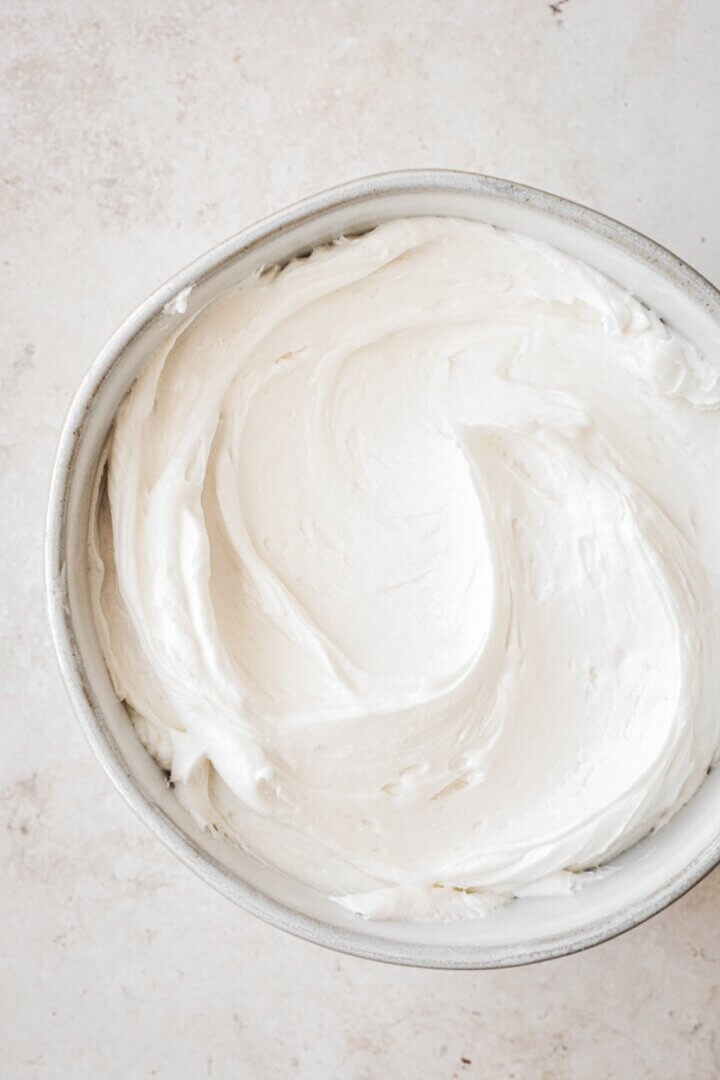
- In the bowl of your stand mixer fitted with the paddle attachment, beat the softened butter for 1 minute until smooth. Beat in the coconut cream, vanilla extract and coconut extract.
- With the mixer on low, add the powdered sugar by spoonfuls, the meringue powder and the salt.
- Increase speed to medium (#6 on a Kitchen Aid mixer) and beat for 4-5 minutes, scraping the bowl down several times, until very light and fluffy. Turn the speed down to “stir” and mix for 1 more minute to pop any large air bubbles.
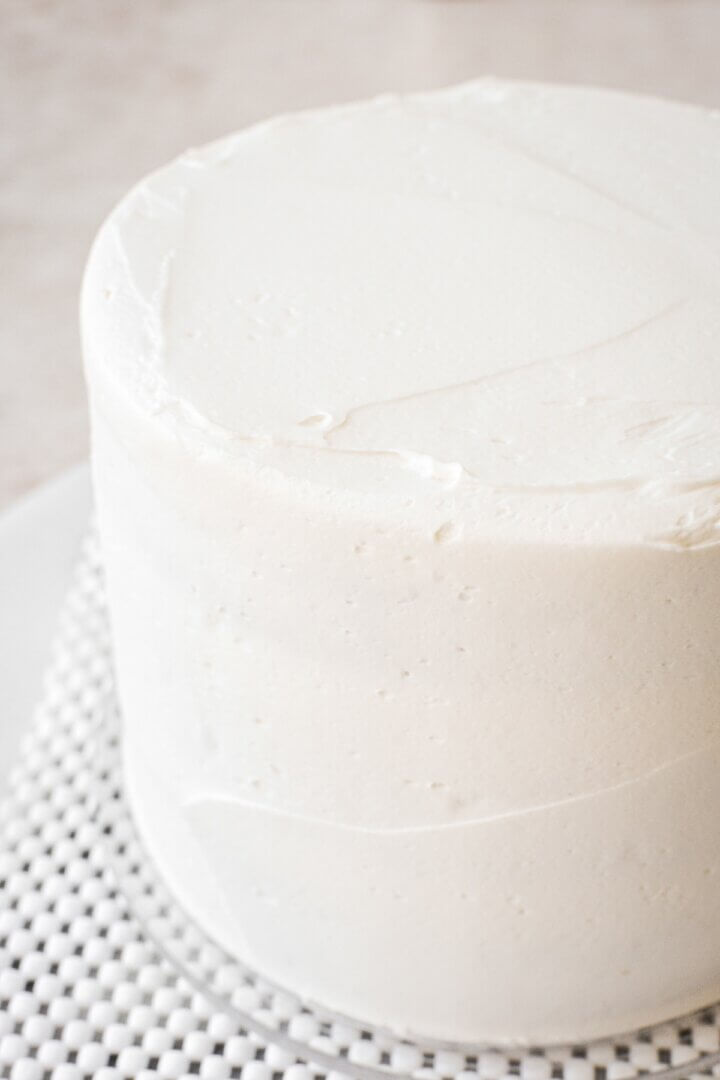
- Remove the cooled cakes from the pans, and stack, fill and frost the cake with the buttercream. See How to Stack, Fill, Crumb Coat and Frost a Layer Cake for more tips. Proceed to the next step of pressing the coconut onto the cake before the buttercream crusts over.
- If you only have freeze dried strawberries (rather than the powder), just use your food processor to finely crush the strawberries into a powder.
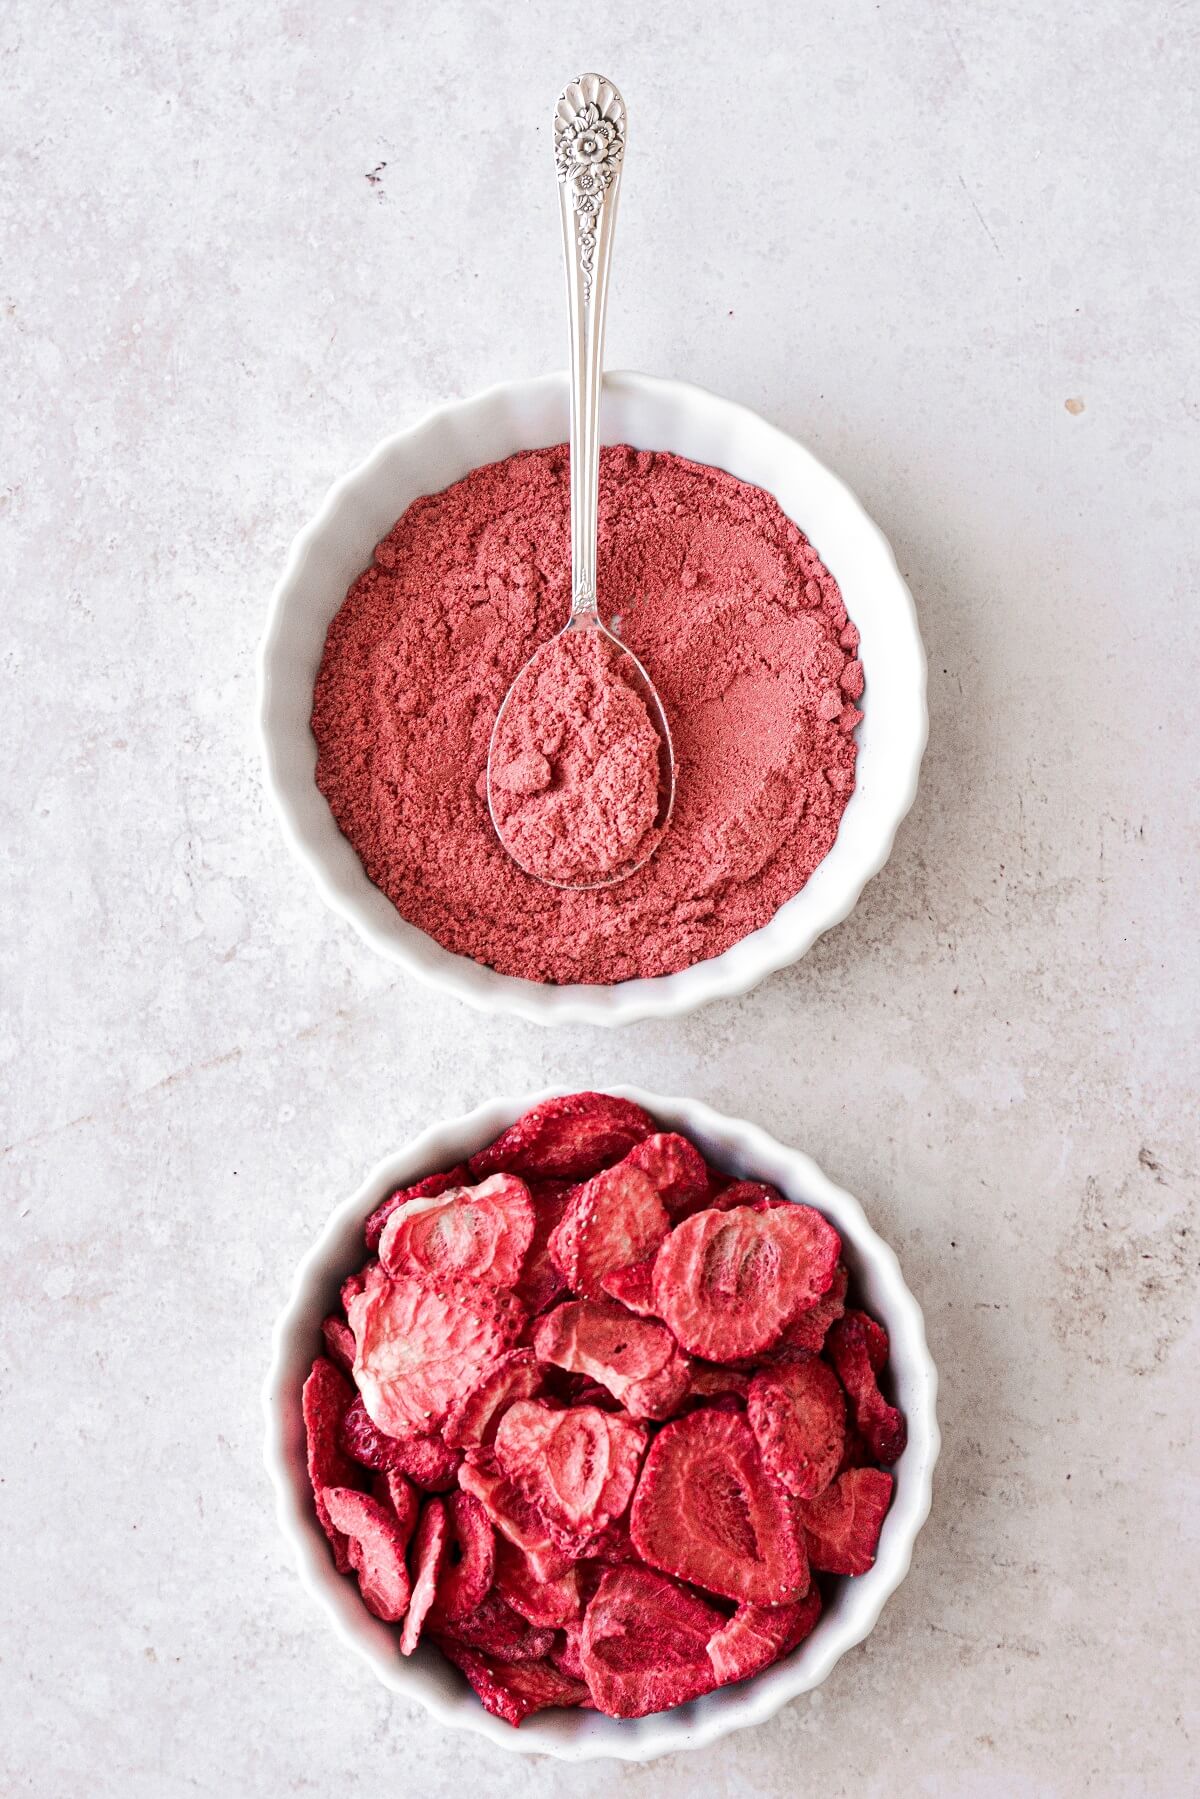
- In a bowl, combine the coconut flakes with the freeze dried strawberry powder, tossing everything together until the coconut is coated in the strawberry powder.
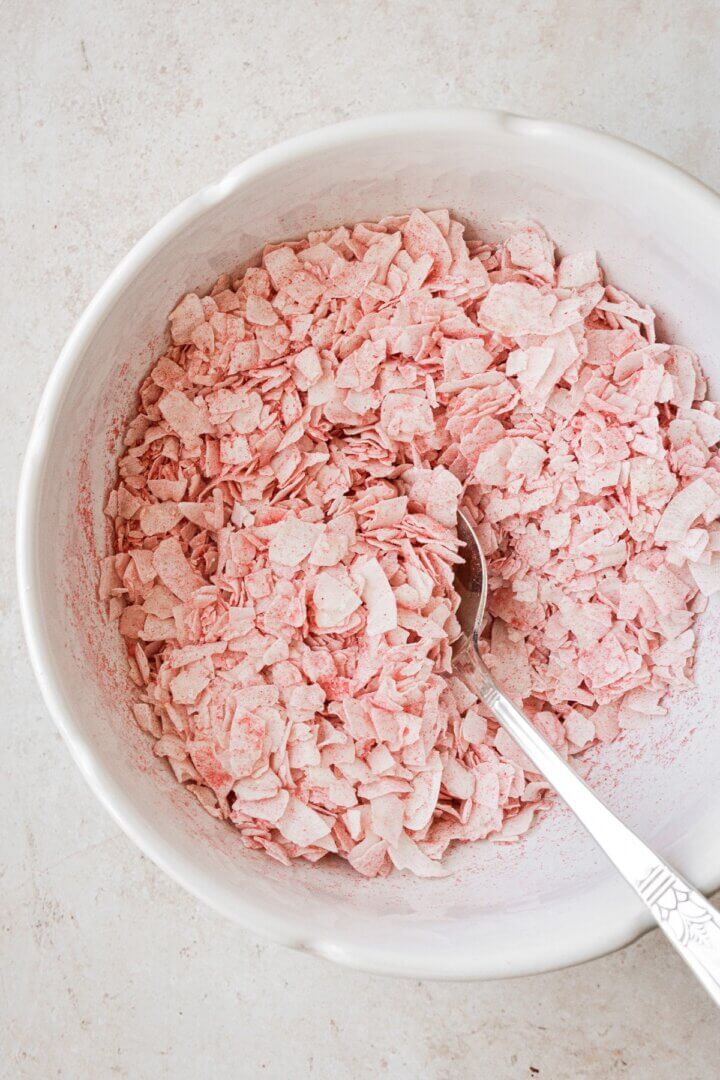
- Press the coconut all over the top and sides of the cake, scooping up whatever falls off and pressing it onto the buttercream until the cake is covered.
Recipe Variations
- Coconut Cake + Strawberry Buttercream. Instead of today’s strawberry cake with coconut buttercream, you can try pairing my high altitude coconut cake recipe with strawberry buttercream, finished with the strawberry coconut all over the cake.
Be sure to read all of my BAKING FAQs where I discuss ingredients, substitutions and common questions with cake making, so that you can be successful in your own baking! I also suggest reading these comprehensive posts on making Perfect American Buttercream, How to Stack, Fill, Crumb Coat and Frost Layer Cakes and How to Use Piping Bags.
Frequently Asked Questions
Can I use sweetened shredded coconut instead of natural coconut flakes?
Natural coconut has a nice crunch and doesn’t contain added sugar, keeping your buttercream from ending up too sweet. If you prefer sweetened shredded coconut, you can certainly use that. I usually use Bob’s Red Mill Unsweetened Flaked Coconut for my coconut cakes.
Where do you get freeze dried strawberry powder?
I keep this freeze dried strawberry powder from Amazon in my pantry, or you can buy freeze dried strawberries at Target and most grocery stores, and crush it with a food processor.
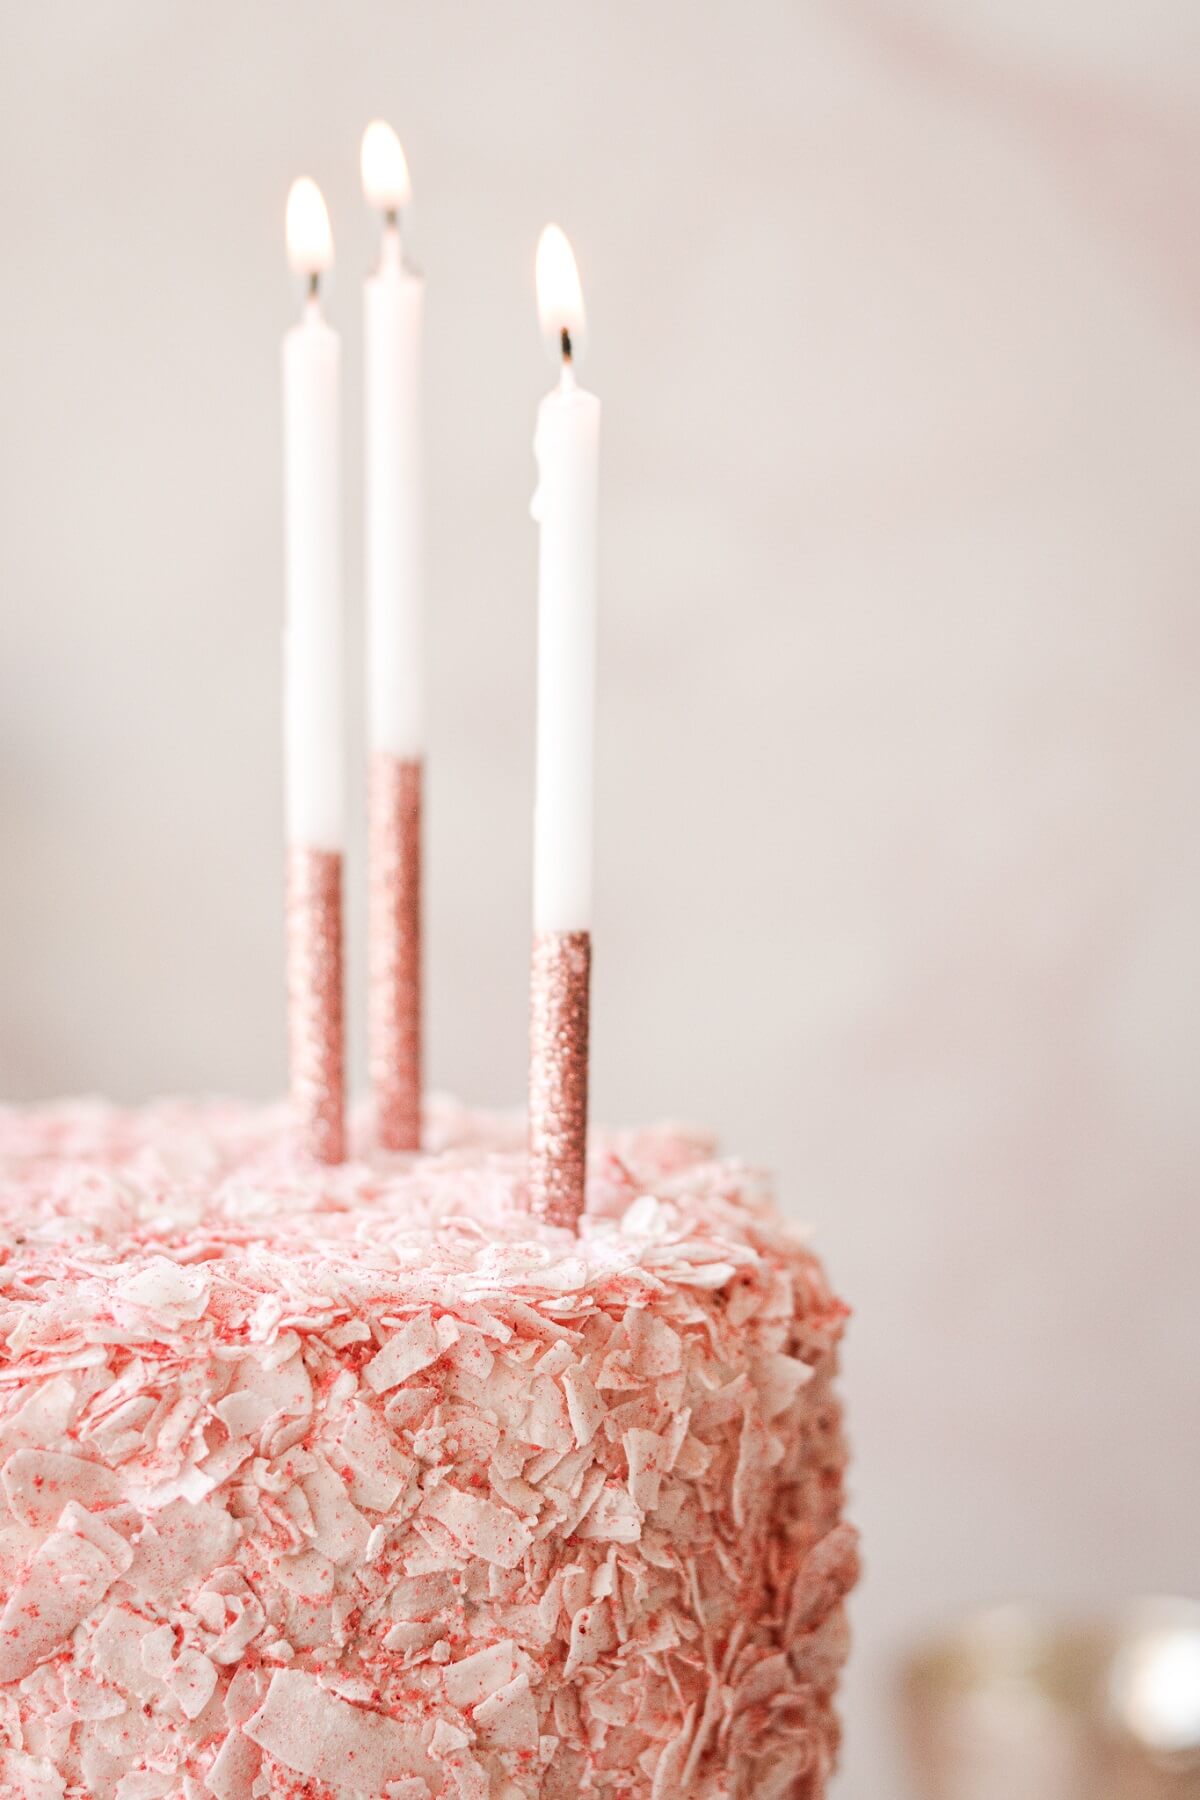
Where did you get the birthday candles?
The candles on my cake are Meri Meri Dusty Pink Glitter Dipped Candles. They have a gorgeous selection of birthday candles, and I also love their color block candles, gold glitter dipped candles, long gold candles, and pink glitter candles.
You Might Also Like

Please check out my Amazon Shop for a curated collection of some of my favorite cake pans from trusted brands, baking tools, ingredients, pretty things and fashion finds. I recommend products that I buy and use every day!
Did you love today’s recipe? Please rate the recipe and let me know in the comments what you thought! Also, be sure to follow Curly Girl Kitchen on Instagram, and tag me when you try one of my recipes so I can see all your delicious creations!
High Altitude Strawberry Coconut Cake
All recipes on Curly Girl Kitchen are developed for high altitude at 5,280 feet. See FAQs for adjusting to higher or lower elevations.

Equipment
- Stand Mixer with Paddle Attachment
Ingredients
Strawberry Reduction
- 6 ½ oz fresh or frozen strawberries
Cake
- 1 ½ cups whole milk
- 1 tbsp lemon juice
- ½ cup strawberry reduction, completely cooled
- 2 large eggs
- 2 large egg whites only (save the extra 2 yolks for another use)
- ½ cup vegetable oil (do not substitute with melted butter)
- 2 tsp vanilla extract
- 1-2 small drops pink or red gel food coloring, optional
- 3 ¼ cups cake flour, fluffed, spooned and leveled
- 1 ¼ cups granulated sugar
- 3 tsp baking powder
- 1 tsp coarse Kosher salt (if using table salt, use half the amount)
Buttercream
- 1 ½ cups unsalted butter, softened to room temperature
- 3-4 tbsp coconut cream (see note)
- 1 tsp vanilla extract
- 1 ½ tsp coconut extract
- 3 cups powdered sugar
- 1 tbsp meringue powder
- ⅛ tsp coarse Kosher salt (if using table salt, use half the amount)
- 1 ½ cups natural coconut flakes
- 1 ½ tbsp freeze dried strawberry powder
Instructions
Strawberry Reduction
- Wash and hull the strawberries, then use a small food processor to puree the strawberries.
- Scrape the pureed strawberries into a small saucepan. Over medium low heat, simmer the strawberries, stirring frequently to keep them from sticking to the bottom of the pan, until reduced to 1/2 cup. This may take up to 30 minutes.
- Once reduced, transfer the strawberry reduction to a container, cool to room temperature, then refrigerate until needed. You can make the reduction up to 2 days in advance. You'll be using the strawberry reduction in the cake.
Cake
- Preheat the oven to 350 F, and position a rack in the center of the oven. Spray the bottoms of three 8-inch round cake pans with non-stick baking spray.If making half the recipe for a smaller cake, use three 6-inch round cake pans.
- In a large bowl, whisk together the milk, lemon juice, 1/2 cup strawberry reduction, eggs, egg whites, vegetable oil, and vanilla extract until well combined. Whisk in the food coloring, if using.I added 2 small drops super red gel food coloring; without the food coloring, the cakes will be a paler pinkish tan color.
- In a separate bowl, sift together the flour, sugar, baking powder and salt, then whisk until everything is evenly distributed. Add the dry ingredients to the wet ingredients, and whisk for about 10-15 seconds, until combined.
- Divide the batter between the pans, then bang the pans on the counter a few times to pop any large air bubbles.
- Bake the cakes until the tops spring back when gently touched, or a cake tester or toothpick comes out clean, about 21-25 minutes for three 8-inch cakes, and about 18-20 minutes for three 6-inch cakes.
- Set the pans on a cooling rack, cover loosely with a clean kitchen towel, and cool completely before frosting.
Buttercream
- In the bowl of your stand mixer fitted with the paddle attachment, beat the softened butter for 1 minute until smooth. Beat in the coconut cream, vanilla extract and coconut extract.
- With the mixer on low, add the powdered sugar by spoonfuls, the meringue powder and the salt.
- Increase speed to medium (#6 on a Kitchen Aid mixer) and beat for 4-5 minutes, scraping the bowl down several times, until very light and fluffy. Turn the speed down to "stir" and mix for 1 more minute to pop any large air bubbles.
- Remove the cooled cakes from the pans, and stack, fill and frost the cake with the buttercream. See How to Stack, Fill, Crumb Coat and Frost a Layer Cake for more tips. Proceed to the next step of pressing the coconut onto the cake before the buttercream crusts over.
- In a bowl, combine the coconut flakes with the freeze dried strawberry powder, tossing everything together until the coconut is coated in the strawberry powder. Press the coconut all over the top and sides of the cake, scooping up whatever falls off and pressing it onto the buttercream until the cake is covered.
Notes
 https://curlygirlkitchen.com/
Can I use the same measurements for not high altitude? I live in NY.
Rachel, please see my FAQs for some info on this topic: https://curlygirlkitchen.com/baking-faqs/
Oddly, I had more buttermilk than regular milk on hand (usually, it’s the opposite). So I used 1 cup buttermilk and 1/2 cup whole milk which worked well. A wonderful recipe!