
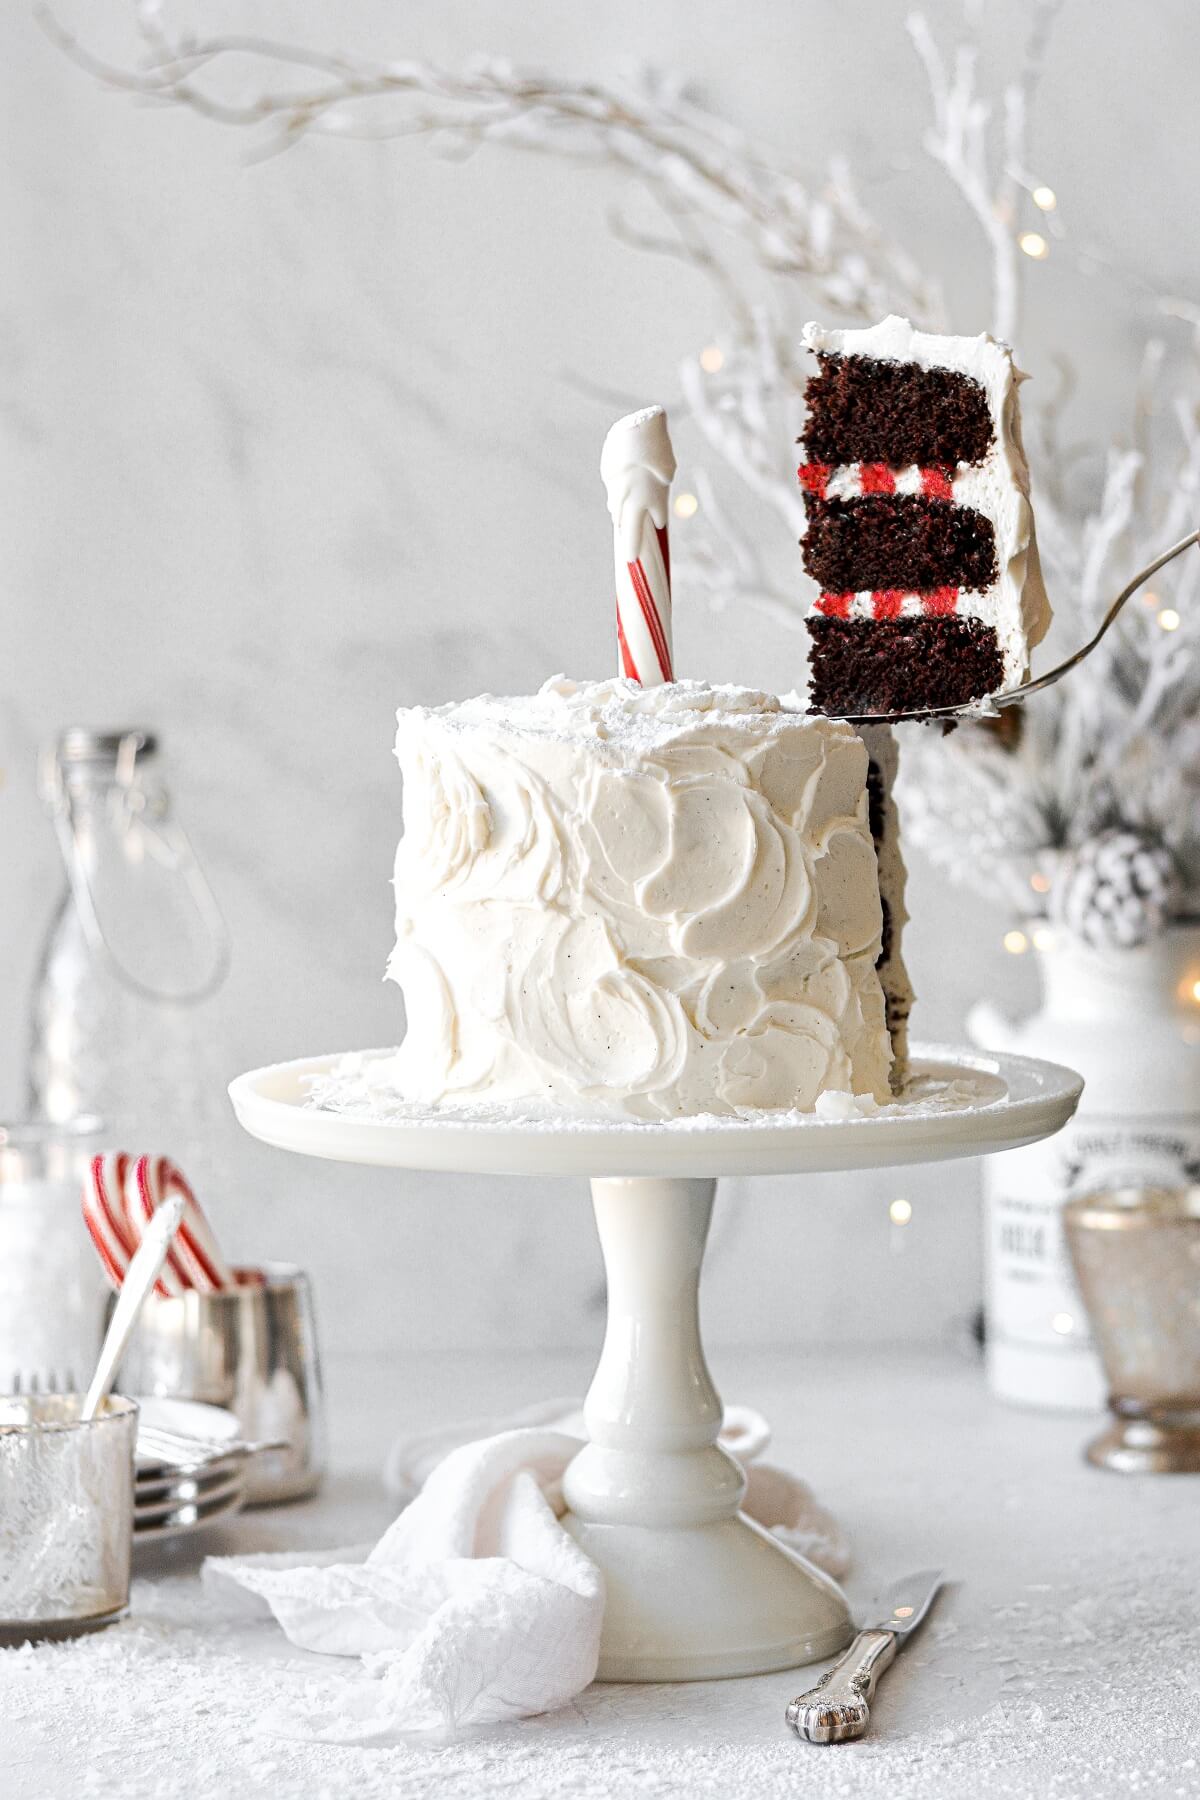
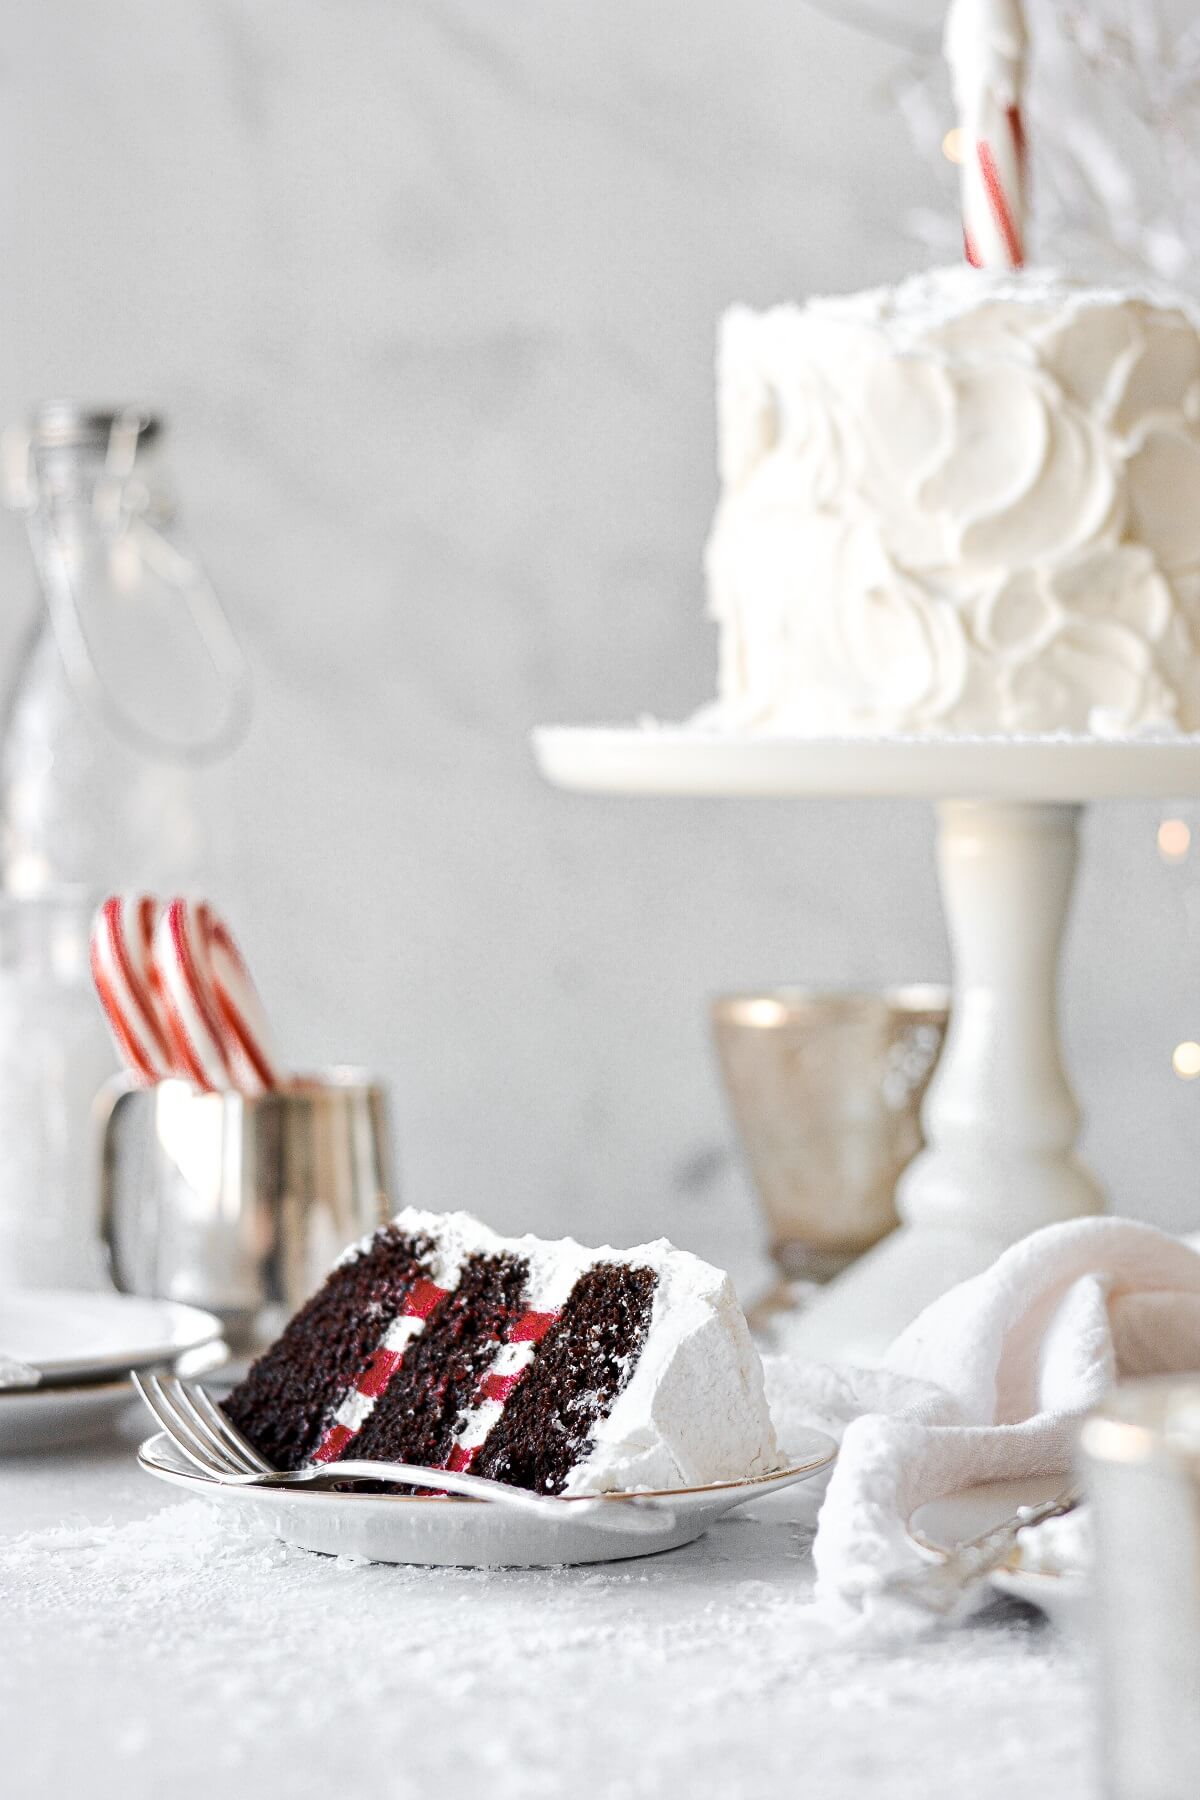
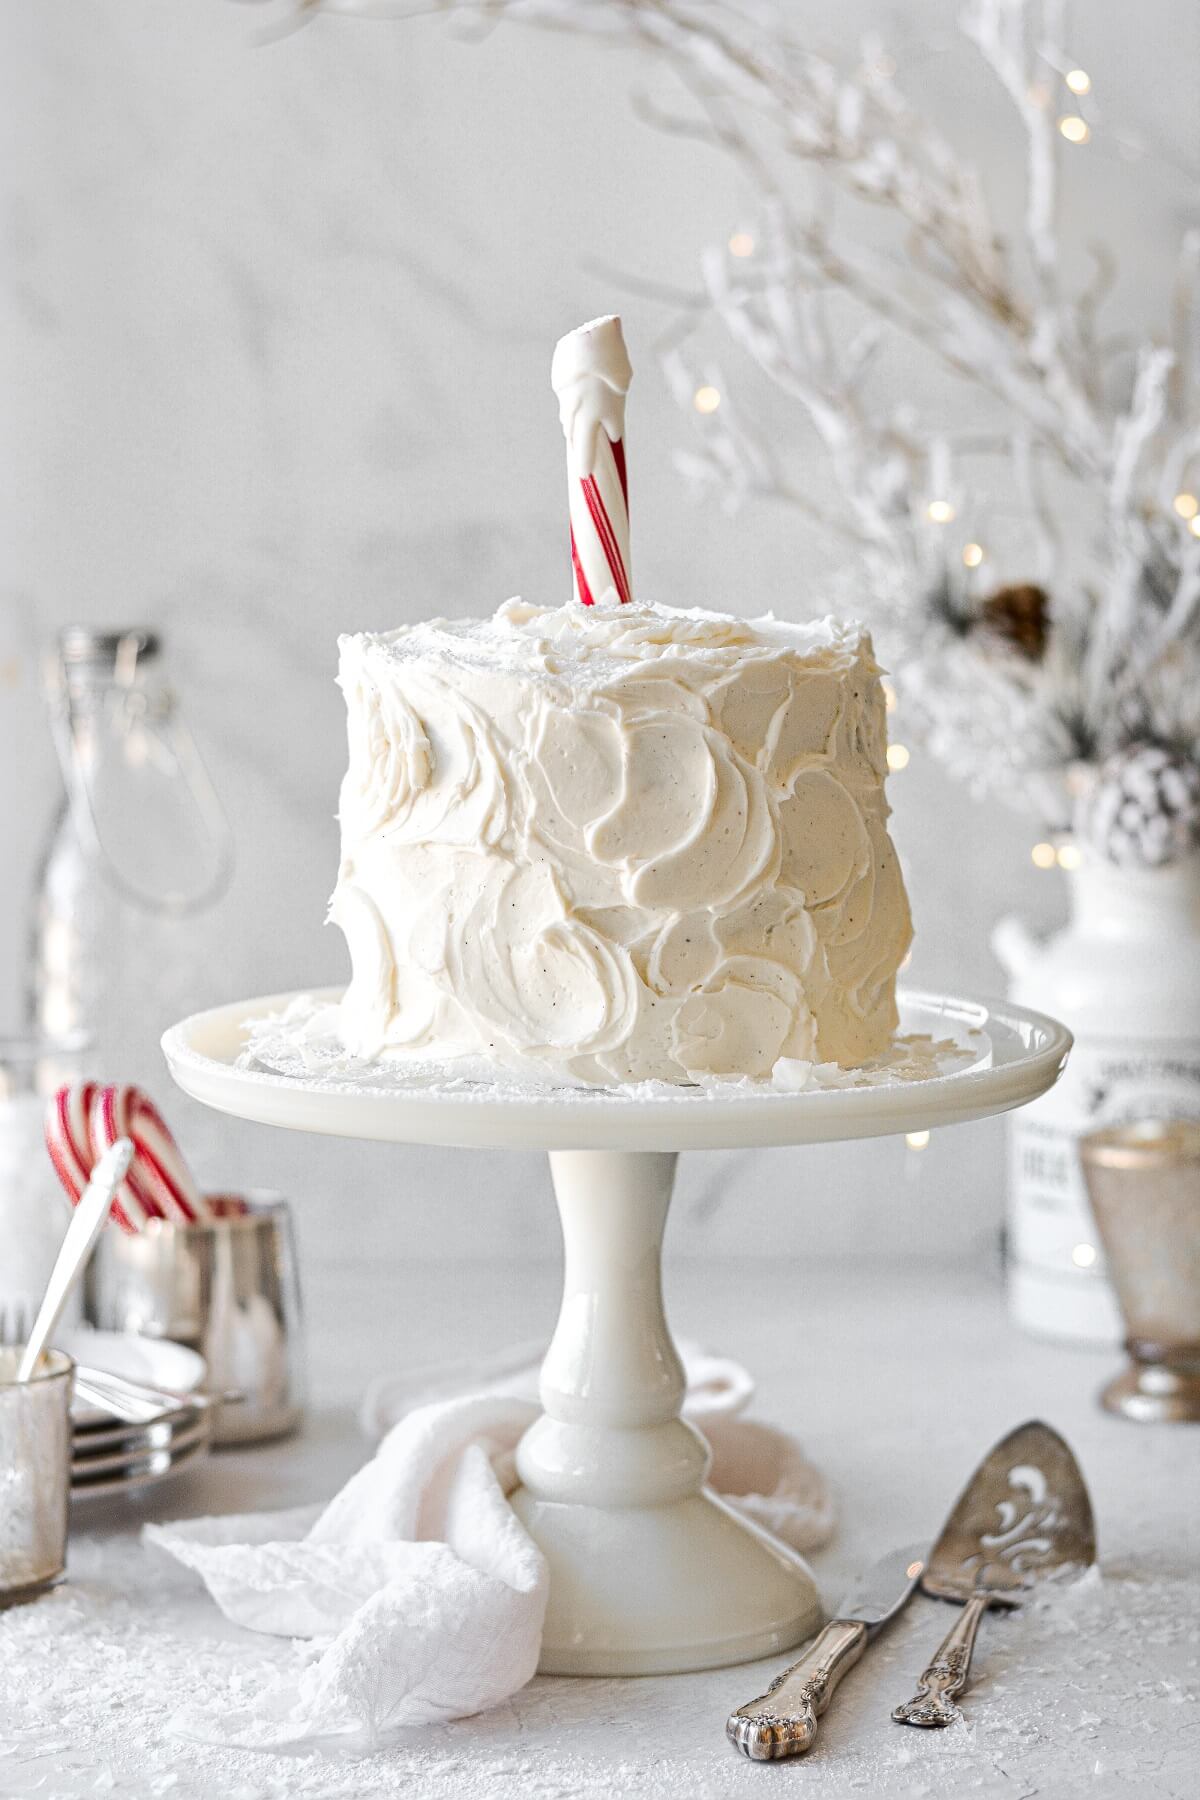
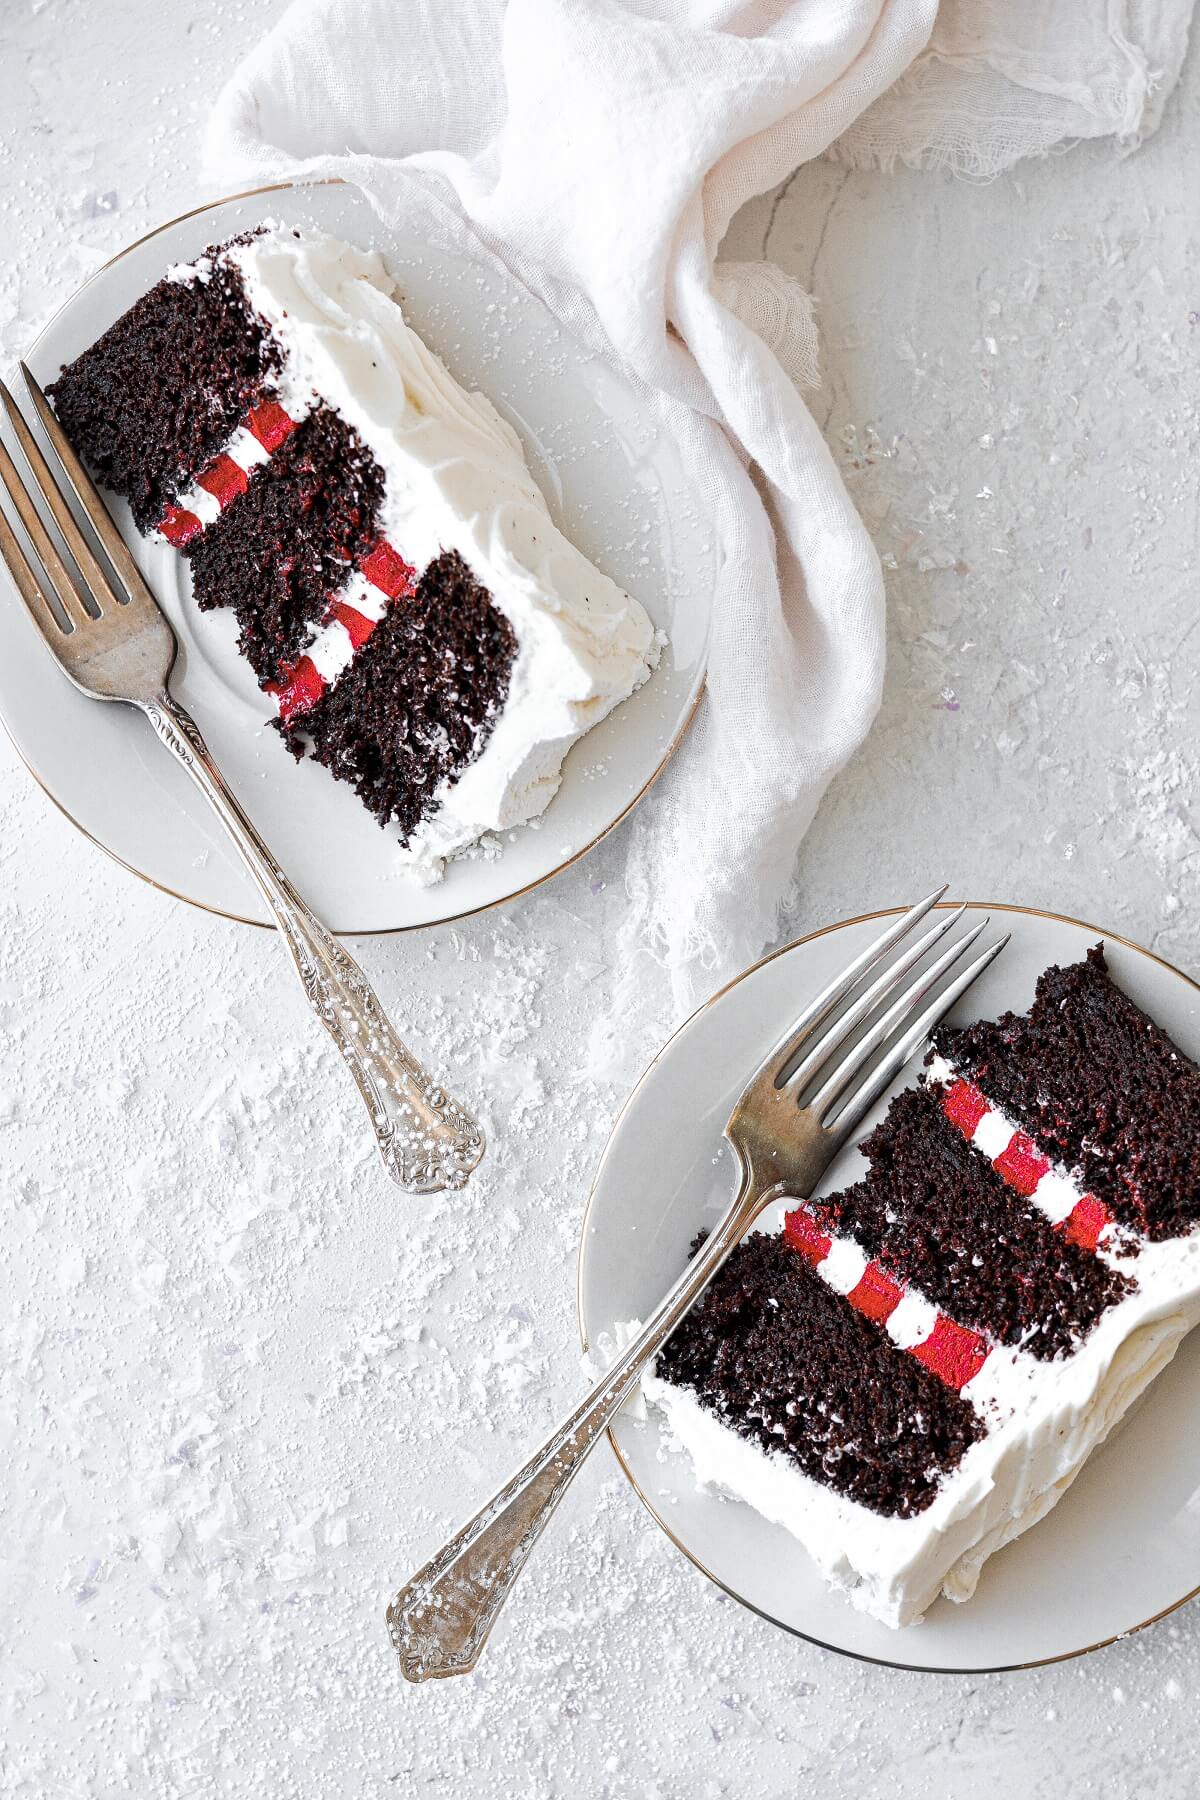
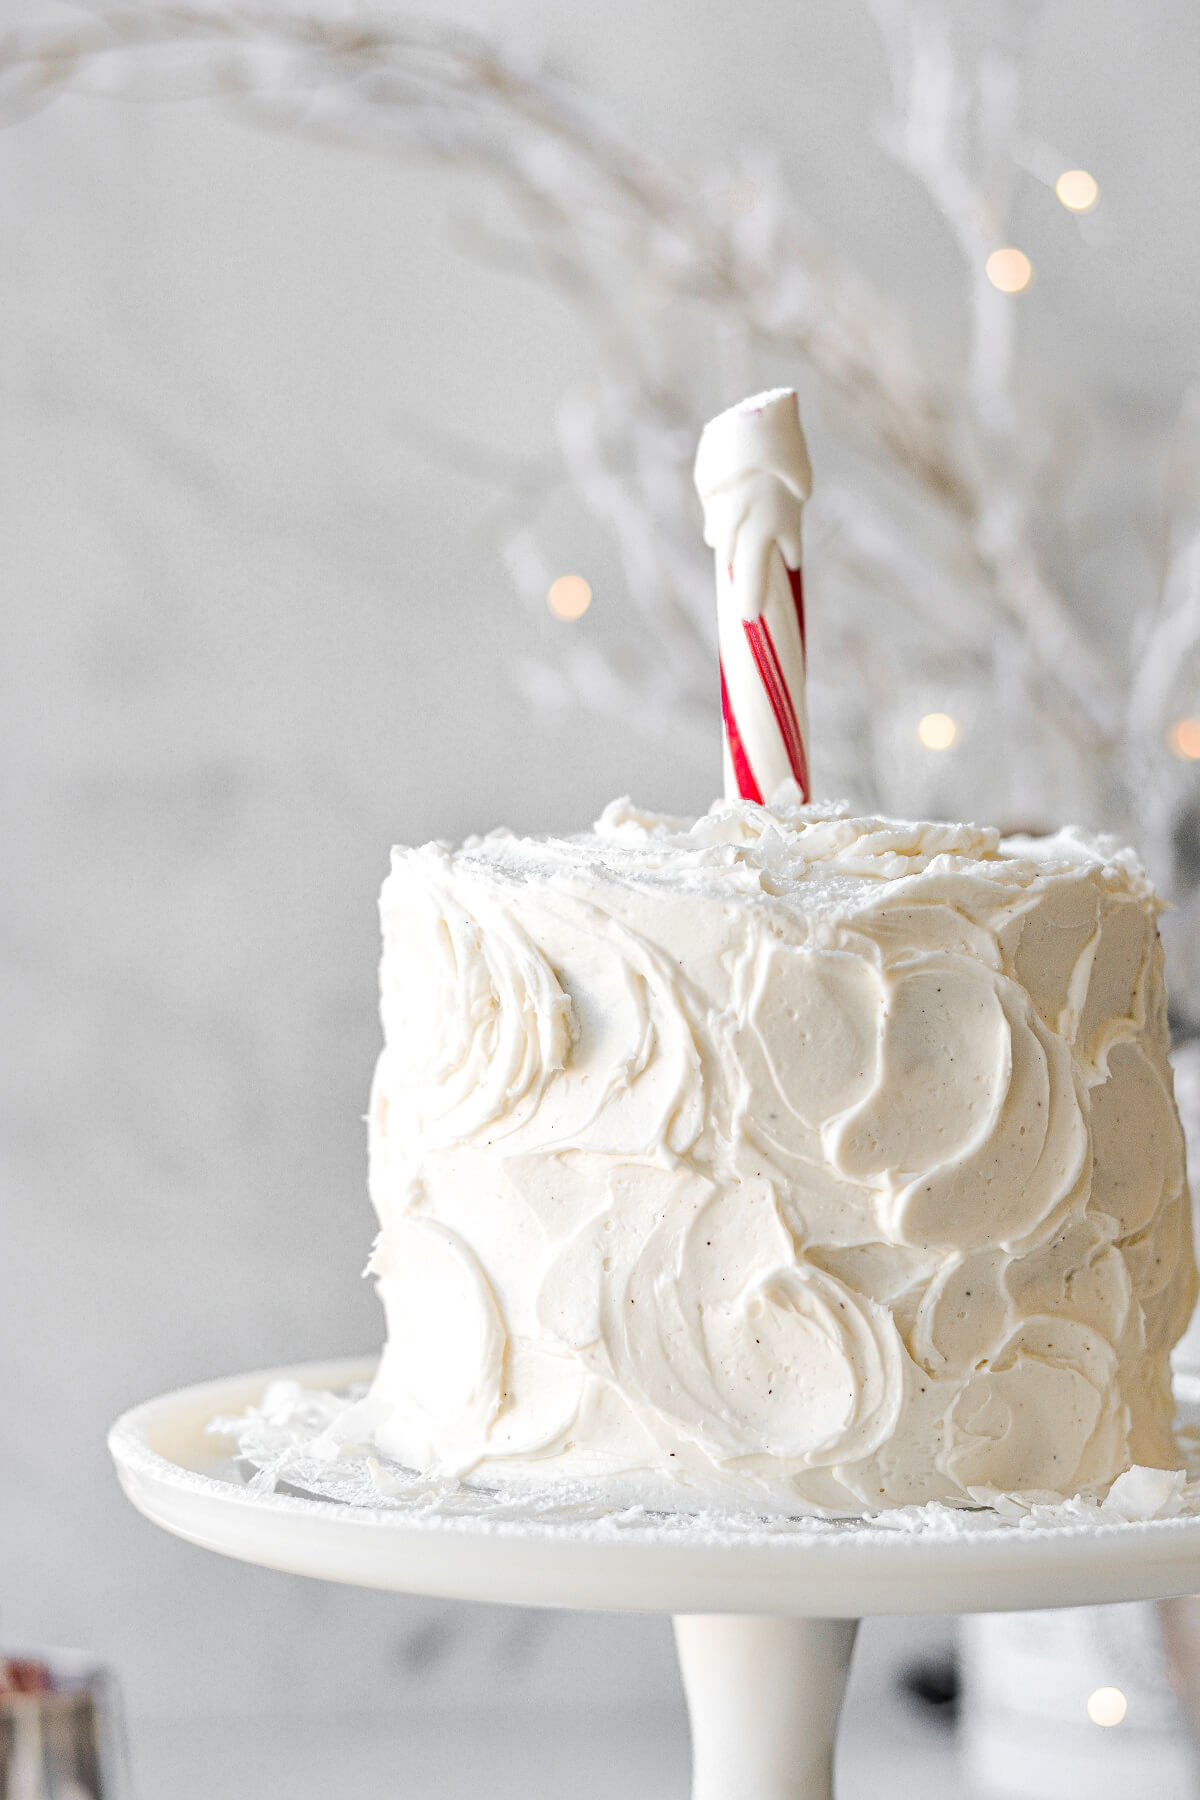
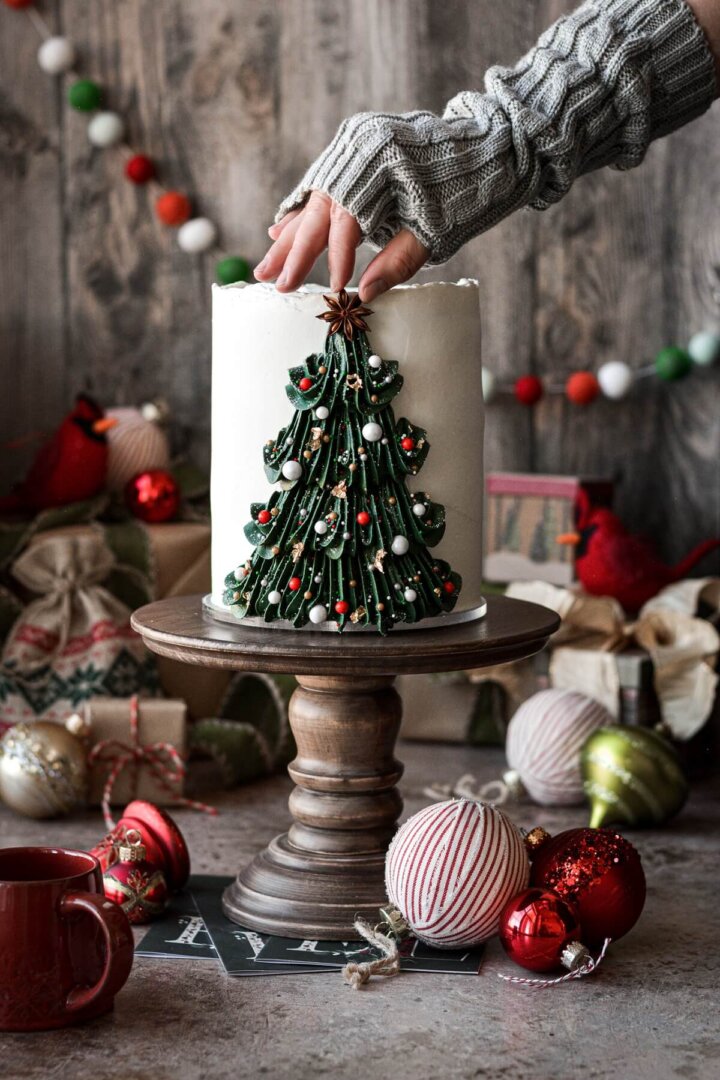
Just in time for Christmas, I’m sharing this festive North Pole Cake. It’s a high altitude chocolate peppermint cake, which is such a perfect combination of flavors for the holidays. The chocolate sour cream cake is so soft and moist, and the snowy swirls of peppermint buttercream are fluffy and perfectly sweet. A peppermint stick dipped in white chocolate makes an easy and adorable North Pole cake topper. And what a surprise to cut into the cake and discover the red and white striped buttercream inside!
Looking for more high altitude Christmas cakes? Don’t miss this cranberry Christmas cake, snowman cake, hot chocolate cake with homemade marshmallows.
This site contains affiliate links. As an Amazon associate, I earn from qualifying purchases. This means that I may make a small commission if you purchase a product using those links. This in no way affects my opinion of those products and services. All opinions expressed on this site are my own.
Why You’ll Love This Cake
You all know how much I love to bake and decorate Christmas cakes. And I just couldn’t resist bringing this particular design to life. It’s adorable, yes, but it also tastes so good, too, which is just as (or more) important. And it’s easy to decorate, so you don’t need any cake decorating skills at all to make this pretty Christmas cake yourself.
With a candy cane North Pole cake topper, I wanted to carry that flavor into the cake with fluffy peppermint buttercream. And the surprise inside red and white striped buttercream is so pretty and striking against the dark chocolate cake and white buttercream. And what goes better with peppermint than chocolate? This cake is as delightful to eat as it is to look at.
See the recipe card at the end of the post for the full ingredients list and instructions.
Ingredients
Cake
- All-Purpose Flour. The flour provides structure and strength to the cake.
- Granulated Sugar. Adds sweetness and moisture.
- Cocoa Powder. Use a good-quality, unsweetened Dutch processed (not natural) cocoa powder. I love both Rodelle and Drost cocoa powders for my chocolate cakes.
- Baking Powder + Baking Soda. Leavens the cake batter, making it rise.
- Salt. Balances the sweetness.
- Eggs. Add structure and richness.
- Whole Milk + Sour Cream. A combination of milk and sour cream adds flavor, richness, moisture, and acidity, which helps the cake rise.
- Vegetable Oil. Moisture. An oil-based cake tends to be lighter and fluffier than butter-based cakes.
- Vanilla Extract. Use a good-quality vanilla extract for the best flavor.
Buttercream
- Unsalted Butter + Vegetable Shortening. Butter has the best flavor for buttercream, but if you want a nice white buttercream for your North Pole cake, then you have to use half butter and half shortening to whiten the color.
- Powdered Sugar. Sweetens and thickens the buttercream.
- Meringue Powder. Improves and stabilizes the texture.
- Vanilla Bean Paste. The flavor of vanilla bean paste is so good in buttercream, and the tiny black specks look gorgeous.
- Peppermint Extract. Be sure to use peppermint extract for a candy cane flavor and not mint extract (which can taste like spearmint).
- Whole Milk. Just a little milk, as needed, for desired spreading and piping consistency.
- Red Gel Food Coloring. If you decide to make the surprise inside striped buttercream, then you’ll need red gel food coloring for the red swirl. I use AmeriColor Super Red.
Cake Topper
- Peppermint Stick or Candy Cane. Either one will do, although a thick peppermint stick looks better than a skinny candy cane. If you use a candy cane, just break off the curved end.
- White Chocolate or Candy Melts. Dipping the tip of the peppermint stick in white chocolate gives it a pretty snowy finish.
Chocolate Cake Instructions
This is my absolute favorite recipe for chocolate cake. It’s moist and fluffy, dark and chocolatey, and so easy to make. It’s delicious enough to eat on its own, but even better with buttercream.
- Preheat the oven to 350. Spray the bottoms of three 8-inch round cake pans with non-stick spray.
- In a bowl, sift together the dry ingredients.
- In another large bowl, whisk together the liquid ingredients until smooth. Add the dry ingredients to the wet, and whisk briefly until combined.
- Divide the batter between the pans. Tap the pans lightly on the counter a few times to pop any large air bubbles. Bake the cakes on the center rack for about 25-30 minutes, until a toothpick or cake tester comes out clean or with moist crumbs clinging to it, and the tops spring back when gently touched.
- Set the pans on a cooling rack, cover loosely with a clean kitchen towel and cool completely before frosting.
How to Make Surprise Inside Candy Cane Striped Peppermint Buttercream
Peppermint Buttercream
- In the bowl of your stand mixer fitted with the whisk attachment, beat the butter and shortening for one minute until smooth.
- With the mixer on low, add the powdered sugar and meringue powder, mixing to combine.
- Add the vanilla bean paste and peppermint extract; whip on medium speed for 4-5 minutes, scraping the bowl occasionally, until very light and fluffy, adding the milk as needed for desired consistency.
- Set aside 1 cup of the buttercream, and add red gel food coloring to color it red. Fit two piping bags with tip #12 (medium sized round tip). Fill one piping bag with the red buttercream, and the other piping bag with white.

Making the Candy Cane Stripes
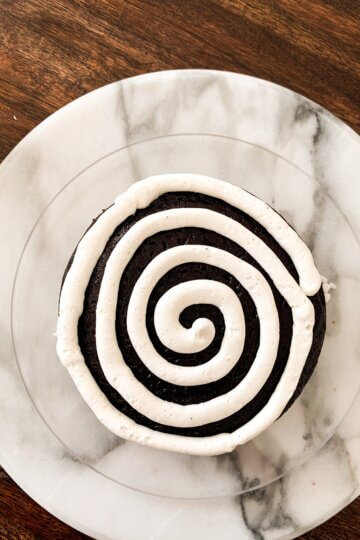
- Place one of the cooled cakes on a cake board. Starting with the white buttercream, pipe a swirl around the cake, leaving a gap in between the lines, all the way from the outer edge to the middle.
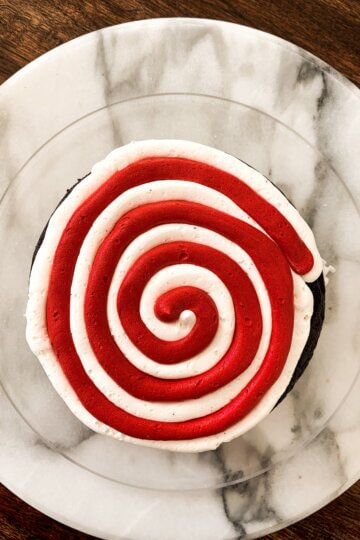
- Now take the red buttercream and pipe a swirl that fills in the gap around the white swirl.
- Place a second cake layer on top, and repeat piping the swirls of white and red buttercream. Top with the last cake layer.
- Frost the cake all over with a thin crumb coat of buttercream, and chill for 30 minutes, then frost the cake with a final swirly coat of buttercream.
How to Make a North Pole Cake Topper
- Melt the white chocolate. Dip the tip of the peppermint stick in the white chocolate, and let it drip down the stick just a little. Wait several minutes for it to set, then dip it again, letting a few more drips run down. Continue dipping the peppermint stick in the white chocolate, maybe 4-5 layers, until you’re happy with how the chocolate looks.
- Insert the peppermint stick on top of the cake. If you like, dust the top of the cake with powdered sugar.
Be sure to read all of my BAKING FAQs where I discuss ingredients, substitutions and common questions with cake making, so that you can be successful in your own baking! I also suggest reading these comprehensive posts on making Perfect American Buttercream, How to Stack, Fill, Crumb Coat and Frost Layer Cakes and How to Use Piping Bags.
You Might Also Like
Please check out my Amazon Shop for a curated collection of some of my favorite cake pans from trusted brands, baking tools, ingredients, pretty things and fashion finds. I recommend products that I buy and use every day!
Did you love today’s recipe? Please rate the recipe and let me know in the comments what you thought! Also, be sure to follow Curly Girl Kitchen on Instagram, and tag me when you try one of my recipes so I can see all your delicious creations!

North Pole Cake
All recipes on Curly Girl Kitchen are developed for high altitude at 5,280 feet. See FAQs for adjusting to higher or lower elevations.

Equipment
- Stand Mixer
Ingredients
Chocolate Cake
- 2 cups all-purpose flour, spooned and leveled
- 1 ¾ cups granulated sugar
- ¾ cup unsweetened Dutch-processed cocoa powder
- ½ tsp baking powder
- 1 ¼ tsp baking soda
- 1 tsp coarse Kosher salt (if using table salt, use half the amount)
- 4 large eggs
- 1 cup whole milk, room temperature
- 1 cup full-fat sour cream, room temperature
- 1 cup vegetable oil
- 2 tsp vanilla extract
Peppermint Buttercream
- 1 cup unsalted butter, softened to room temperature
- 1 cup vegetable shortening
- 4 cups powdered sugar
- 1 tbsp meringue powder
- 1 tsp vanilla bean paste
- 1-2 tsp peppermint extract
- 2-4 tbsp whole milk, if needed
- red gel food coloring
North Pole Decoration
- 1 thick peppermint stick or candy cane
- 2 tbsp white chocolate chips or white candy melts
Instructions
Cake
- Preheat the oven to 350. Spray the bottoms of three 8-inch round cake pans with non-stick spray.
- In a bowl, sift together the flour, sugar, cocoa powder, baking powder, baking soda and salt, then whisk until completely combined.
- In another large bowl, whisk together the eggs, milk, sour cream, oil and vanilla until smooth. Add the dry ingredients to the wet, and whisk for about 30 seconds until well combined and mostly free of lumps.
- Divide the batter between the pans. Tap the pans lightly on the counter a few times to pop any large air bubbles. Bake the cakes on the center rack for about 25-30 minutes, until a toothpick or cake tester comes out clean or with moist crumbs clinging to it, and the tops spring back when gently touched.
- Set the pans on a cooling rack, cover loosely with a clean kitchen towel and cool completely before frosting.
Buttercream
- In the bowl of your stand mixer fitted with the whisk attachment, beat the butter and shortening for one minute until smooth.
- With the mixer on low, add the powdered sugar and meringue powder, mixing to combine.
- Add the vanilla bean paste and peppermint extract; whip on medium speed for 4-5 minutes, scraping the bowl occasionally, until very light and fluffy, adding the milk as needed for desired consistency.
Assembly
- Set aside 1 cup of the buttercream, and add red gel food coloring to color it red. Fit two piping bags with tip #12 (medium sized round tip). Fill one piping bag with the red buttercream, and the other piping bag with white.

- Place one of the cooled cakes on a cake board. Starting with the white buttercream, pipe a swirl around the cake, leaving a gap in between the lines, all the way from the outer edge to the middle. Now take the red buttercream and pipe a swirl that fills in the gap around the white swirl.Place a second cake layer on top, and repeat piping the swirls of white and red buttercream. Top with the last cake layer.
- Frost the cake all over with a thin crumb coat of buttercream, and chill for 30 minutes, then frost the cake with a final swirly coat of buttercream.
The North Pole
- Melt the white chocolate. Dip the tip of the peppermint stick in the white chocolate, and let it drip down the stick just a little. Wait several minutes for it to set, then dip it again, letting a few more drips run down. Continue dipping the peppermint stick in the white chocolate, maybe 4-5 layers, until you're happy with how the chocolate looks.
- Insert the peppermint stick on top of the cake. If you like, dust the top of the cake with powdered sugar.
Notes
 https://curlygirlkitchen.com/
This is such an adorable cake!! I’m so happy I found your website. My mom and I have been having so much fun trying your recipes! Every one of them has turned out awesome! I do have a question for you about this cake, do you think I could use your eggnog buttercream recipe (the one with 1/3 cup eggnog) listed in the cardamom cake page or do you think it would be too much eggnog between the cake and frosting ?
I’m so glad to hear that! That wouldn’t be too much eggnog by my standards. In fact, I have plans to update this post/recipe this winter doing that very thing. 😉