
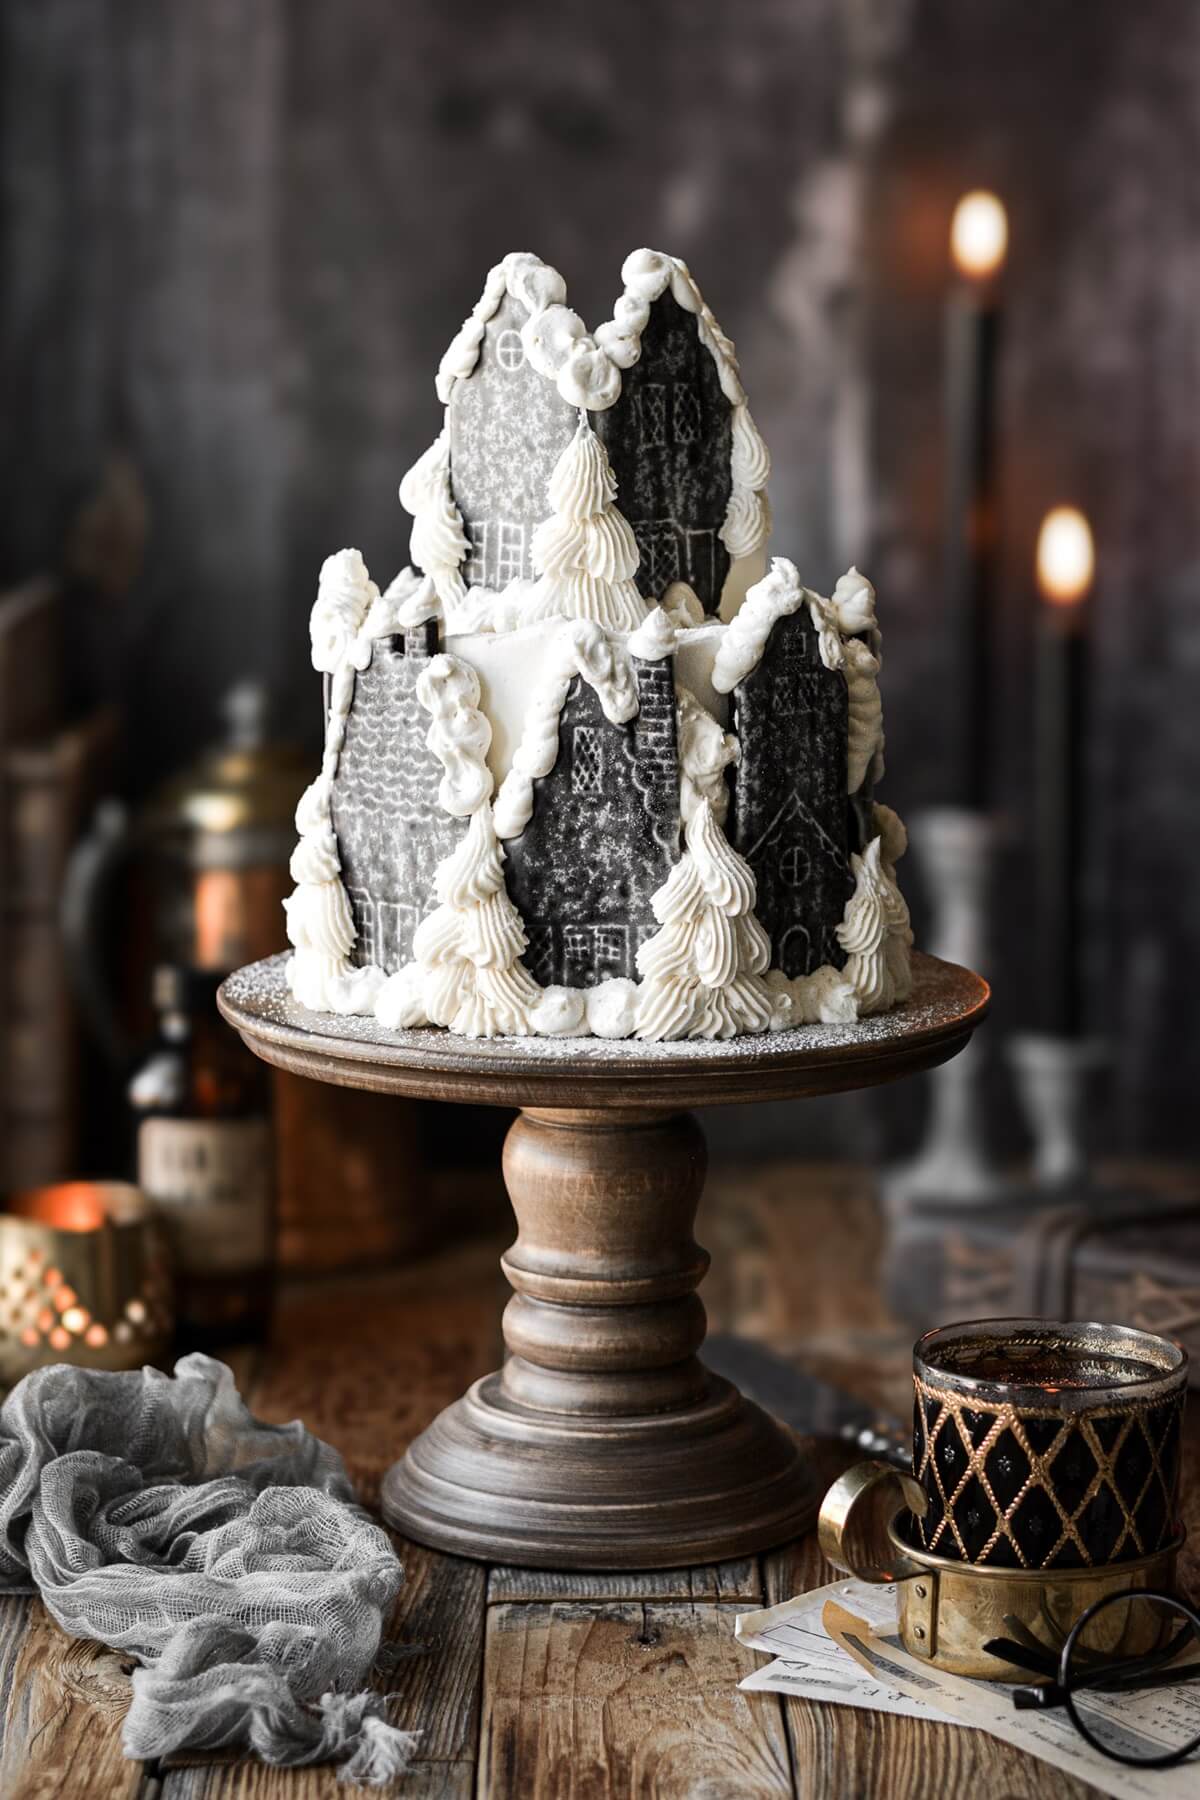
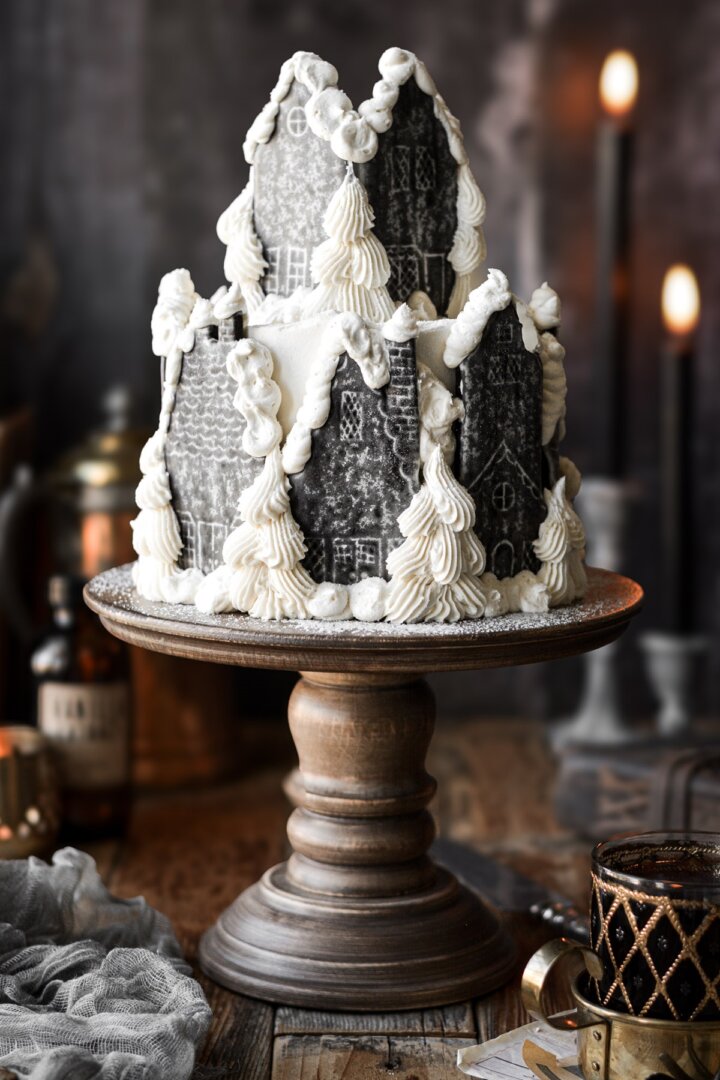
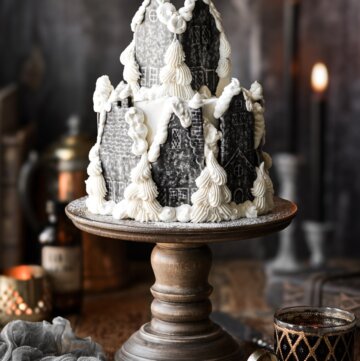
Today I’m sharing a stunning design for a Hogsmeade Village Christmas Cake that looks like a snowy gingerbread village. This cake features iced chocolate shortbread houses encircling a chocolate cake, with snowy buttercream trees and snowdrifts. Step into the magical world of Harry Potter, stroll the streets of Hogsmeade in wintertime, and enjoy a mug of butter beer at the pub with this enchanting cake.
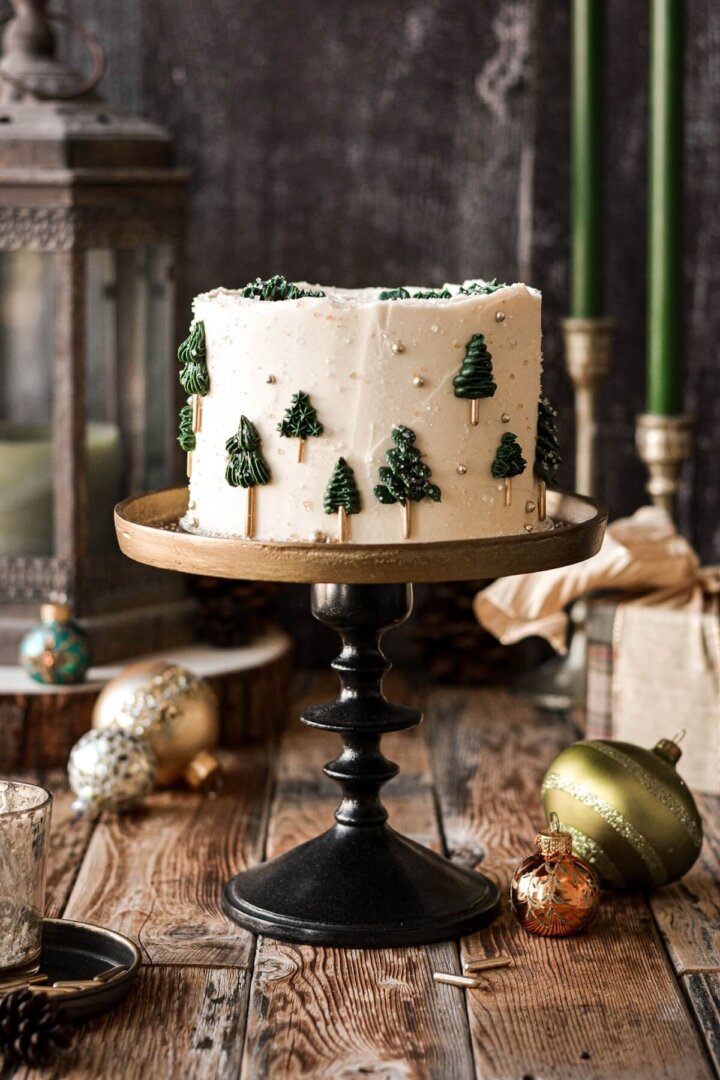
Looking for more Christmas recipes? You might also love this cardamom almond star bread, gingerbread sheet cake with powdered sugar snowflakes, and a cute little snowman cake.
This site contains affiliate links. As an Amazon associate, I earn from qualifying purchases. This means that I may make a small commission if you purchase a product using those links. This in no way affects my opinion of those products and services. All opinions expressed on this site are my own.
Why You’ll Love This Recipe
Tastes like Oreos. With the dark chocolate cake and cookies and the vanilla buttercream and icing, this cake tastes like an Oreo.
No Spread Cookies. While you could use gingerbread cookie dough for the decorated cookies, I decided to go with chocolate shortbread for my houses. The color is beautiful, they taste deliciously chocolatey, and they stay soft for days. And, very importantly, mine is a no spread shortbread cookie recipe. Since the cookies don’t spread, they hold their shape perfectly, and the stamped design is beautifully preserved as they bake.
Step by Step Photos. While there are a few different components in this cake, the step by step photos in today’s post will help guide you through the process if you want to try creating your own Hogsmeade village cake for Christmas.
High Altitude Tested. I develop all the recipes on my site for Denver’s altitude of 5,280 feet. If you’re at a lower or higher elevation, please see my FAQs for guidance on adjusting recipes for your altitude. Everything in today’s post, from the cake to the cookies, is tested at high altitude for reliable results.
How to Decorate Cookies without Royal Icing
This Hogsmeade village Christmas cake actually began with my experimenting with ways to decorate Christmas cookies and gingerbread cookies without royal icing. Piping intricate details with royal icing isn’t one of my strongest skills, as I’m guessing is the case for many people. So I’ve been looking for ways to make beautiful Christmas cookies without trying to pipe all those tiny details in icing.
Stamped Shortbread Cookies
Using cookie stamps to press shortbread cookie dough, and then glaze with icing is one way to make beautiful cookies for the holidays. They’re easy to make and they look simply gorgeous. I made these stamped chocolate shortbread cookies using the Nordic Ware Starry Nights cookie stamps, and I just love them.
Continue reading below for step-by-step photos of how I made the cookie houses.
Embossed Shortbread Cookies
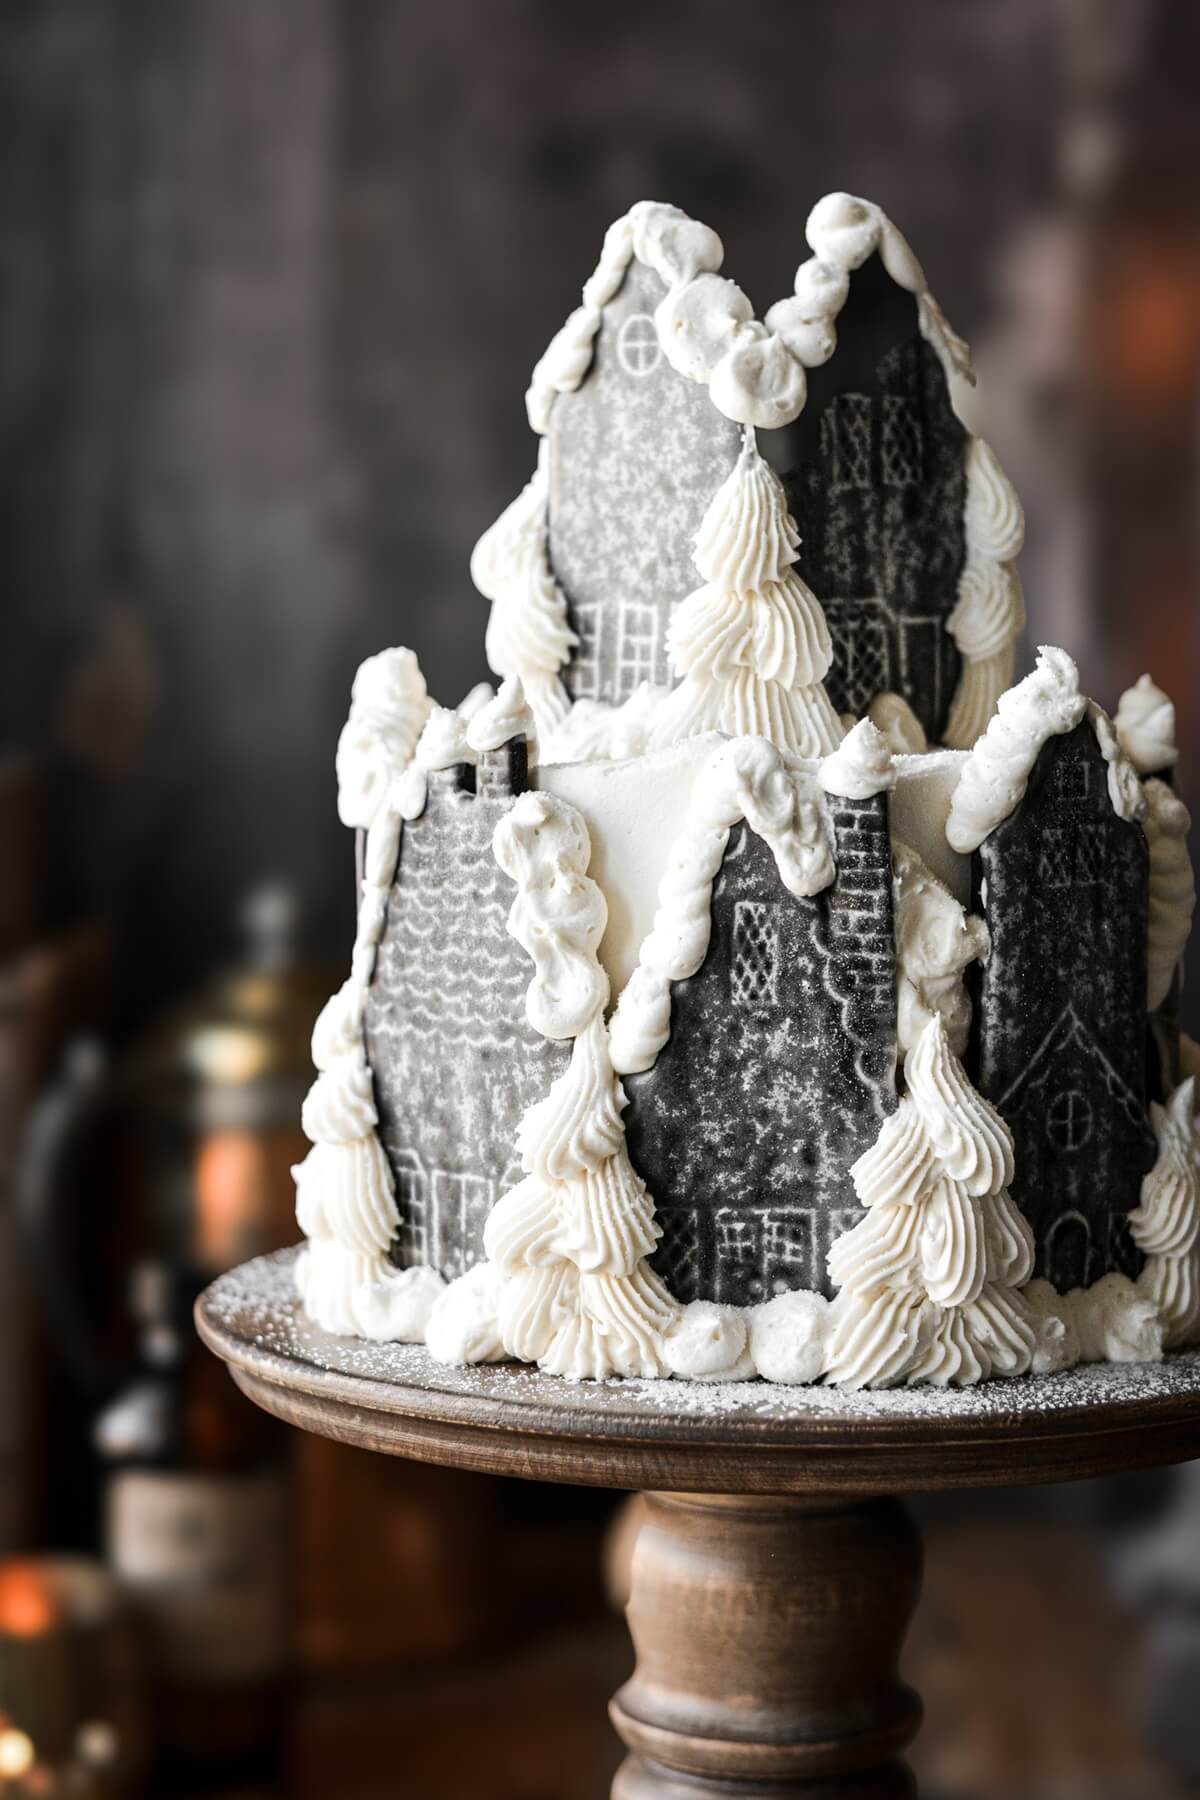
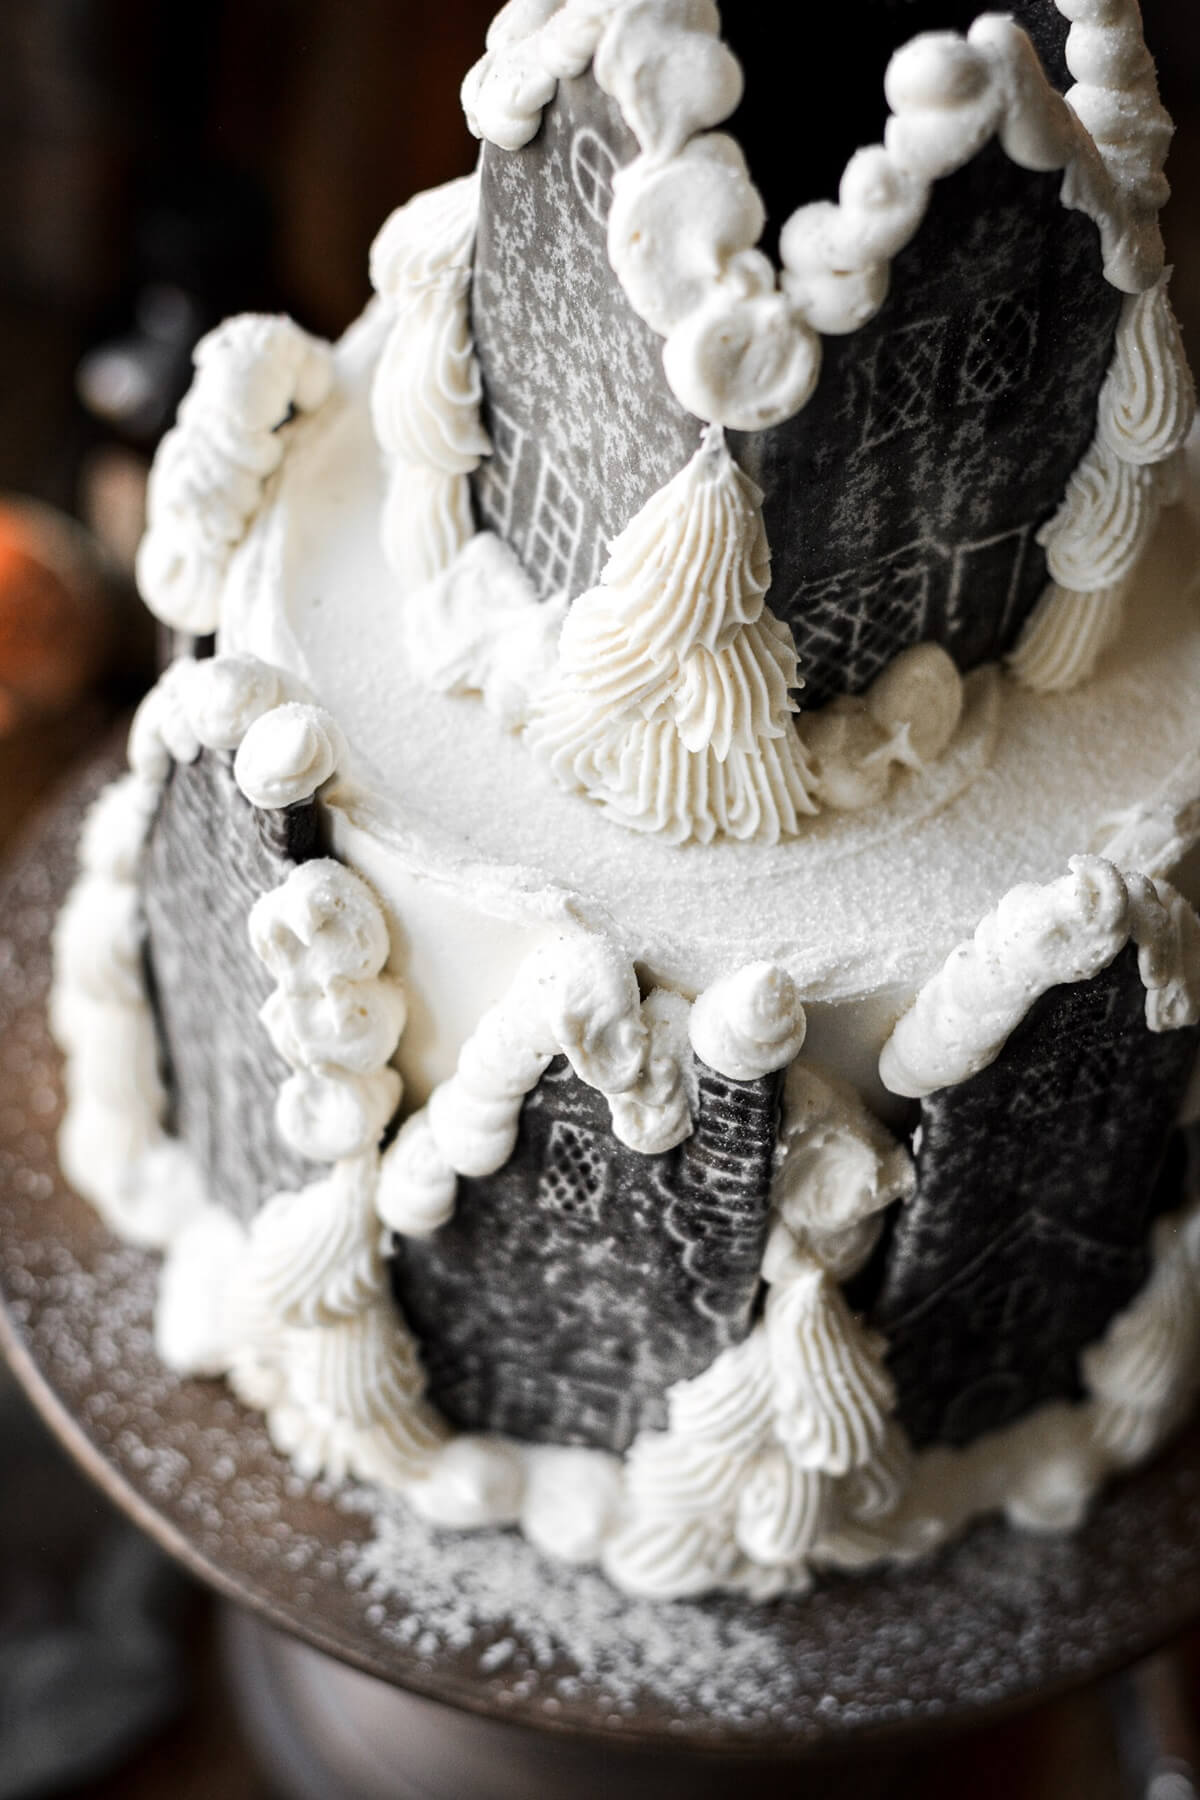
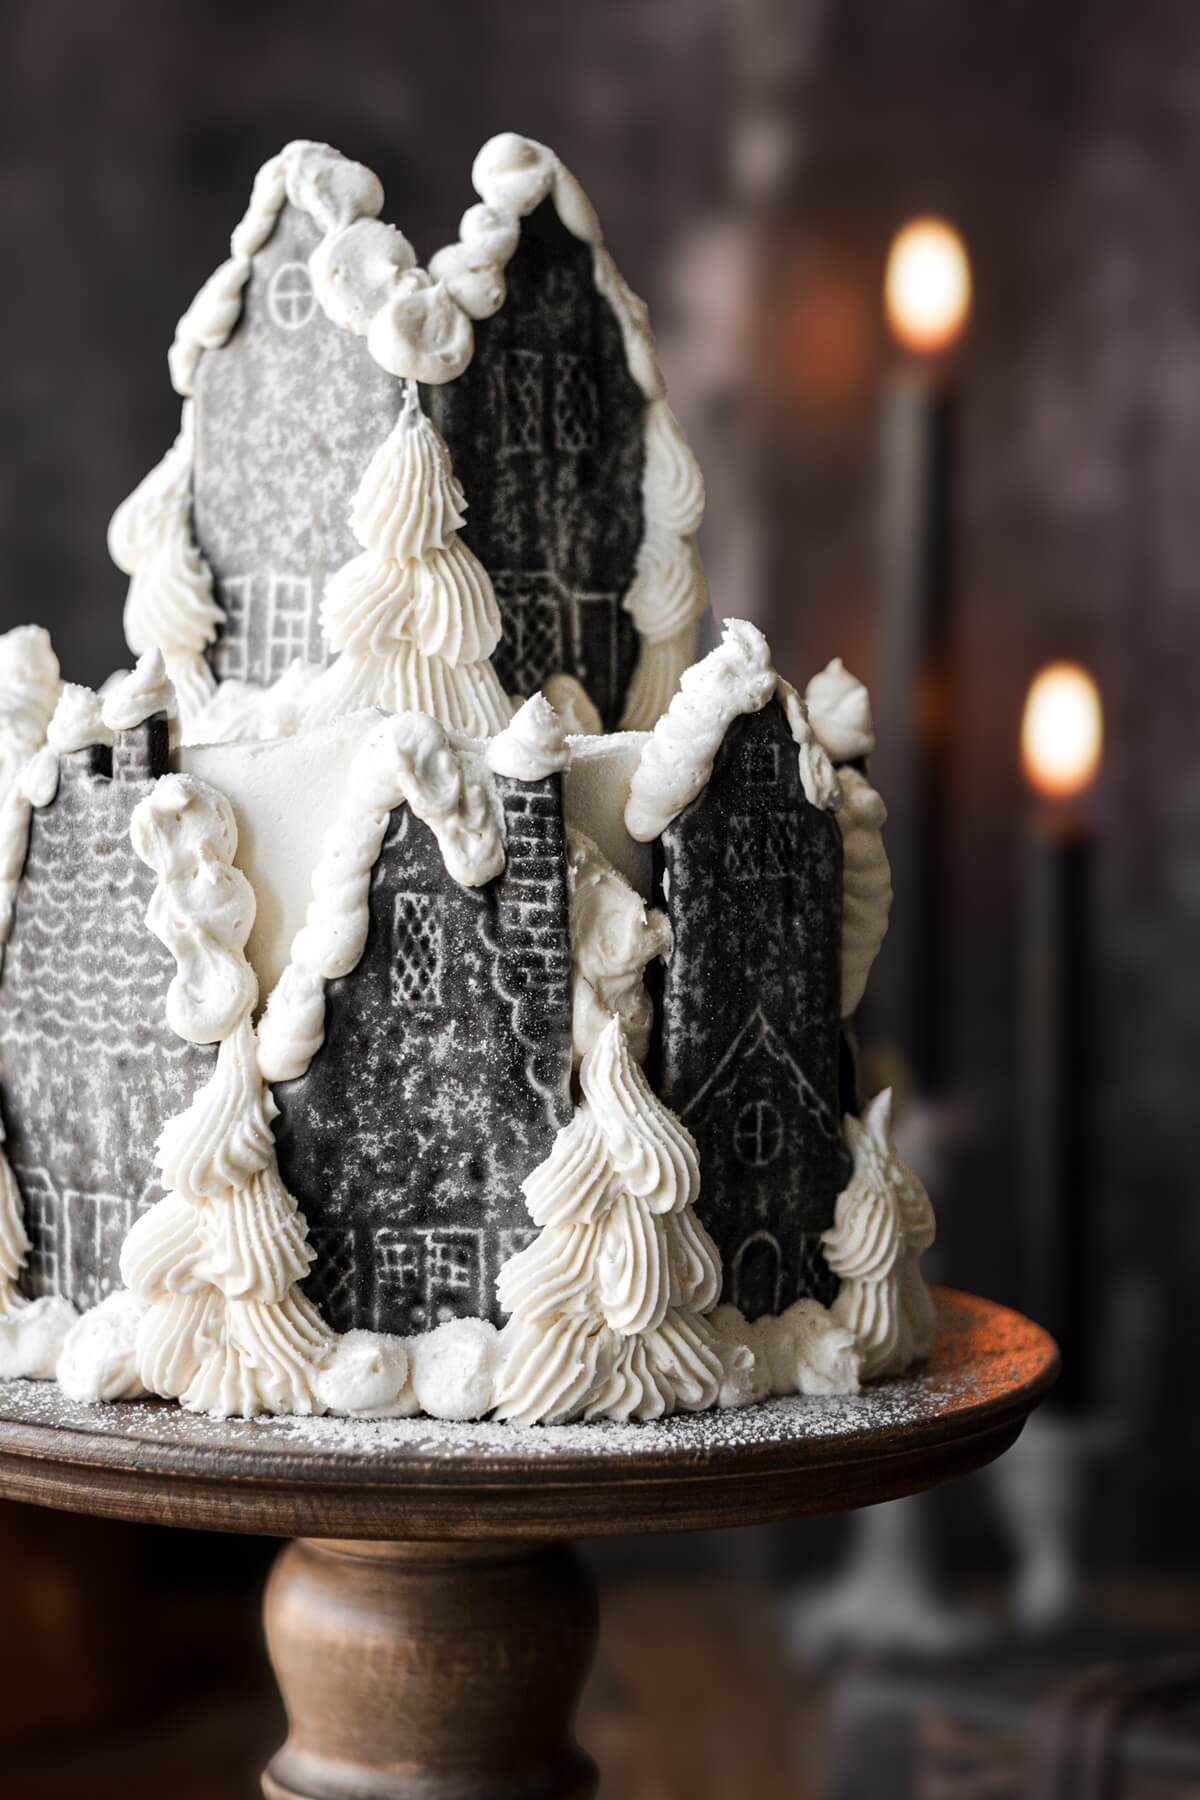
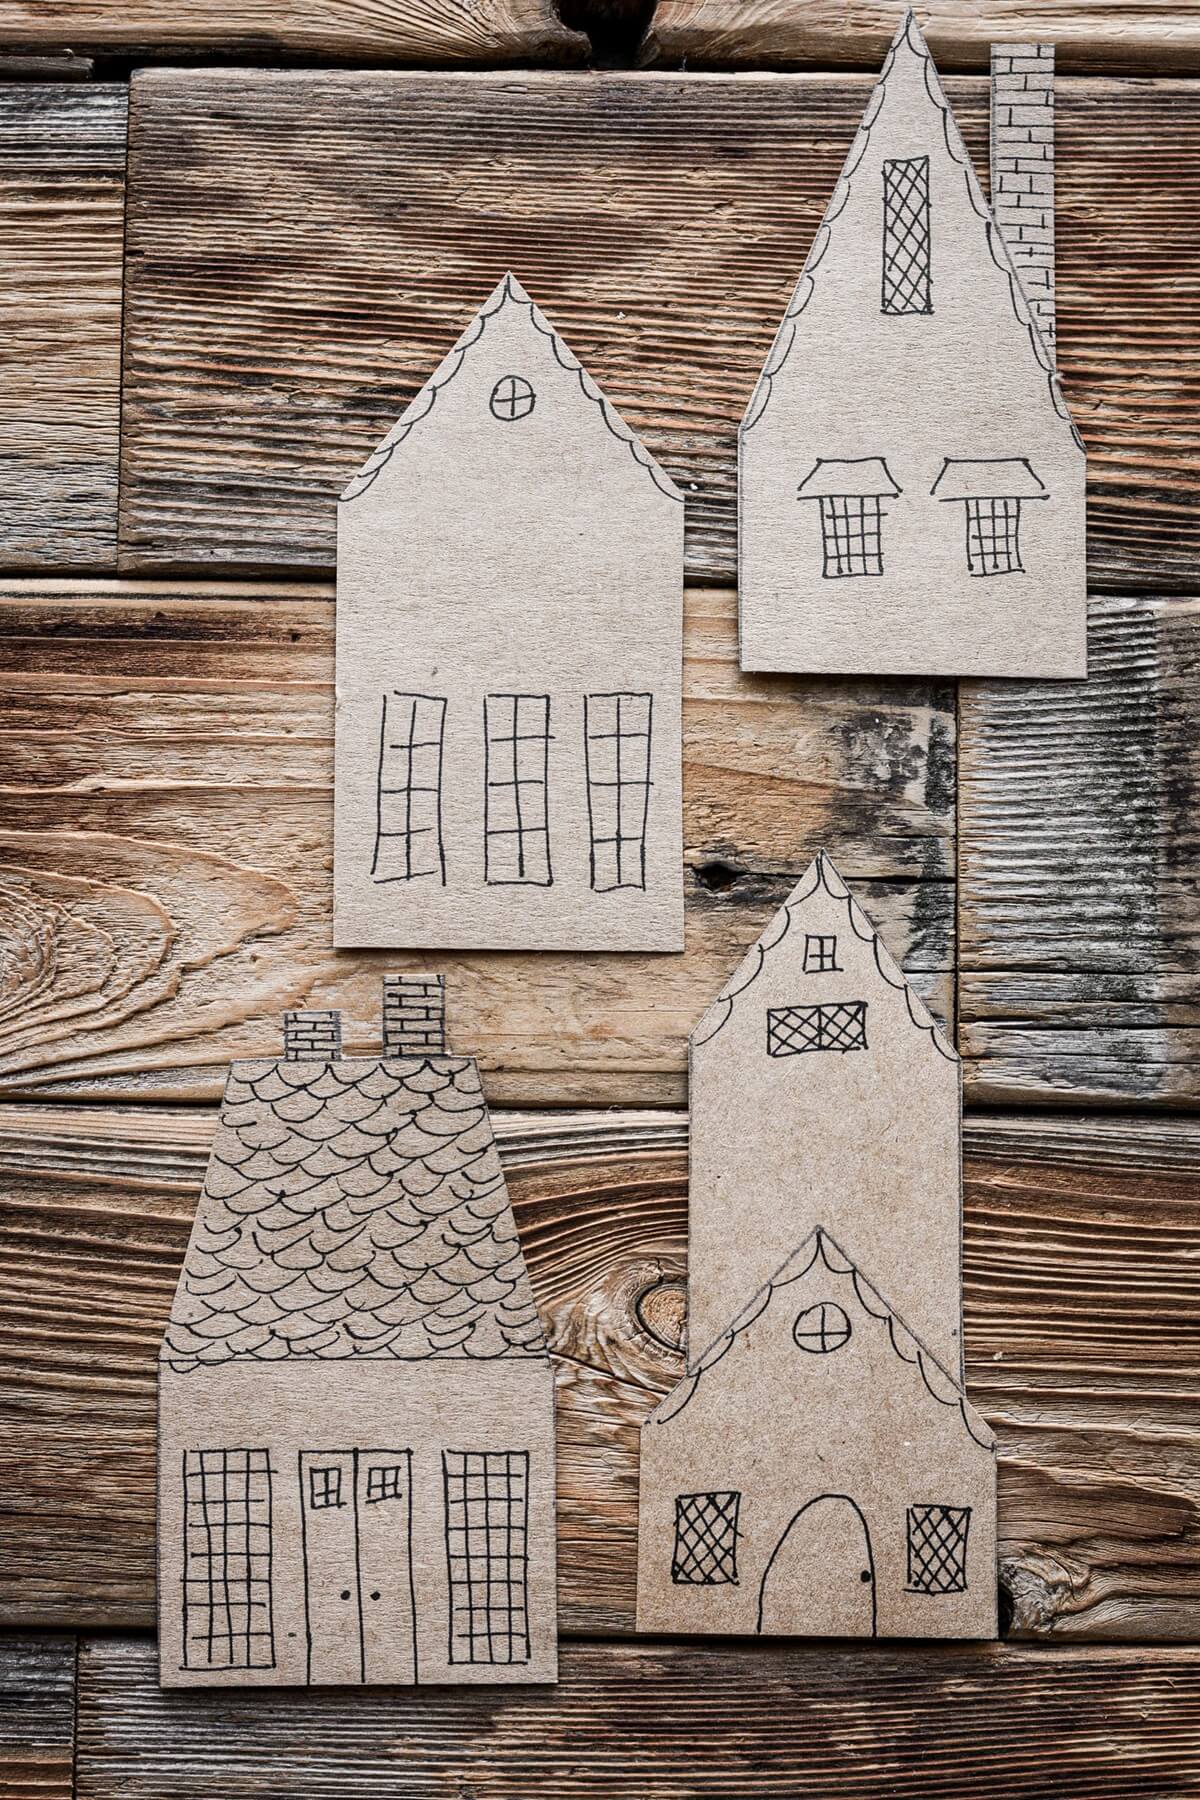
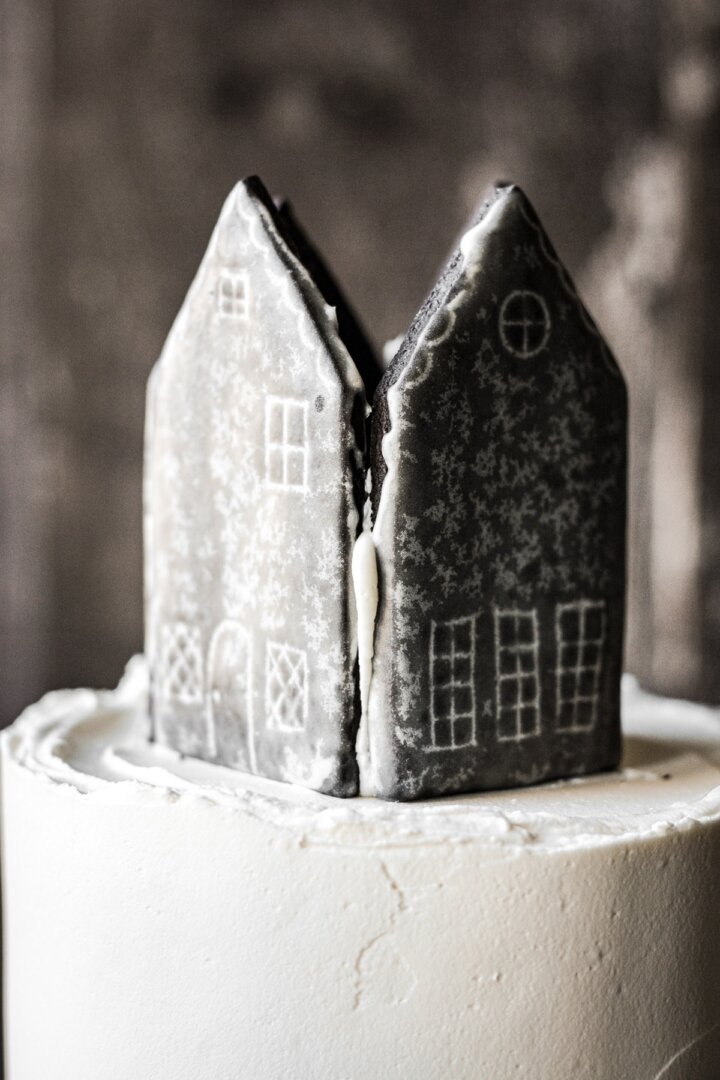
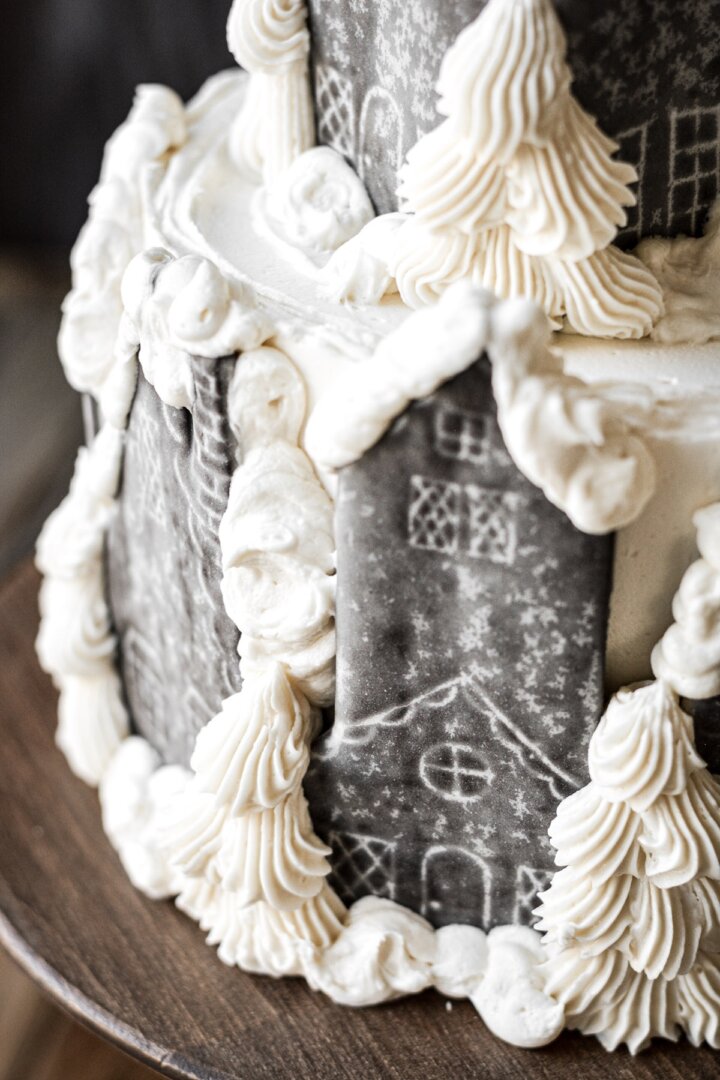
For my village house cookies, I chose to emboss my cookies. Quite simply, this involves rolling out the chocolate shortbread cookie dough, cutting it into shapes, then using various tools to emboss patterns and designs onto the dough before baking.
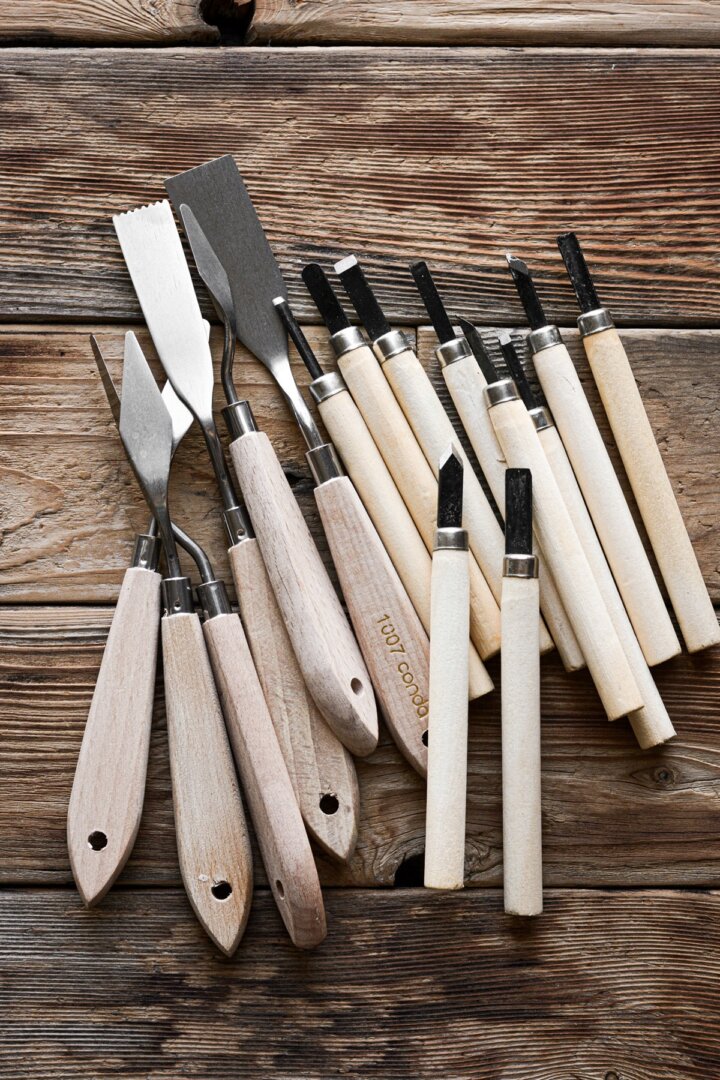
I used mini cookie cutters such as squares, rectangles and stars, as well as some palette knives, to create the doors and windows. The end of a piping tip pressed along the roof line created a pretty scalloped effect. But if you don’t have these tools, you can be creative and use whatever you have. The tines of a fork, a piece of jewelry, the end of a chopstick, etc, can all be used to create unique and interesting patterns on the dough.
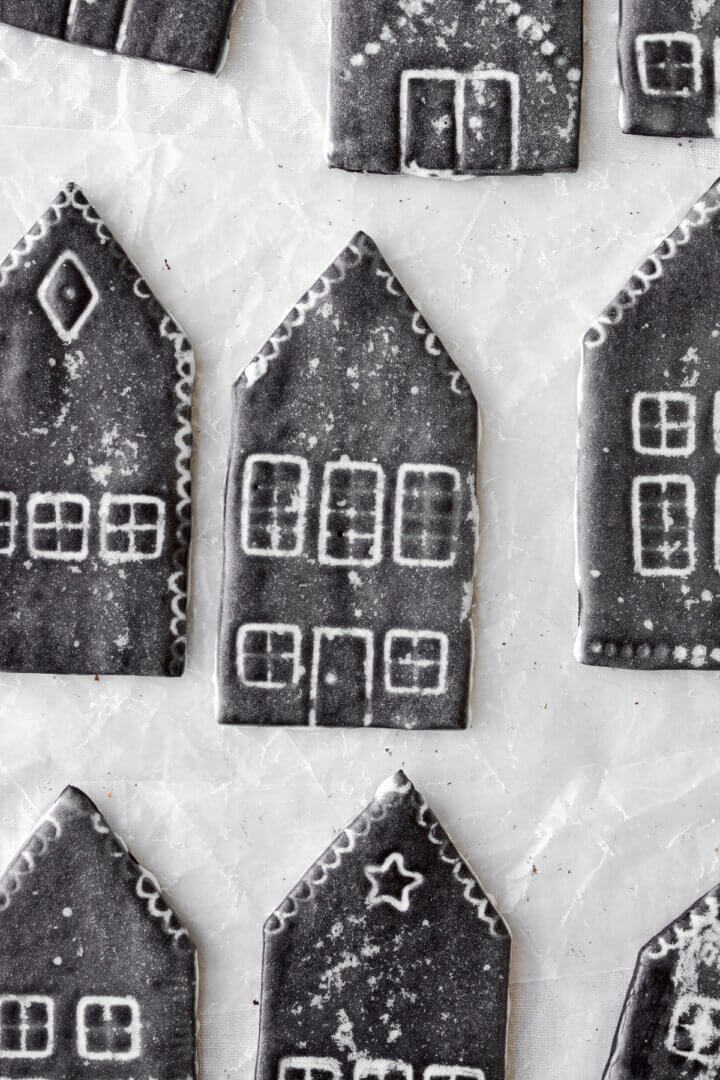
What really brings the details to life, though, is the icing. When you brush the icing onto the warm cookies, the thin glaze fills all the cracks and crevices, while remaining fairly translucent over the cookies. And as the glaze dries and turns whiter, all those embossed details really pop.
The Cake
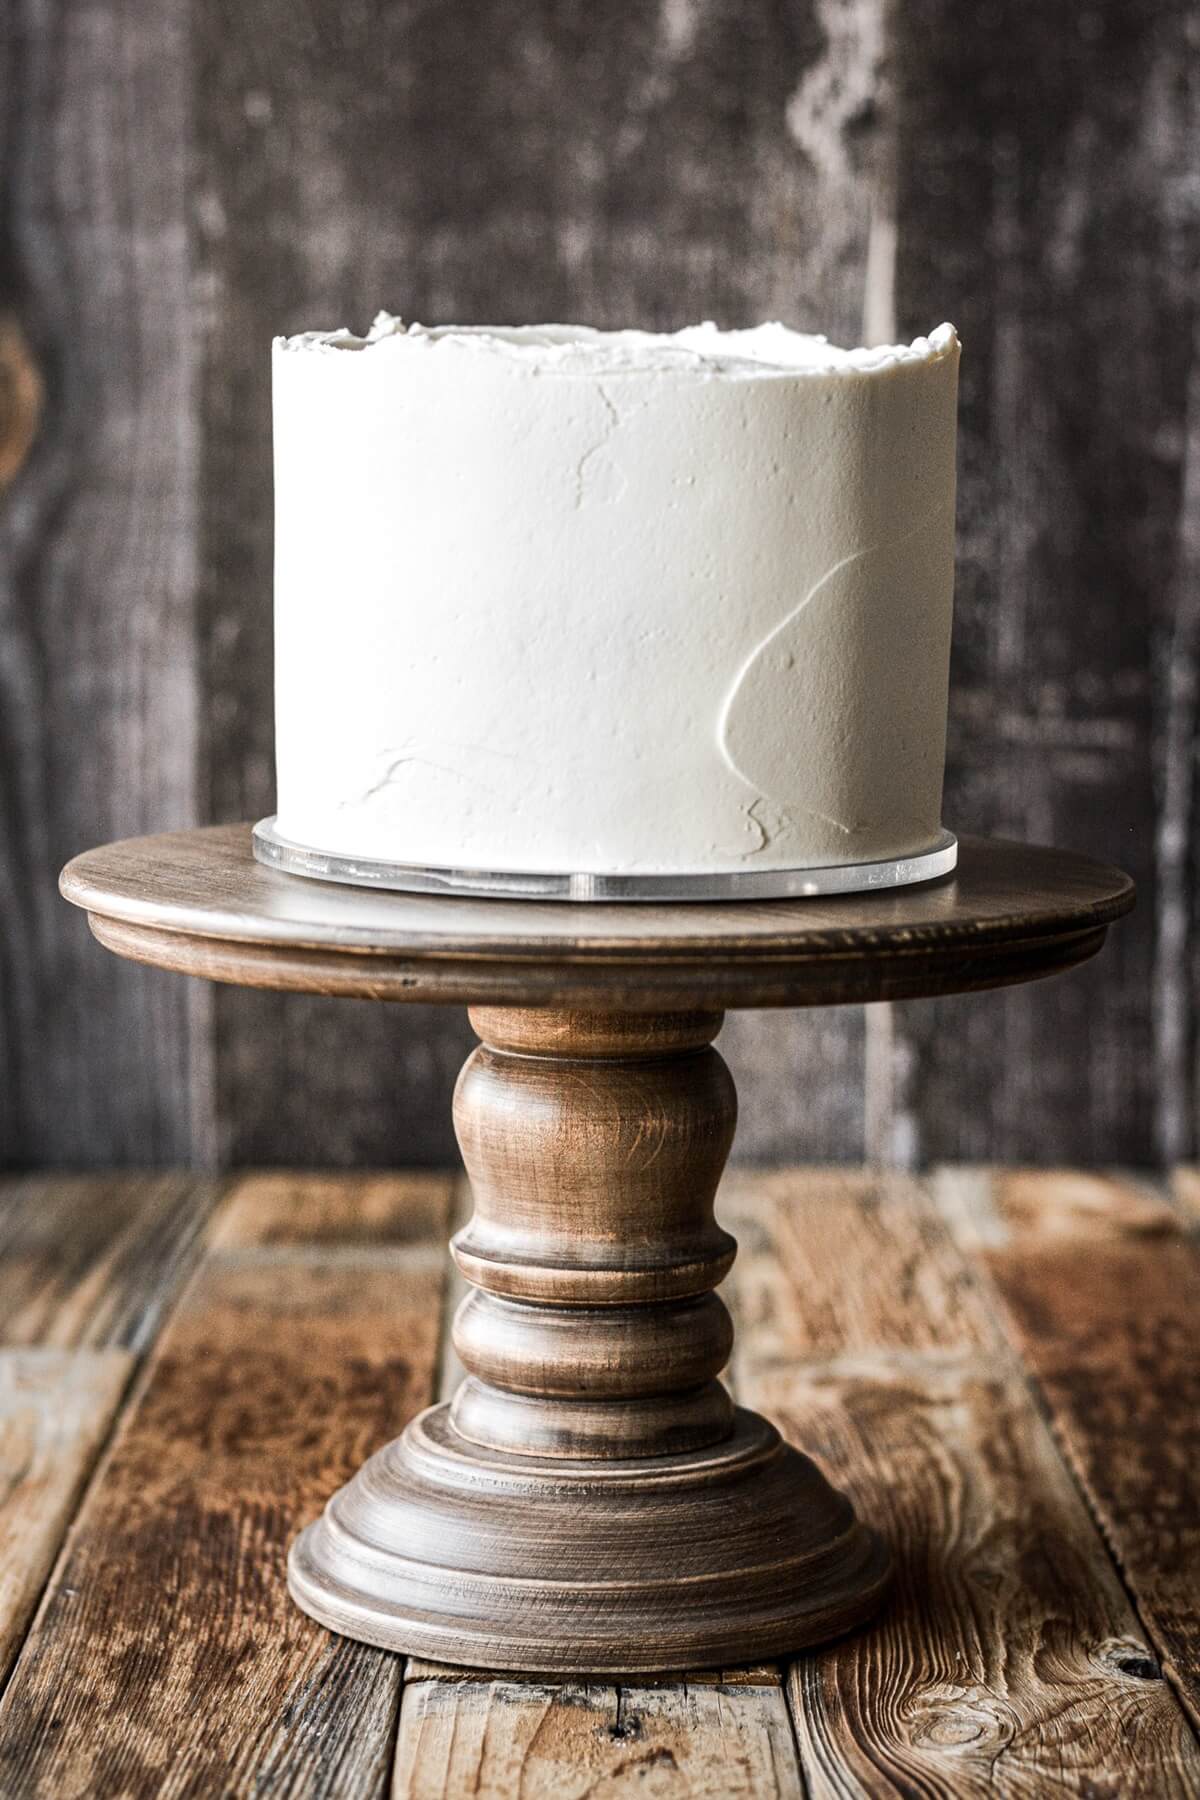
The cake flavor doesn’t matter, of course. I used my recipe for high altitude chocolate cake, and it was simply delicious with the iced chocolate shortbread cookies, like cookies and cream.
Since I didn’t want my assembled cake to be too big, I baked half the cake recipe in three 6-inch cake. The smaller size is perfect for this Hogsmeade village cake, and the houses arranged on top of the cake look like a second cake tier.
The Buttercream
You’ll need a fluffy white buttercream for this cake, one that holds its shape when piped, so that you can pipe the trees and swirly snow drifts. My Perfect American Buttercream recipe has everything you need to know about making the best buttercream you’ve ever tasted and decorated a cake with.
There are a few steps to making this cake, but you can make each element of the cake a day or two in advance, and then take your time with the decorating the next day. Your friends and family will be so impressed when you serve them this gorgeous Christmas cake!
Instructions and Assembly
Make the cookie dough.
- You’ll need 2x the recipe for Chocolate Shortbread Dough. Prepare the dough, wrap in plastic wrap, and refrigerate for 20 minutes before rolling and cutting your houses.
- You can wrap the dough and refrigerate it for several days until needed. Let the dough warm up to room temperature until pliable enough to roll out without difficulty, but still cool.
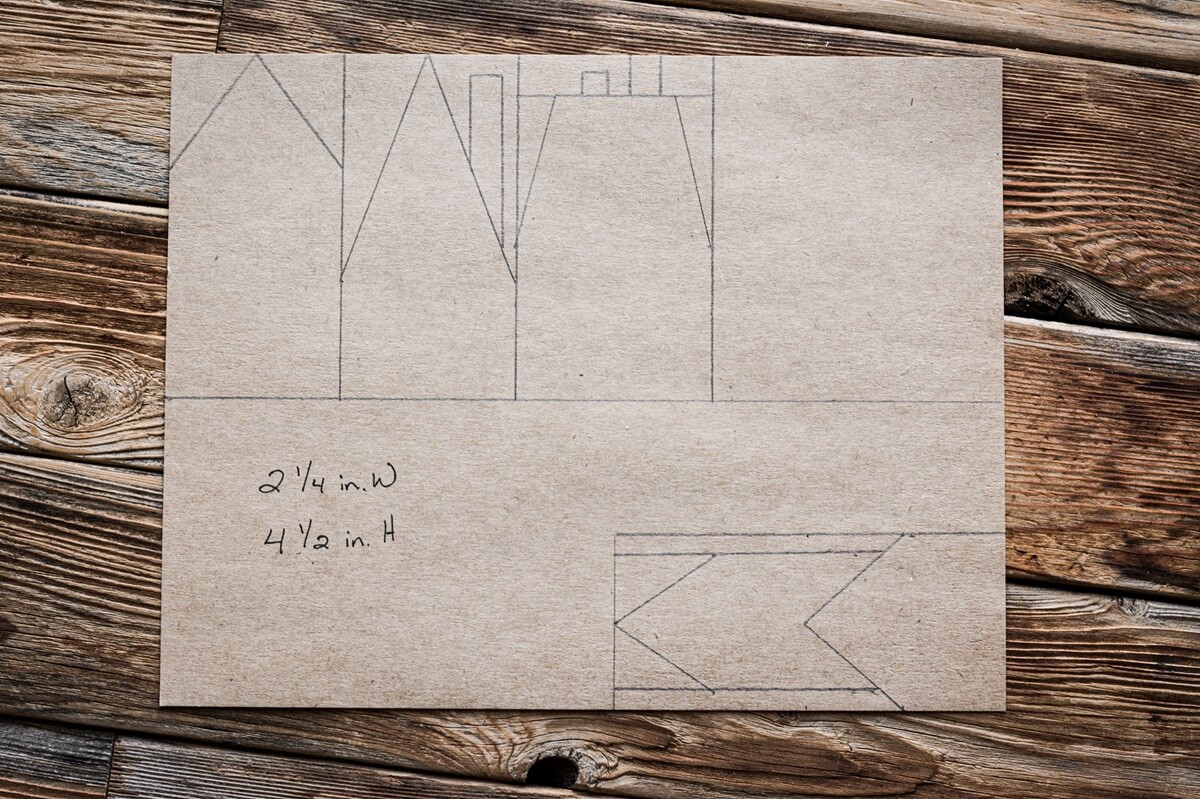
Make the house template.
- Draw and cut a template on a piece of card stock. First, cut a rectangle measuring 2 1/4 inches x 4 1/2 inches. Then, cut off two corners at the top to make the roof line.
- You can make other shapes of houses, as you can see I did on my template, but it’s helpful to keep them similar in width and height.
Roll and cut the house cookies.
- Roll out the dough on a lightly floured surface, to just under 1/4 inch thick.
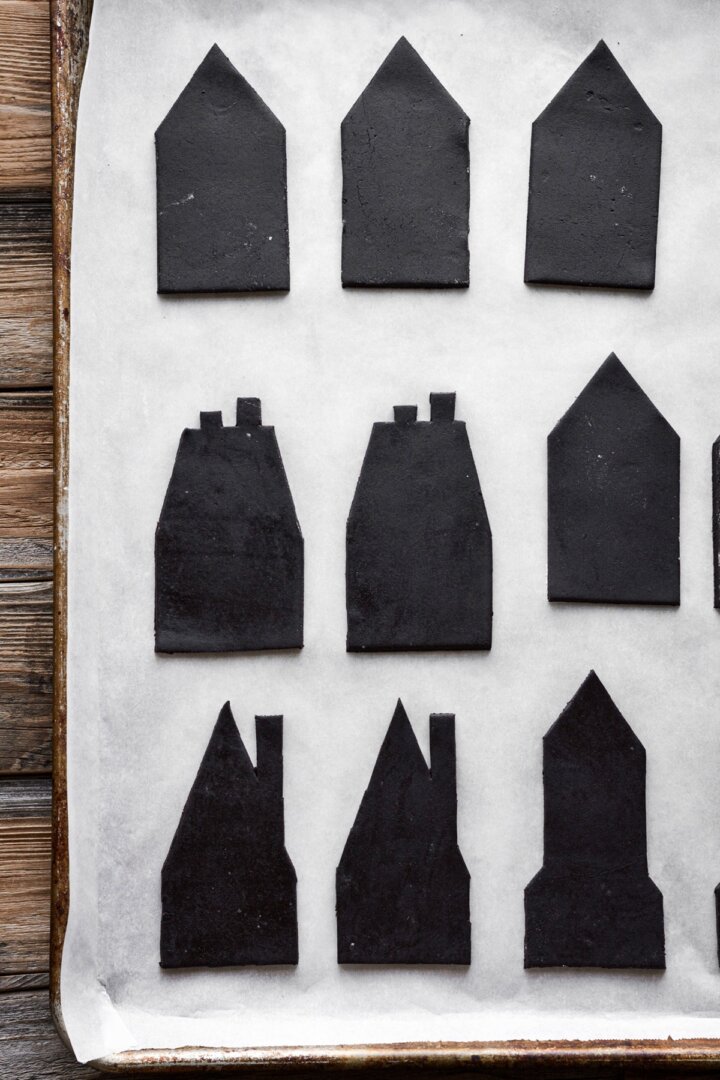
- Set your card stock template onto the dough, and use a sharp knife, bench scraper, or palette knife to cut out the dough. You’ll need to cut 12 houses, 4 for the top, and 8 for around the cake. You may even want to make a few extra, in case you break any cookies. Wrap any leftover dough, and freeze for another project.
- Place the houses 1 inch apart on a large baking sheet lined with parchment paper.
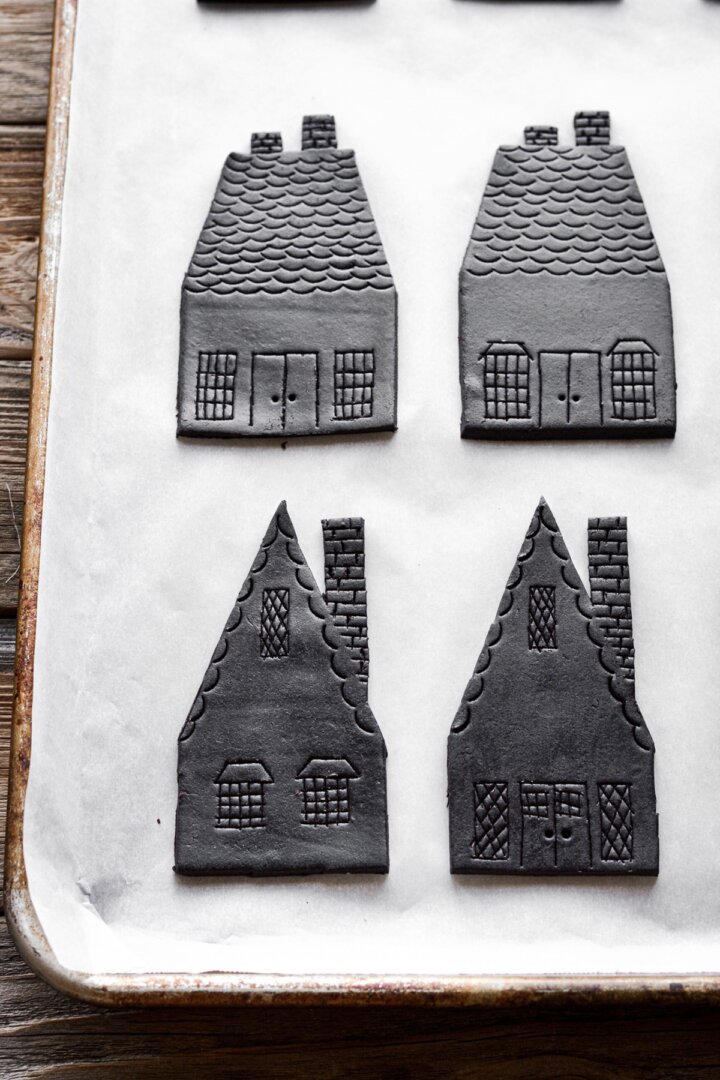
Emboss the cookies with the house details.
- It’s helpful if you have some small shapes cutters, palette knives, or other tools to use to make impressions on the houses. For example, squares, rectangles, circles, stars, hearts, etc, all work well for impressing windows, doors, and other designs on the dough. For the roof line, you can use the end of a piping tip to impress a scalloped pattern.
- Be creative, look around your house for little things you can use to impress interesting patterns and designs. Everything you stamp onto your dough will be highlighted when you ice your cookies. Try to do a variety of designs on the cookies, to keep them different and interesting.
- When embossing your dough, press the cutters and tools (blunt side against the dough) deep enough to leave an impression, but not deep enough to cut through the dough.
- Once you’re satisfied with your designs, set the pan in the refrigerator and chill for 1 hour before baking. Chilling the dough ensures your pattern will be preserved, and the dough won’t spread while baking.
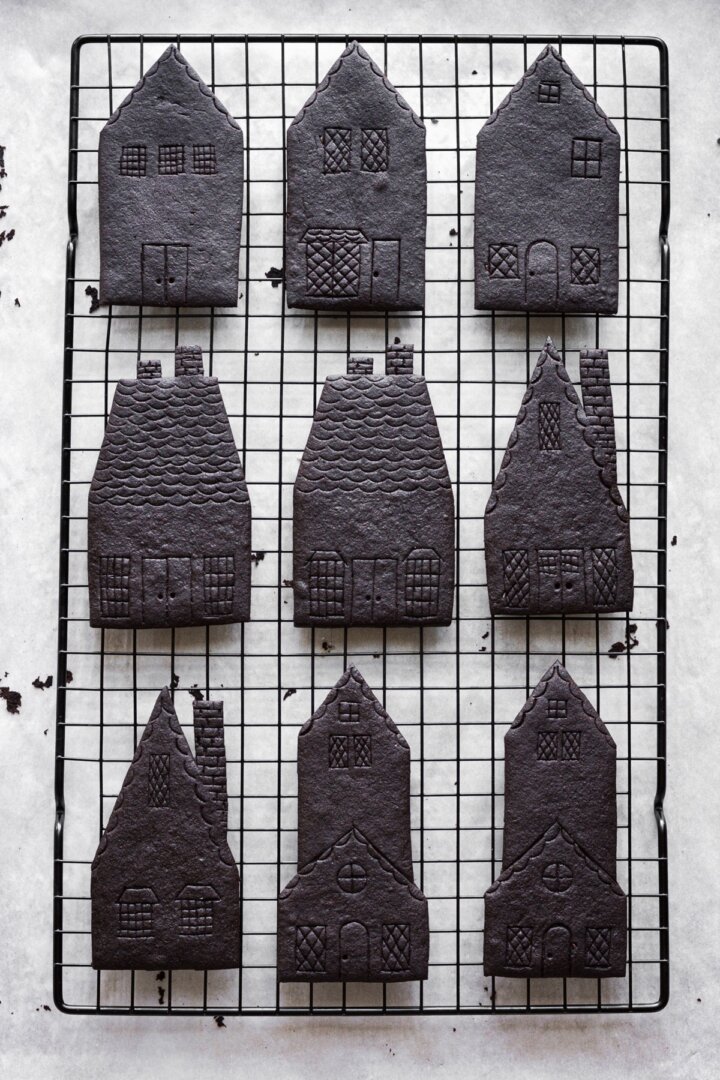
Bake the cookies and brush with icing.
- Preheat the oven to 350 F. Bake the chilled cookies for 11-12 minutes. Cool on the baking sheet for exactly 5 minutes, then gently transfer to a cooling rack. Immediately brush the warm cookies with the icing.
- As soon as the cookies come out of the oven, you can quickly make the icing. In a bowl, whisk together all ingredients until smooth. The glaze should be thin, with a consistency like warm honey. After cooling the cookies on the baking sheet for 5 minutes, gently transfer to a cooling rack. Use a pastry brush to immediately and quickly brush the icing over the warm cookies, getting it into all the crevices, and letting it drip over the edges.
- Once you’ve finished a cookie, don’t brush over it again or touch it until the glaze sets completely. The glaze will crust over and set quickly, in about 30 minutes. Let cool and set completely for several hours. Then store in a single layer, or stacked with sheets of wax paper between each layer, in an airtight container, until ready to decorate your cake.

Icing Notes
- For a milkier, more opaque looking icing that doesn’t crystallize as easily, I used my updated icing recipe in this post on today’s updated cake design (photos above).
- For a more translucent icing with crystallized patches, use the icing recipe in today’s recipe card. This is the icing I used on my original design for this cake in 2020 (photos below). Soon after icing your cookies, the glaze will develop whiter patches that look crystallized. You can also encourage more crystallization by freezing the cookies. While I don’t generally care for this appearance on my stamped cookies, I do prefer it for this Hogsmeade village cake, since it adds to the icy appearance of the snowy scene.
Bake and Frost the Cake
- You can bake any flavor cake you like, but I chose my Chocolate Cake with Vanilla Buttercream recipe.
- I made a small 6-inch 3-layer cake (which is 1/2 the cake recipe), but you can certainly make yours an 8-inch 3-layer cake. You’ll need to make 5x the buttercream recipe to have enough for frosting and decorating.
- Bake, cool, stack and frost your cake. Smooth out the sides of the cake, but it doesn’t have to look perfect, since it will be covered up with cookies.
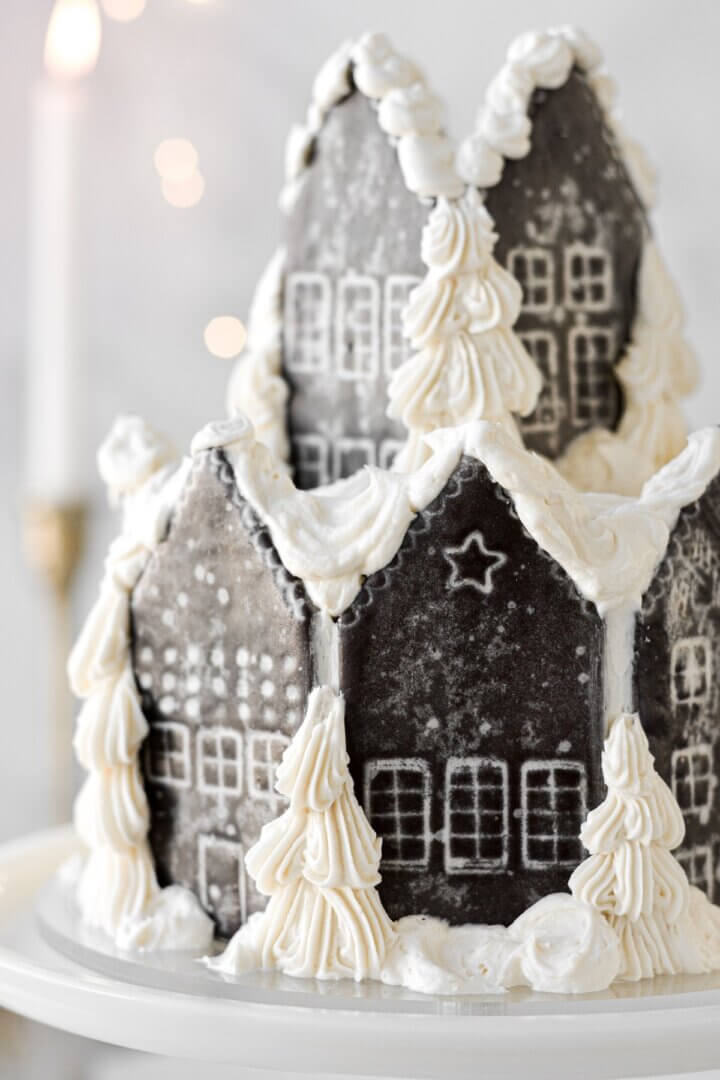
Decorate your gingerbread village cake.
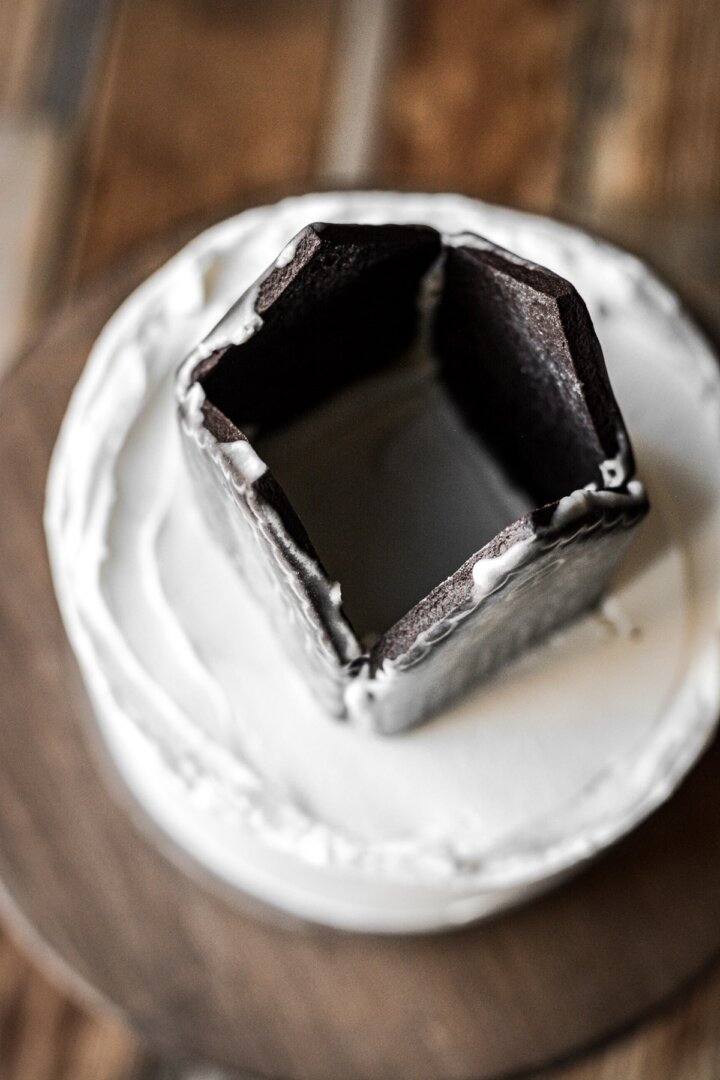
- Arrange 4 of the houses on top of the cake, so that they form a square, pressing them gently into the frosting. Spread or pipe a little buttercream at the seams to help hold them in place. If needed, you can support them by inserting a popsicle stick into the cake behind each.
- Arrange the remaining houses around the side of the cake, pressing them gently against the buttercream.
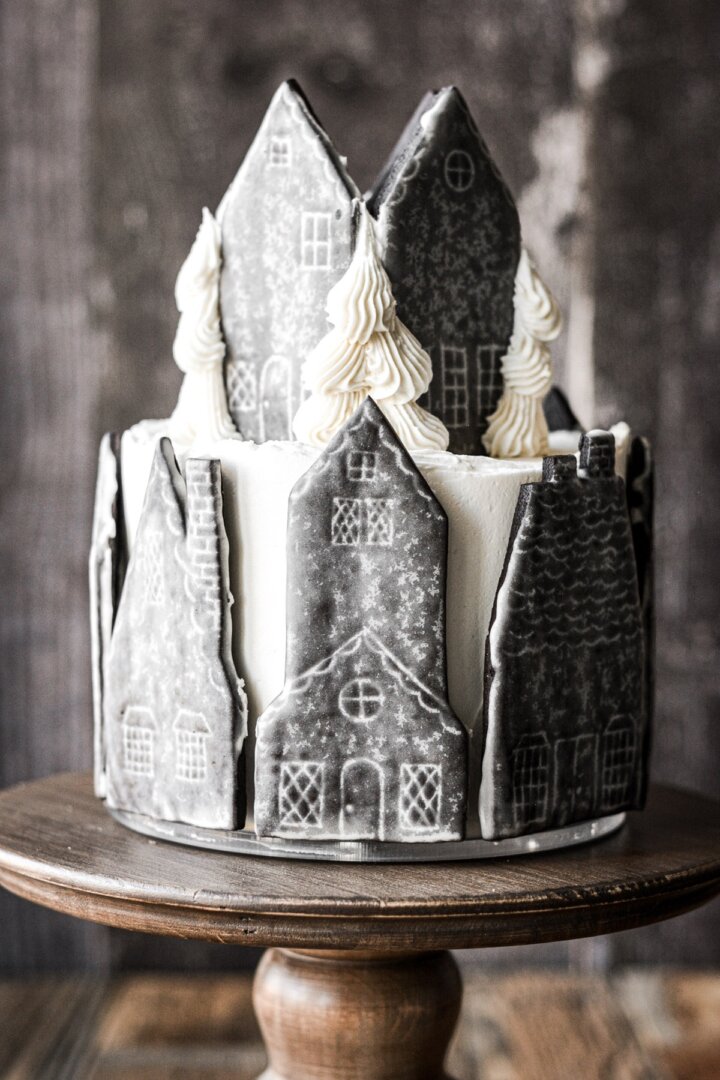
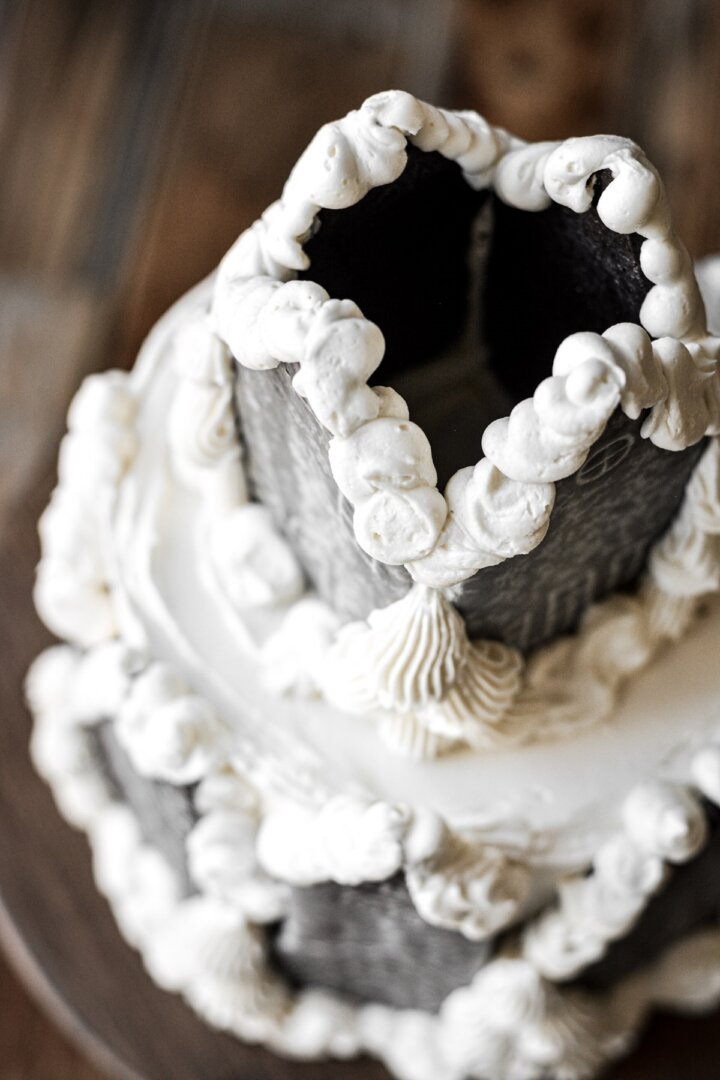
- Fit a piping bag with a coupler and a medium star tip, like tip 18, and fill with buttercream. Pipe trees between each of the houses.
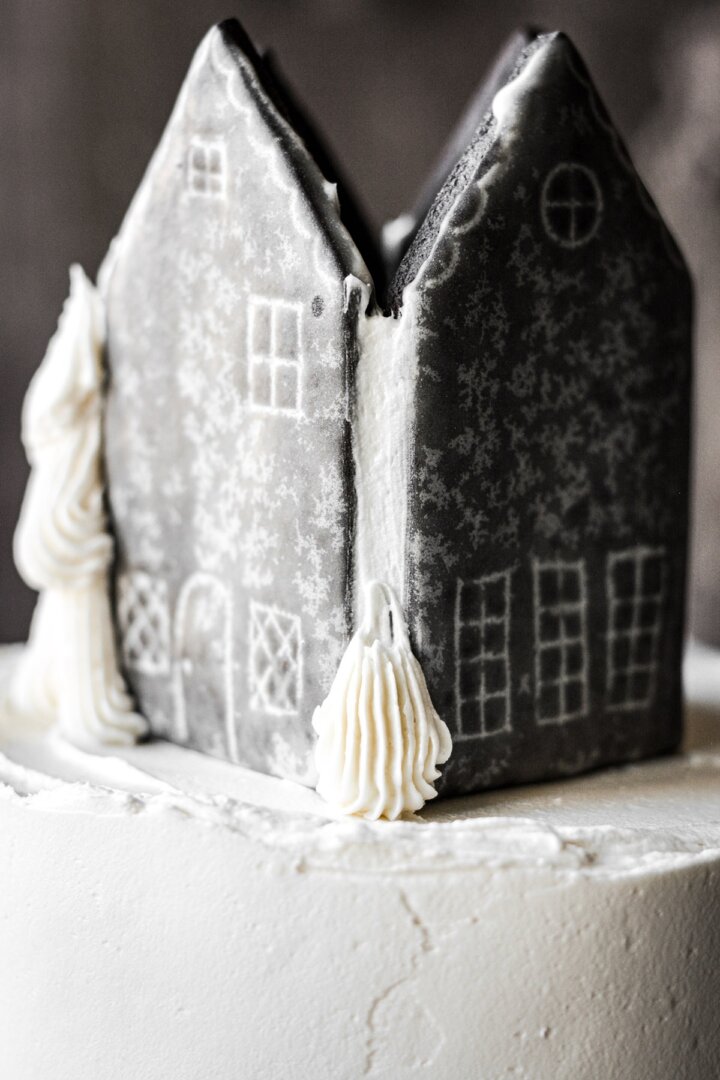
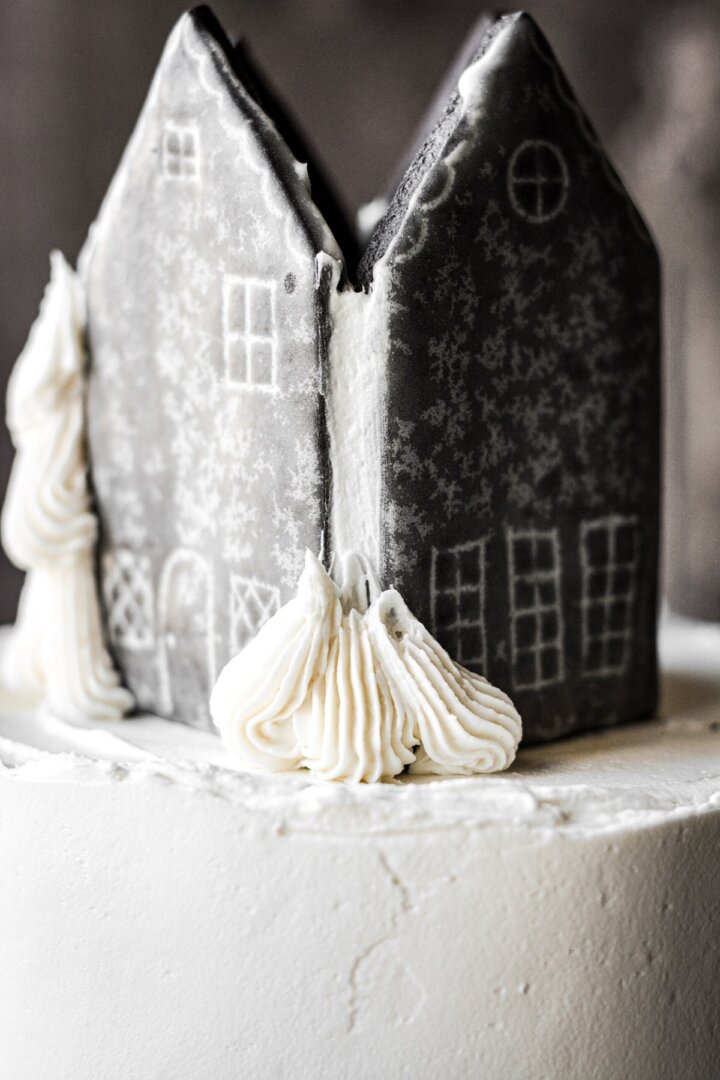
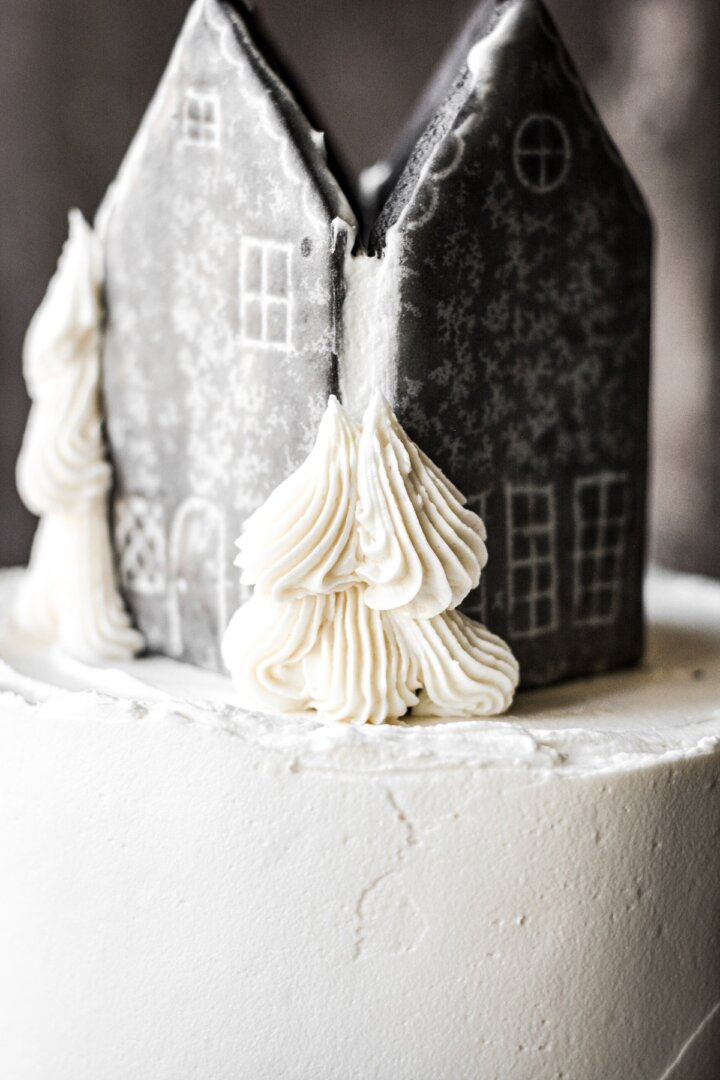
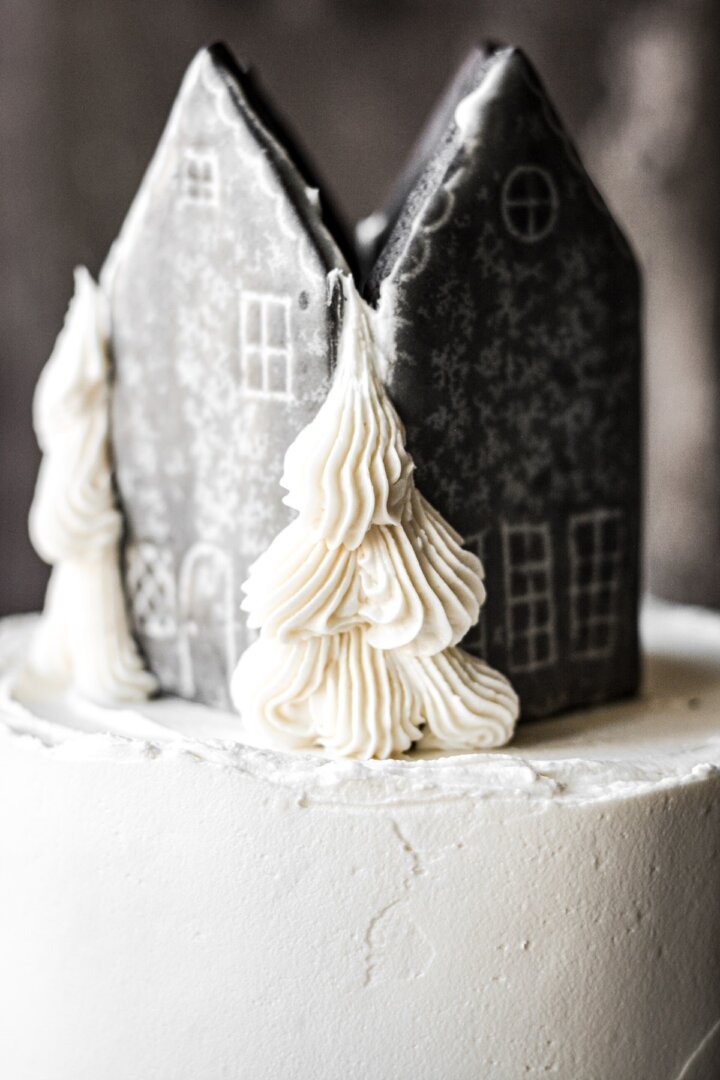
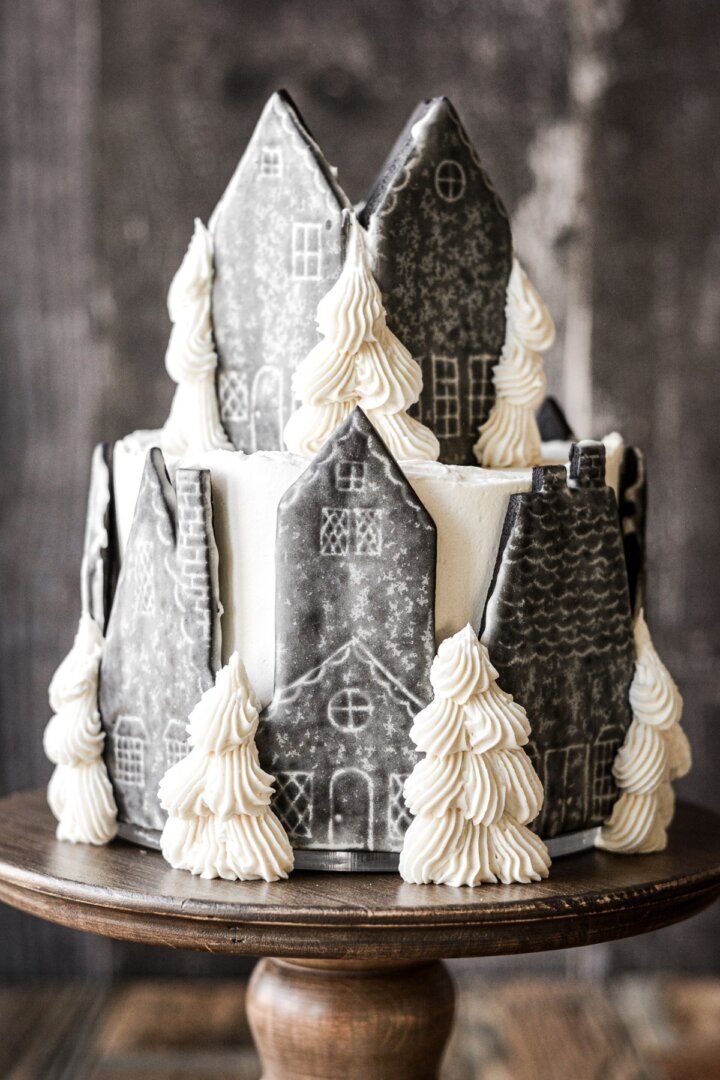
- Switch to the round tip, and pipe swirls of buttercream at the base of each of the houses, and along the roof tops.
- Finish by lightly sprinkling the cake with a little granulated sugar or sparkling sugar.
Serving the cake.
- To serve the cake, cut pieces by slicing between the houses. If those are too big, the cookies are soft enough that with a sharp knife, you can easily cut through them for smaller cake slices.
- While this cake looks beautiful, it tastes incredible, too. Because if you’re going to put forth this much effort to decorate a cake, it better taste damn good. The combination of the snowy white velvet cake with vanilla buttercream and soft, buttery chocolate shortbread cookies is just fantastic.
Be sure to read all of my BAKING FAQs where I discuss ingredients, substitutions and common questions with cake making, so that you can be successful in your own baking! I also suggest reading these comprehensive posts on making Perfect American Buttercream, How to Stack, Fill, Crumb Coat and Frost Layer Cakes and How to Use Piping Bags.
Frequently Asked Questions
Can I make the cake or cookies in advance?
You can pretty much do everything in advance, until you’re ready to assemble and decorate your gingerbread village cake.
- Cake. Bake and cool the cake, then wrap each layer in plastic wrap. Freeze until needed.
- Buttercream. Make the buttercream, cover and refrigerate for up to 1 week, or freeze until needed. Let warm up to room temperature and re-whip until fluffy.
- Cookies. Bake the cookies, and store at room temperature for up to 1 week, or freeze until needed. I don’t recommend freezing the iced cookies. Note that the longer the cookies are stored, the milkier the icing will look.
Do the cookies get soggy as they sit on the cake?
No, they stay soft, but not soggy, since they’re only touching the buttercream, and not the cake.
You Might Also Like

Please check out my Amazon Shop for a curated collection of some of my favorite cake pans from trusted brands, baking tools, ingredients, pretty things and fashion finds. I recommend products that I buy and use every day!
Did you love today’s recipe? Please rate the recipe and let me know in the comments what you thought! Also, be sure to follow Curly Girl Kitchen on Instagram, and tag me when you try one of my recipes so I can see all your delicious creations!
Hogsmeade Village Christmas Cake
All recipes on Curly Girl Kitchen are developed for high altitude at 5,280 feet. See FAQs for adjusting to higher or lower elevations.

Equipment
- 6-inch Round Cake Pans (x3)
- Stand Mixer with Paddle Attachment
- Palette Knifes (or other embossing tools)
- Disposable Piping Bag
- Coupler + Piping Tips 12, 18, 32
- Bench Scraper, Ruler and Cardstock
Ingredients
- ½ Recipe Chocolate Cake
- 5x Recipe Vanilla Buttercream
- 2x Recipe Chocolate Shortbread Cookie Dough
Instructions
Chocolate Shortbread Cookie Houses
- DOUGH:You'll need 2x the recipe for Chocolate Shortbread Dough. Prepare the dough, wrap in plastic wrap, and refrigerate for 20 minutes before rolling and cutting your houses.
- HOUSE TEMPLATE:Draw and cut a template on a piece of card stock. First, cut a rectangle measuring 2 1/4 inches x 4 1/2 inches. Then, cut off two corners at the top to make the roof line. You can make other shapes of houses, as you can see I did on my template, but it's helpful to keep them similar in width and height.
- CUTTING THE HOUSES:Roll out the dough on a lightly floured surface, to just under 1/4 inch thick. Set your card stock template onto the dough, and use a sharp knife, bench scraper, or palette knife to cut out the dough.You'll need to cut 12 houses, 4 for the top, and 8 for around the cake. You may even want to make a few extra, in case you break any cookies. Wrap any leftover dough, and freeze for another project.Place the houses 1 inch apart on a large baking sheet lined with parchment paper.
- EMBOSSING THE HOUSE DETAILS:It's helpful if you have some small shapes cutters, palette knives, or other tools to use to make impressions on the houses. For example, squares, rectangles, circles, stars, hearts, etc, all work well for impressing windows, doors, and other designs on the dough. For the roof line, you can use the end of a piping tip to impress a scalloped pattern. Be creative, look around your house for little things you can use to impress interesting patterns and designs. Everything you stamp onto your dough will be highlighted when you ice your cookies. Try to do a variety of designs on the cookies, to keep them different and interesting.When embossing your dough, press the cutters and tools (blunt side against the dough) deep enough to leave an impression, but not deep enough to cut through the dough.Once you're satisfied with your designs, set the pan in the refrigerator and chill for 1 hour before baking. Chilling the dough ensures your pattern will be preserved, and the dough won't spread while baking.
- BAKE THE COOKIE HOUSES:Preheat the oven to 350 F. Bake the chilled cookies for 11-12 minutes. Cool on the baking sheet for exactly 5 minutes, then gently transfer to a cooling rack. Immediately brush the warm cookies with the icing (recipe follows).
- ICE THE WARM COOKIE HOUSES:Icing Ingredients:1/2 cup powdered sugar1 tbsp melted butter1/4 tsp vanilla extract3 tbsp warm waterAs soon as the cookies come out of the oven, you can quickly make the icing. In a bowl, whisk together all ingredients until smooth. The glaze should be thin, with a consistency like warm honey. After cooling the cookies on the baking sheet for 5 minutes, gently transfer to a cooling rack. Use a pastry brush to immediately and quickly brush the icing over the warm cookies, getting it into all the crevices, and letting it drip over the edges.
- Once you've finished a cookie, don't brush over it again or touch it until the glaze sets completely. The glaze will crust over and set quickly, in about 30 minutes. Let cool and set completely for several hours. Then store in a single layer, or stacked with sheets of wax paper between each layer, in an airtight container, until ready to decorate your cake.The cookies can be baked and iced 1 day in advance.Icing Note: Soon after icing your cookies, the glaze will develop whiter patches that look crystallized, which add to the icy appearance of the snowy scene. You can also encourage more crystallization by freezing the cookies. For a milkier, more opaque looking icing that doesn't crystallize as easily, use my updated icing recipe in this post.
Cake and Buttercream
- FLAVOR:You can bake any flavor cake you like, but I chose my Chocolate Cake with Vanilla Buttercream recipe.
- SIZE:I made a small 6-inch 3-layer cake (which is 1/2 the cake recipe), but you can certainly make yours an 8-inch 3-layer cake. You'll need to make 5x the buttercream recipe to have enough for frosting and decorating.
- GETTING READY:Bake, cool, stack and frost your cake. Smooth out the sides of the cake, but it doesn't have to look perfect, since it will be covered up with cookies.
Decorating
- HOUSES:Arrange 4 of the houses on top of the cake, so that they form a square, pressing them gently into the frosting. Spread or pipe a little buttercream at the seams to help hold them in place. If needed, you can support them by inserting a popsicle stick into the cake behind each.Arrange the remaining houses around the side of the cake, pressing them gently against the buttercream.
- TREES:Fit a piping bag with a coupler and a medium star tip, like tip 18, and fill with buttercream. Pipe trees between each of the houses.
- SNOW DRIFTS:Switch to the round tip, and pipe swirls of buttercream at the base of each of the houses, and along the roof tops.Finish by lightly sprinkling the cake with a little granulated sugar or sparkling sugar.
Notes
 https://curlygirlkitchen.com/
Beauty post top to bottom🥰
Hi
I have a question about the cookie glaze recipe.
I made it and followed recipe exactly but the glaze didn’t dry milky looking, just shiny.
Any suggestions? Add more icing sugar to glaze maybe?
The glaze will be shiny and clear at first, and then after a day or two as it fully cures, it turns whiter and milkier looking. You can also speed that up by putting the cookies in the freezer, which will turn the icing more white.