
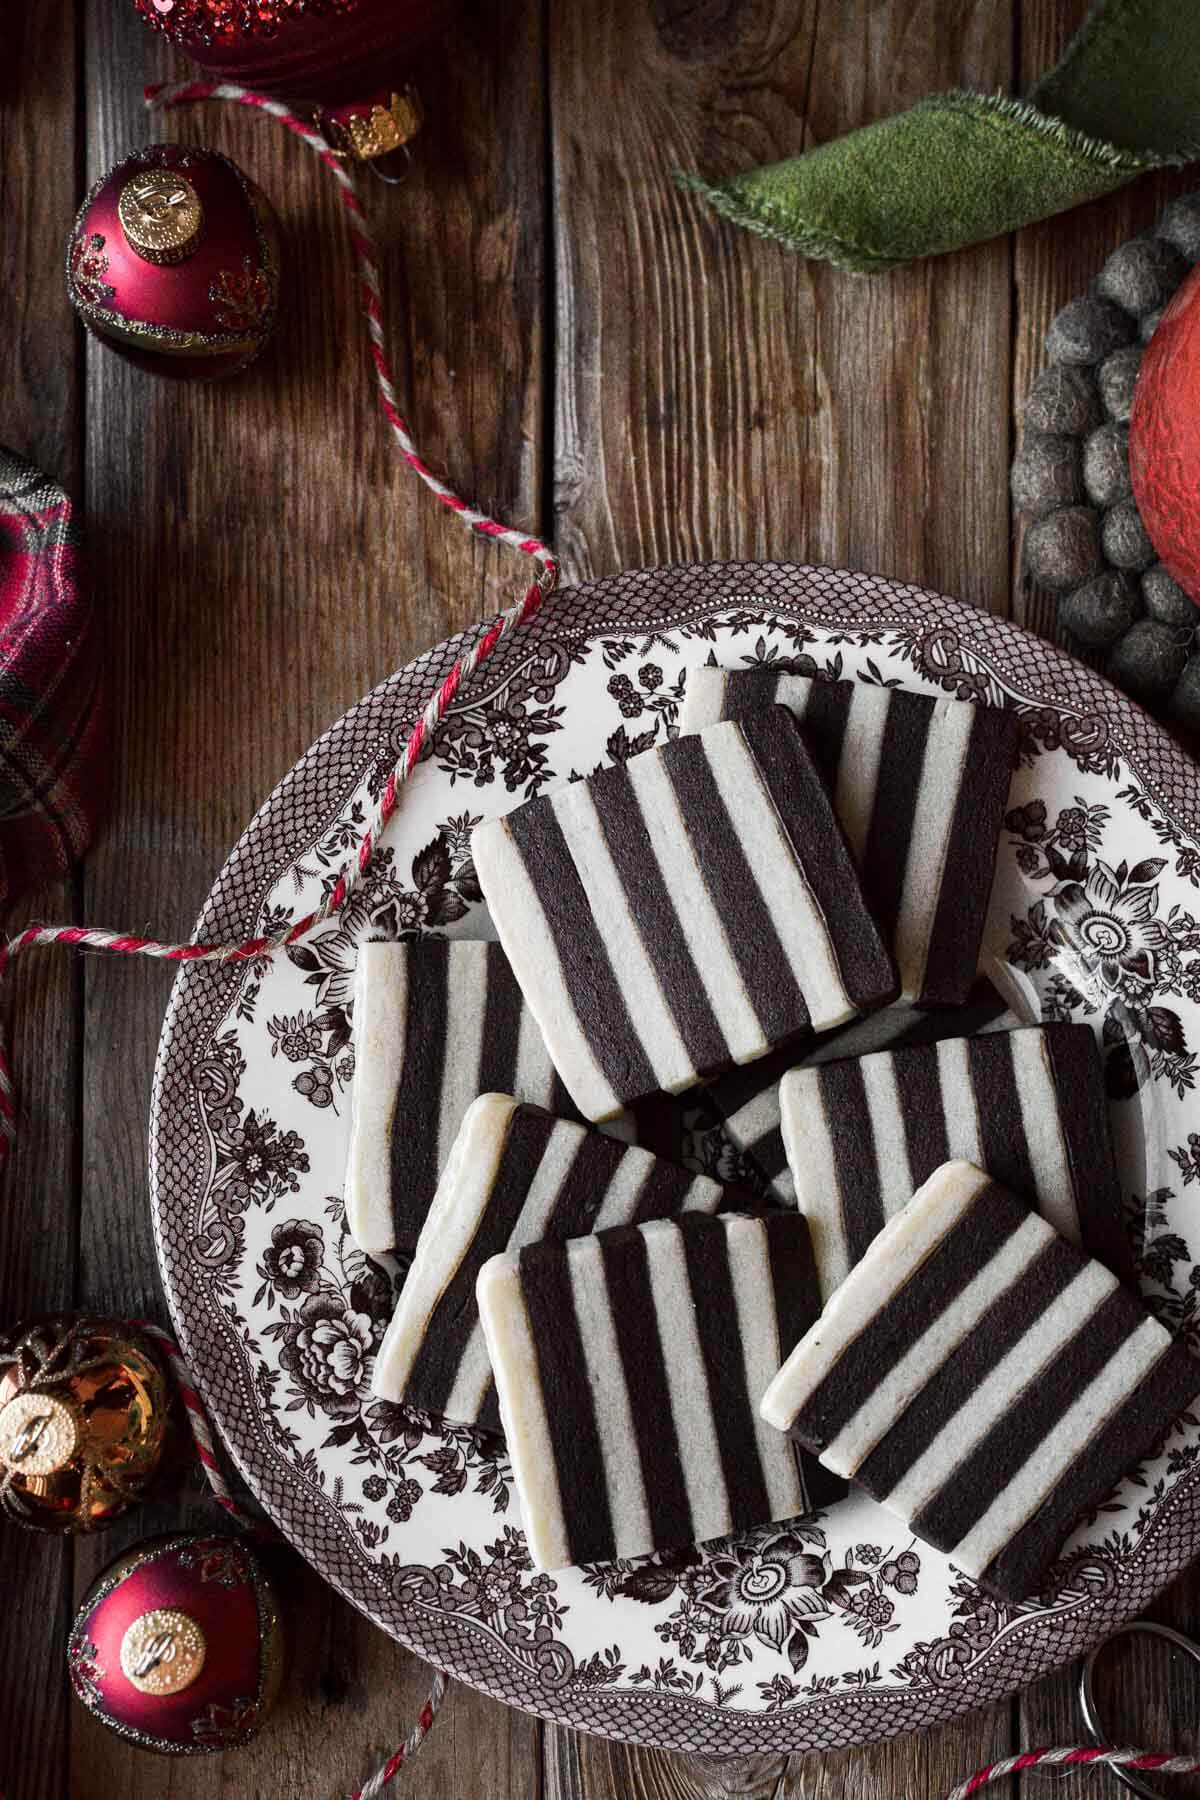
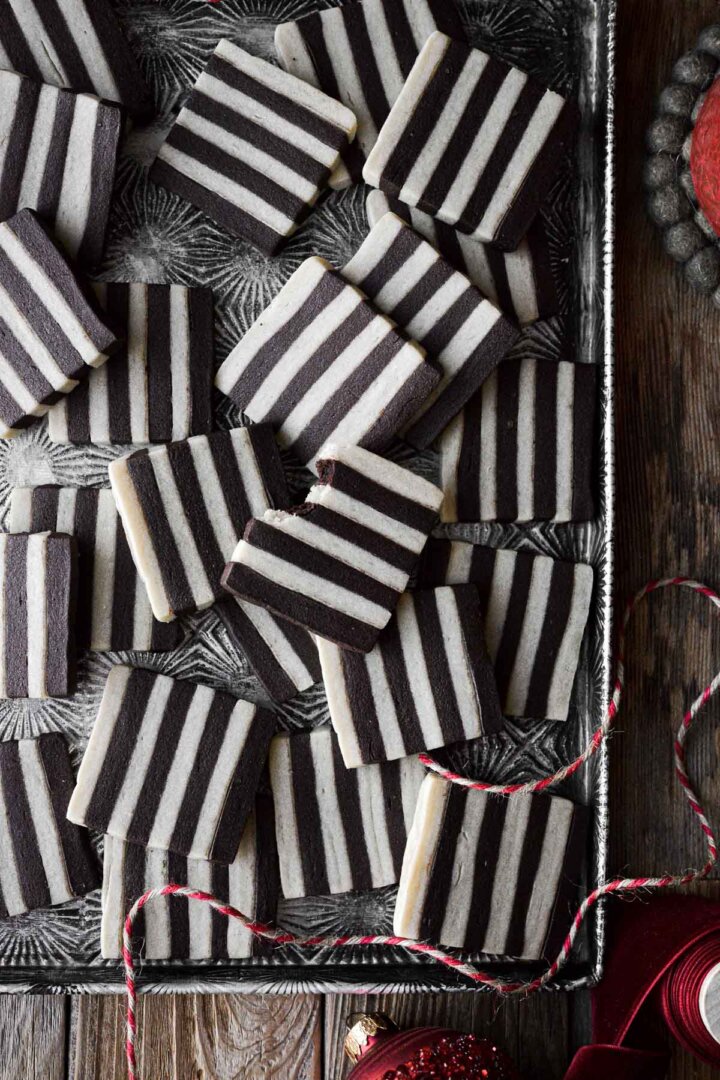
A high altitude tested recipe for the most beautiful striped sugar cookies. Learn how to make these striking and elegant striped sugar cookies, using both chocolate and vanilla cookie dough, with today’s photo tutorial. With the same dough and two different methods, you can make striped cutout cookies in any shape, as well as square-shaped striped slice and bake cookies.
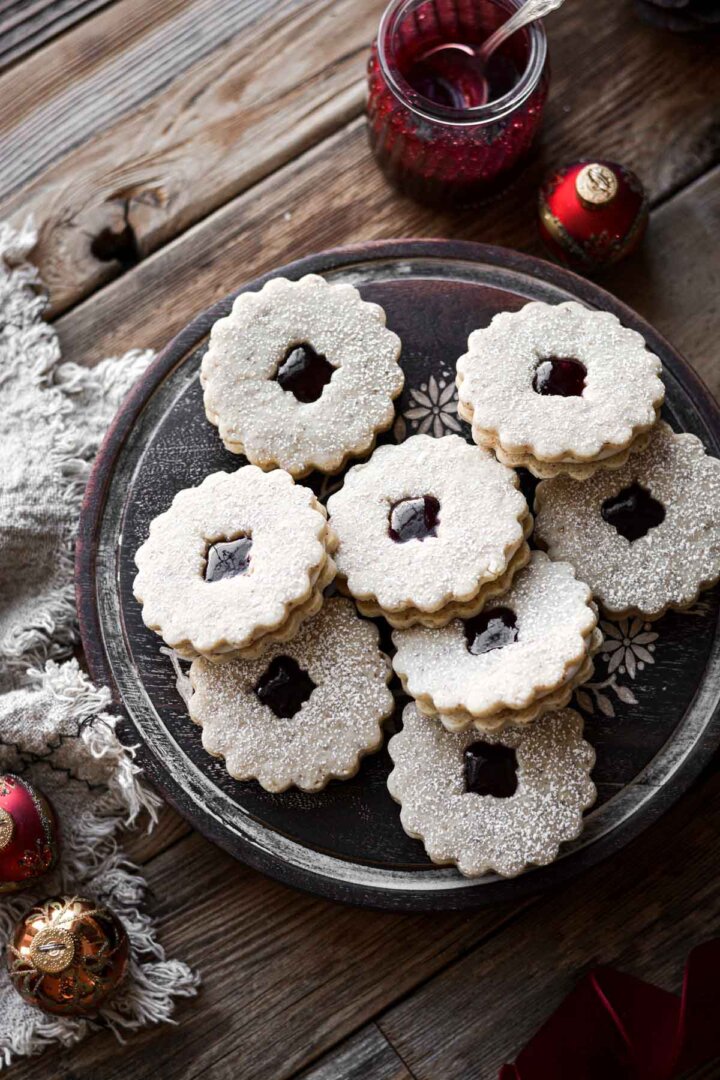
You might also love these chocolate hazelnut linzer cookies, iced chocolate gingerbread cookies, and iced chai spice sugar cookies.
This site contains affiliate links. As an Amazon associate, I earn from qualifying purchases. This means that I may make a small commission if you purchase a product using those links. This in no way affects my opinion of those products and services. All opinions expressed on this site are my own.
Why You’ll Love This Recipe
Versatile Techniques. Since there’s usually more than one way to reach a similar result, I like to provide a few different options for doing something, whenever possible. With these cookies, you can choose the method that works best for you, whether that’s making cutout striped sugar cookies, slice and bake cookies or even checkerboard cookies.
Soft and Buttery. I used my popular no spread sugar cookie recipes for today’s striped sugar cookies. The texture is always soft, and the cookies combine all the delicious flavors of butter, vanilla, almond and chocolate.
Perfect for the Holidays. These gorgeous cookies look stunning in a Christmas cookie box, and will have everyone asking how you made them.
High Altitude Tested. While I develop everything on my site for Denver’s altitude of 5,280 feet, today’s sugar cookie recipe will work great at any altitude with no adjustments needed.
See the recipe card at the end of the post for the full ingredients list and instructions.
Ingredients
All you’ll need for today’s striped sugar cookies is vanilla cookie dough and chocolate cookie dough. I made 1/2 the recipe of each, so all together, you’ll get about 2 dozen cookies. Or, make the full recipes of each flavor of dough for a larger batch of striped cookies.
Instructions
Make the Dough
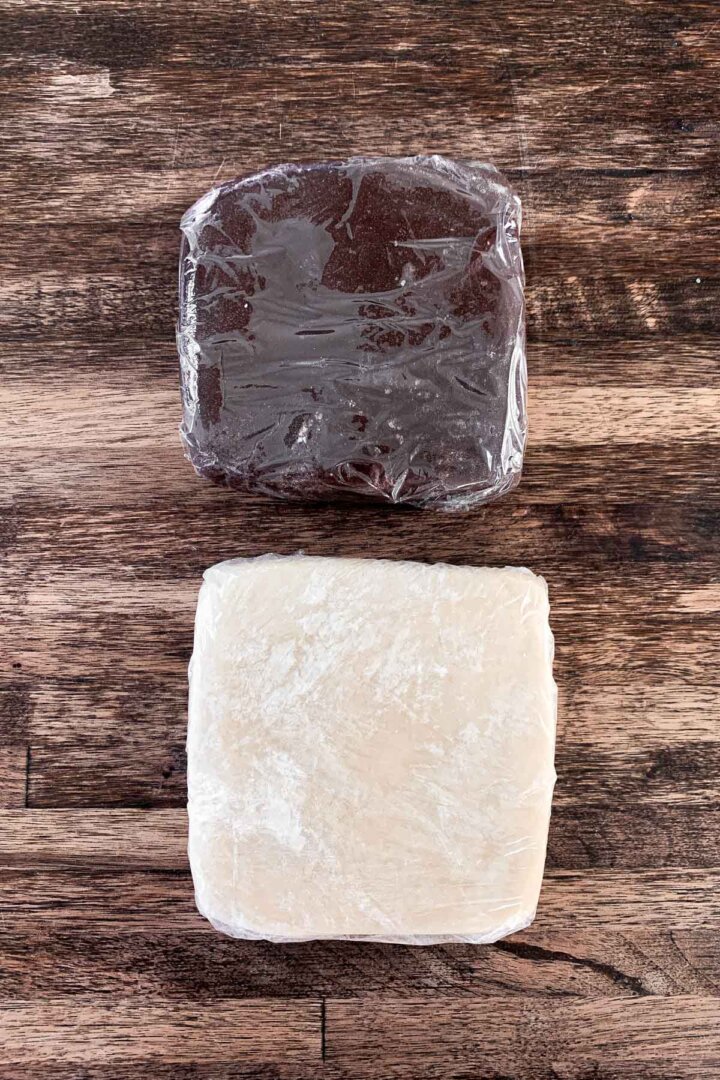
- With your food processor, make 1/2 the recipe for vanilla sugar cookies. Note, I also added 1/2 tsp almond extract, for extra flavor, since these cookies will be unfrosted.
- With your food processor, make 1/2 the recipe for chocolate sugar cookies.
- Shape the dough into thick disks, wrap in plastic wrap, and refrigerate for 20 minutes.
Shaping and Cutting Cutout Cookies
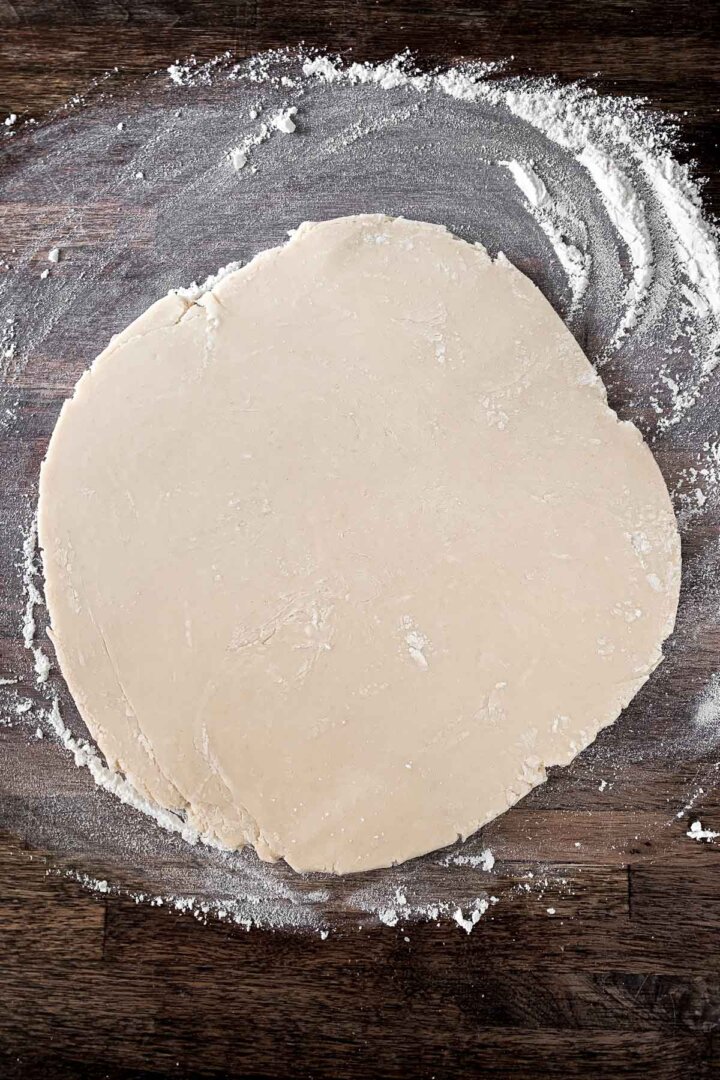
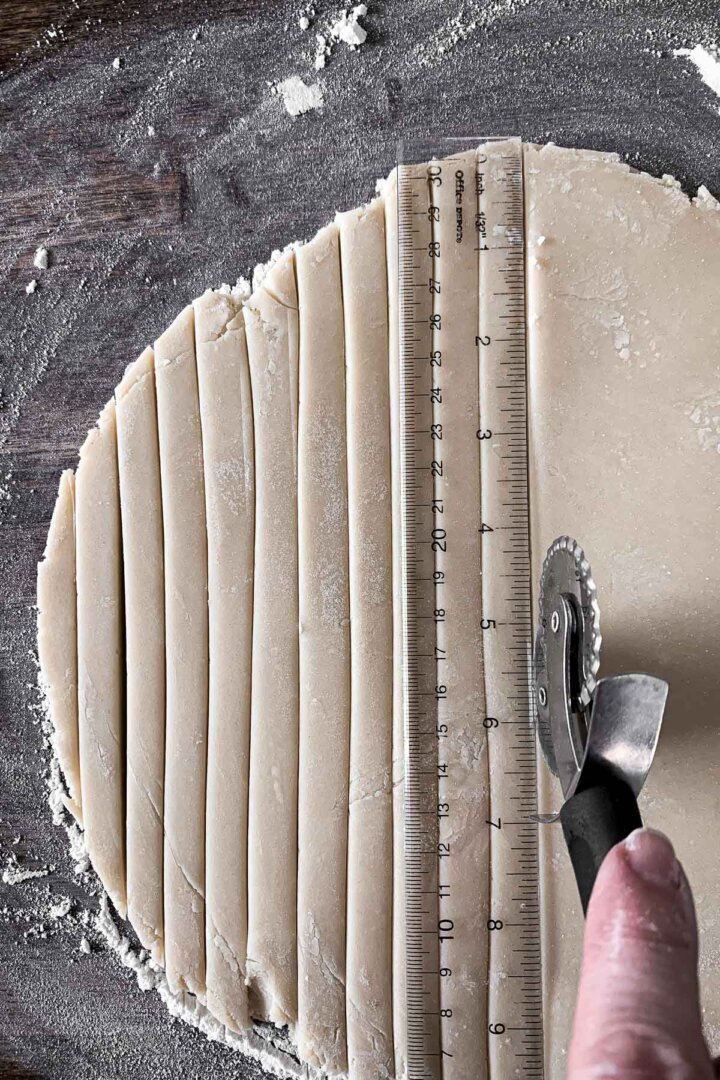
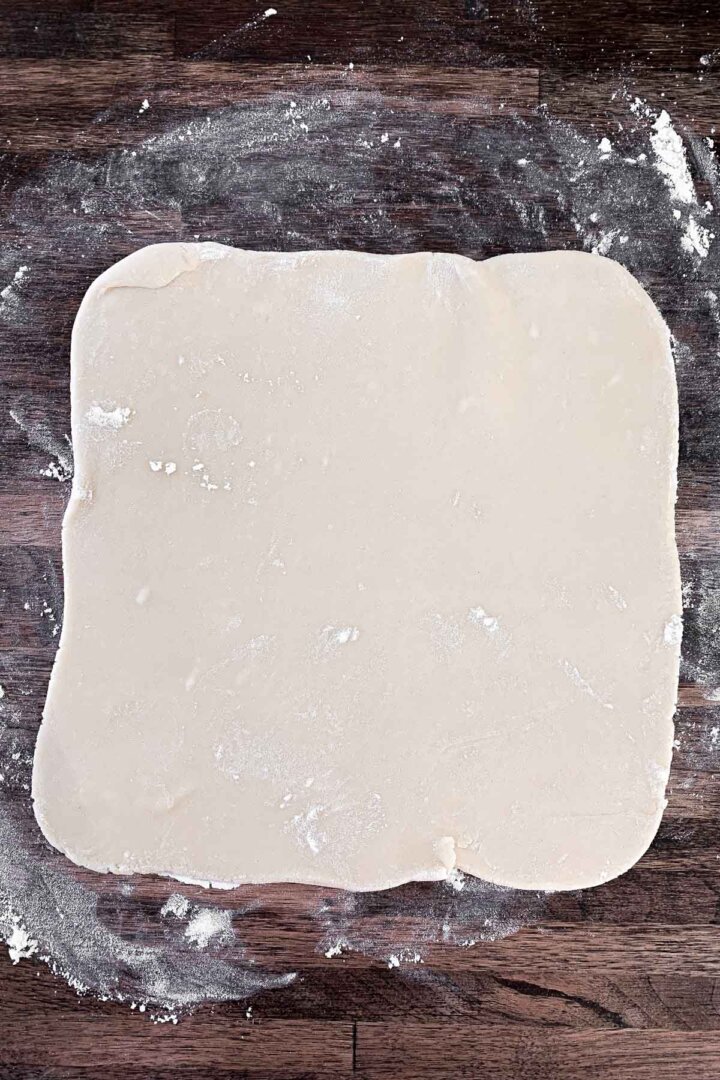
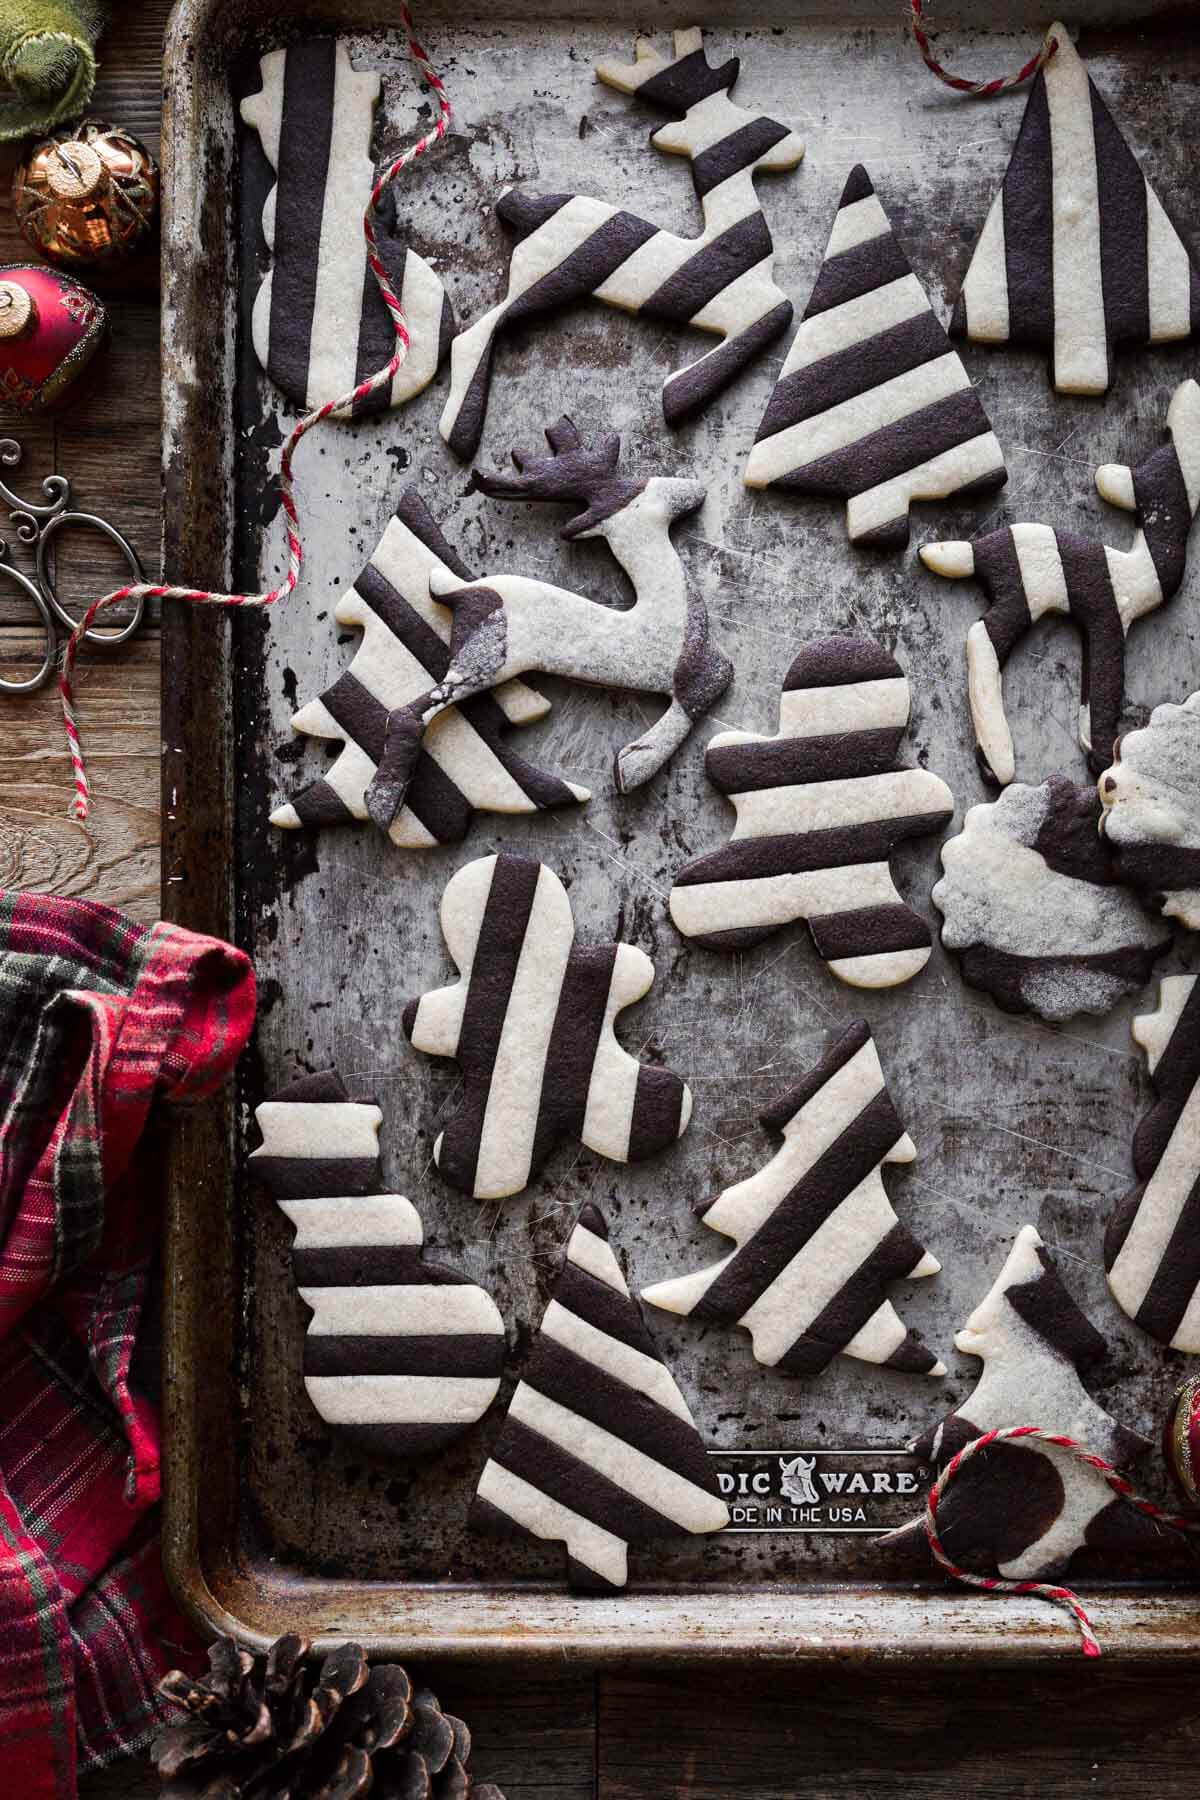
- On a lightly floured surface, roll out the vanilla cookie dough into a circle, with an even thickness of a little more than 1/4 inch thick. Then do the same with the chocolate dough, trying to keep it about the same size and shape as the vanilla.
- Using a ruler or straightedge and a rolling pastry wheel cutter, cut the vanilla dough into strips measuring 1/4 inch wide. Then do the same with the chocolate dough.


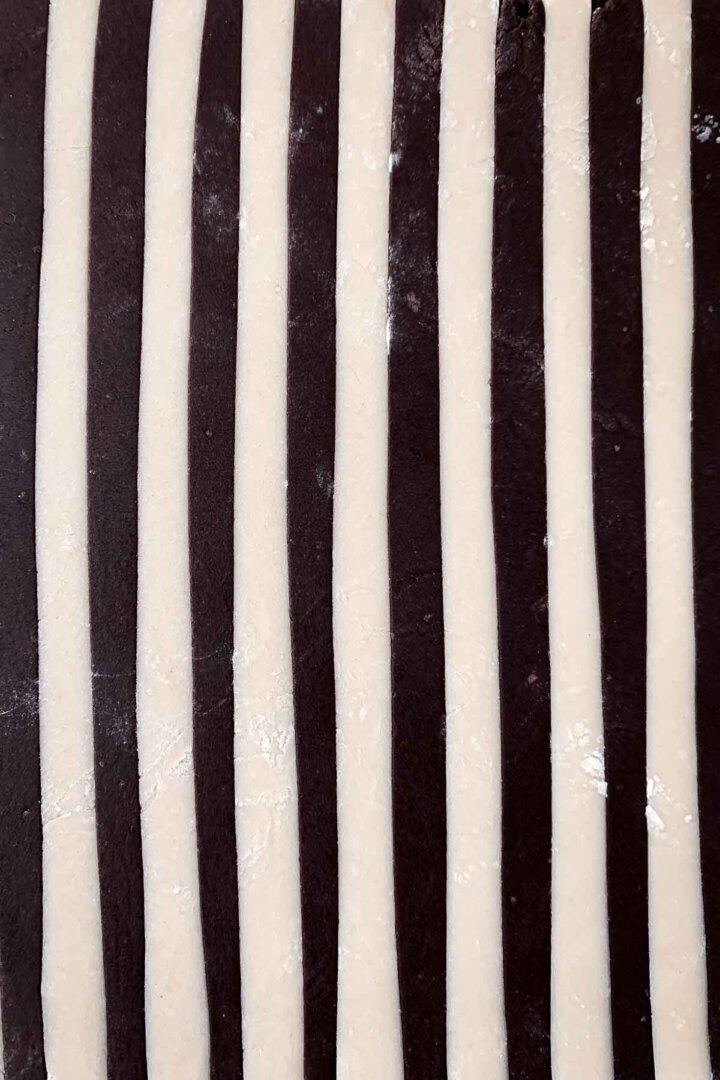
- Arrange the strips of vanilla and chocolate dough in an alternating pattern. As you lay each strip of dough down, be sure to use a dry pastry brush to brush the dough free of excess flour, as too much flour will prevent the strips from sticking together, and will make the cookies prone to breaking along the seams.
- Once you have all the strips of dough arranged tightly together, lay a piece of wax paper over the dough. Use your rolling pin to gently roll out the dough in the direction of the stripes, to an even thickness a little less than 1/4 inch thick. This will help to seal the strips of dough against each other.


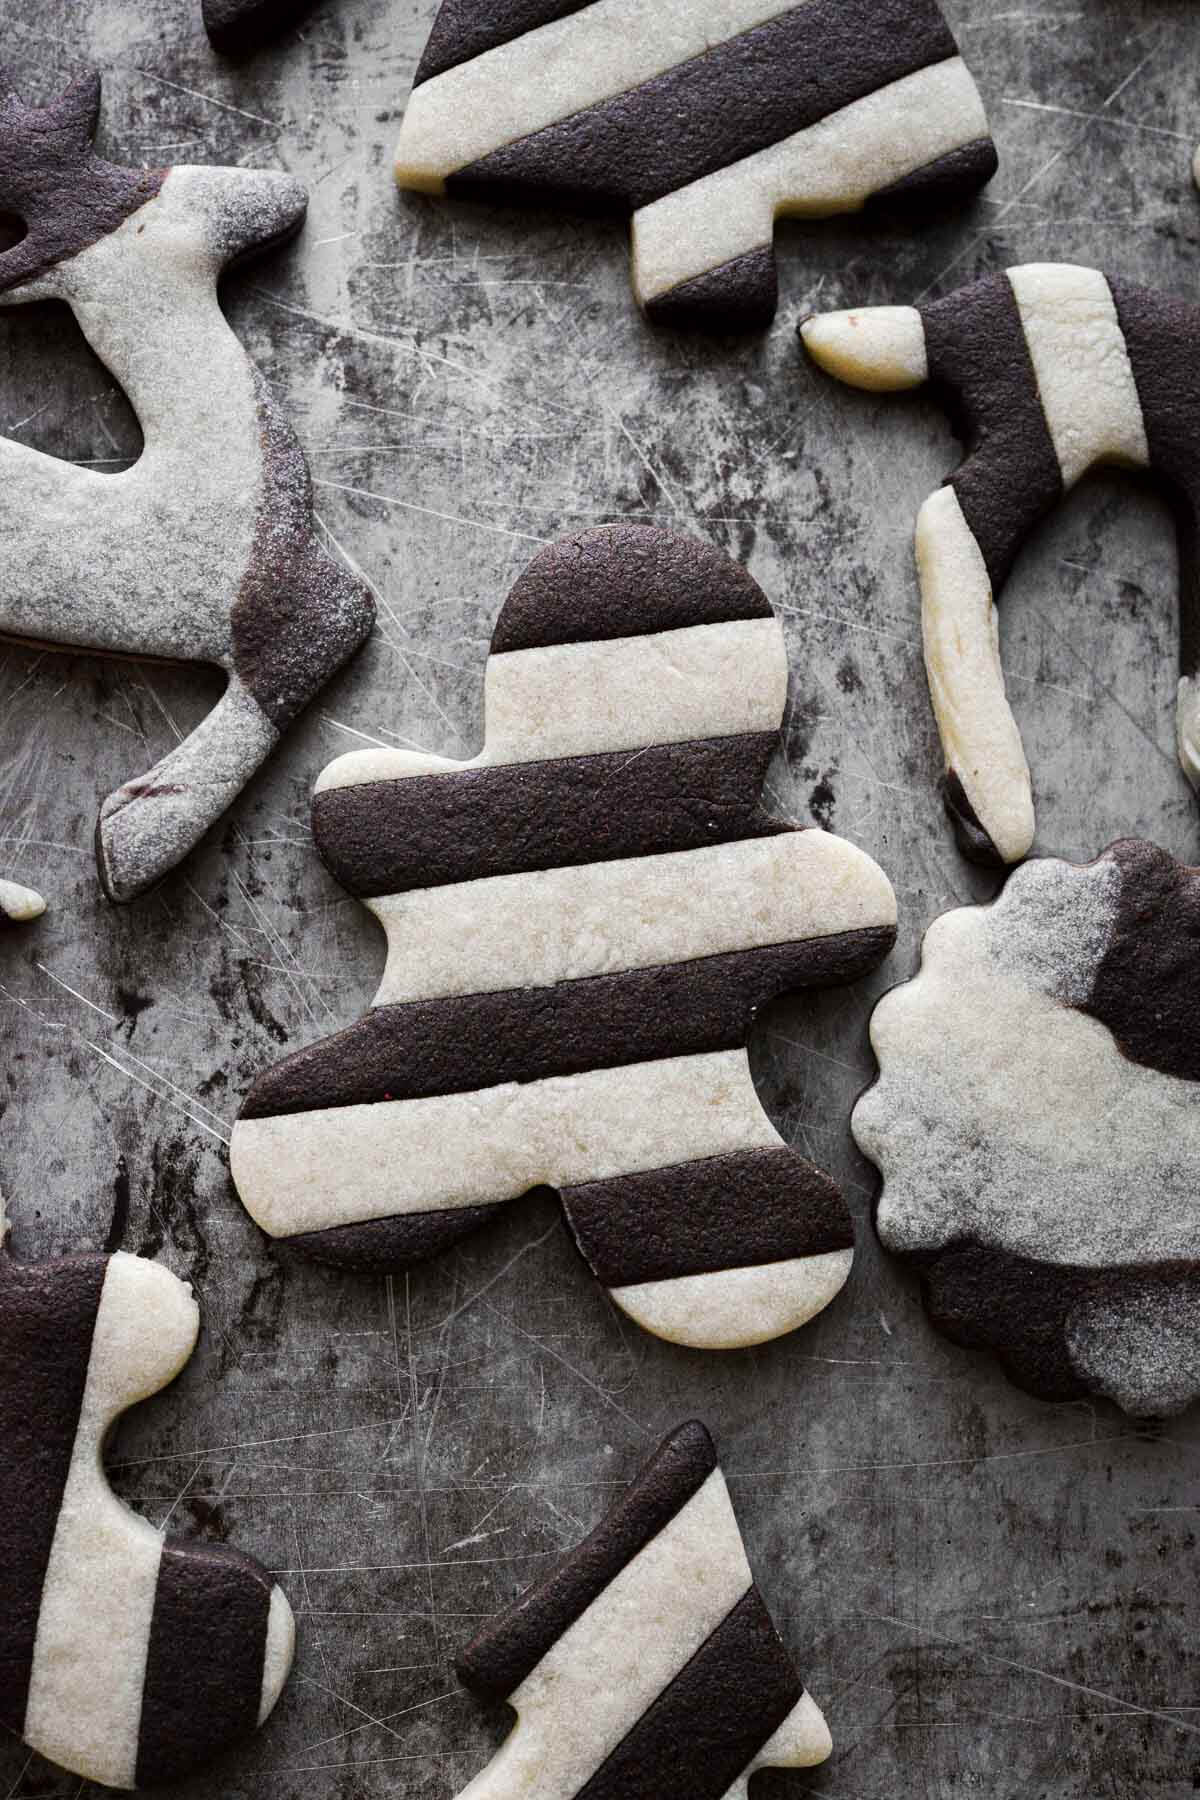
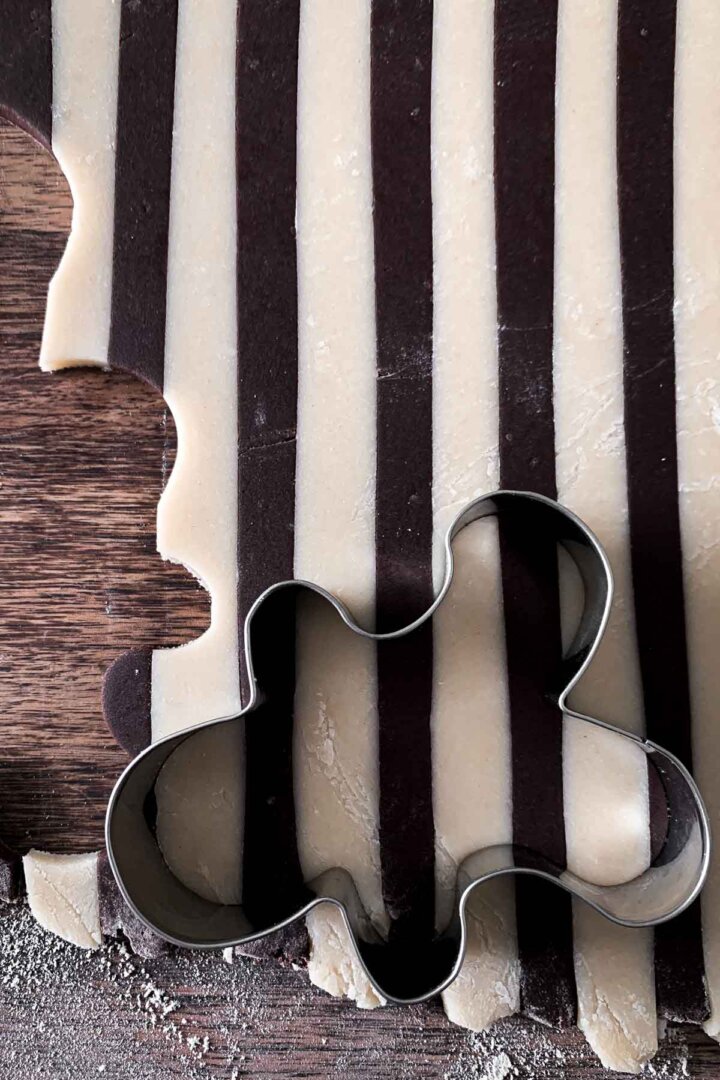
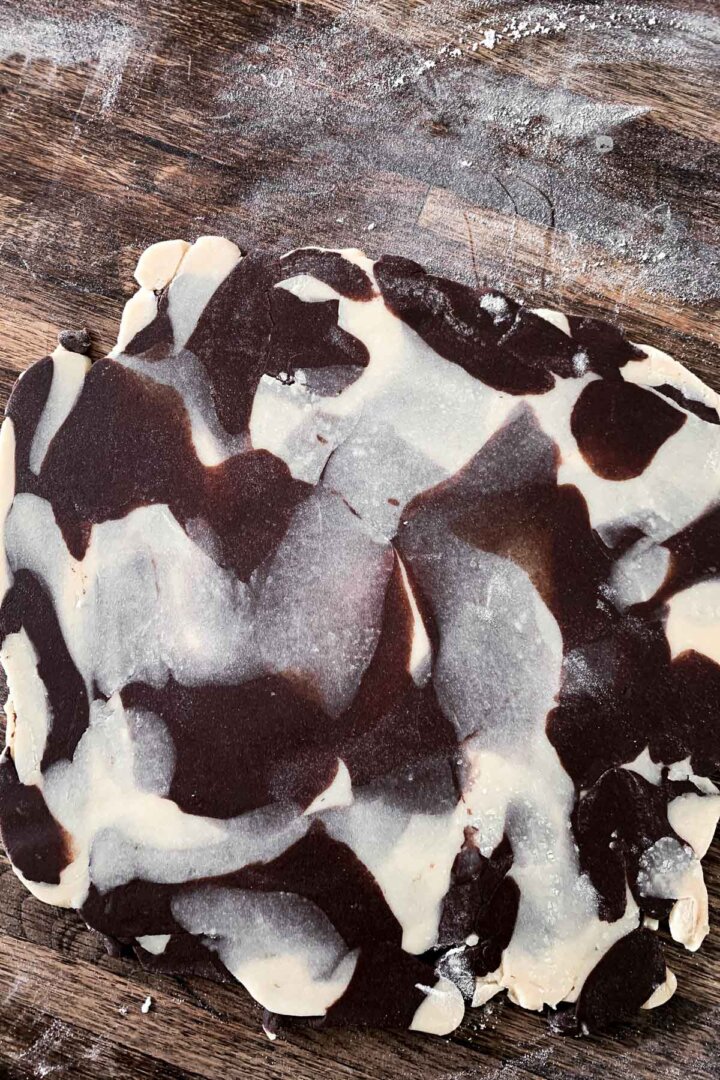
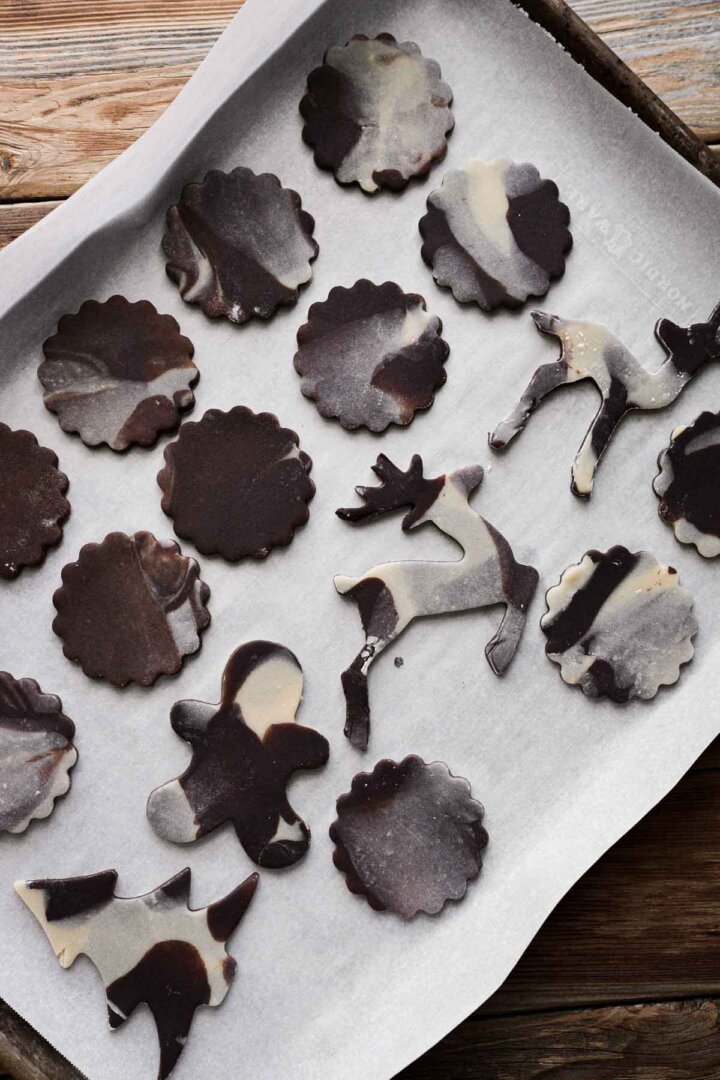
- Now use your cookie cutters to cut as many striped cookies as you can. Gather up the scraps of dough, roll them out again, and continue to cut cookies until you’ve used up all the dough. The cookies cut from the scraps will have a marbled or camouflage pattern instead of stripes.
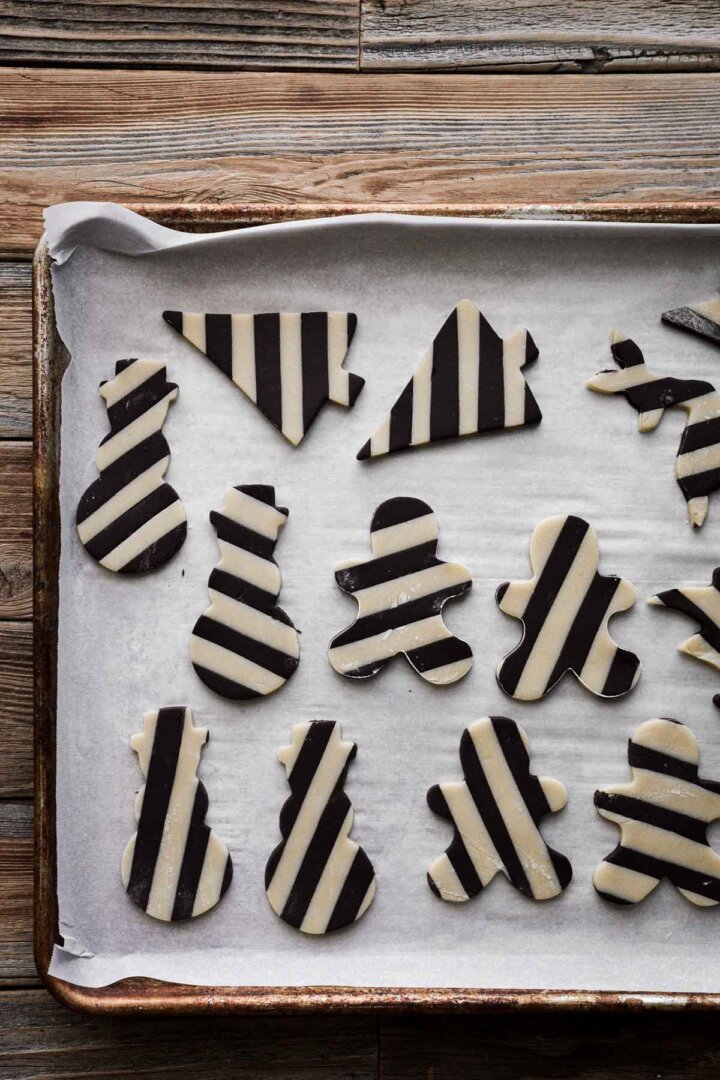
- Place the cut cookies two inches apart on two baking sheets lined with parchment paper. Refrigerate for 30 minutes before baking.
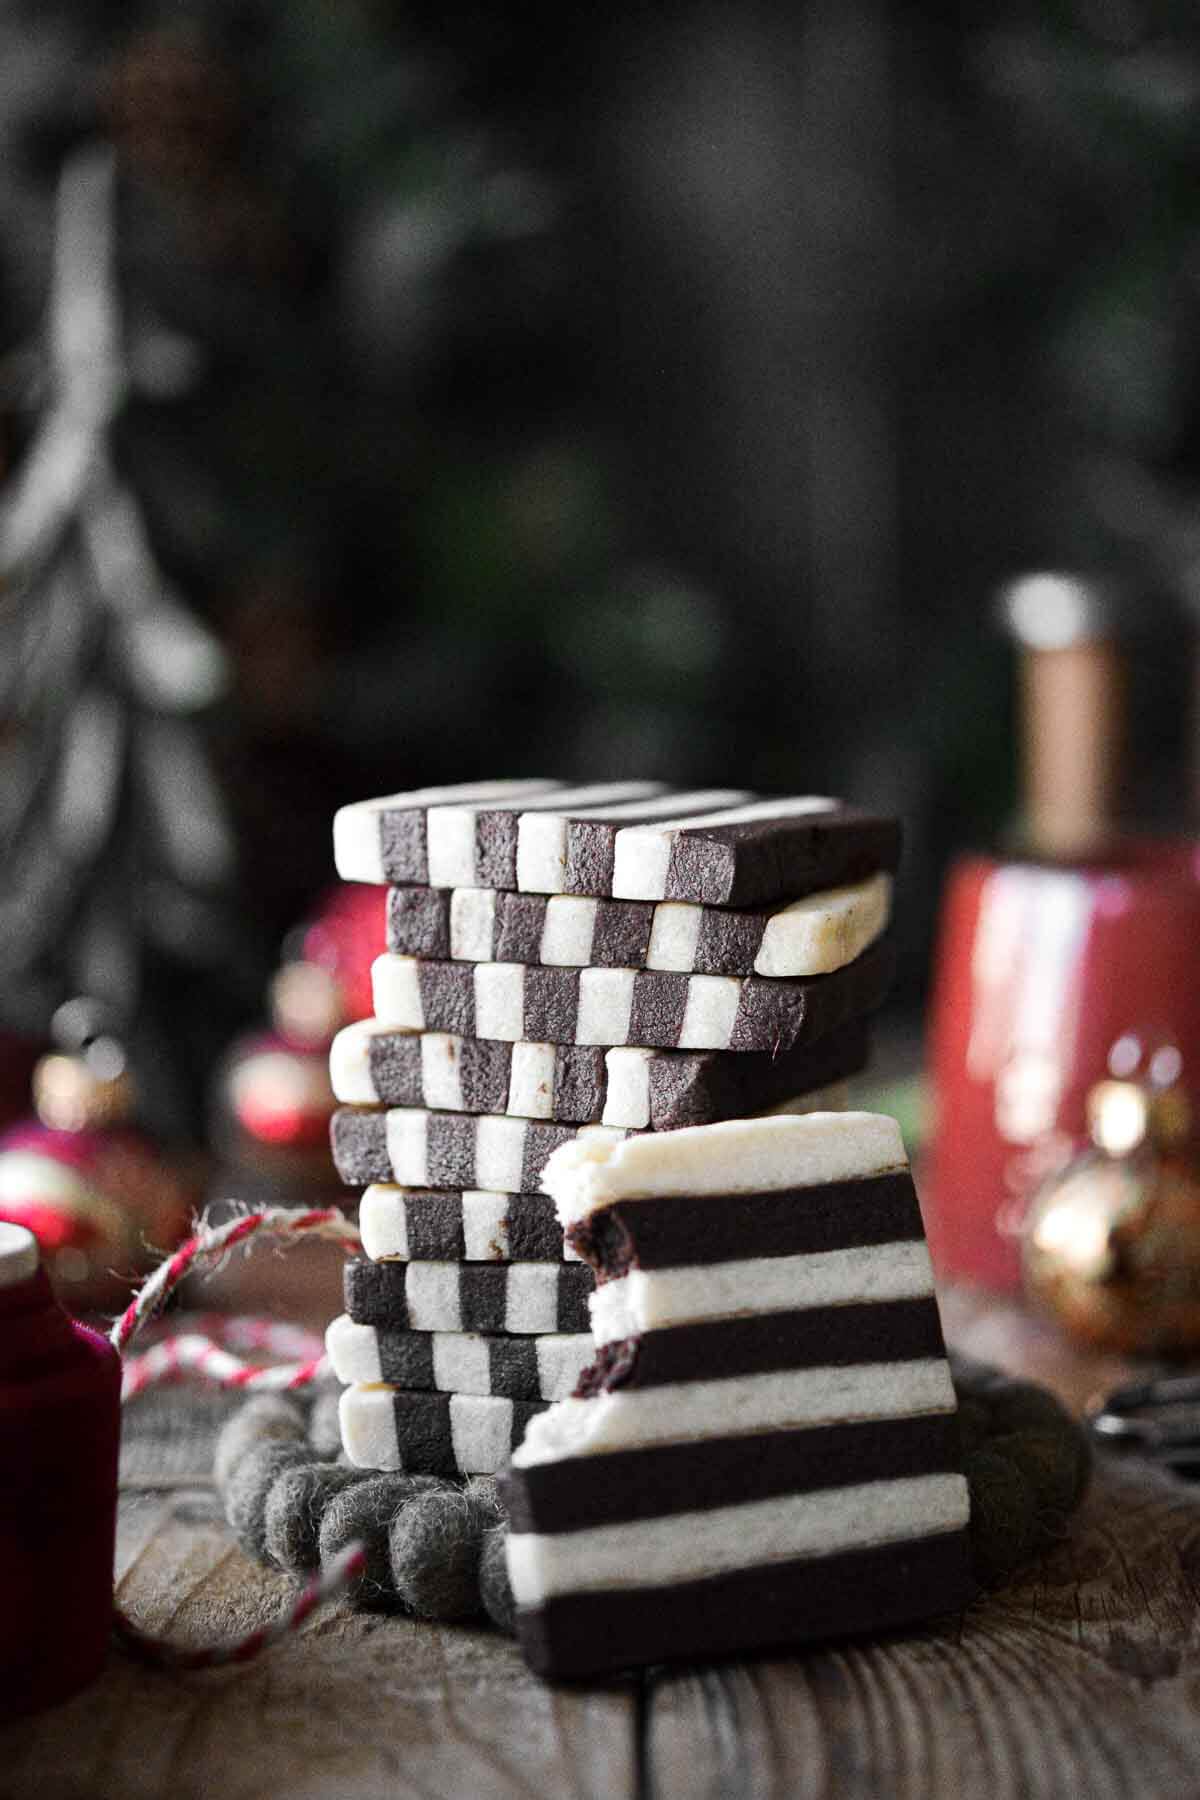
Shaping and Cutting Slice and Bake Cookies
- Line a 9×9 inch square baking pan with wax paper. To keep the paper from sliding around, it helps to brush the pan with a little butter first.
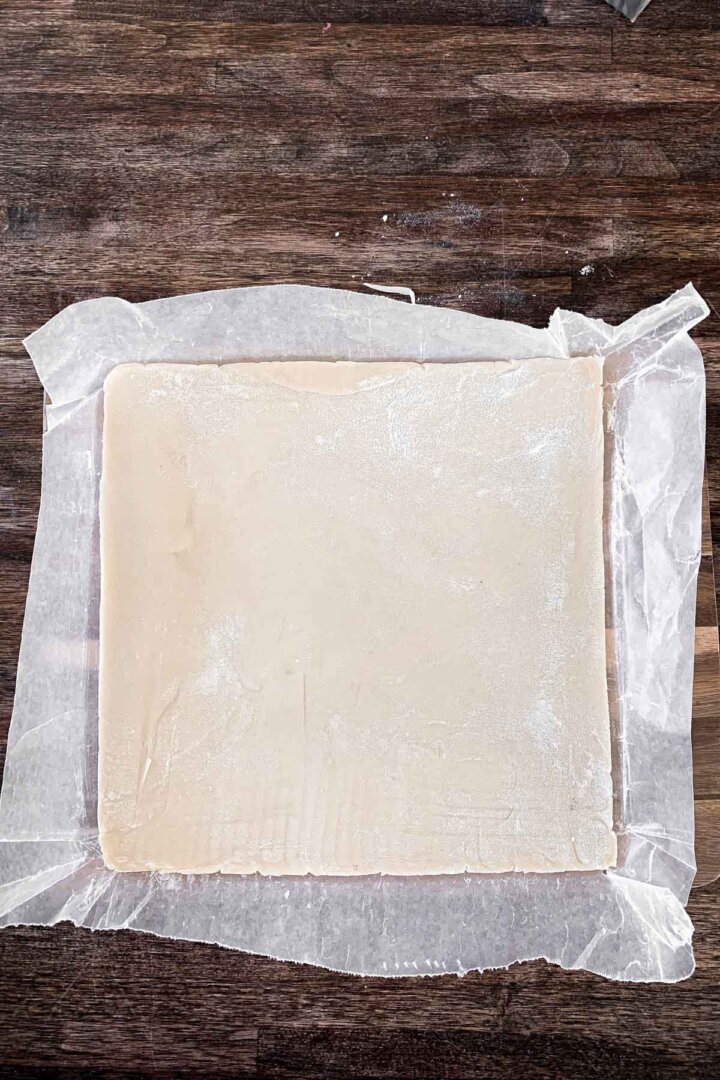
- Take the disk of vanilla dough, and shape it into a square. Then roll it out into a thick square measuring 8×8 inches. Set the dough into the pan, and finish pressing it out to fill the pan all the way to the edges, trying to keep it as even as possible.
- Lift the wax paper with the dough out of the pan, and set it on a cutting board.
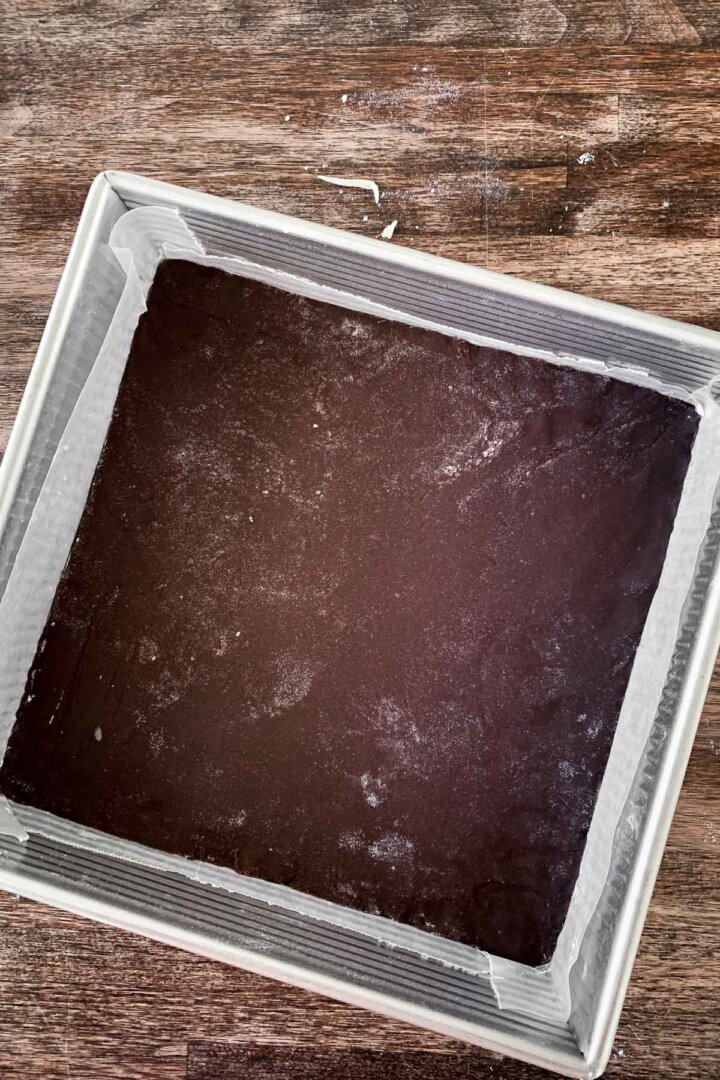
- Now line the pan with another piece of wax paper, and repeat the above steps with the chocolate dough.

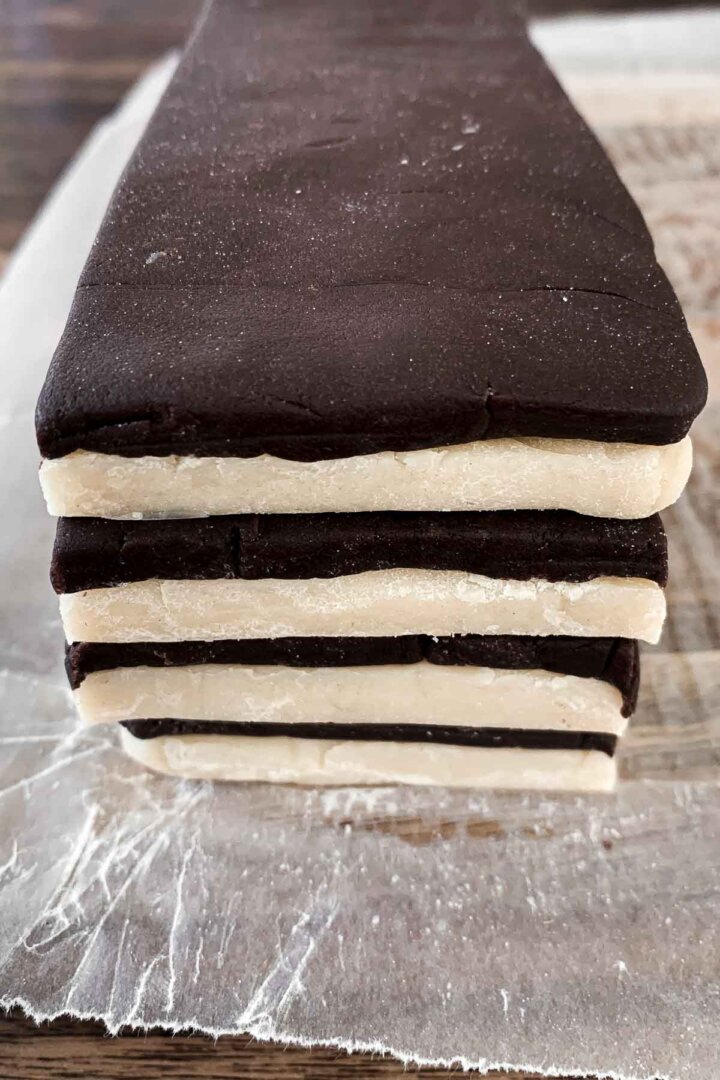
- Brush both squares of dough free of excess flour. Dip a pastry brush in water, and lightly brush it over the top of the vanilla dough so that the dough is slightly tacky (but not drenched in water). Then lay the chocolate dough over the top of the vanilla, pressing it down gently to stick the squares of dough together.
- Cover the dough with plastic wrap, and freeze for 20 minutes.
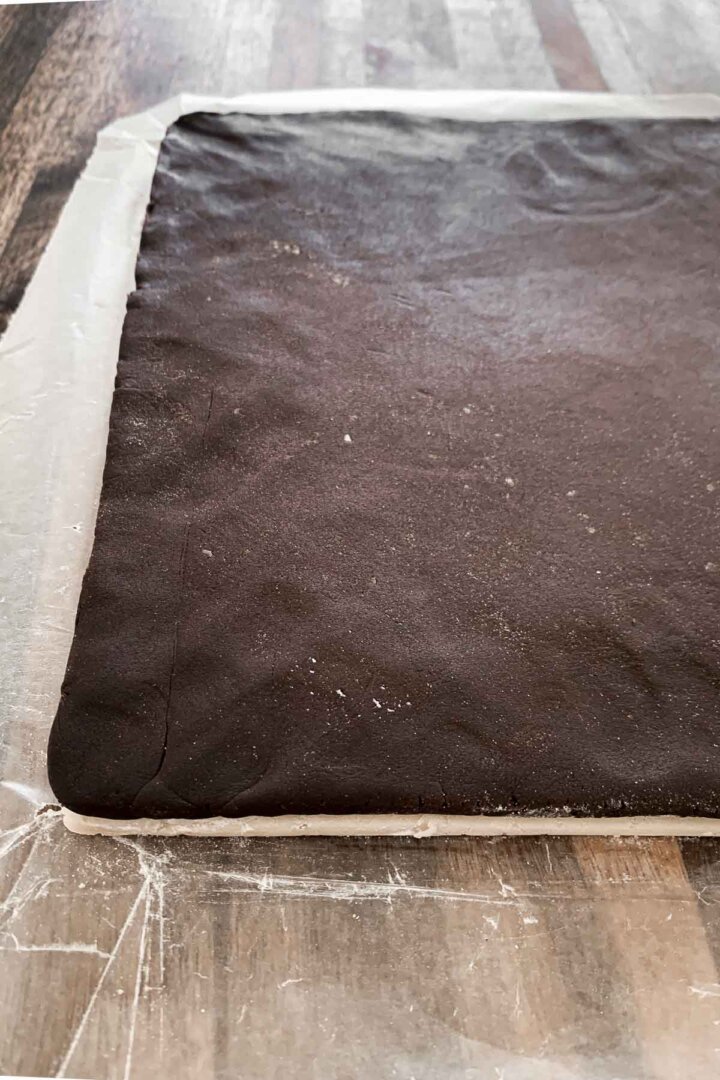
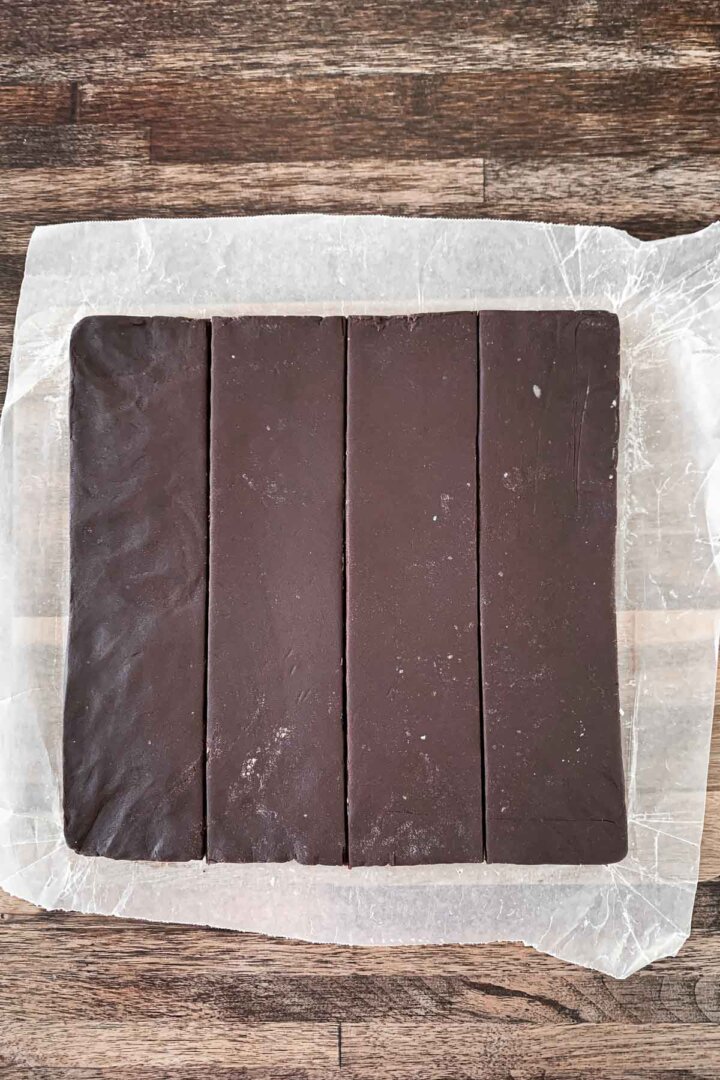
- Measure the diameter of the chilled dough, then use a straight edge to cut it into 4 equal rectangles.
- Again, brush all the dough free of excess flour. Dip a pastry brush in water, and lightly brush it over the top of one section of dough, then stack another section of dough on top. Repeat until you’ve stacked all four sections of dough and you have a long cube of dough with alternating layers of chocolate and vanilla dough. Gently press down on the top to ensure all the layers are sticking together.
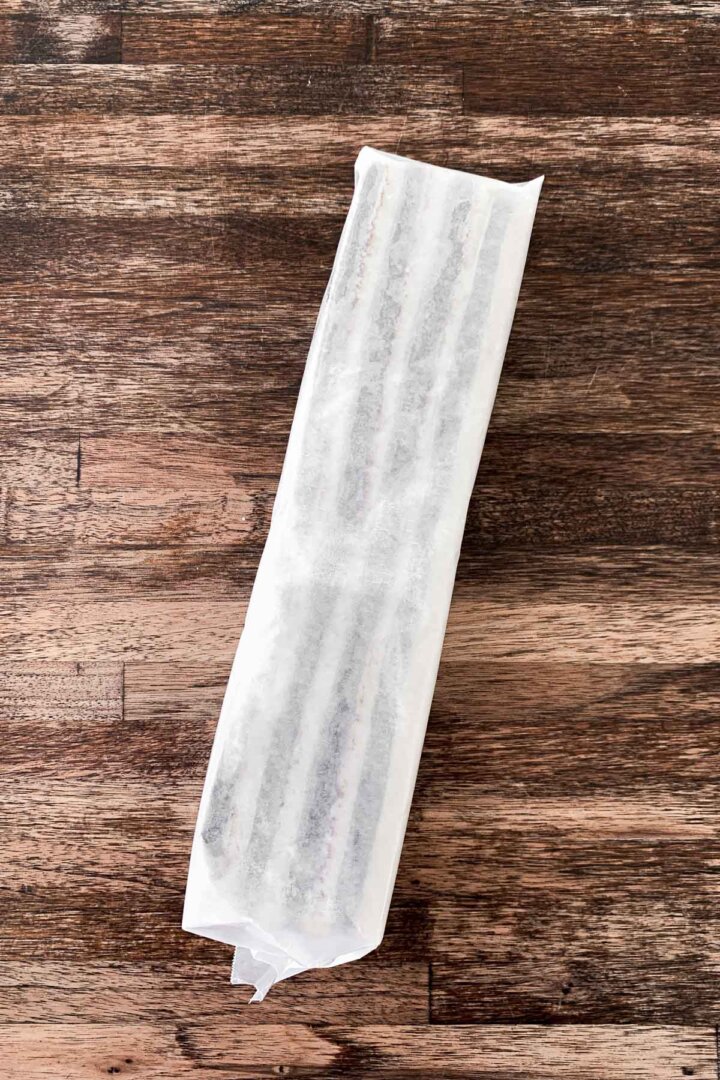
- Wrap the dough up in the wax paper, and refrigerate for 40 minutes, then transfer it to the freezer for 20 more minutes before slicing the cookies.

- If you want to take this option a step further and make checkerboard cookies, use a large sharp chef’s knife to trim the sides of the dough so it’s perfectly square and even. Then cut it lengthwise into 8 long slabs. Stack the slabs so that the pattern of the chocolate and vanilla alternates (starting with vanilla on one side for the first slab, then flipping the next slab over so that you start with chocolate, etc.). This way, when you slice the cookies, you’ll have a beautiful checkerboard pattern. Use a little water in between each slab to ensure the dough is sticking, press all the layers together, and chill again before slicing into cookies.
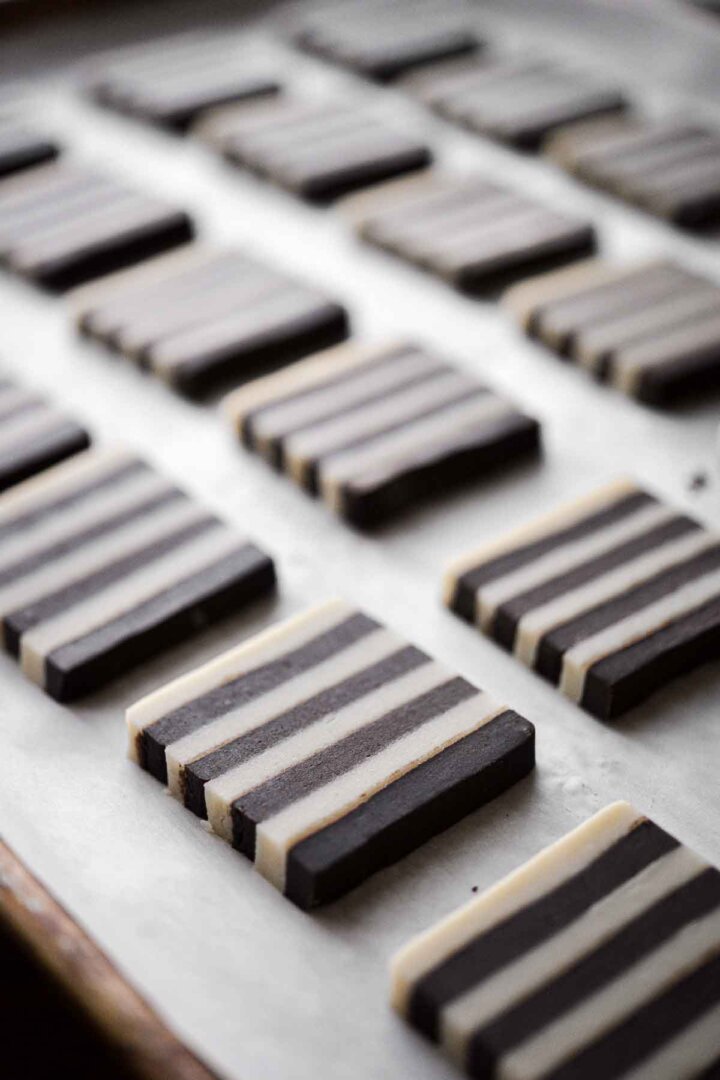
- After the dough has chilled, you can slice it into cookies. Use a large, sharp chef’s knife to slice the cookies 1/4 inch thick. If needed, trim any uneven edges.
- Place the cut cookies two inches apart on two baking sheets lined with parchment paper. Refrigerate for 30 minutes before baking.
Baking the Cookies
- Preheat the oven to 350 F, and position a rack in the center of the oven.
- Bake one pan of cookies at a time, keeping the rest refrigerated until ready to bake.
- For the cutout cookies, these should bake for about 12 minutes. Let the cookies cool for five minutes on the baking sheet before gently transferring them to cooling racks to cool completely.
- For the slice and bake cookies, due to the added water between each layer, they need a few extra minutes to bake through, and should bake for about 15-17 minutes. To check that they’re done, very carefully slide a spatula underneath a cookie and turn it over. If it looks wet or doughy underneath, it needs a few more minutes in the oven.
- The layers of the slice and bake cookies tend to slightly puff against each other in one direction, so while the cookies are warm, just take two spatulas and gently press them back together to square off the cookies. Let the cookies cool for five minutes on the baking sheet before gently transferring them to cooling racks to cool completely.

Decorating Ideas
- Although you wouldn’t want to cover up these beautiful cookies with icing, you can sandwich two cookies together with buttercream or Nutella in between.
- Another option for decorating is to lightly brush the tops of the unbaked cookies with beaten egg white, and sprinkling them with sparkling sugar before baking. This will give them a sweet, crunchy finish on top. See this recipe for almond sugar cookies for an example.


Black and White Cookies for Halloween
Make a striking variation of these cookies for Halloween by replacing half of the Dutch processed cocoa powder with black cocoa powder. My favorite black cocoa powder is The Cocoa Trader black cocoa powder.

Be sure to read all of my BAKING FAQs where I discuss ingredients, substitutions and common baking questions, so that you can be successful in your own baking!
Frequently Asked Questions
These are soft and buttery, with lightly crisp edges.
These cookies are extremely delicate when warm, so handle them gently until they’ve cooled. Be sure to follow all steps of brushing the dough free of flour and sealing all the edges together, or the cookies will be prone to breaking along the seams where the vanilla and chocolate dough join.
For black and white striped cookies, replace half of the cocoa powder with black cocoa powder.
I used Cacao Barry Extra Brute Dutch processed cocoa powder.
After cooling the cookies completely, store them in an airtight container at room temperature for up to 5 days, or in the freezer for up to 3-6 months.

You Might Also Like


Please check out my Amazon Shop for a curated collection of some of my favorite cake pans from trusted brands, baking tools, ingredients, pretty things and fashion finds. I recommend products that I buy and use every day!
Did you love today’s recipe? Please rate the recipe and let me know in the comments what you thought! Also, be sure to follow Curly Girl Kitchen on Instagram, and tag me when you try one of my recipes so I can see all your delicious creations!

High Altitude Chocolate and Vanilla Striped Sugar Cookies
All recipes on Curly Girl Kitchen are developed for high altitude at 5,280 feet. See FAQs for adjusting to higher or lower elevations.

Equipment
- Food Processor or Pastry Cutter
Ingredients
- ½ recipe Vanilla Sugar Cookies
- ½ recipe Chocolate Sugar Cookies
Instructions
Make the Dough
- With your food processor, make 1/2 the recipe for vanilla sugar cookies. Note, I also added 1/2 tsp almond extract, for extra flavor, since these cookies will be unfrosted.
- With your food processor, make 1/2 the recipe for chocolate sugar cookies.
- Shape the dough into thick disks, wrap in plastic wrap, and refrigerate for 20 minutes.
Shaping and Cutting Cutout Cookies
- On a lightly floured surface, roll out the vanilla cookie dough into a circle, with an even thickness of a little more than 1/4 inch thick. Then do the same with the chocolate dough, trying to keep it about the same size and shape as the vanilla.
- Using a ruler or straightedge and a rolling pastry wheel cutter, cut the vanilla dough into strips measuring 1/4 inch wide. Then do the same with the chocolate dough.
- Arrange the strips of vanilla and chocolate dough in an alternating pattern. As you lay each strip of dough down, be sure to use a dry pastry brush to brush the dough free of excess flour, as too much flour will prevent the strips from sticking together, and will make the cookies prone to breaking along the seams.
- Once you have all the strips of dough arranged tightly together, lay a piece of wax paper over the dough. Use your rolling pin to gently roll out the dough in the direction of the stripes, to an even thickness a little less than 1/4 inch thick. This will help to seal the strips of dough against each other.
- Now use your cookie cutters to cut as many striped cookies as you can. Gather up the scraps of dough, roll them out again, and continue to cut cookies until you've used up all the dough. The cookies cut from the scraps will have a marbled or camouflage pattern instead of stripes.
- Place the cut cookies two inches apart on two baking sheets lined with parchment paper. Refrigerate for 30 minutes before baking.
Shaping and Cutting Slice and Bake Cookies
- Line a 9×9 inch square baking pan with wax paper. To keep the paper from sliding around, it helps to brush the pan with a little butter first.
- Take the disk of vanilla dough, and shape it into a square. Then roll it out into a thick square measuring 8×8 inches. Set the dough into the pan, and finish pressing it out to fill the pan all the way to the edges, trying to keep it as even as possible.
- Lift the wax paper with the dough out of the pan, and set it on a cutting board.
- Now line the pan with another piece of wax paper, and repeat the above steps with the chocolate dough.
- Brush both squares of dough free of excess flour. Dip a pastry brush in water, and lightly brush it over the top of the vanilla dough so that the dough is slightly tacky (but not drenched in water). Then lay the chocolate dough over the top of the vanilla, pressing it down gently to stick the squares of dough together.
- Cover the dough with plastic wrap, and freeze for 20 minutes.
- Measure the diameter of the chilled dough, then use a straight edge to cut it into 4 equal rectangles.
- Again, brush all the dough free of excess flour. Dip a pastry brush in water, and lightly brush it over the top of one section of dough, then stack another section of dough on top. Repeat until you've stacked all four sections of dough and you have a long cube of dough with alternating layers of chocolate and vanilla dough. Gently press down on the top to ensure all the layers are sticking together.
- Wrap the dough up in the wax paper, and refrigerate for 40 minutes, then transfer it to the freezer for 20 more minutes before slicing the cookies.
- If you want to take this option a step further and make checkerboard cookies, use a large sharp chef's knife to trim the sides of the dough so it's perfectly square and even. Then cut it lengthwise into 8 long slabs. Stack the slabs so that the pattern of the chocolate and vanilla alternates (starting with vanilla on one side for the first slab, then flipping the next slab over so that you start with chocolate, etc.). This way, when you slice the cookies, you'll have a beautiful checkerboard pattern. Use a little water in between each slab to ensure the dough is sticking, press all the layers together, and chill again before slicing into cookies.
- After the dough has chilled, you can slice it into cookies. Use a large, sharp chef's knife to slice the cookies 1/4 inch thick. If needed, trim any uneven edges.
- Place the cut cookies two inches apart on two baking sheets lined with parchment paper. Refrigerate for 30 minutes before baking.
Baking the Cookies
- Preheat the oven to 350 F, and position a rack in the center of the oven.
- Bake one pan of cookies at a time, keeping the rest refrigerated until ready to bake.
- For the cutout cookies, these should bake for about 12 minutes. Let the cookies cool for five minutes on the baking sheet before gently transferring them to cooling racks to cool completely.
- For the slice and bake cookies, due to the added water between each layer, they need a few extra minutes to bake through, and should bake for about 15-17 minutes. To check that they're done, very carefully slide a spatula underneath a cookie and turn it over. If it looks wet or doughy underneath, it needs a few more minutes in the oven.
- The layers of the slice and bake cookies tend to slightly puff against each other in one direction, so while the cookies are warm, just take two spatulas and gently press them back together to square off the cookies. Let the cookies cool for five minutes on the baking sheet before gently transferring them to cooling racks to cool completely.
Notes
- These cookies are extremely delicate when warm, so handle them gently until they’ve cooled.
- Be sure to follow all steps of brushing the dough free of flour and sealing all the edges together, or the cookies will be prone to breaking along the seams where the vanilla and chocolate dough join.
- For black and white striped cookies, replace half of the cocoa powder with black cocoa powder.
- After cooling the cookies completely, store them in an airtight container at room temperature for up to 5 days, or in the freezer for up to 3-6 months.
- Although you wouldn’t want to cover up these beautiful cookies with icing, you can sandwich two cookies together with buttercream or Nutella in between.
- Another option for decorating is to lightly brush the tops of the unbaked cookies with beaten egg white, and sprinkling them with sparkling sugar before baking. This will give them a sweet, crunchy finish on top. See this recipe for almond sugar cookies for an example.
 https://curlygirlkitchen.com/
I am going to try these today. Just wondering if adding a gel colouring to the vanilla cookie dough will change anything up in the preparation?
No, it doesn’t change anything. I’ve added red gel coloring when I made these red and white striped: https://curlygirlkitchen.com/red-and-white-striped-heart-cookies/