
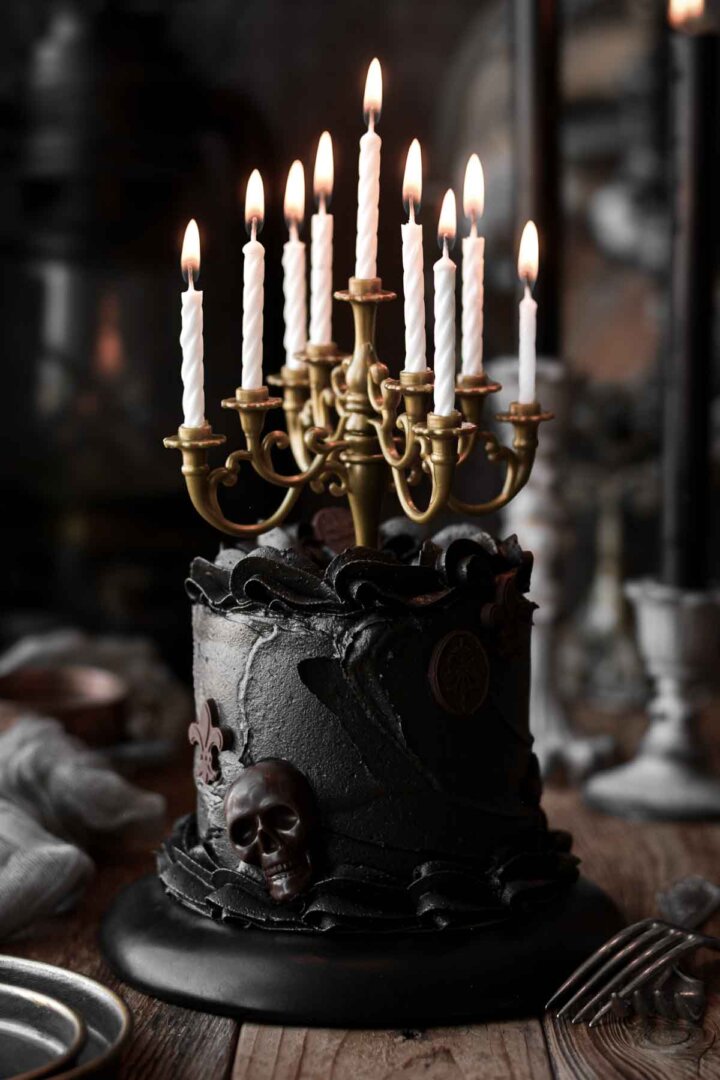
This high altitude black velvet cake is moist, dark and rich, made with black cocoa powder for an intense dark chocolate color and flavor that’s perfect for Halloween. Based on my high altitude chocolate cake, this black velvet cake uses a combination of both Dutch-processed cocoa powder and black cocoa powder. The result is a deep chocolate flavor that’s complex, rich and dark. Whether you want a dark and moody Halloween cake, or you’re a dark chocolate lover, you’ll adore this cake.
Don’t miss this pumpkin-shaped pumpkin cake with chocolate leaves, pumpkin maple sugar cookies, and candy corn striped Halloween cake.

This site contains affiliate links. As an Amazon associate, I earn from qualifying purchases. This means that I may make a small commission if you purchase a product using those links. This in no way affects my opinion of those products and services. All opinions expressed on this site are my own.
Why You’ll Love This Cake
Perfect for Halloween. This cake is dark, moody and gothic, but also so elegant for a Halloween party.
Easy to Make. The cake batter comes together quickly with just a bowl and whisk!
So Moist and Chocolatey. This is an incredibly moist chocolate cake, with a dark Oreo flavor that’s simply delicious.
High Altitude Tested. I develop all the recipes on my site for Denver’s altitude of 5,280 feet. If you’re at a lower or higher elevation, please see my FAQs for guidance on adjusting recipes for your altitude.

TIP: Be sure to use the specific type of cocoa powder that a recipe calls for. Each type of cocoa powder contains different levels of acidity, and reacts differently with the leavening, which affects the rise of baked goods. If you use a different type of cocoa powder than stated, you could end up with a sunken cake.
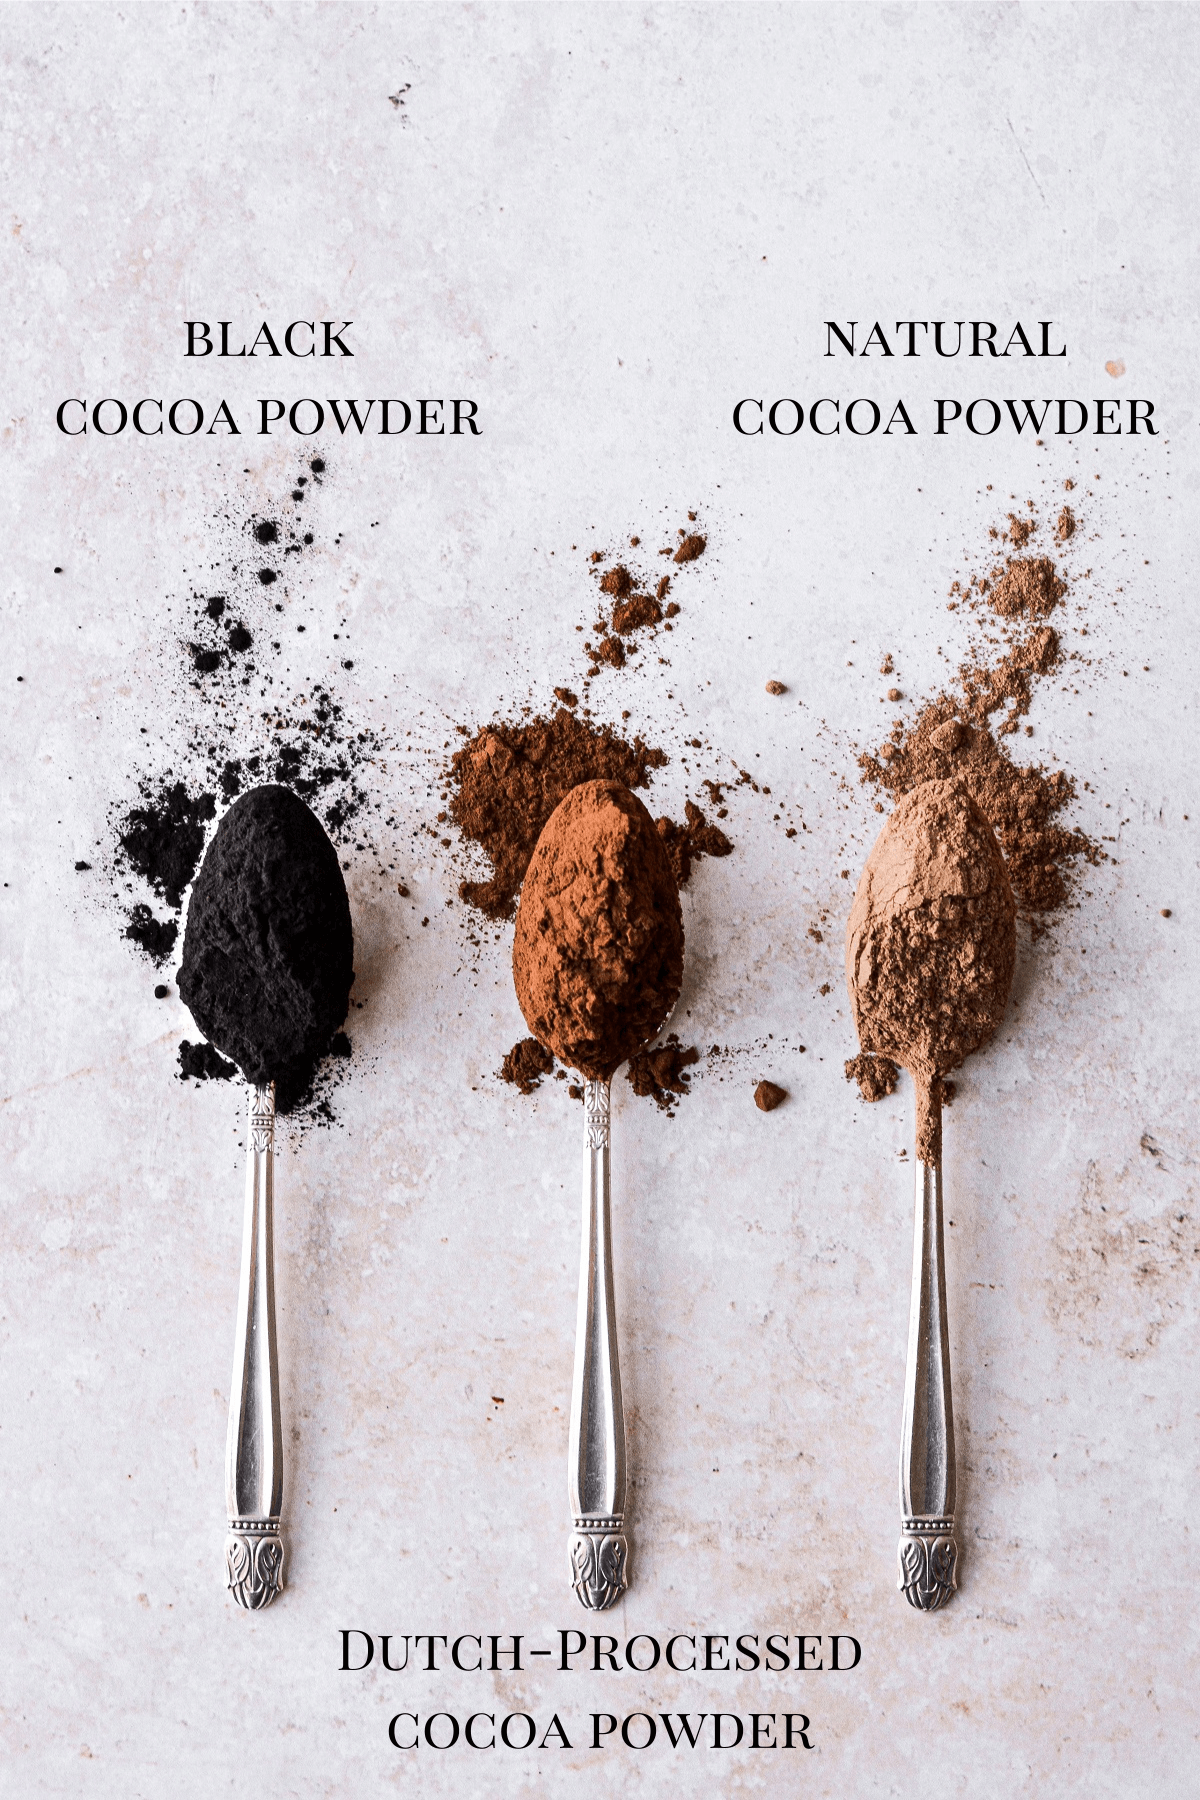
Types of Cocoa Powder
There are three main types of cocoa powder, natural, Dutch-processed and black. Understanding the difference between them is important when choosing a cocoa powder for your baked goods.
Natural Cocoa Powder
Natural cocoa powder is made from beans that have not been alkalized, so they are natural. It’s acidic and bitter, with a very strong flavor.
Dutch-Processed Cocoa Powder
Dutch processed cocoa powder begins with cacao beans that have been washed in an alkaline solution of potassium carbonate. The wash neutralizes their acidity, so the cocoa powder made from these beans is non-acidic. The alkalization process creates a cocoa powder that’s darker and redder in color and more mellow in flavor, for a rich, deep chocolate flavor and color in your baked goods.
Black Cocoa Powder
Black cocoa powder is cocoa powder that has been heavily Dutched, and it truly is black as coal. It has less chocolate flavor than Dutch-processed and natural cocoa powders, and is known for giving Oreo cookies their classic black color. It has a very strong, almost smoky flavor, and is best used in smaller quantities to add the black color. I recommend using it in combination with Dutch-processed cocoa powder (a 50/50 ratio) for the best flavor.
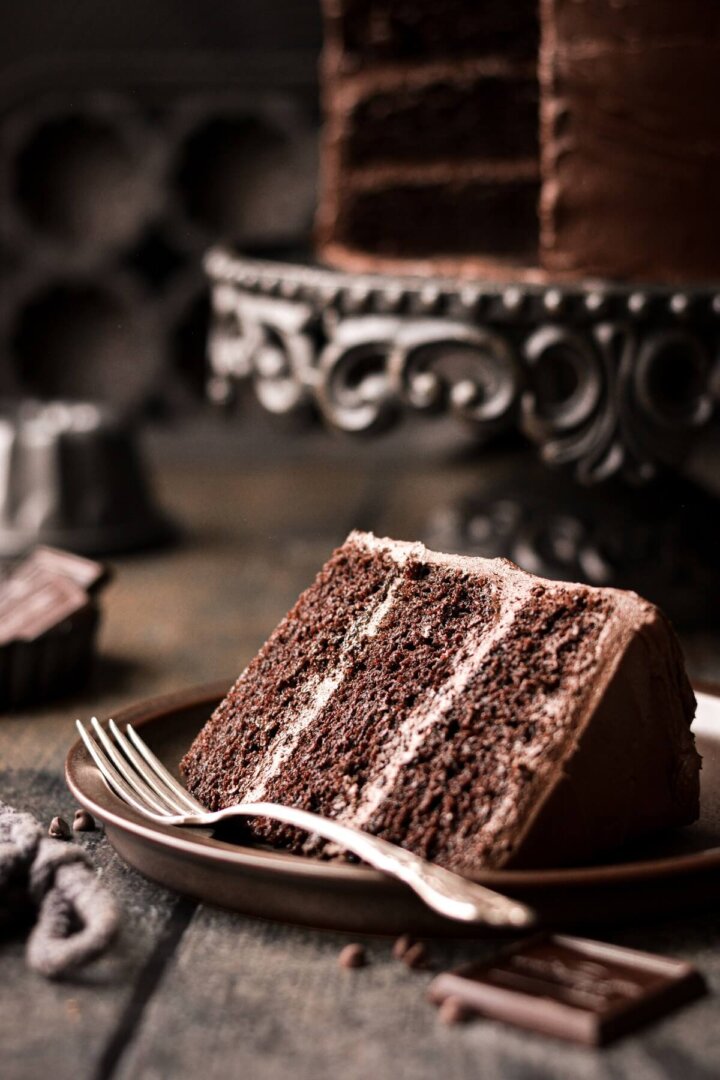
Black Cocoa vs. Dutch-Processed Cocoa Powder
In the image below, on the left you can see the dark color of the cake and buttercream made with both black cocoa and Dutch-processed cocoa powder. On the right, a chocolate cake made with just Dutch-processed cocoa powder.
When testing today’s recipe, the baking soda in my original chocolate cake recipe turned out to be far too aggressive when paired with the black cocoa powder. The cake ended up rising too quickly as it baked, and then sank and collapsed in the center. Swapping the baking soda for baking powder, which leavens cakes more gently, turned out to be the solution for making a perfect black velvet cake at high altitude.

See the recipe card at the end of the post for the full ingredients list and instructions.
Ingredients
Cake
- Flour. All-purpose flour gives the cake structure and strength.
- Sugar. Granulated sugar adds sweetness and moisture.
- Cocoa Powder. A blend of black cocoa powder and Dutch-processed cocoa powder gives this cake its dark black color and rich chocolate flavor.
- Espresso Powder. Enhances the flavor of the chocolate.
- Baking Powder. Leavens the cake batter so it rises.
- Salt. Balances the sweetness and adds flavor.
- Eggs. Gives the cake structure and strength.
- Milk + Sour Cream. Whole milk and sour cream adds fat, flavor, moisture and acidity for a tender cake crumb.
- Vegetable Oil. Makes the cake moist, light and fluffy.
- Vanilla Extract. Flavor.
Buttercream
- Butter. Gives the buttercream its silky, buttery flavor and texture.
- Powdered Sugar. Sweetens and thickens the buttercream.
- Cocoa Powder. A blend of black cocoa powder and Dutch-processed cocoa powder gives the buttercream its dark black color and rich chocolate flavor.
- Meringue Powder. Gives the buttercream stability.
- Salt. Balances the sweetness and adds flavor.
- Vanilla Extract. Flavor.
- Milk. Thins the buttercream to desired consistency.

Instructions
Make the cake batter.
- Preheat the oven to 350 F. Spray the bottoms of three 8-inch round cake pans with non-stick baking spray.
- In a large bowl, sift together the flour, sugar, cocoa powders, espresso powder, baking powder and salt.
- Separately, whisk together the eggs, milk, sour cream, oil and vanilla extract.
- Add the dry ingredients to the wet and whisk for 10-15 seconds until well combined. If the batter doesn’t seem dark enough, whisk in the black gel food coloring.
Bake the cake.
- Divide the batter between the cake pans. Bake the cakes on the center oven rack for about 25-27 minutes, until the tops spring back when gently touched, or a toothpick or cake tester inserted in the center comes out clean.
- Set the pans on a cooling rack, cover loosely with a clean kitchen towel and cool completely.
TIP: Be sure your cold dairy ingredients are at room temperature before making the cake batter.
Make the buttercream
- In the bowl of your stand mixer fitted with the paddle attachment, beat the butter for 1 minute until smooth.
- Separately, combine the powdered sugar, cocoa powders, meringue powder and salt. With the mixer on low, add the dry ingredients by spoonfuls, mixing until mostly combined. Add the vanilla extract.
- Whip the buttercream on medium speed (#4/6 on a Kitchen Aid mixer) for 4-5 minutes, scraping the bowl several times, until very light and fluffy. Add the milk only if needed for desired consistency.
TIP: Black cocoa powder has a stronger flavor than Dutch-processed cocoa powder. If the buttercream doesn’t seem sweet enough to you, you can add 1/2-1 cup additional powdered sugar, but you’ll need to add a small amount of milk, too, so the buttercream isn’t too stiff.
Assemble and frost the cake.
- Place one of the cooled cakes on a cake board or cake pedestal. Frost the cake with a layer of buttercream. Repeat stacking and filling the cake layers with buttercream, then frost all over with a thin crumb coat of buttercream. Chill the cake for 30 minutes in the refrigerator to set the crumb coat.
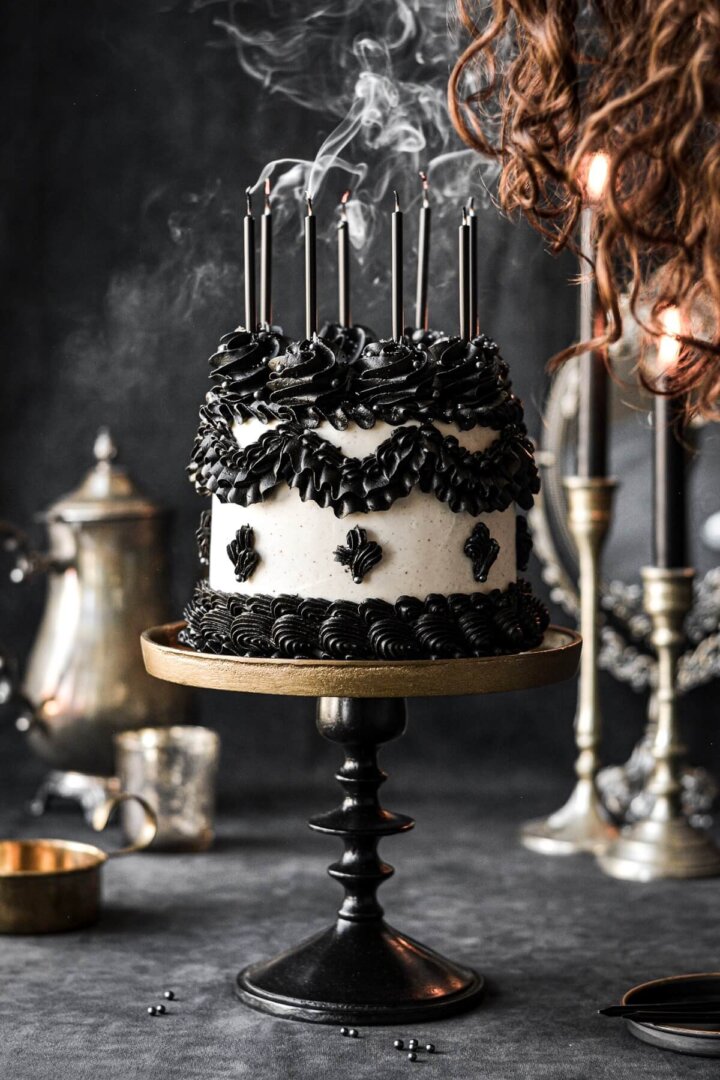
- Frost the cake all over with a final coat of buttercream. Before the frosting crusts over, scatter it with black sparkling sugar and sugar pearls. If desired, use any leftover buttercream to pipe swirls on top of the cake.

Be sure to read all of my BAKING FAQs where I discuss ingredients, substitutions and common questions with cake making, so that you can be successful in your own baking! I also suggest reading these comprehensive posts on making Perfect American Buttercream, How to Stack, Fill, Crumb Coat and Frost Layer Cakes and How to Use Piping Bags.
Frequently Asked Questions
The brand of black cocoa powder you choose will make a big difference in the flavor of your black velvet cake. I read many reviews of various brands before deciding on The Cocoa Trader Black Cocoa Powder. Used together with Rodelle Dutch-Processed Cocoa Powder (in a 50/50 ratio of each), the flavor of this cake is excellent with a gorgeous dark color. King Arthur Baking also has fantastic cocoa powders, and their black cocoa powder has great reviews.
You might, but you might not. I added a very small amount (between 1/4-1/2 teaspoon) of super black gel food coloring to both my cake and buttercream, just to ensure the color was as deep and dark as I wanted it to be. But since the cocoa powder does a good job of darkening the cake and frosting, you don’t need much food coloring. Note that the longer the buttercream sits, the darker it becomes.
I’ve baked this same recipe in three 8-inch cake pans (or two 9-inch cake pans) for a standard layer cake, or as a tiered cake using two 8-inch cake pans and two 6-inch cake pans. For the tiered option, divide 2/3 of the cake batter between the two 8-inch pans, then divide the remaining 1/3 of the batter between the two 6-inch pans.
You Might Also Like


Please check out my Amazon Shop for a curated collection of some of my favorite cake pans from trusted brands, baking tools, ingredients, pretty things and fashion finds. I recommend products that I buy and use every day!
Did you love today’s recipe? Please rate the recipe and let me know in the comments what you thought! Also, be sure to follow Curly Girl Kitchen on Instagram, and tag me when you try one of my recipes so I can see all your delicious creations!
High Altitude Black Velvet Cake for Halloween
All recipes on Curly Girl Kitchen are developed for high altitude at 5,280 feet. See FAQs for adjusting to higher or lower elevations.

Equipment
- Stand Mixer with Paddle Attachment
- 8-inch cake pans (x3)
Ingredients
Cake
- 2 cups all-purpose flour, spooned and leveled
- 1 ¾ cups granulated sugar
- 6 tbsp black cocoa powder
- 6 tbsp Dutch-processed cocoa powder
- 1 tbsp espresso powder
- 2 ¼ tsp baking powder
- 1 tsp coarse Kosher salt (if using table salt, use half the amount)
- 4 large eggs
- 1 cup whole milk
- 1 cup full-fat sour cream
- 1 cup vegetable oil
- 1 tbsp vanilla extract
- ¼ – ½ tsp super-black gel food coloring (optional)
Buttercream
- 2 cups unsalted butter, softened to room temperature
- 3 cups powdered sugar (see note)
- ½ cup black cocoa powder
- ½ cup Dutch-processed cocoa powder
- 1 tbsp meringue powder (optional)
- ¼ tsp coarse Kosher salt (if using table salt, use half the amount)
- 2 tsp vanilla extract
- 2-4 tbsp milk or cream, only if needed for consistency
- ¼ – ½ tsp super-black gel food coloring, optional
Instructions
Cake
- Preheat the oven to 350 F. Spray the bottoms of three 8-inch round cake pans with non-stick baking spray.(For the tiered cake also pictured in today's post, and featured in the video, you can use two 8-inch cake pans and two 6-inch cake pans. Divide 2/3 of the cake batter between the 8 inch pans, then divide the remaining 1/3 of the batter between the 6-inch pans.)
- In a large bowl, sift together the flour, sugar, cocoa powders, espresso powder, baking powder and salt.
- Separately, whisk together the eggs, milk, sour cream, oil and vanilla extract.
- Add the wet ingredients to the dry and whisk for 10-15 seconds until well combined. If the batter doesn't seem dark enough, whisk in the black gel food coloring.
- Divide the batter between the cake pans. Bake the cakes on the center oven rack for about 25-30 minutes, until the tops spring back when gently touched, or a toothpick or cake tester inserted in the center comes out clean.
- Set the pans on a cooling rack, cover loosely with a clean kitchen towel and cool completely.
Buttercream
- In the bowl of your stand mixer fitted with the paddle attachment, beat the butter for 1 minute until smooth.
- Separately, combine the powdered sugar, cocoa powders, meringue powder and salt. With the mixer on low, add the dry ingredients by spoonfuls, mixing until mostly combined. Add the vanilla extract.
- Whip the buttercream on medium speed (#4/6 on a Kitchen Aid mixer) for 4-5 minutes, scraping the bowl several times, until very light and fluffy. Add the milk only if needed for desired consistency.Note: Black cocoa powder is more bitter than Dutch-processed cocoa powder. If the buttercream doesn't seem sweet enough to you, you can add 1/2-1 cup additional powdered sugar, but you'll need to add a small amount of milk, too, so the buttercream isn't too stiff.
Assembly
- Place one of the cooled cakes on a cake board or cake pedestal. Frost the cake with a layer of buttercream. Repeat stacking and filling the cake layers with buttercream, then frost all over with a thin crumb coat of buttercream. Chill the cake for 30 minutes in the refrigerator to set the crumb coat.
- Frost the cake all over with a final coat of buttercream. Before the frosting crusts over, scatter it with black sparkling sugar and sugar pearls. If desired, use any leftover buttercream to pipe swirls on top of the cake.
Video
Notes
 https://curlygirlkitchen.com/
Hi,
Trying this cake for the first time and using it for cakesicles. Can this be baked in a 9×13 pan? Would it cook the same length of time?
Thank you!
It should work just fine baked in a 9×13 pan. I imagine it would bake for about the same time or a few minutes longer.
Thank you so much! Can’t wait to try it!
Could this be made into cupcakes? If so, any adjustments?
Please see this post for my black velvet cupcakes recipe: https://curlygirlkitchen.com/high-altitude-black-velvet-cupcakes/
So happy with my all black birthday cake! I made this recipe today in 3 6″ cake pans. I baked it at 325 degrees F for 50 minutes and it all came out perfectly!
Cake, pie or ice cream? My son would reply “cake” and his favorite flavor is anything dark chocolate. This recipe was a big hit! He said that this may become his new birthday cake request. The color of this cake and frosting is perfectly black and fun to decorate. Thanks again, Heather!