
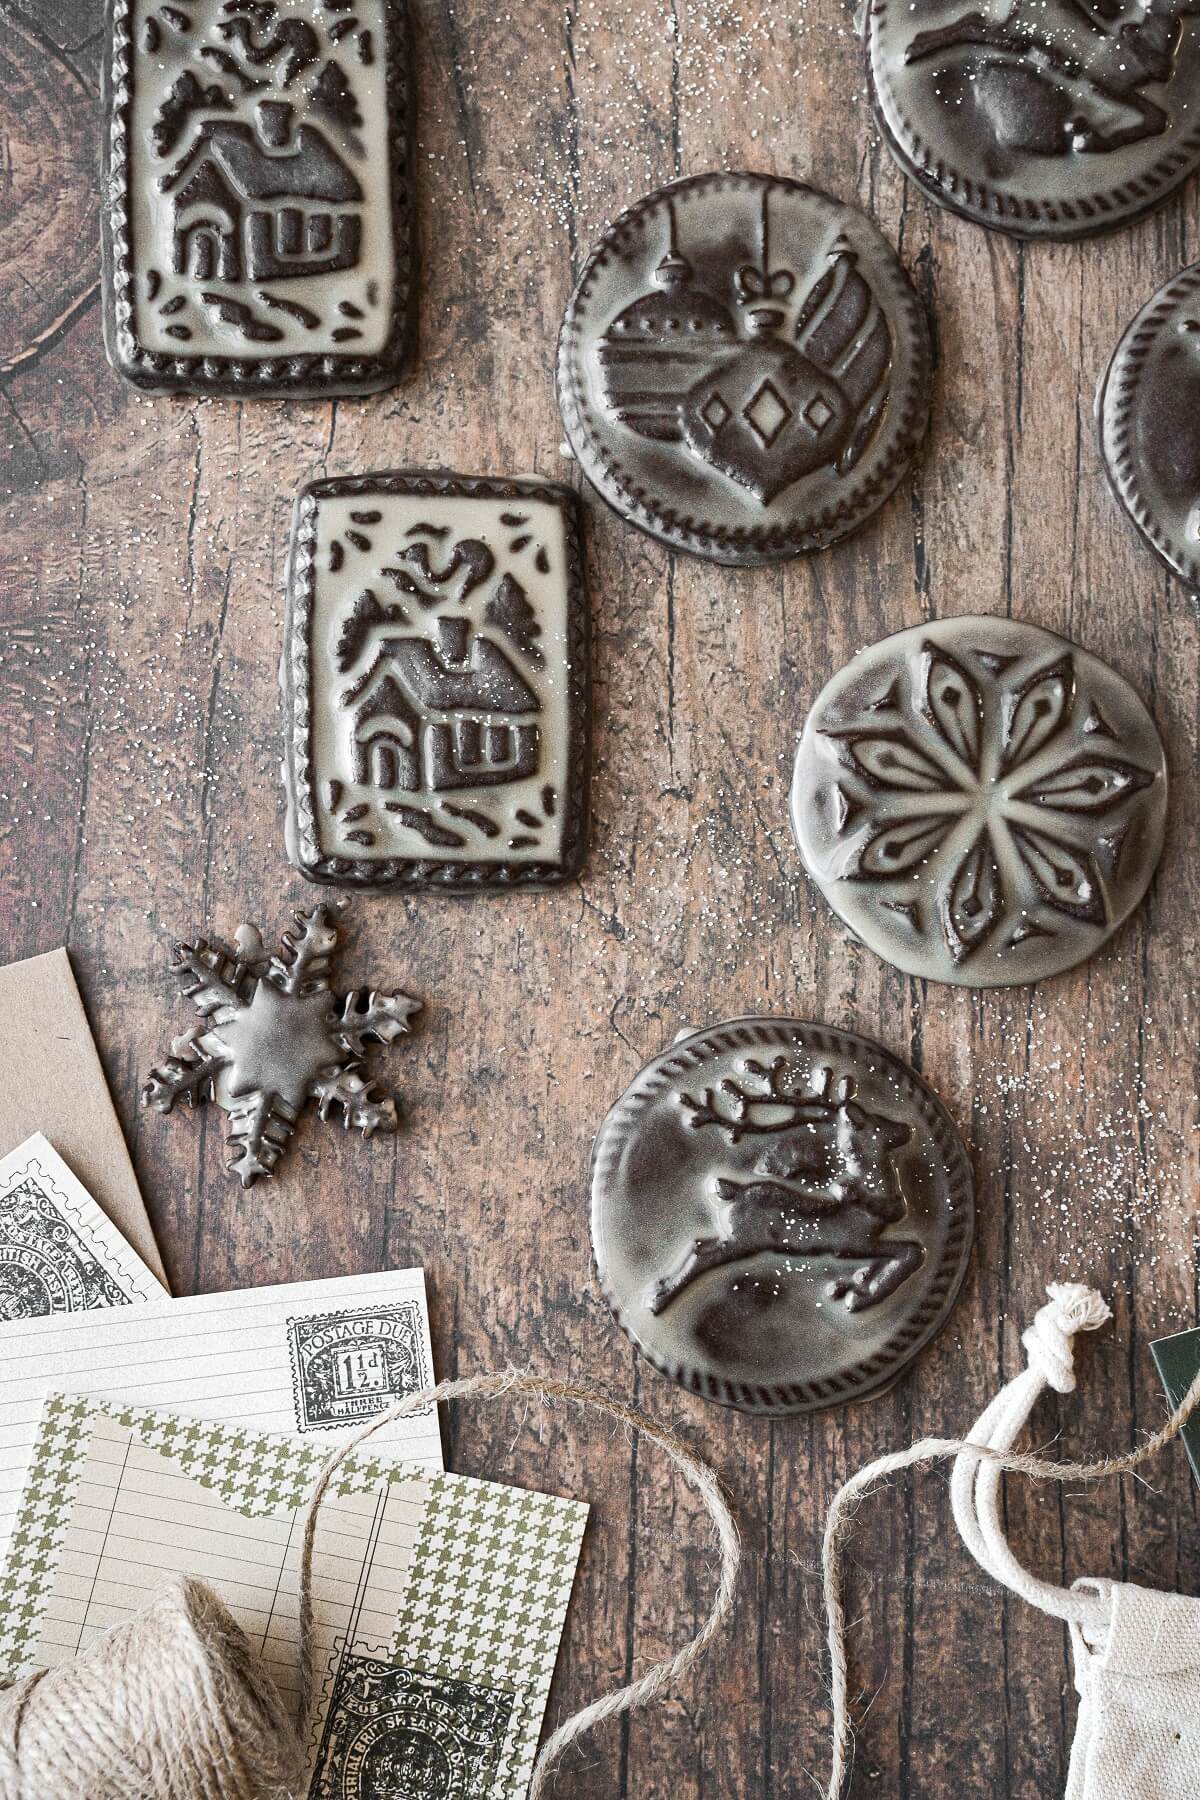
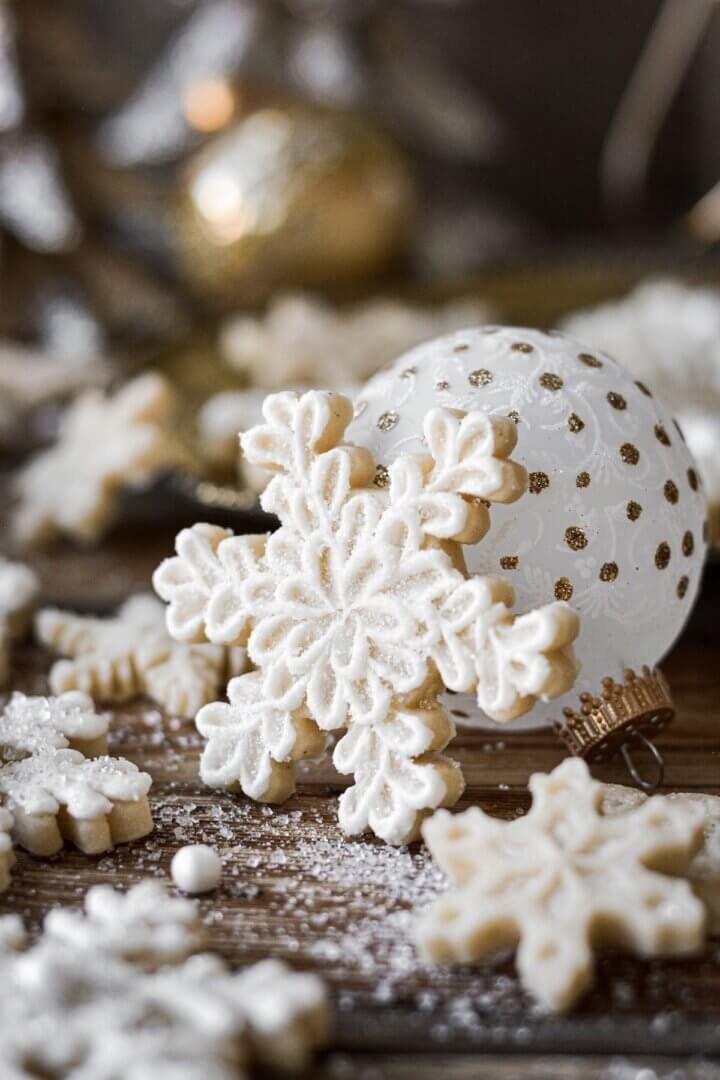
I’ve been collecting cookie stamps for a few years, but it wasn’t until this winter that I fell in love with the look of a stamped cookie glazed with icing. These stamped chocolate shortbread cookies are buttery, and not too sweet. They hold their shape perfectly when they bake, so the stamped design is beautifully preserved. And the icing brushed over the cookies while they’re still warm highlights all the gorgeous details of the cookie stamp design. You can use seasonal cookie cutters, cookie stamps and embossed plunger style cookie cutters or pie crust cutters to decorate these for Halloween, Thanksgiving, Christmas, or any other holiday!
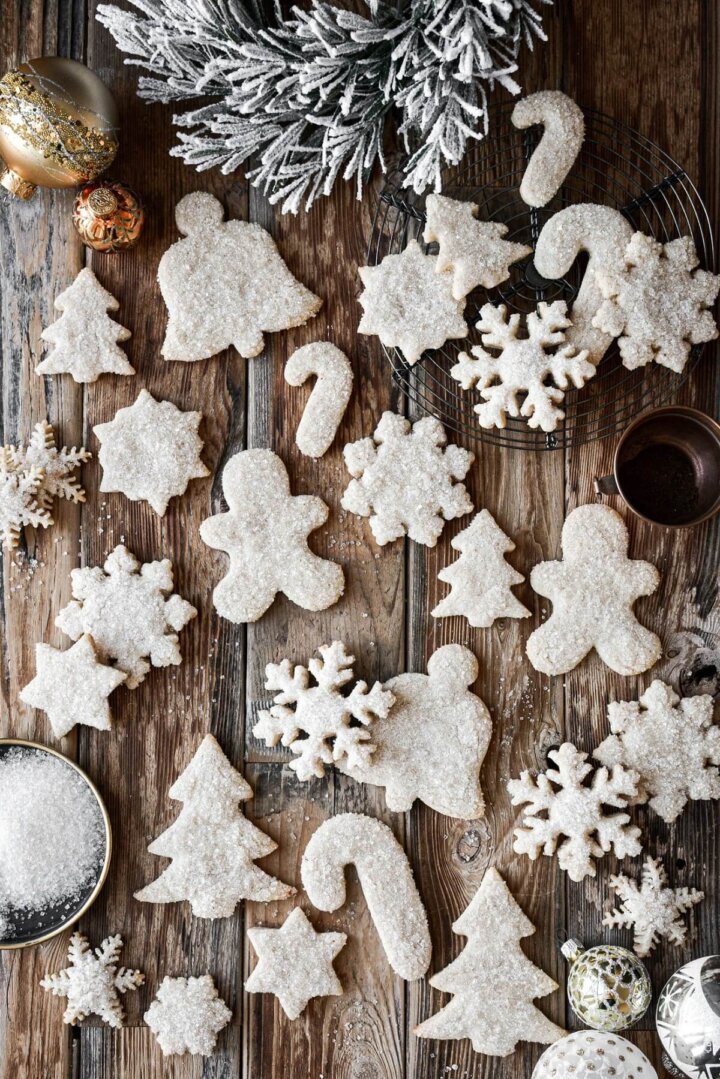
Looking for more Christmas cookie ideas? Don’t miss these classic Linzer cookies with bourbon cherry jam, almond sugar cookie Christmas trees, and soft maple cookies.
This site contains affiliate links. As an Amazon associate, I earn from qualifying purchases. This means that I may make a small commission if you purchase a product using those links. This in no way affects my opinion of those products and services. All opinions expressed on this site are my own.
Types of Cookie Stamps
Cast Cookie Stamps
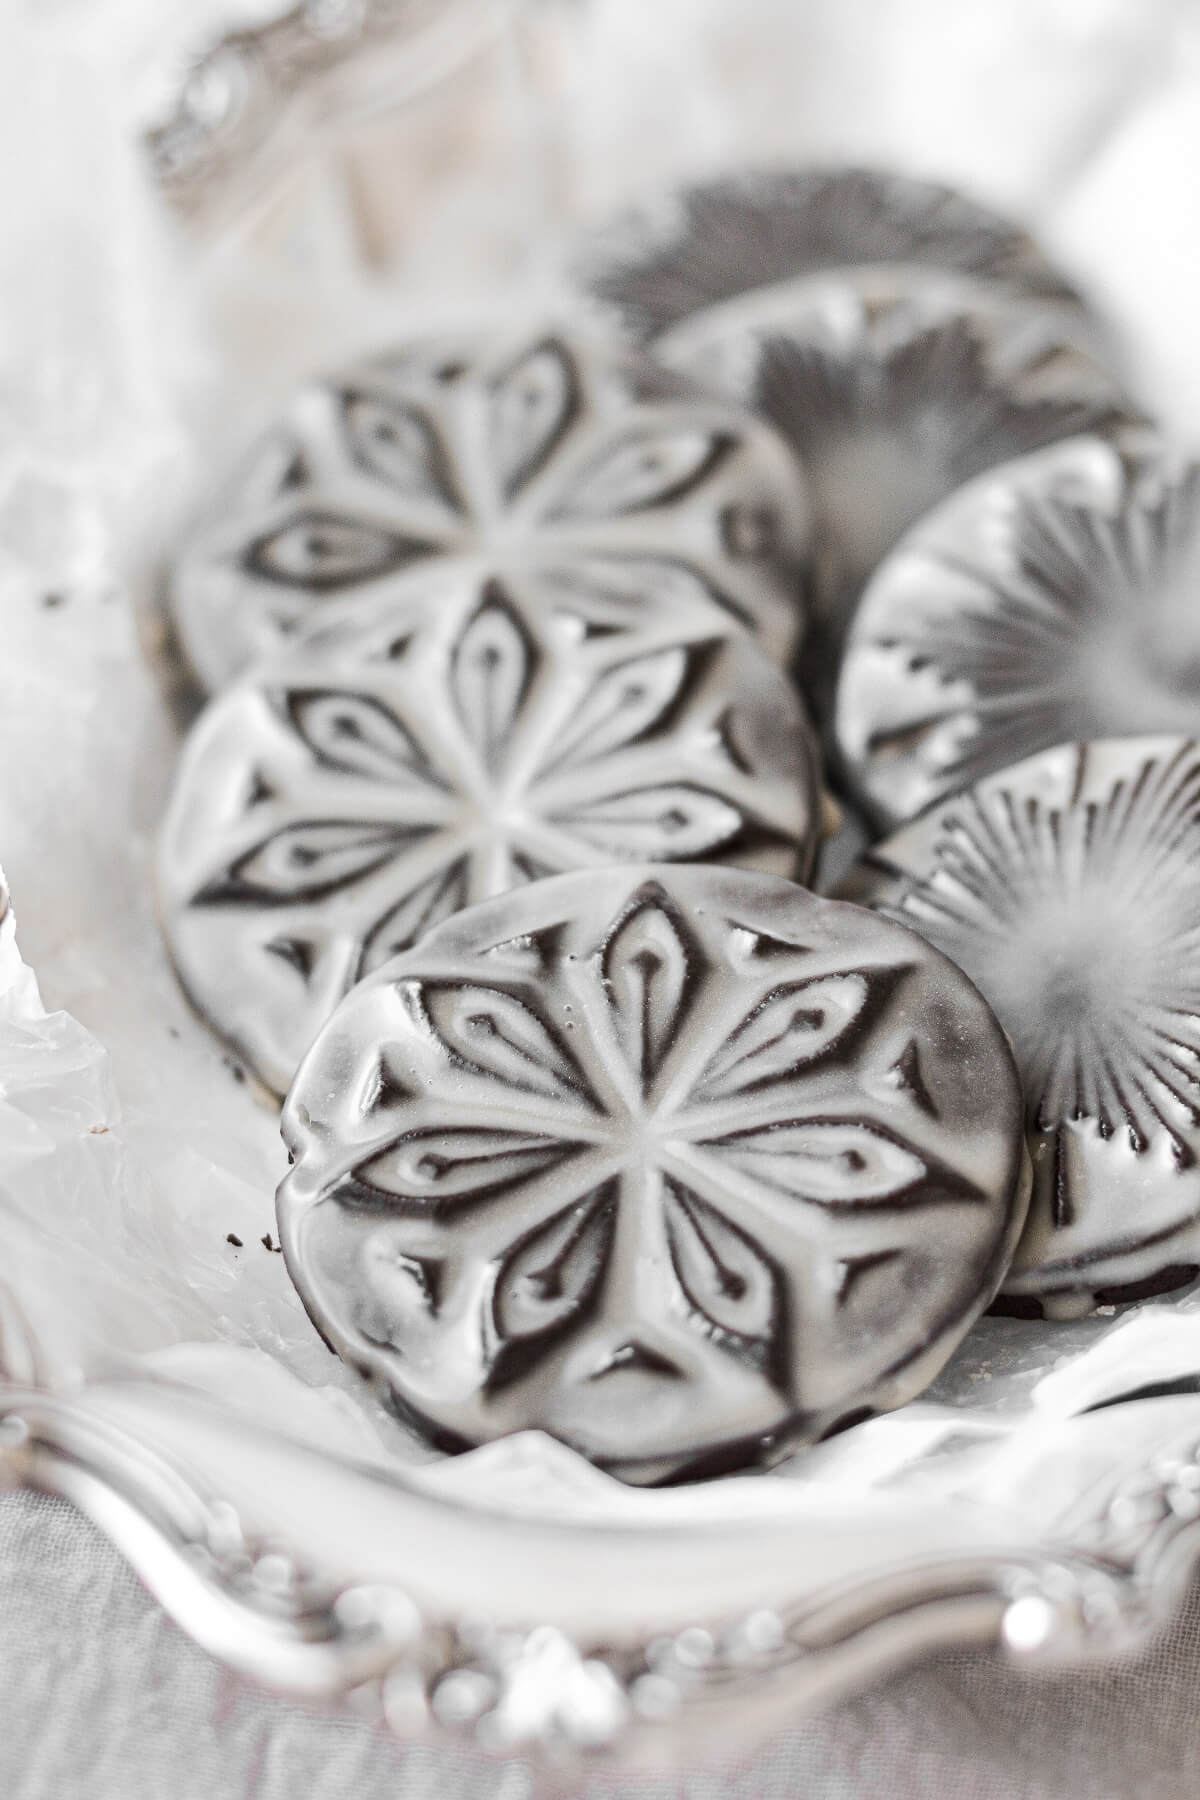
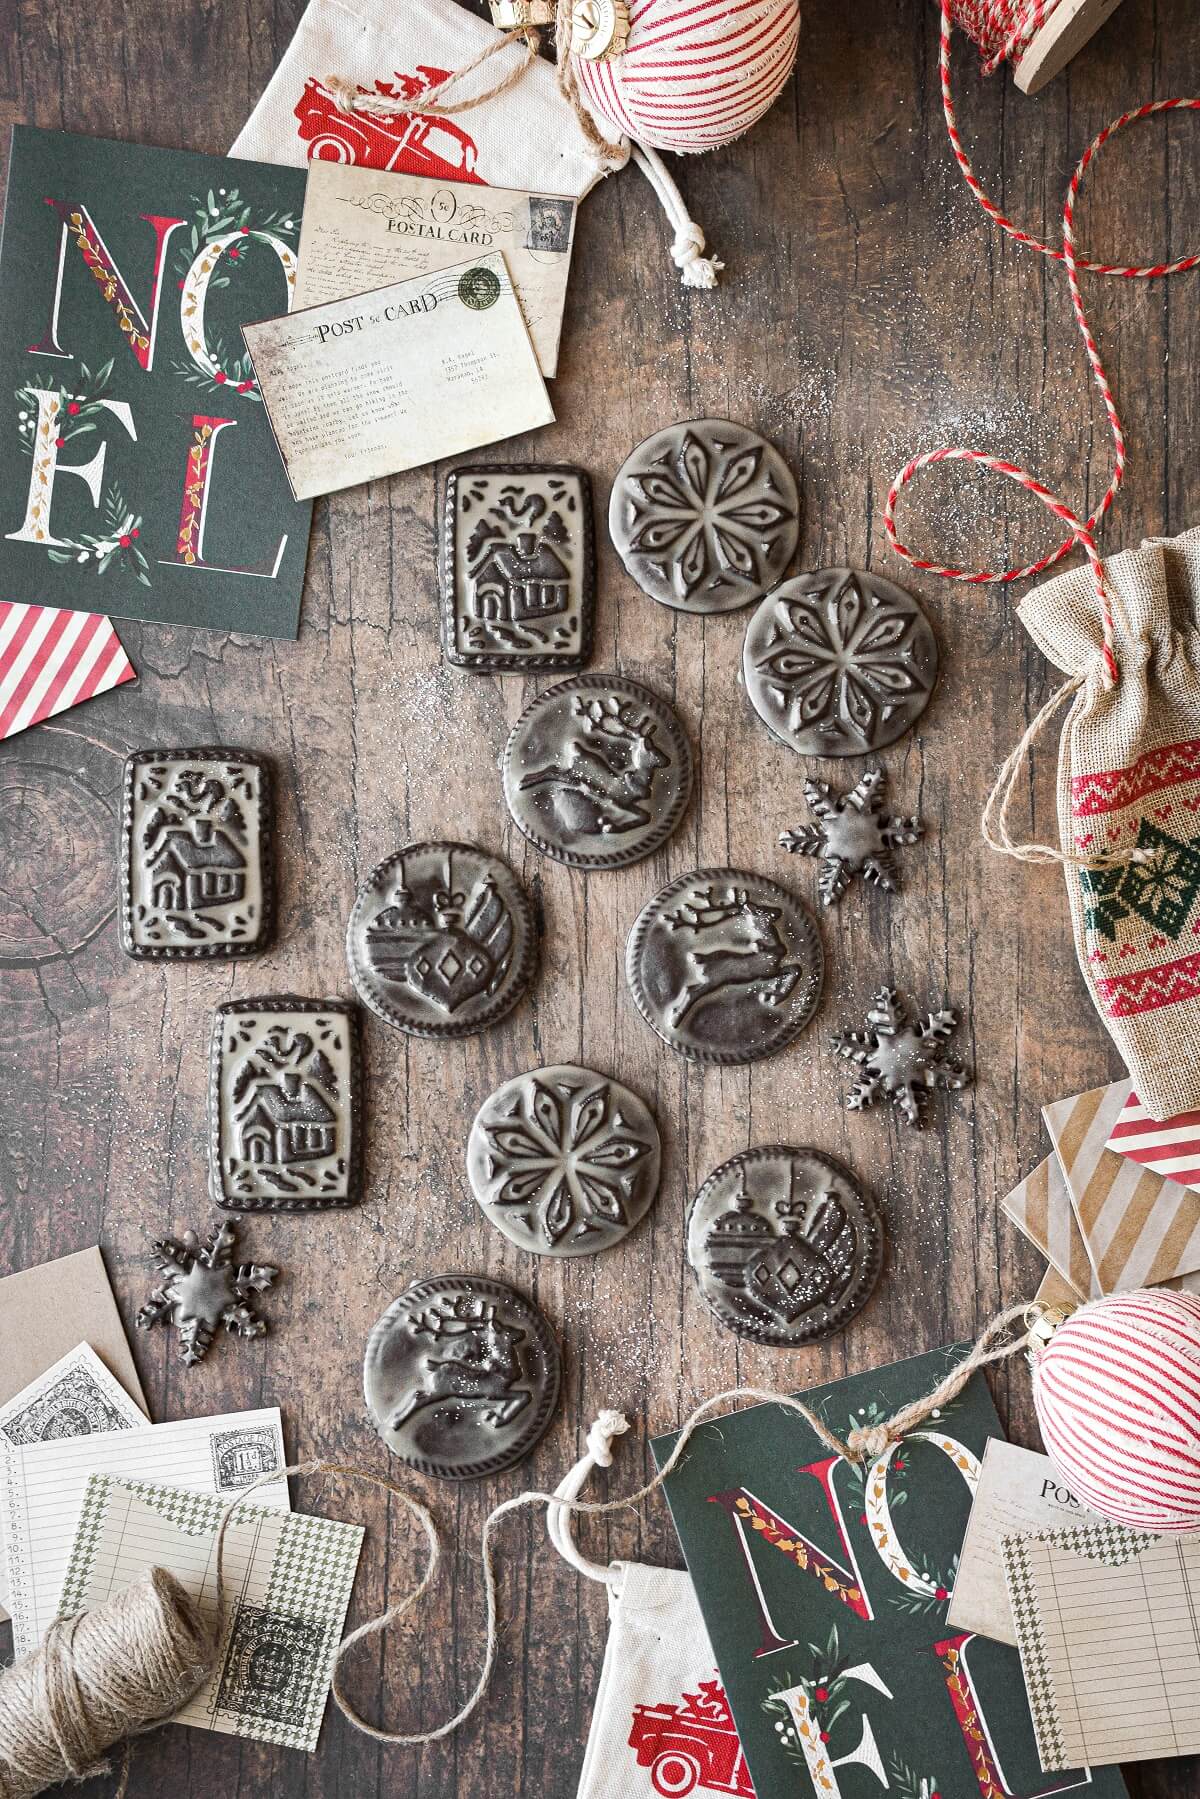
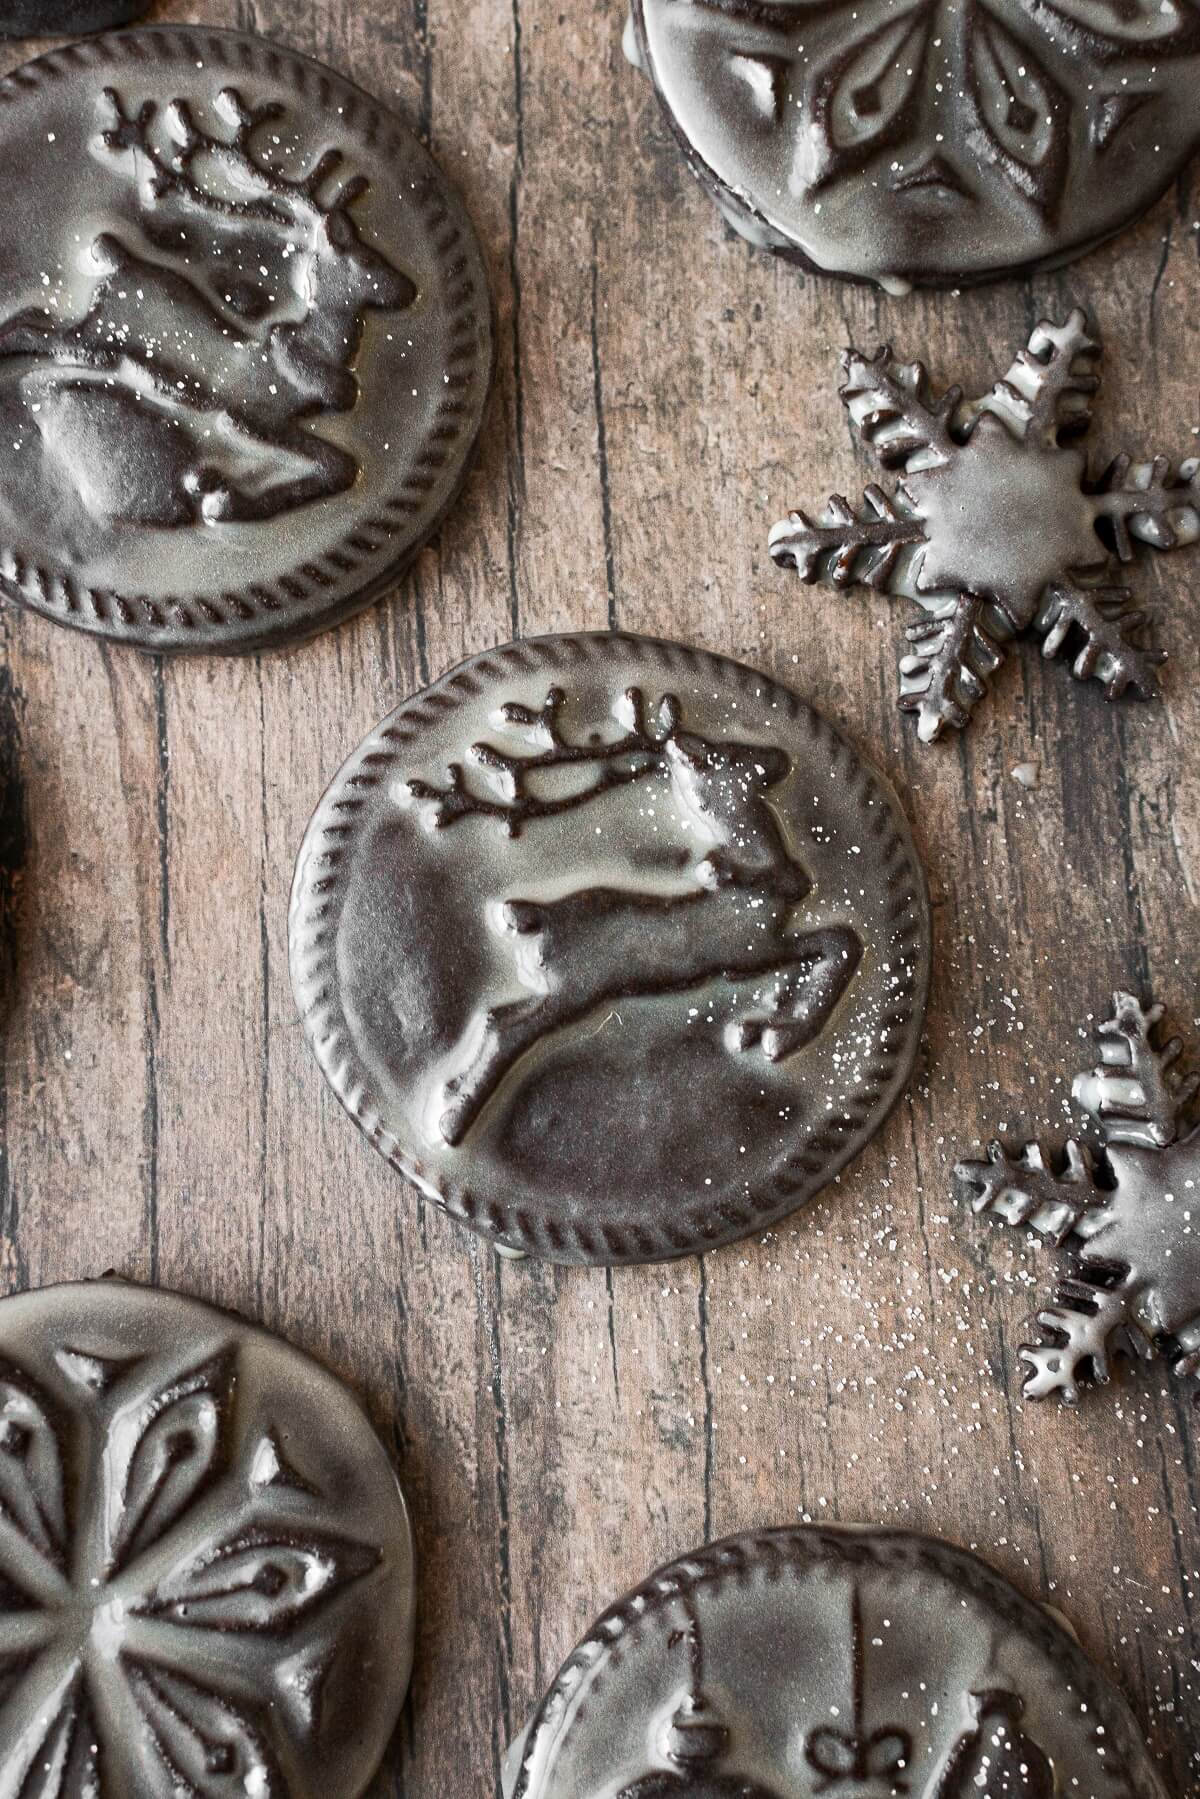
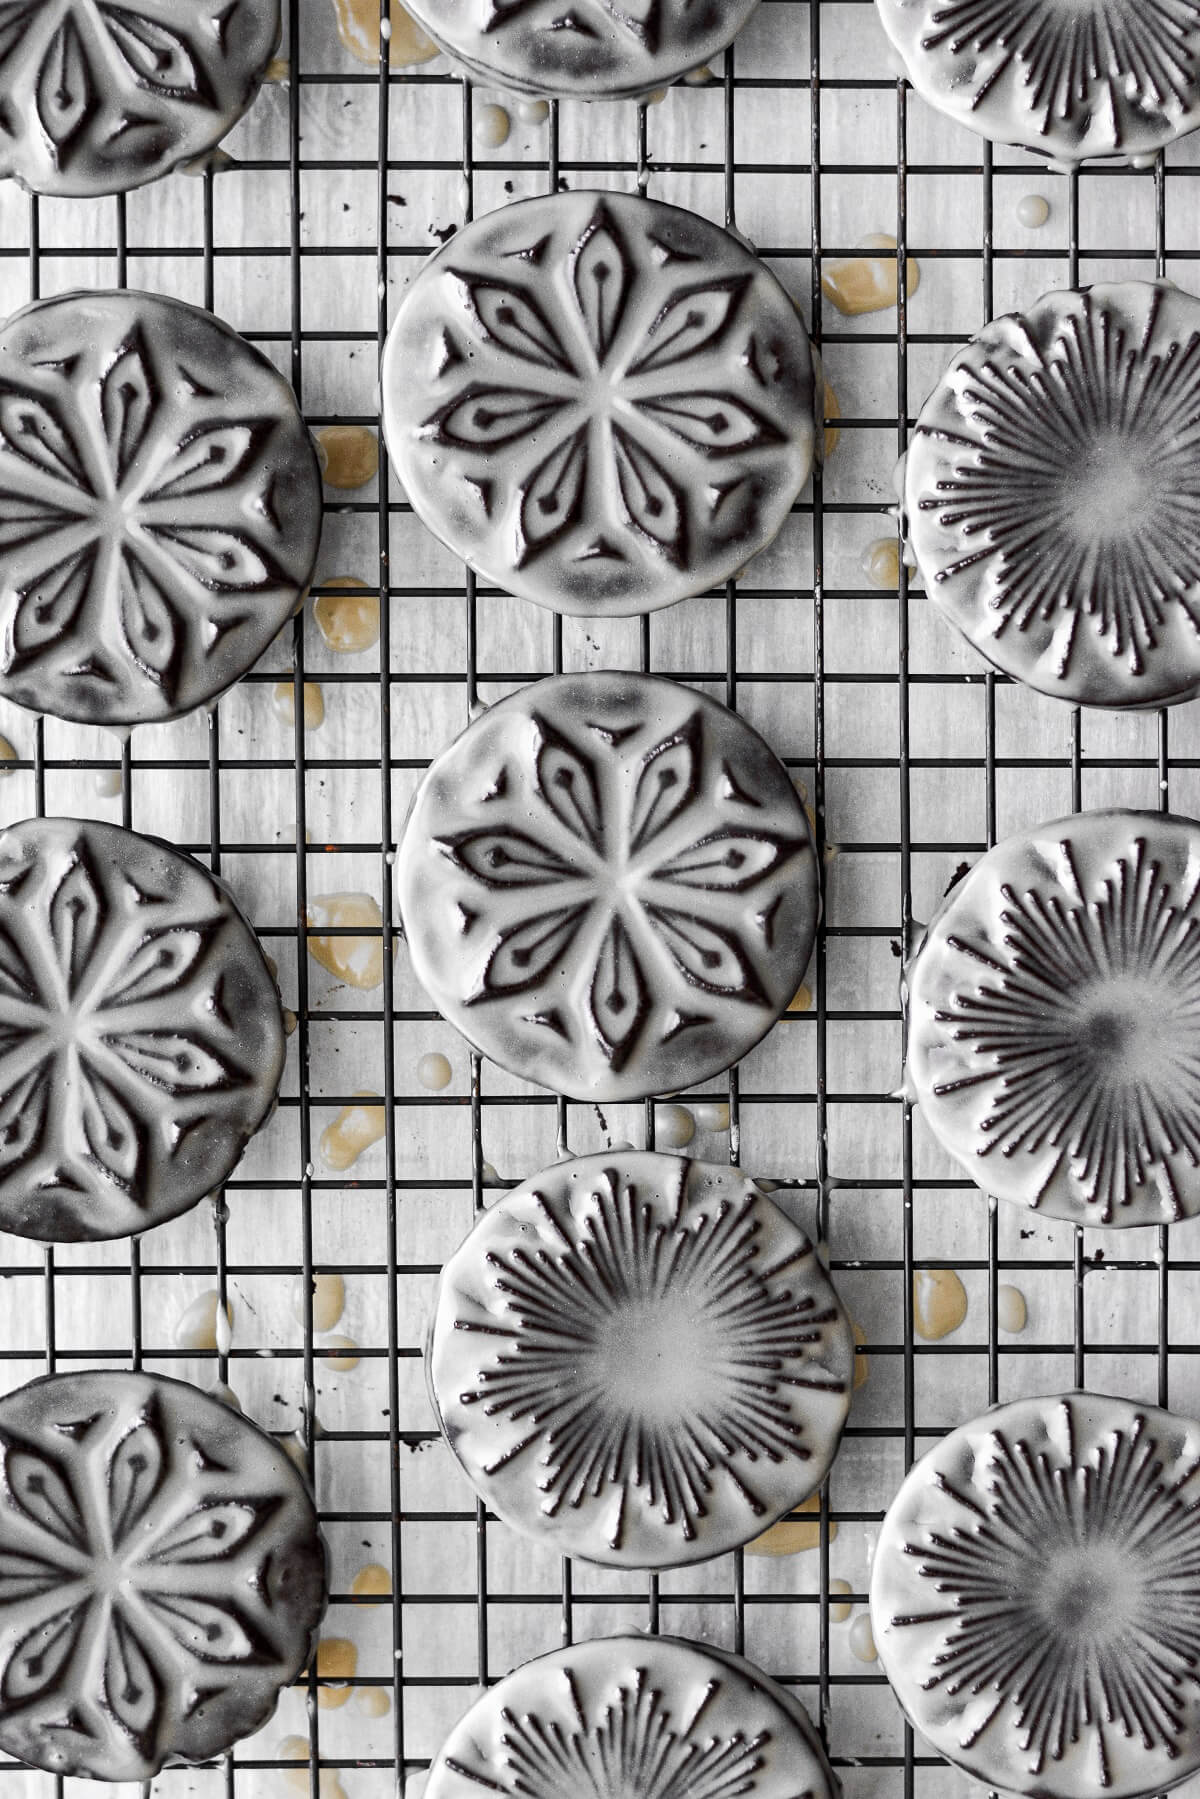
The Nordic Ware cast cookie stamps are commonly used for pressed shortbread cookies. They have such a beautiful variety of designs to choose from. And for my stamped chocolate shortbread cookies in today’s post, I used the Nordic Ware Starry Nights cookie stamps. The designs in this set are so gorgeous, and I love that they’re wintery, without necessarily being a Christmas stamp, so they can be used all winter long. I also recently added their Yuletide cookie stamps to my collection, and they’re gorgeous, too. Most of the cookie stamps I own are Nordic Ware, and I love them! The quality is amazing, the detail is beautiful, and the dough releases perfectly.
Silicone Cookie Stamps
Another option are silicone cookie stamps. They’re available in a wide variety of patterns, and a bonus is that they can be taken apart for washing.
Springerle Molds, Embossed Rolling Pins and Wooden Cookie Molds
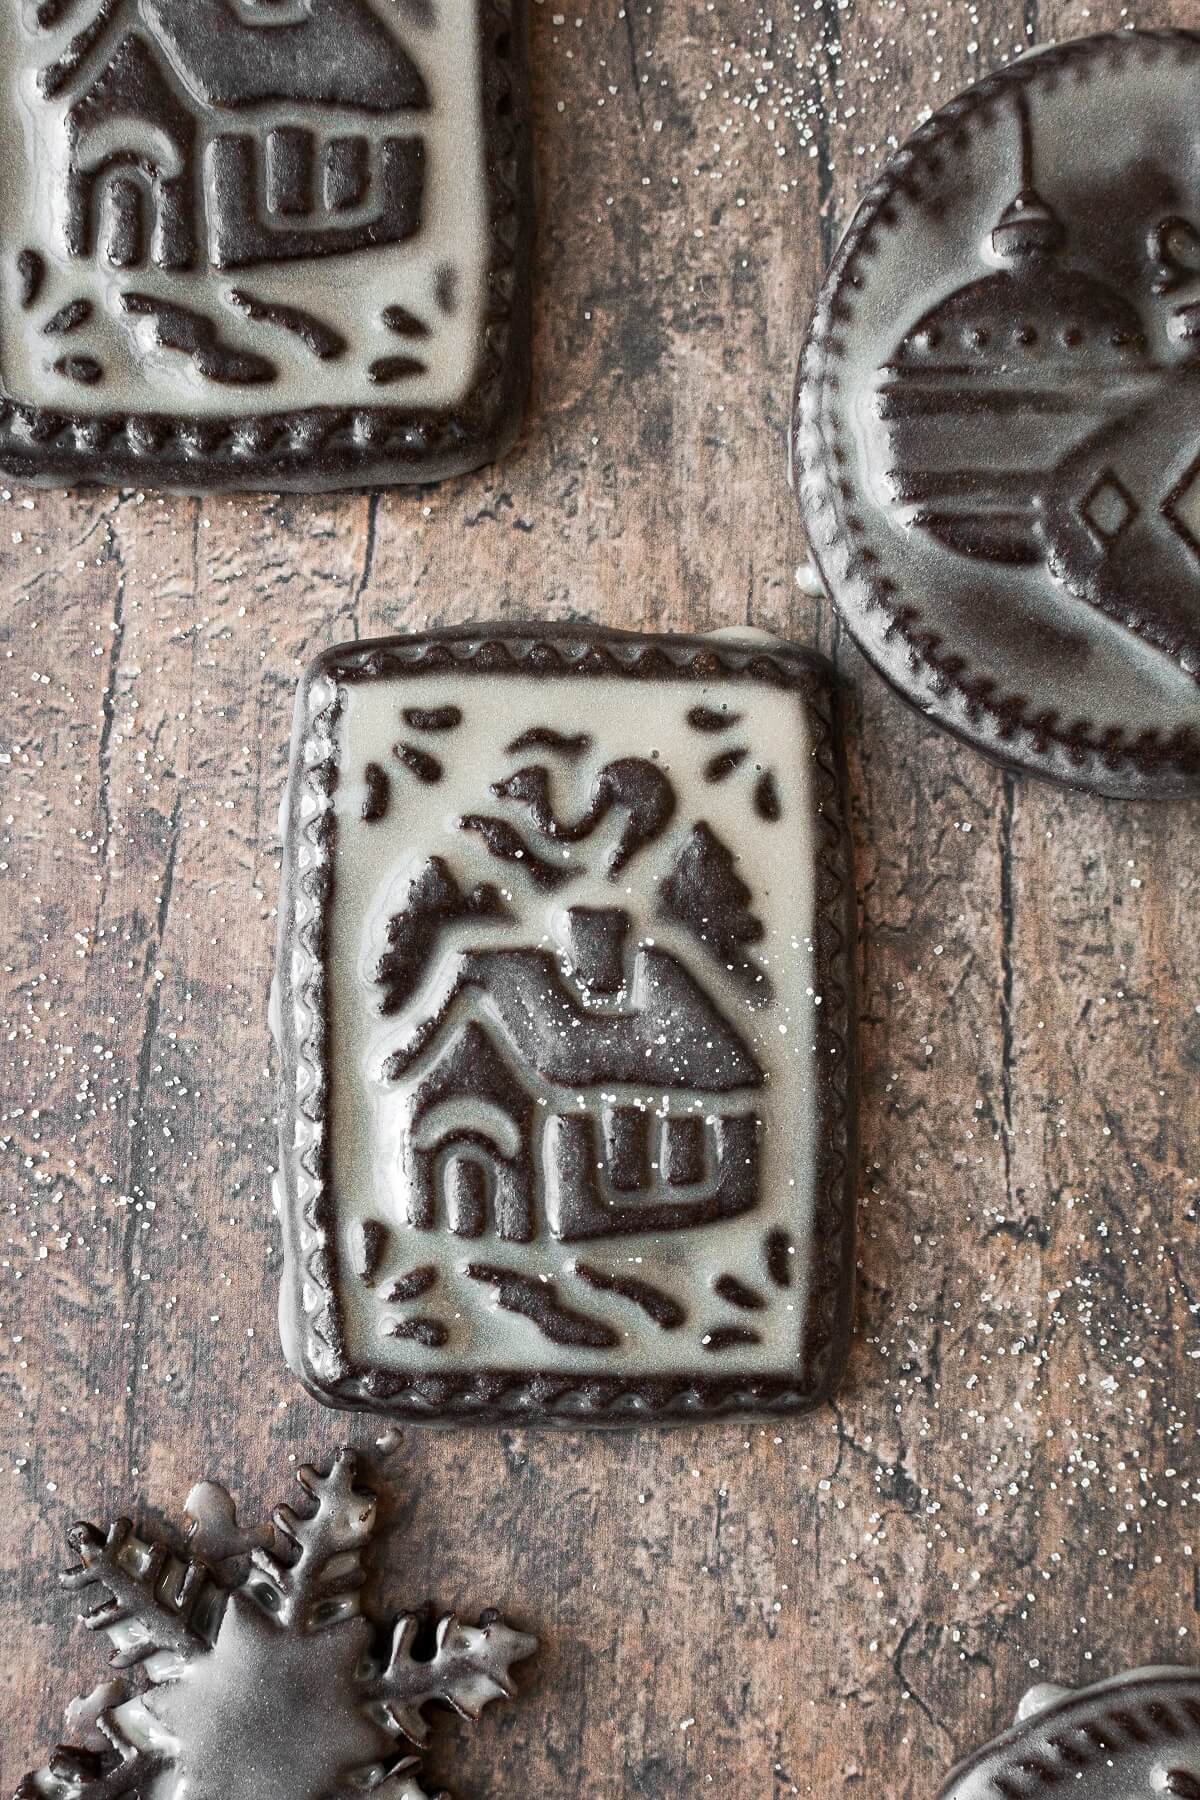
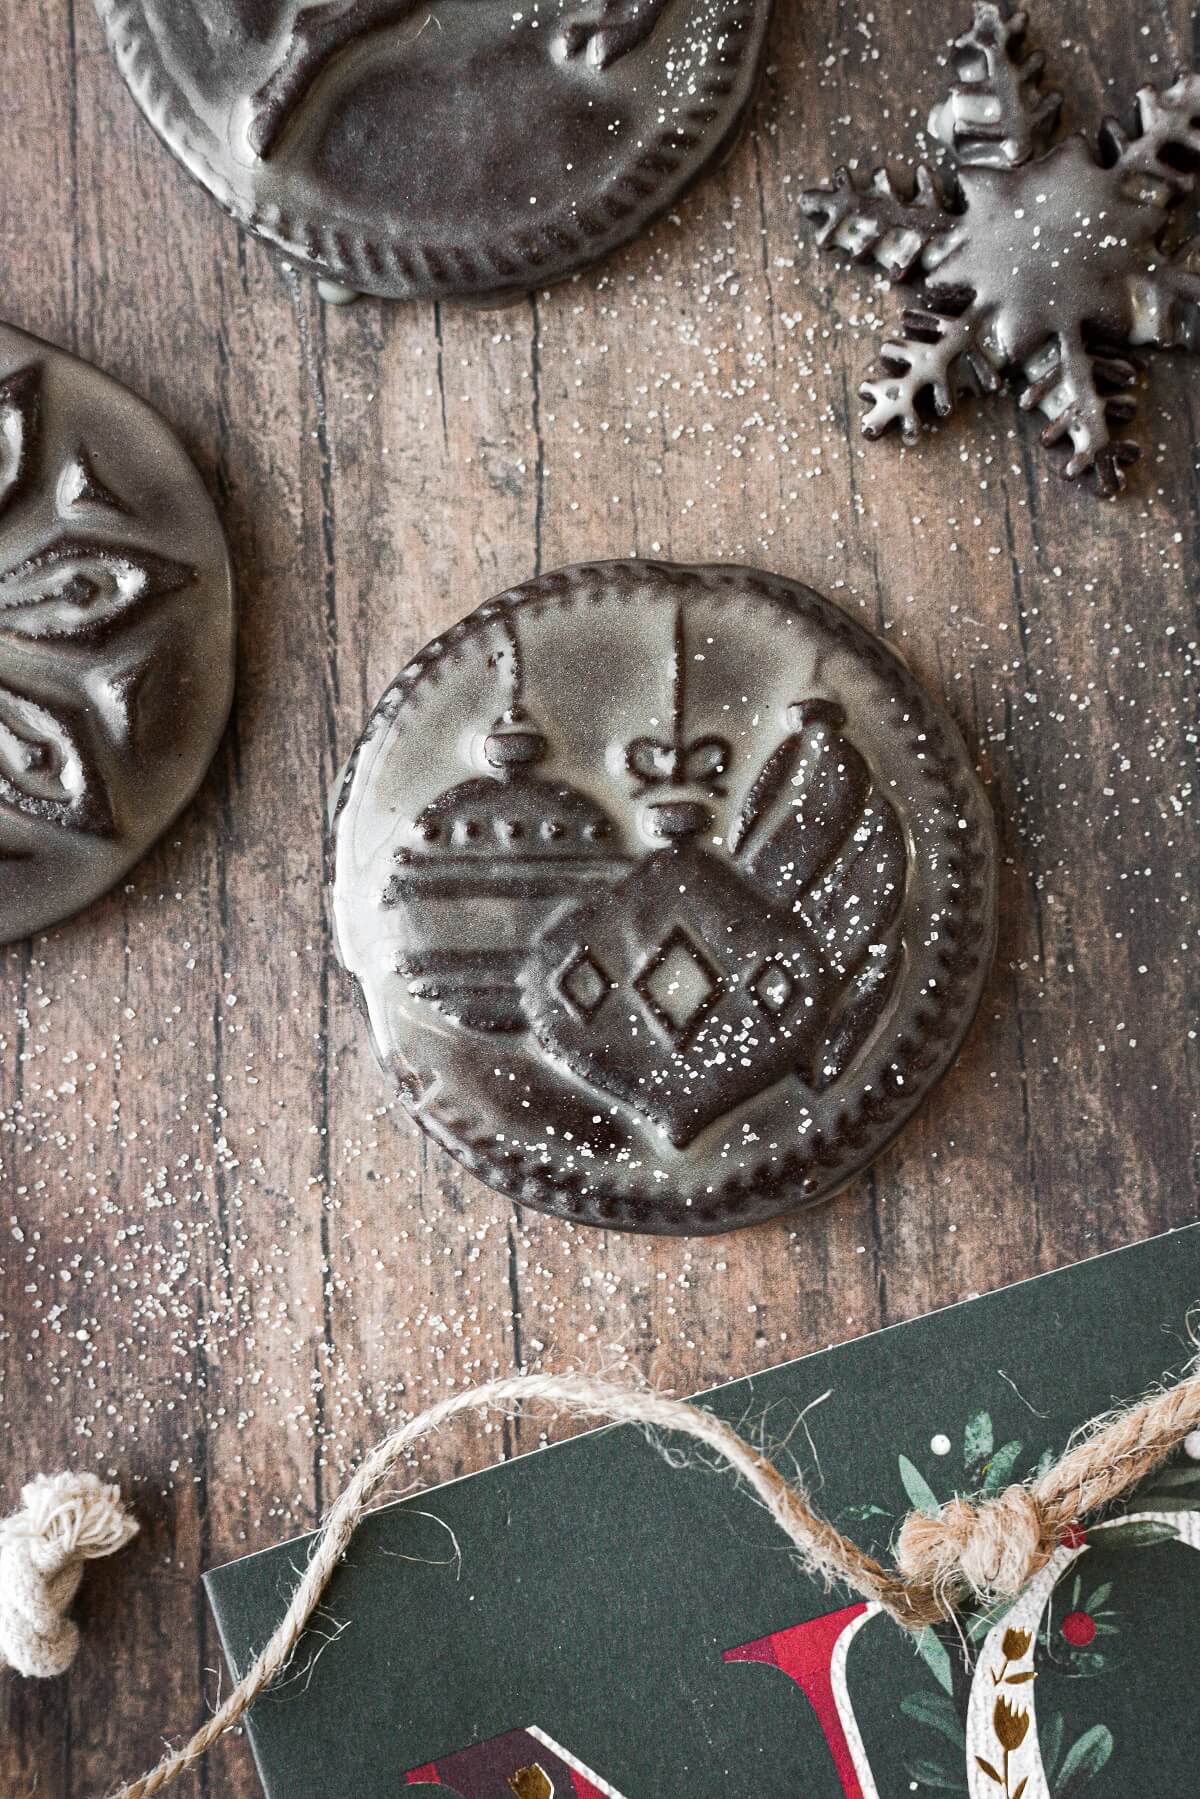
Then there are traditional Springerle molds, carved wooden molds and patterned rolling pins. A Springerle is a type of German cookie with an embossed design. They’re made by pressing springerle molds onto rolled dough and allowed to dry before baking, to preserve the detail of the pattern. I haven’t ever made Springerle cookies, but I do often use the wooden molds to emboss dough. Simply press a floured ball of cookie dough into a mold such as this reindeer mold, then bang it firmly on the counter to release the molded cookie before baking.
Plunger Cookie Cutters
A plunger style cookie cutter or pie crust cutter is usually plastic, with a center spring-loaded plunger. The outer edge of the cutter cuts the shape of the cookie, while the plunger, when pressed down against the dough, creates the embossed pattern on the dough. You will often find these types of seasonal cutters at your local Michaels store.
How to Use Stamp Cookie Cutters
One of the great things about using stamp cookie cutters, is that you don’t need to roll out your dough. After making the shortbread dough, let it rest and chill for about 20 minutes. Then shape the dough into uniformly sized balls, and lightly coat the balls in flour. Dip the cookie stamp in flour, shake off the excess, and press down firmly on the dough balls. After lifting the stamp off the pressed cookie, use a cookie cutter to trim off the uneven edges.
The Best Types of Cookie Dough for Stamped Cookies
Use a Dark Cookie Dough
If you’re planning on icing your stamped cookies, then it’s best to use a darker cookie dough. The contrast of the dark cookie dough with the icing is what really beautifully highlights the detail of your embossed pattern.
Gingerbread cookies are a popular option for embossed cookies, since the rich brown color of the dough looks very pretty with the translucent icing.
Chocolate cookies are another perfect option your stamped cookies. And, personally, I’d far rather eat a chocolate cookie than a gingerbread cookie, so this chocolate shortbread cookie recipe is a winner in both appearance and taste.
Use a No Spread Cookie Recipe
It’s also important to use a no spread cookie recipe. This means you’ll need a recipe that doesn’t contain any leavening or eggs, both of which will cause the dough to puff and spread out. And a cookie that spreads will lose the detail of that gorgeous stamped pattern.
My chocolate shortbread cookie recipe is perfect for embossed cookies. Since the dough doesn’t spread while baking, it perfectly preserves the detail of the pressed pattern. The baked cookies are also soft, not crunchy, and totally delicious.
And if you’re looking for a no-spread vanilla shortbread, be sure to check out my soft vanilla bean shortbread cookie recipe. It’s my go-to recipe for all my cutout cookies.
See the recipe card at the end of the post for the full ingredients list and instructions.
Ingredients
- All-Purpose Flour. Provides structure to the cookies.
- Powdered Sugar. I like to use powdered sugar in my shortbread cookies, rather than granulated sugar. The finer texture makes a lovely, soft cookie.
- Cocoa Powder. Use a good-quality Dutch-processed cocoa powder, such as Rodelle, for delicious results.
- Coarse Kosher Salt. Balances the sweetness and enhances the flavor of the chocolate.
- Unsalted Butter. Adds richness, moisture and flavor. The butter is what makes shortbread cookies so light and flaky.
- Vanilla Extract. Flavor.
- Milk. A little milk helps to bind the dough together, without adding leavening, like an egg would do.
Instructions
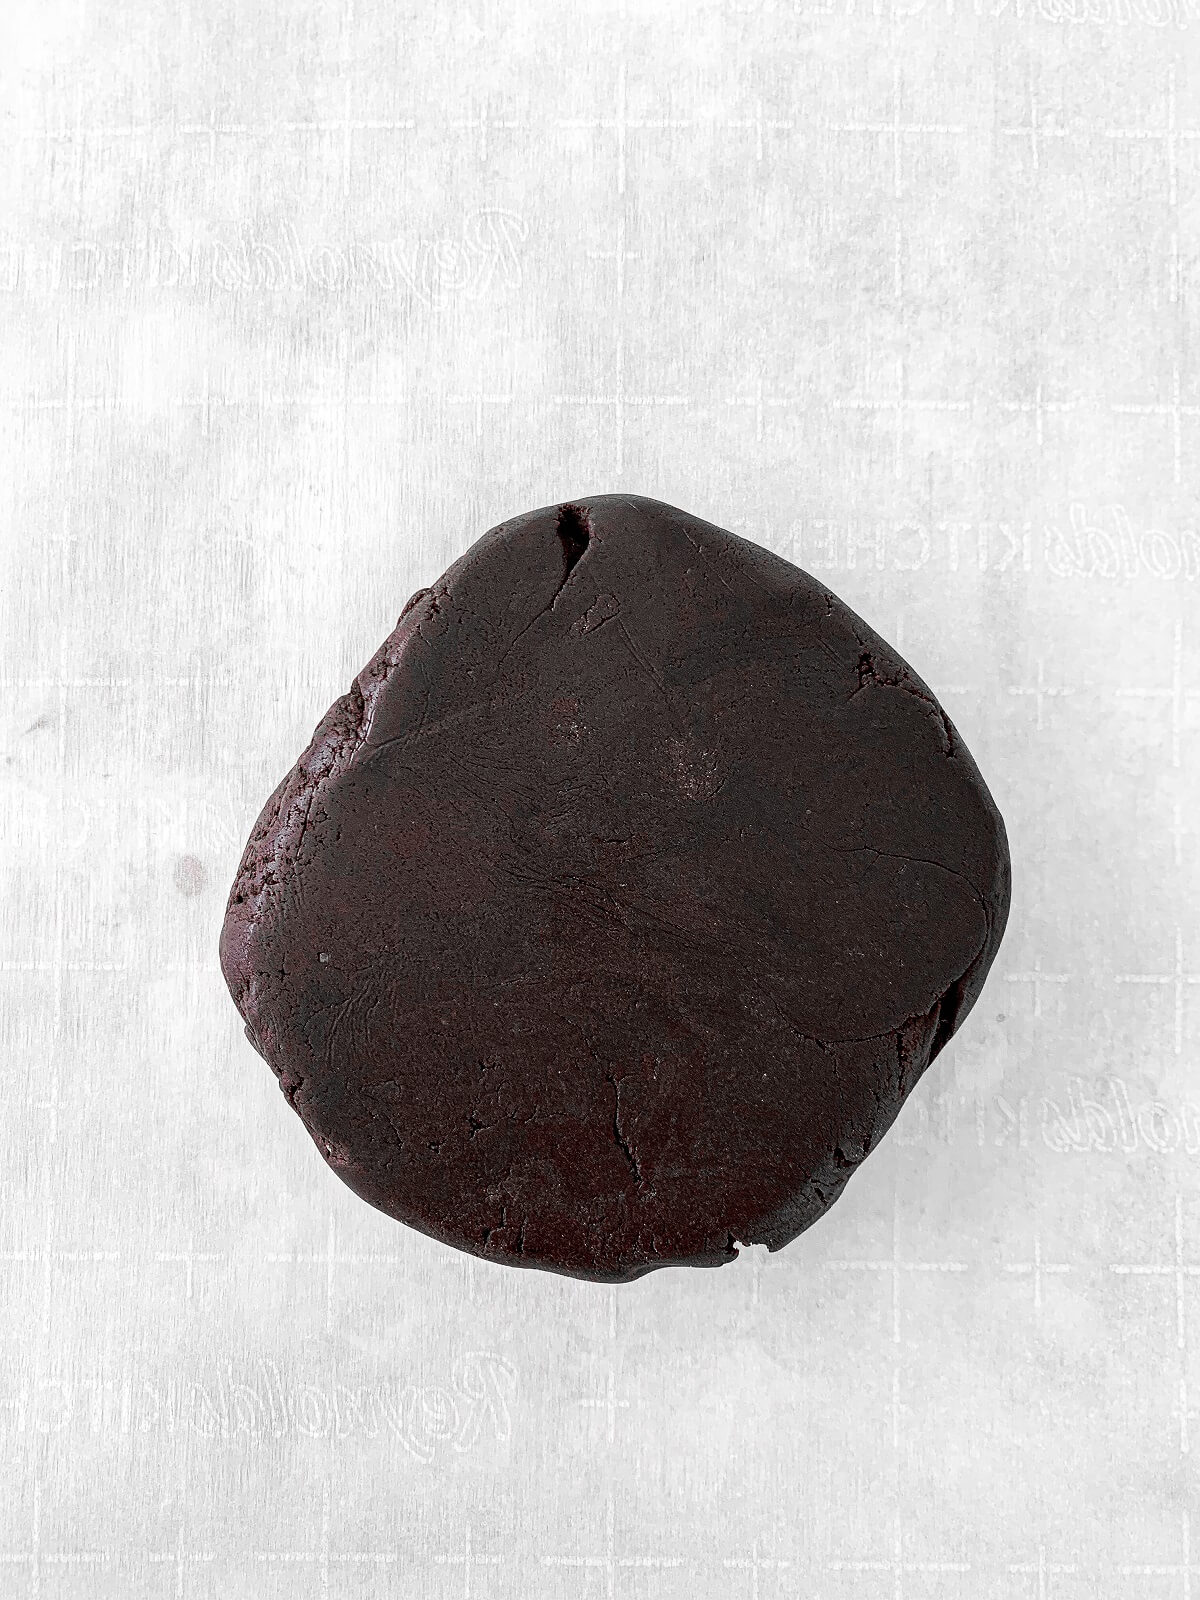
Make the Dough.
Shortbread dough is a breeze to make in a food processor. But if you don’t have one, you can absolutely make the dough using just a bowl and pastry cutter. After you make the dough, chill it for about 20 minutes.
Divide the Dough into Portions.
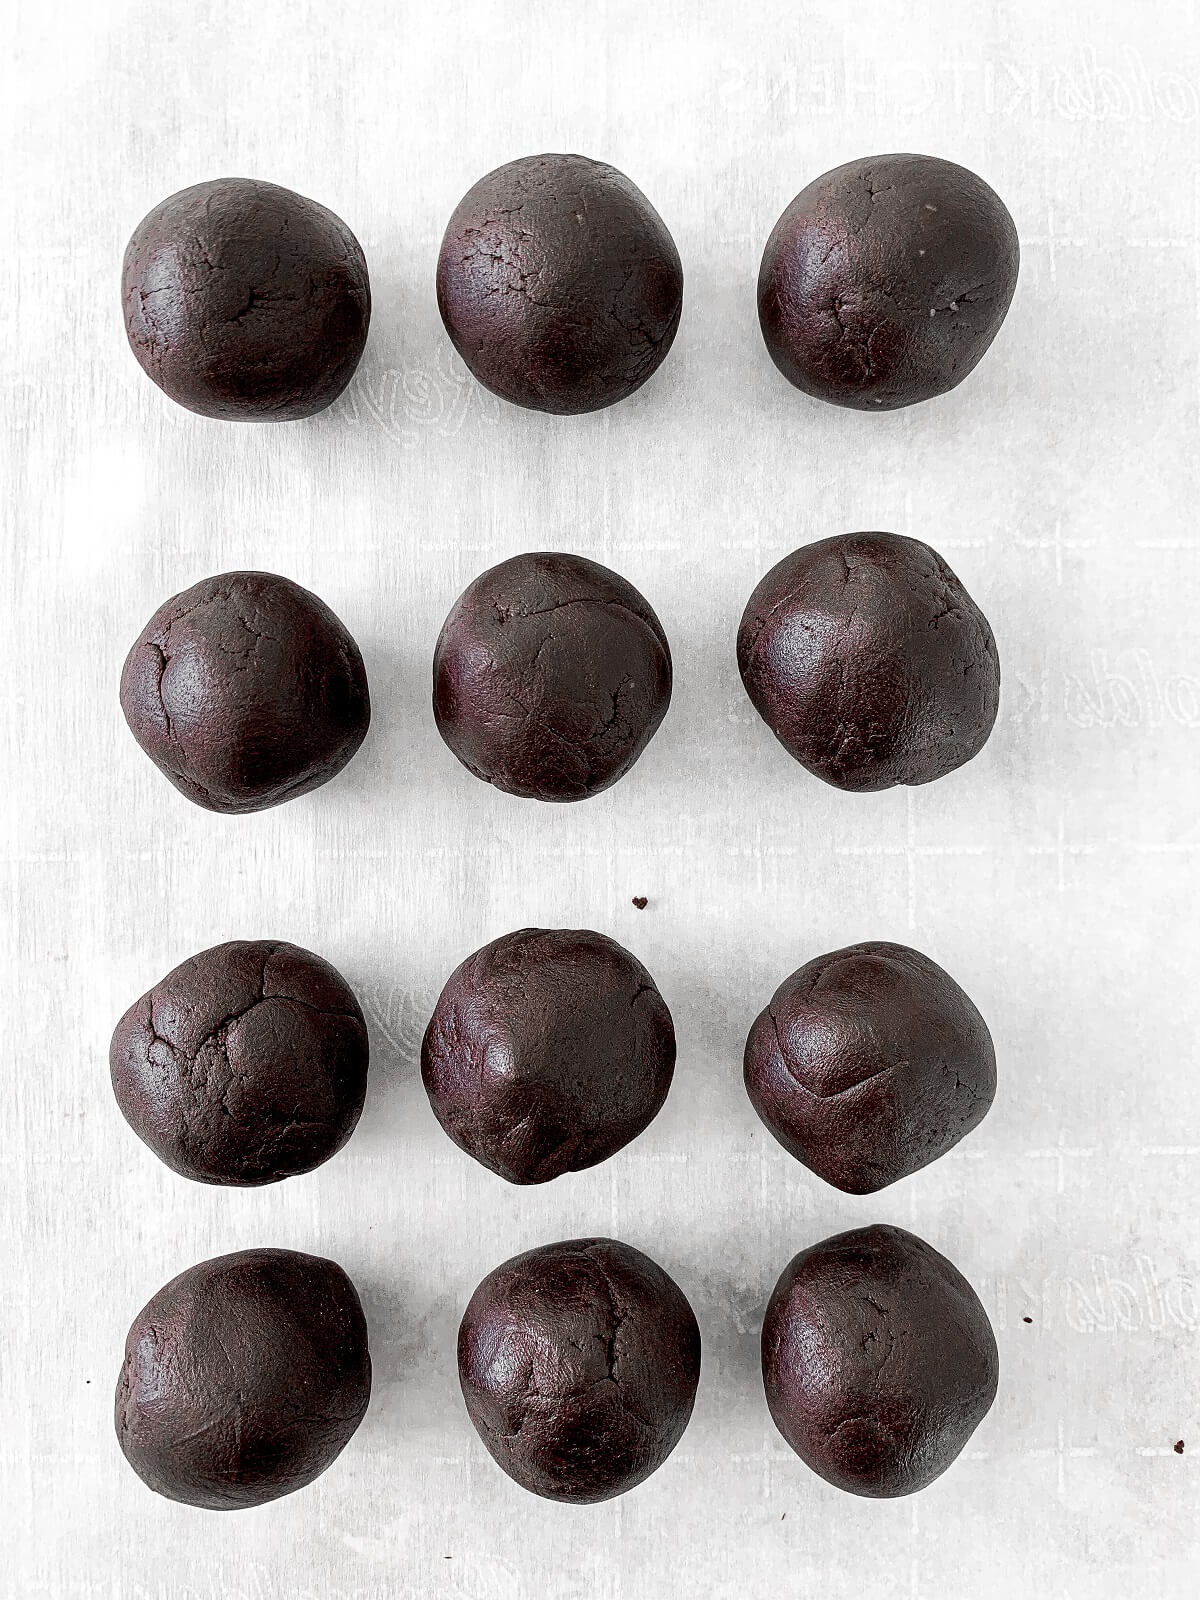
If you have a food scale, use it to weigh the dough, then weigh out 12 equal portions. You’ll want your cookies to be as uniform in size as possible, so that they all bake evenly, which is why it’s so helpful to weigh out the portions. Roll each portion of dough into a ball.
Press the Dough with Cookie Stamps.
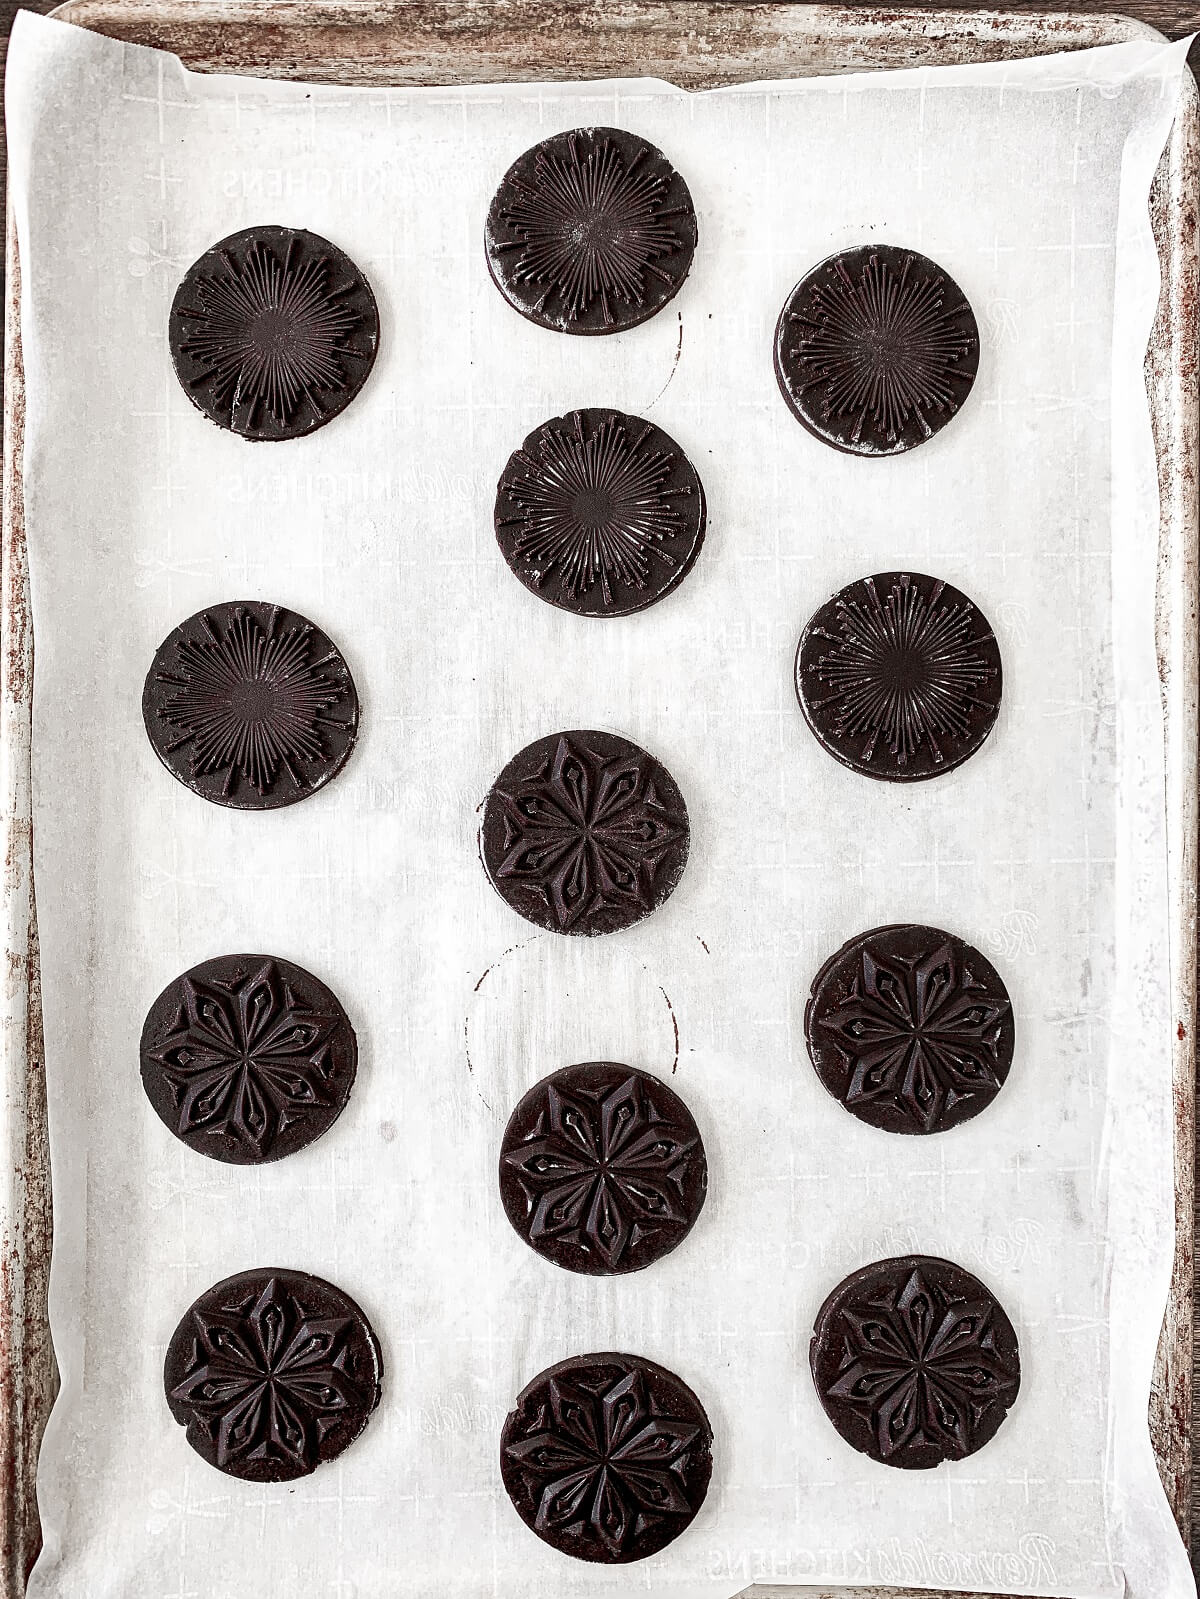
To ensure that the dough doesn’t stick to your cookie stamps when you press your cookies, you’ll need to lightly coat the dough balls in flour. Then dip the cookie stamp in flour, and tap to shake off the excess.
Center the stamp over a dough ball and press down firmly until the dough is pressed all the way to the edges of the stamp. Lift the stamp off the dough, revealing your beautiful design.
Since your pressed cookies will look rough around the edges, use a cookie cutter that’s slightly smaller than the cookie stamp to trim the edges of the cookies. Save all the scraps, then roll them together to press one last cookie.
Chill the Pressed Cookies.
Once you’ve pressed all your cookies, place them on a parchment lined baking sheet and chill them in the refrigerator for one hour prior to baking. Chilling the pressed cookies helps to ensure that they won’t spread while baking.
Bake.
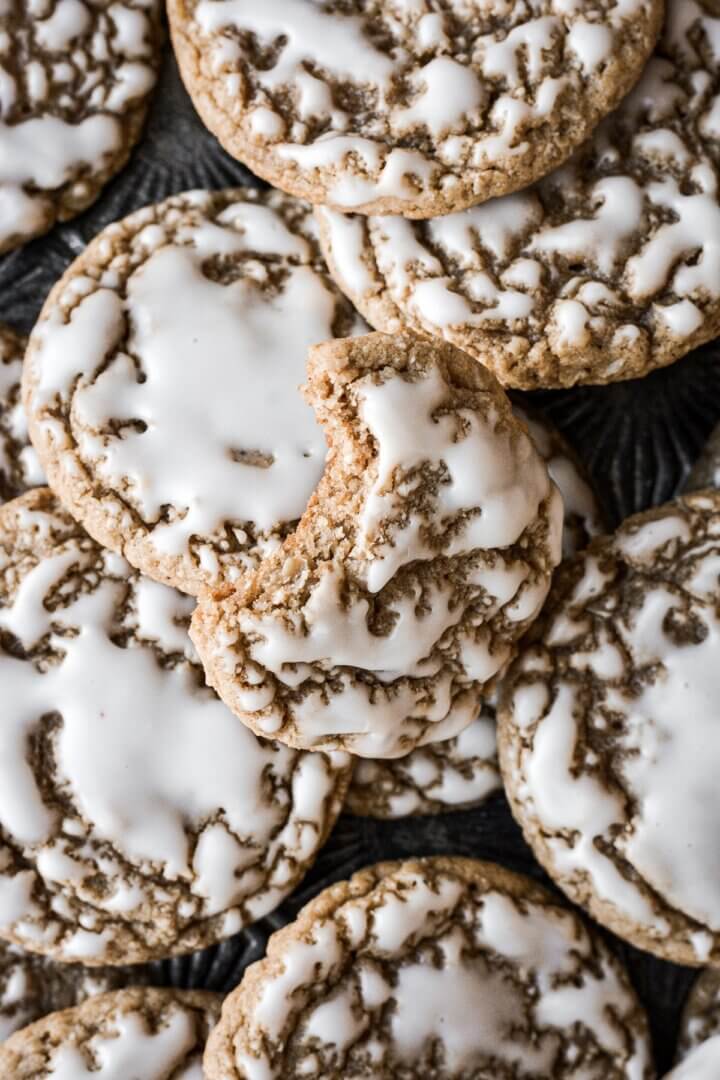
Bake the chilled cookies in a 350-degree oven for about 11-12 minutes. Cool on the pan for 5 minutes, transfer to a cooling rack, and then brush with the icing while the cookies are still warm.
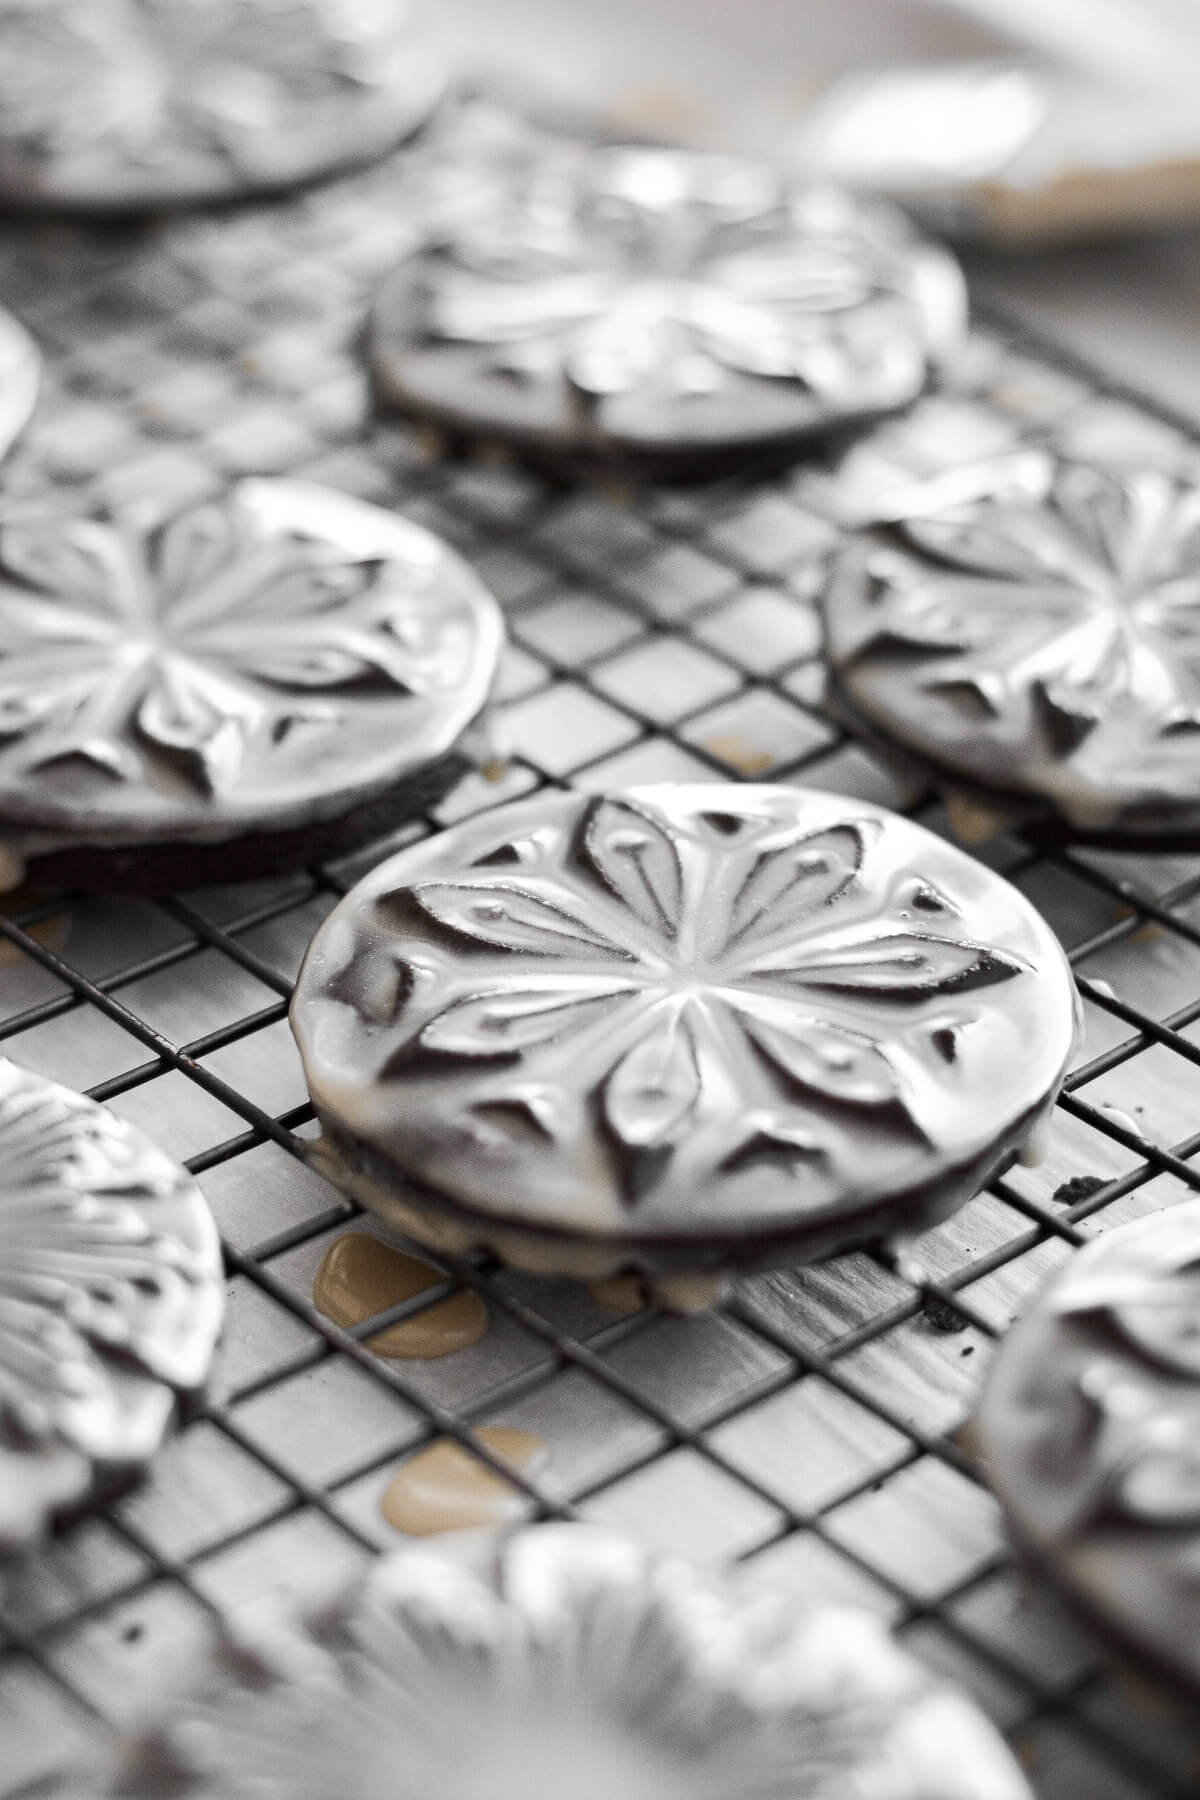
TIP: While the embossed pattern on your shortbread cookies looks beautiful just as is, it’s the icing that really illuminates the gorgeous pattern. As the glaze fills all the cracks and crevices, the contrast of the dark dough and light icing looks simply gorgeous.
Icing Your Cookies
Ingredients
- 1 cup powdered sugar, sifted
- ¼ tsp cream of tartar
- ⅛ tsp coarse Kosher salt (if using table salt, use half the amount)
- ½ tsp vanilla extract
- 2 ½ – 3 tbsp whole milk
Instructions
- As soon as you take the cookies out of the oven, prepare the glaze. In a bowl, whisk together all ingredients until smooth. The glaze should be fairly thin, about the consistency of warm honey.
- After cooling the cookies on the baking sheet for 5 minutes, transfer them to a cooling rack. They’re ready to be iced right away.
- Dip a pastry brush into the icing, getting a generous amount onto the brush. Brush it over the cookies, getting it into all the crevices, and letting it drip over the sides. Repeat with all the cookies.
- Once you’ve iced a cookie, the glaze will crust and set quickly, so leave it alone. Don’t brush over it again, and don’t touch it. The glaze will set in about 30 minutes. Let the icing harden completely, about 2 hours, before storing the cookies in an airtight container.
Various Icing Flavors
- Coffee Icing. Add 1-2 teaspoons espresso powder.
- Almond Icing. Add 1 teaspoon almond extract.
- Lemon or Orange Icing. Substitute lemon juice or orange juice for half the milk, and add 1/2 – 1 teaspoon lemon or orange extract.
- Peppermint Icing. Add 1/2 – 1 teaspoon of peppermint extract. Peppermint is great with the chocolate cookies.
- Maple Icing. Instead of vanilla extract, use maple extract for a delicious flavor.
- Bourbon Icing. Substitute 1 tablespoon of the milk with good quality bourbon.
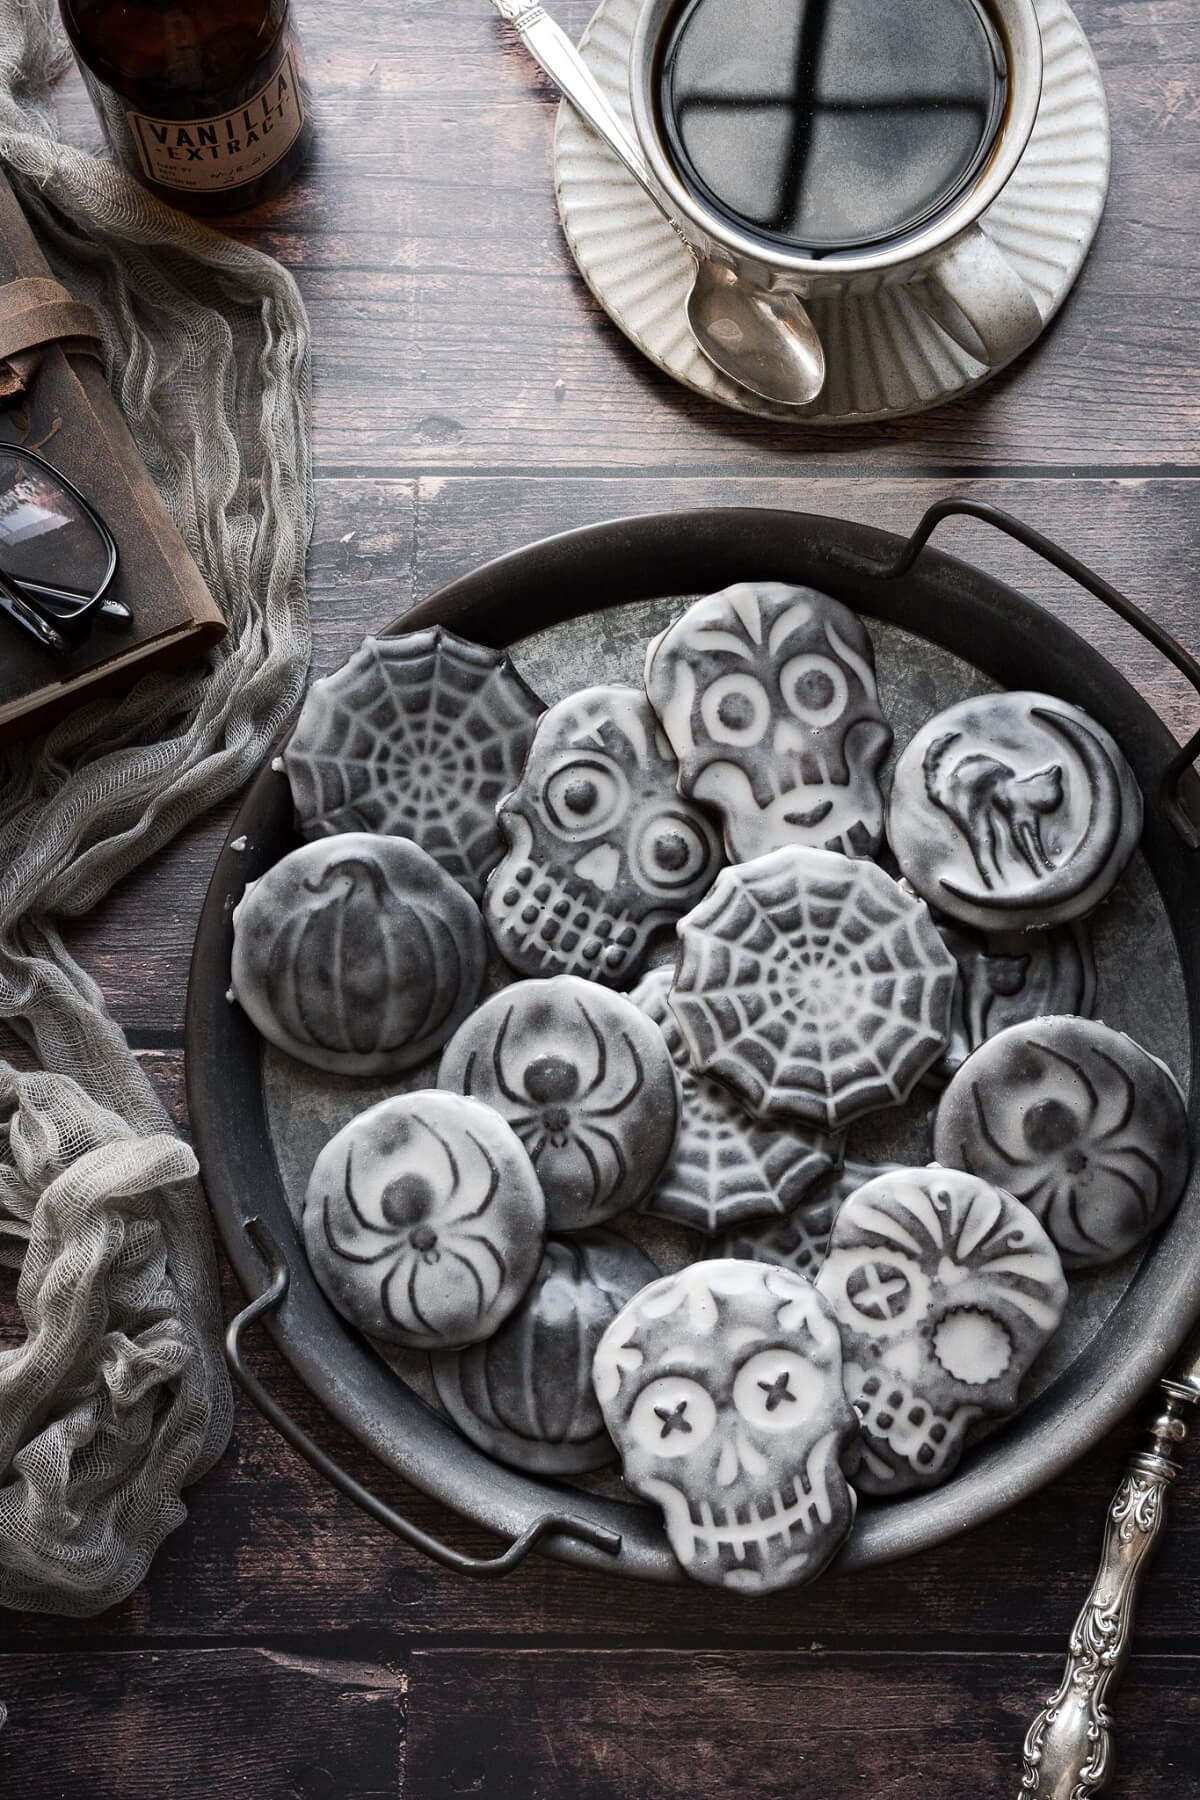
Halloween Stamped Cookies
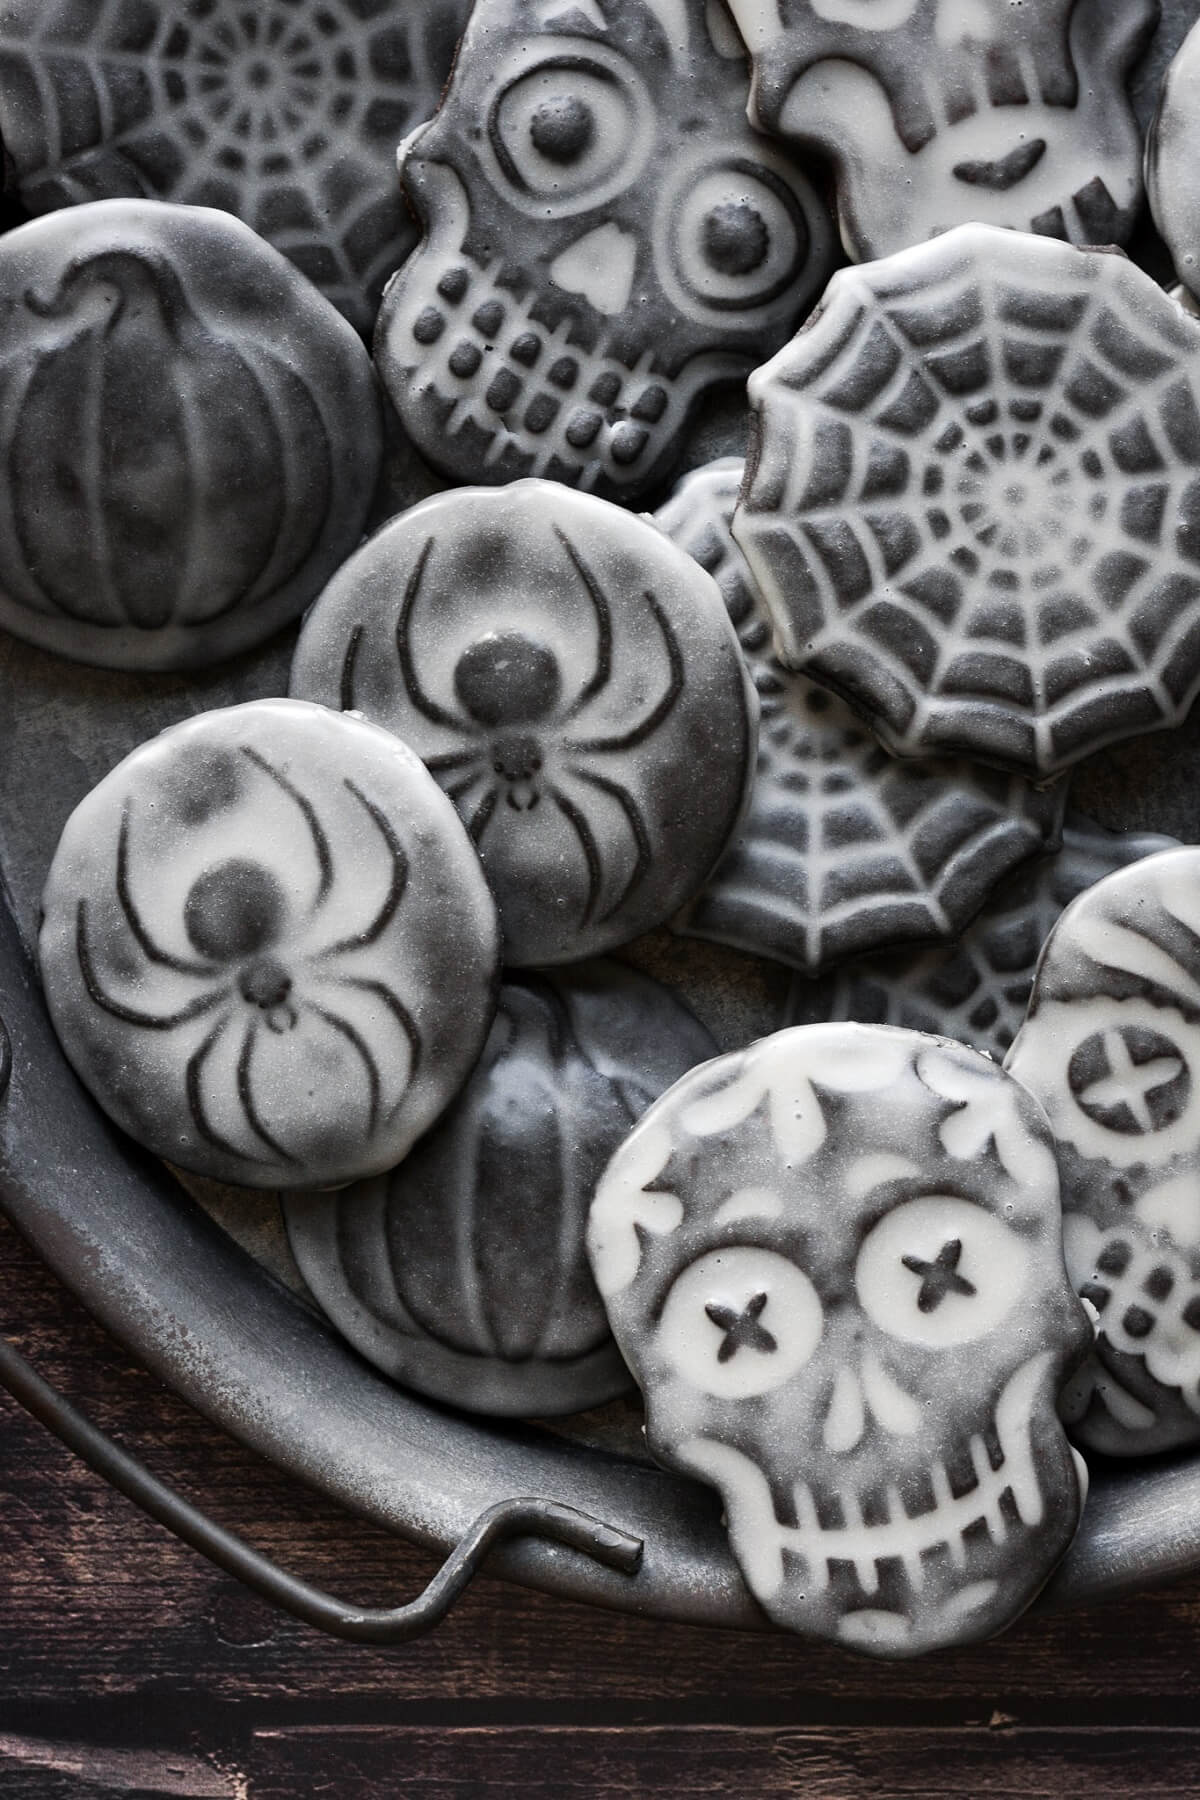
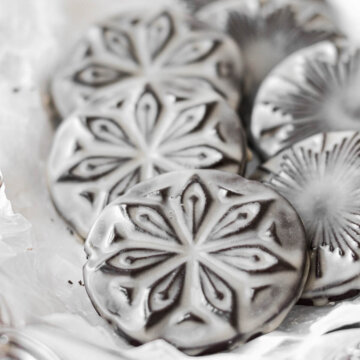
This year (October 2023) I added another new set of cookie stamps to my collection, the Nordic Ware Spooky Cast Cookie Stamps. This set includes a spider, pumpkin and cat, and I love how creepy they look with the dark chocolate cookie highlighted with vanilla icing.
I also bought these Day of the Dead cookie cutters, and found this spider web stamper cutter at my local Michael’s store. For both of these, you’ll need to roll the dough out to 1/4 inch thick, then stamp and cut it with the cutters.
The spooky, creepy designs were absolutely perfect for this year’s Halloween cookies. For the extra dark color in your cookies, replace 1 tablespoon of the Dutch processed cocoa powder with black cocoa powder.
How to Use Plunger Cookie Cutters or Pie Crust Cutters
Using a plunger style cookie cutter to emboss your cookies is so easy. Simply roll out your cookie dough to between 1/8 – 1/4 inch thick. Dip the cutters in flour, tap off the excess, then use them to cut the dough. Press the plunger firmly down so it stamps the dough, then release the dough from the cutter.
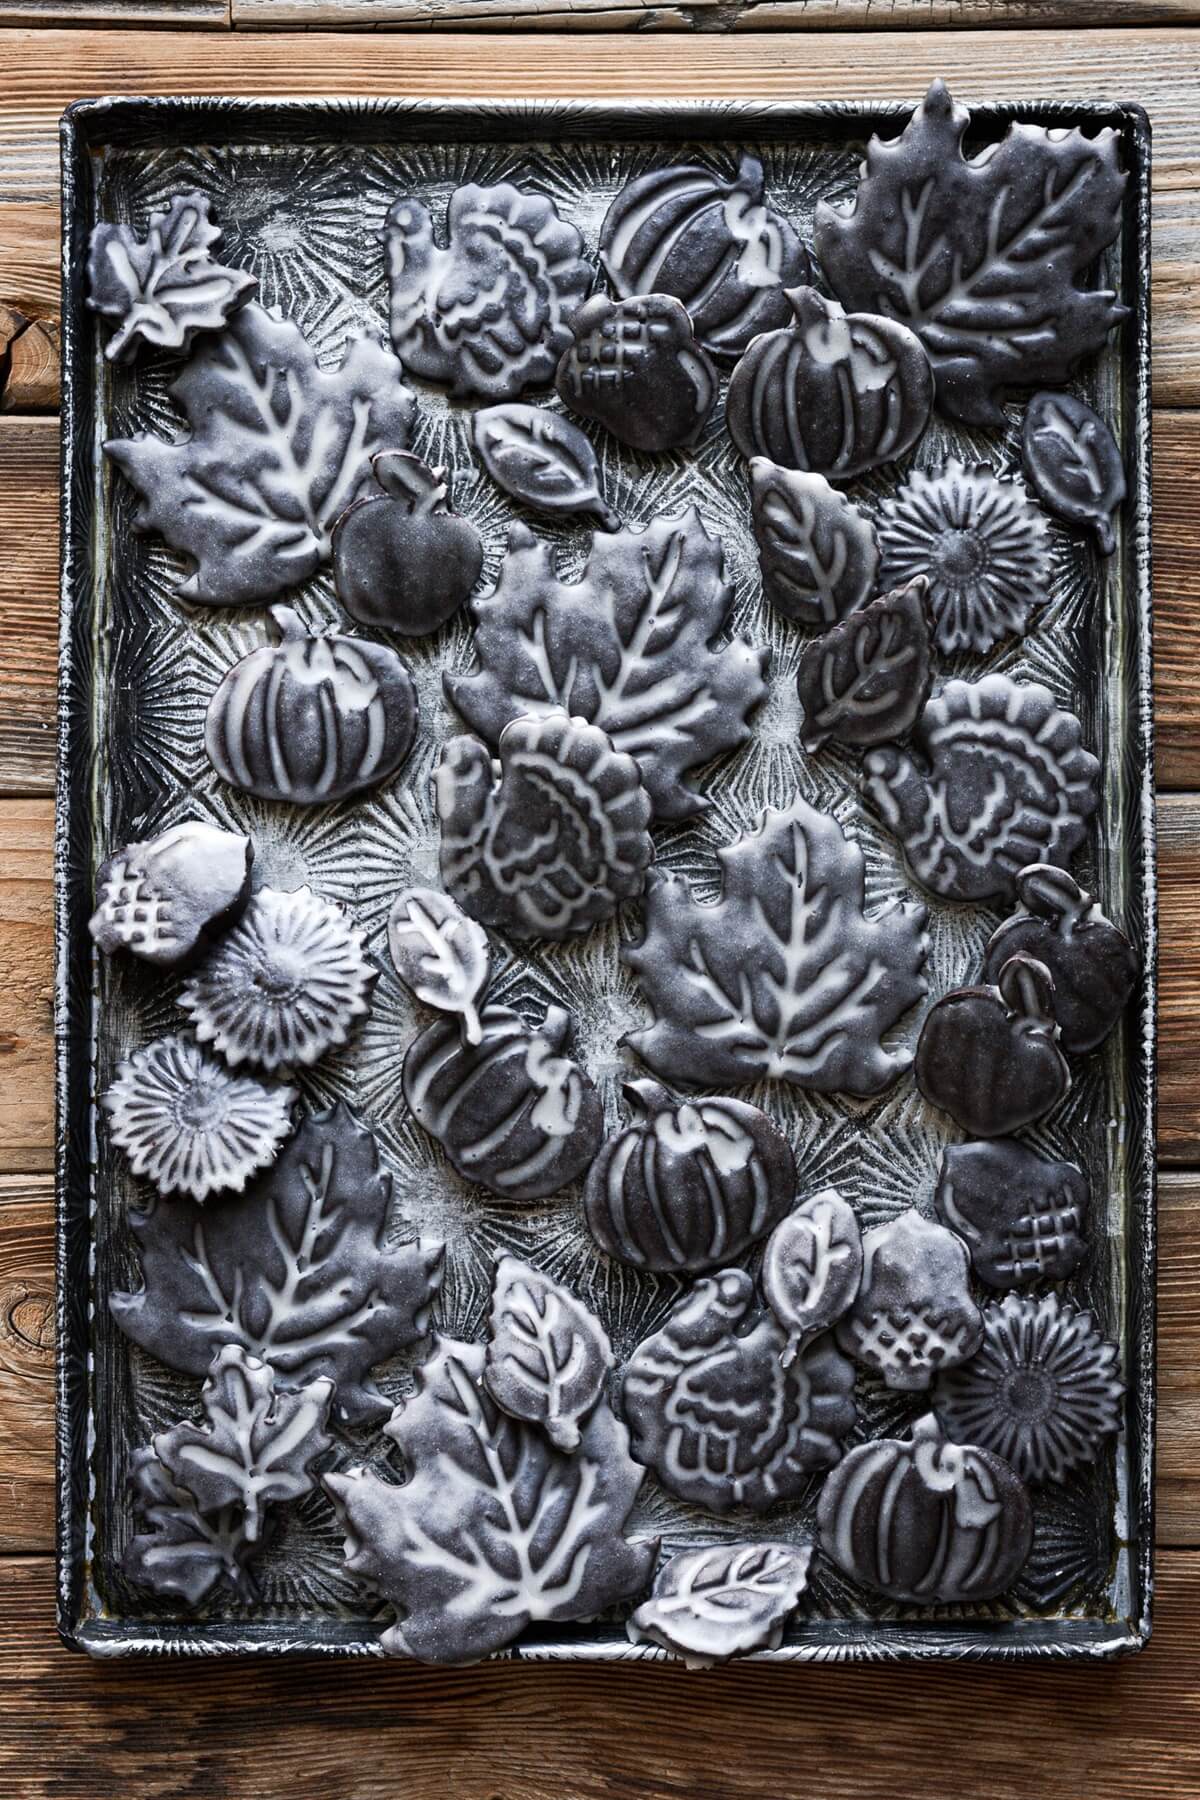
I created the fall themed cookies in the next photo using my collection of small plunger style pie crust cutters, with the exception of the larger maple leaf cookies, which I made using this maple leaf cookie cutter. I’ve collected a variety of pie crust cutters over the years in shapes like pumpkins, leaves, flowers, apples, turkeys and acorns, so you may have to search Amazon or your local craft stores to find all these designs.
Be sure to read all of my BAKING FAQs where I discuss ingredients, substitutions and common baking questions, so that you can be successful in your own baking!
Frequently Asked Questions
Yes, absolutely. Once you make the dough, wrap it well and refrigerate it for up to 5 days, or freeze it for up to 3-6 months. When you’re ready to roll and cut the dough, thaw it overnight in the refrigerator, then let it warm up at room temperature until still cool, but pliable enough to roll out without too much difficulty.
This is not a very sweet cookie, with a strong, rich dark chocolate cocoa flavor and a hint of sweetness from the icing. If you like sweeter chocolate cookies, you can decrease the cocoa powder by 2-4 tablespoons, and increase the flour by the same amount.
Firstly, cream of tartar is an acidic powder that’s commonly used both as a leavener in baking (such as in snickerdoodles) and as a stabilizing agent. It can stabilize egg whites and whipped cream, and it can prevent the sugar crystals in syrups from binding together and crystallizing. In today’s recipe, the cream of tartar is a necessary component in the icing to prevent white crystallized spots from forming. This crystallization doesn’t affect the taste or texture of the cookies, but it does mar their appearance. You definitely need to use the cream of tartar for the best results in your iced cookies.
Yes, you can, BUT… You’ll get much better results by making a milk glaze than if you use water. When I say that I’ve tested this recipe over a dozen times to get it right, I’m actually not kidding. The glaze has given me so much grief (see above, re. the crystallized sugar patches), and I’ve carefully and repeatedly tested the recipe to perfect it. When I used water or coffee, the icing would start off looking beautiful, then develop crystallized patches by the next day. I’ve tried adding corn syrup, adding an egg white, adding butter, heating the glaze to make sure the sugar was completely dissolved, icing the cookies cold, and a dozen other variations. None of them worked. It wasn’t until I combined milk with the cream of tartar that the glaze was just right. So please keep in mind that if you make changes to the recipe as it’s written, you may not be happy with the results.
I’m not sure, as this isn’t something I’ve tested. I suspect that the proteins in cow’s milk, combined with the acidity of the cream of tartar, are what works to stabilize the sugar in the icing.
I don’t recommend it. Freezing the cookies can cause the crystallized spots to appear in the icing. You can freeze the un-iced cookies in an airtight container for up to 3-6 months, then thaw them out when you’re ready to ice them.
For the stamps pictured in today’s post, these are my sources:
Nordic Ware Starry Night Cast Cookie Stamps
Nordic Ware Yuletide Cast Cookie Stamps
Wooden Gingerbread House Mold
Snowflake Cookie Cutter
You Might Also Like
Please check out my Amazon Shop for a curated collection of some of my favorite cake pans from trusted brands, baking tools, ingredients, pretty things and fashion finds. I recommend products that I buy and use every day!
Did you love today’s recipe? Please rate the recipe and let me know in the comments what you thought! Also, be sure to follow Curly Girl Kitchen on Instagram, and tag me when you try one of my recipes so I can see all your delicious creations!
Stamped Chocolate Shortbread Cookies
All recipes on Curly Girl Kitchen are developed for high altitude at 5,280 feet. See FAQs for adjusting to higher or lower elevations.

Ingredients
Cookie Dough
- 1 cup all-purpose flour, spooned and leveled
- ½ cup powdered sugar
- ½ cup unsweetened, Dutch-processed cocoa powder
- ¼ tsp coarse Kosher salt (if using table salt, use half the amount)
- ½ cup cold, unsalted butter, cut into 8 pieces
- 1 tsp vanilla extract
- 2 tbsp milk
Icing
- 1 cup powdered sugar, sifted
- ¼ tsp cream of tartar
- ⅛ tsp coarse Kosher salt (if using table salt, use half the amount)
- ½ tsp vanilla extract
- 2 ½ – 3 tbsp whole milk
Instructions
Cookies
- In a food processor, pulse the flour, powdered sugar, cocoa powder and salt until combined.With the processor running, drop in the pieces of butter, one at a time. Pulse a few times until evenly distributed.Add the vanilla and milk. Process just until the dough comes together and sticks together in a ball.
- Note that if you don't have a food processor, you can make the dough in a bowl, using a pastry cutter to cut the butter into the flour mixture. Then use your hands to work in the liquid until it comes together into a dough.
- Turn the dough out, and knead a few times, just to fold in any floury bits. Shape the dough into a disk, wrap in plastic, and refrigerate for 20 minutes.
- Divide the dough into 12 equal portions. They should be as close in size as possible, so it's helpful if you have a food scale, to weigh the dough, then weigh each portion so they're uniform in size.Roll each portion between your hands to shape a ball, and lightly dust each ball of dough in flour.Place the dough balls on a baking sheet lined with parchment paper.
- Dip a cookie stamp in flour, then tap off the excess. Center the stamp over a ball of dough, then firmly press down on the dough, until it flattens and spreads out all the way to the edge of the stamp. Carefully pull the dough off the stamp and set onto the baking sheet.Use a round cookie cutter that's slightly smaller than the cookie stamp to cut the pressed cookie and trim off the uneven edges. Save the scraps.Repeat pressing all the cookies, dipping the stamp in flour and tapping off the excess in between each.
- Gather up all the scraps from the trimmed edges, roll into a ball, dust in flour, and press one more cookie, for a total of 13 cookies.Place all the pressed cookies about 1 inch apart on the baking sheet.
- Set the baking sheet in the refrigerator and chill the pressed cookies for 1 hour. Chilling the dough prior to baking ensures that the dough maintains its shape in the oven and doesn't spread.
- Preheat the oven to 350 F. Bake the chilled cookies on the center oven rack for 11 1/2 minutes.
- Cool the cookies on the pan for 5 minutes, then carefully transfer them to a cooling rack. Brush with the glaze while the cookies are still warm.
Icing
- As soon as you take the cookies out of the oven, prepare the glaze. In a bowl, whisk together all ingredients until smooth. The glaze should be fairly thin, about the consistency of warm honey.
- After cooling the cookies on the baking sheet for 5 minutes, transfer them to a cooling rack. They're ready to be iced right away.
- Dip a pastry brush into the icing, getting a generous amount onto the brush. Brush it over the cookies, getting it into all the crevices, and letting it drip over the sides. Repeat with all the cookies.
- Once you've iced a cookie, the glaze will crust and set quickly, so leave it alone. Don't brush over it again, and don't touch it. The glaze will set in about 30 minutes. Let the icing harden completely, about 2 hours, before storing the cookies in an airtight container.
Notes
- Make in Advance: The dough can be made in advance, wrapped well, and refrigerated up to 5 days, or frozen for 3-6 months.
- Storing: Leftover cookies should be stored in an airtight container for 7-10 days.
- Sweetness: This is not a very sweet cookie, with a strong, rich dark chocolate cocoa flavor and a hint of sweetness from the icing. If you like sweeter chocolate cookies, you can decrease the cocoa powder by 2-4 tablespoons, and increase the flour by the same amount.
 https://curlygirlkitchen.com/
Made these for Christmas and they were delicious, as well as the peppermint version.
I’m so glad you loved them!
Can you freeze these once iced?
You can, but the icing will develop a crystallized appearance in the freezer.
Hearher, Do u have a non-high altitude recipe version?? My first try LOOKED beautiful, but cookie is dry, crumbly; not buttery/flaky. I am wondering if low altitude is the culprit. Ideas? Maybe less flour or less temp or cooking times?
Laurie, this recipe shouldn’t be affected by altitude since there’s no leavening in it. Since shortbread is a “short” dough, it’s normal for the baked cookies to be a bit crumbly – more so than say a chewy chocolate chip cookie – but not excessively so. Is it possible you measured too much flour? If you scoop the flour with the measuring cup, the flour packs in, making the dough more dense and dry, so be sure you lightly spoon it in and level it off. If you’re already measuring flour using the spoon and sweep method, then you can try adding a few tablespoons less to see if that works better for you.
Saw these on Instagram and knew I had to make them for Christmas. I found a stamp last night while I was out shopping. I have loved using black cocoa in recipes and wondered if you think it might work with this one? I just love the darker color and thought it would be a wonderful contrast to the white icing. Thanks.
Maria, you could definitely try some black cocoa powder for a deeper color, just be careful not to add too much, or the flavor can be too strong. I’d recommend 25% black cocoa and 75% Dutch-processed cocoa.
These look and sound wonderful and I am looking forward to making them this year. An earlier comment says you can freeze the baked cookies unfrosted then glaze them later. If you generally glaze the cookies while they are warm, what is the process for glazing cookies that have been pre baked & frozen? Thanks for your help!!
Glazing them while they’re warm from the oven just helps the glaze go on a little more smoothly. If you freeze the the unglazed cookies, just let them thaw completely to room temperature before adding the glaze.
When I made them they looked exactly like the picture, and the glaze was wonderful. I opted for the bourbon version and will be using it again. The cookie itself I didn’t like the taste of. I think it was just a personal preference. You need to really like the taste of cocoa. I thought the glaze would help to mask the flavor, but it is subtle. The recipe seems very accurate, bake tes etc..and the glaze is great. But if you don’t like a strong cocoa then it won’t be the cookie for you.
Katie, if you like a sweeter chocolate cookie, note that you can decrease the cocoa powder by 2-4 tablespoons, and increase the flour by the same amount. This will give them a less intense cocoa flavor so the sugar is more pronounced.
Have you ever made these with an embossed rolling pin?
I haven’t had great luck with embossed rolling pins, because the ones I’ve tried don’t make a deep enough impression, which is why I prefer cookie stamps. I’m sure the quality of embossed rolling pins varies greatly, though, and I may not have had a good one.
I made these! Quadrupled the recipe. They turned out delicious and beautiful. I substituted corn syrup for the cream of tartar with no problem. I made the balls a little bit smaller by chance, and so did not have to cut around any of the circles. Plan to make again with the peppermint icing.
I made these at my third attempt with different recipes for using cookie stamps. Trust the process after the milk and vanilla (I used vanilla paste 1:1) I was tempted to add more water but didn’t and it turned out great. This recipe works. The definition in the stamp was beautiful and I’ll make them again. Thank you!
used skeleton bone dinosaur cutters and these were perfect!!!
These cookies are absolutely gorgeous! I knew I wanted to make them the second I saw them! They will be a beautiful addition to my Christmas cookie collection. Thank you so much!
I’ve got 2 questions:
1. Can I make the dough, form the balls and put them in the fridge overnight before pressing them and baking them?
2. I put my Christmas cookies in a large cello bag, tied with ribbon and then put in a holiday themed take out container. You mentioned that these are softer and not crunchy. Will these hold up in a bag with other cookies?
Thank you so much! Can’t wait to hear from you!
1. I would make the dough, form the balls, press the cookies, and then refrigerate them overnight if you want to bake them the next day.
2. Yes, they are soft, but sturdy enough not to just fall apart.
Thank you so much! I really appreciate the response:)
Heather…I just stamped 120 of these with the Nordic Ware Starry Night stamps! Lots of work, but so far so good!
🙂
I’m sure they look so beautiful! I love those stamps.
Heather!
I just stamped 120 of these cookies with the Nordic Ware Starry Night set! I can’t wait to see how they come out!
Thanks so much:)
Has anyone tried replacing the flour with Gluten Free King Arthur and did it/would it work?
Can I roll out this dough and use cookie cutters?
Yes.
I made these today for a neighborhood gathering. I can’t help myself when I see any cute holiday themed cookies, I have to make them. I used a plunger spiderweb cookie cutter and I followed your directions. They are adorable and tasty too, not too sweet. Thank you.
I’m so glad you love them! I make these about 4 times a year for various holidays, and I just love the rich chocolate flavor.
I purchased the Nordic Ware stamps and decided on this recipe to try them. It did not disappoint. I initially attempted to roll my dough thinking it would be easier, but I wasn’t getting a good imprint no matter how thick I rolled it, or how hard I pushed. After that, I put the dough back in the fridge for 20 minutes and then followed the
recipe carefully. My cookies are
beautiful and taste delicious-
similar to a devils food iced donut.
Yum!
these are gorgeous, I want to make them tonight! I saw a comment about a stamped rolling pin, but was wondering if they could be baked in a shortbread pan, and what adjustments would need to be made (temp/baking time) etc.
I have some other recipes where I’ve baked shortbread in various pans, so these posts might help you find the answers you need:
https://curlygirlkitchen.com/maple-walnut-shortbread/
https://curlygirlkitchen.com/classic-almond-shortbread-cookies/
https://curlygirlkitchen.com/iced-lemon-lavender-shortbread-cookies/