
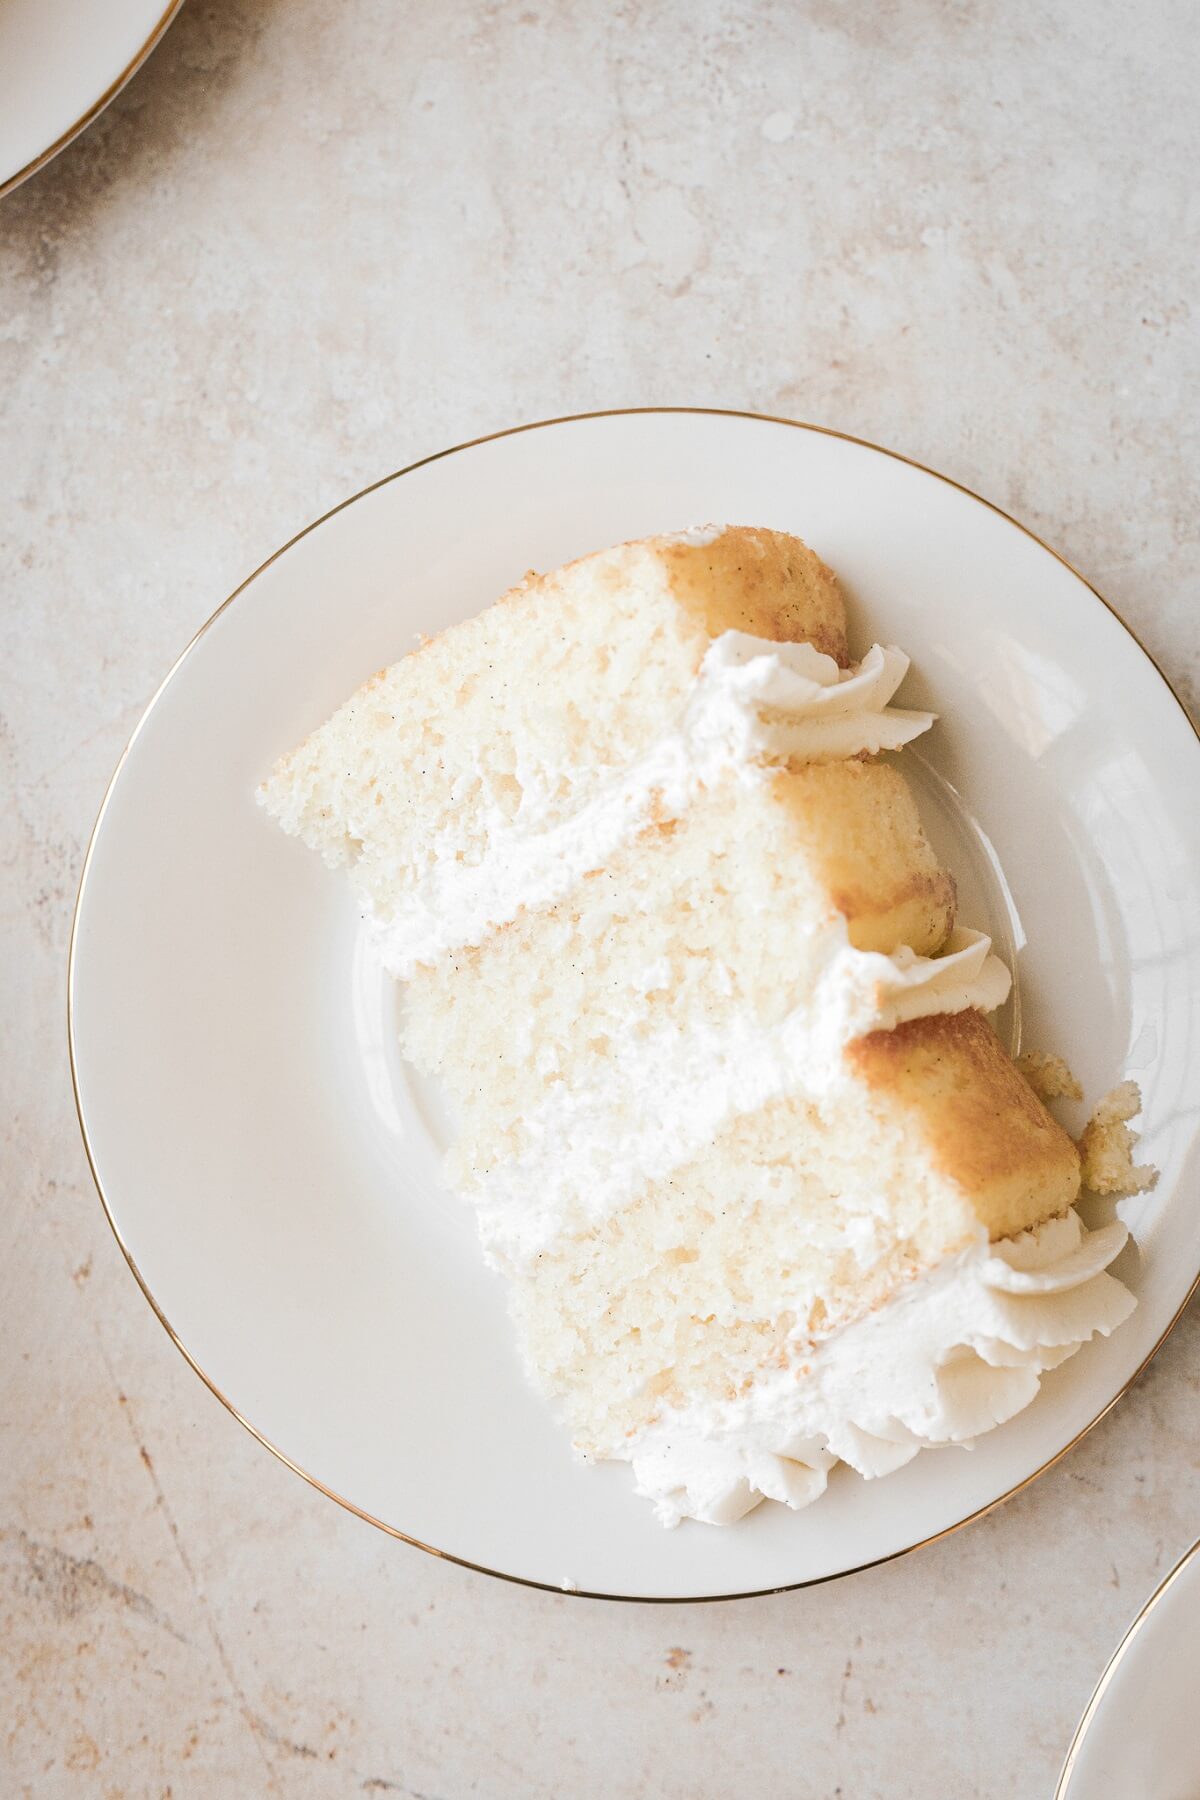
My high altitude vanilla cake is so soft, light and fluffy, made with buttermilk, real vanilla beans and butter. The cake crumb is beautiful and moist, even days after baking. This is also an incredibly easy cake to make, requiring nothing more than just whisking the ingredients together in a bowl before baking. You’ll love this delicious and versatile high altitude vanilla cake recipe! It’s just the perfect choice for a birthday party or special occasion cake that will please everyone. And for an eggless vanilla cake, be sure to see the recipe variations section.
Looking for more high altitude cake recipes? Don’t miss this brown butter carrot cake, chocolate fudge cake, and mint chocolate chip cake.
Update: I originally published this recipe in 2015, but have updated the post and recipe in 2023.
This site contains affiliate links. As an Amazon associate, I earn from qualifying purchases. This means that I may make a small commission if you purchase a product using those links. This in no way affects my opinion of those products and services. All opinions expressed on this site are my own.
Let’s Talk About Vanilla
I genuinely love vanilla, and I don’t think there’s anything plain about it, really. Vanilla is a complex flavor that pairs so beautifully with so many other ingredients. And vanilla beans are a very difficult crop to grow and cultivate, so I have great respect for vanilla!
About 80% of the world’s vanilla beans are grown on the island of Madagascar. In recent years, the cost of vanilla skyrocketed, due to a series of storms that ravaged the island, destroying the plants and driving up vanilla prices to almost 10 times what they were a few years before.
The other major contributing factor to the high price of vanilla is the fact that the plant is just so difficult to grow. Vanilla comes from an orchid plant, and while there are 100+ varieties of orchids, only one, the vanilla planifolia, grows vanilla beans. The hand pollination process is difficult and labor intensive, requiring skill and experience. The orchids flower just once a year, and the pollination must take place on that day. And after the harvesting the beans, they still need to be dried and cured. The entire process of growth to export of 1 vanilla bean takes a whole year.
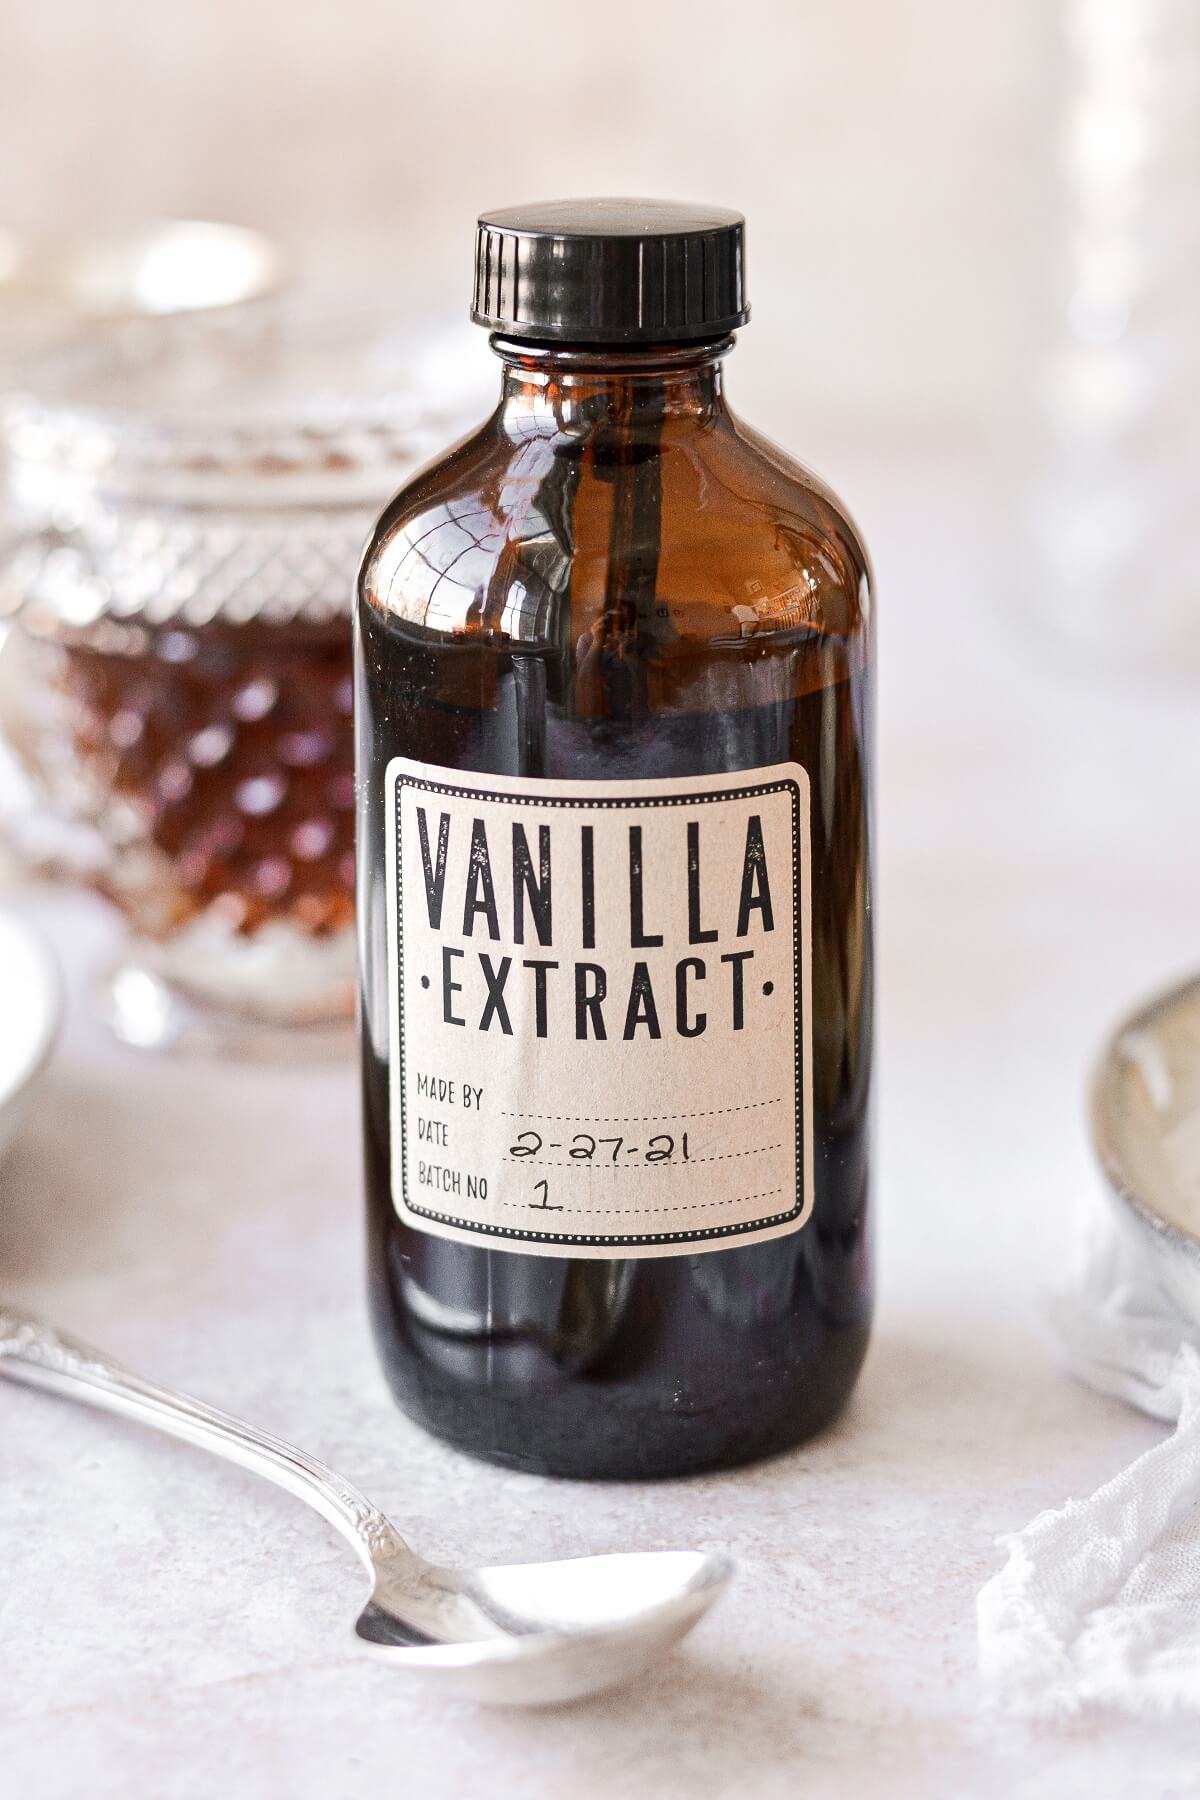
TIP: Be sure to check out my post on How to Make Homemade Vanilla Extract.
Types of Vanilla to Use in Baking
When flavoring your vanilla cake, you can use real vanilla beans, vanilla bean paste, or vanilla extract, and each has something a little different to offer.
Real Vanilla Beans
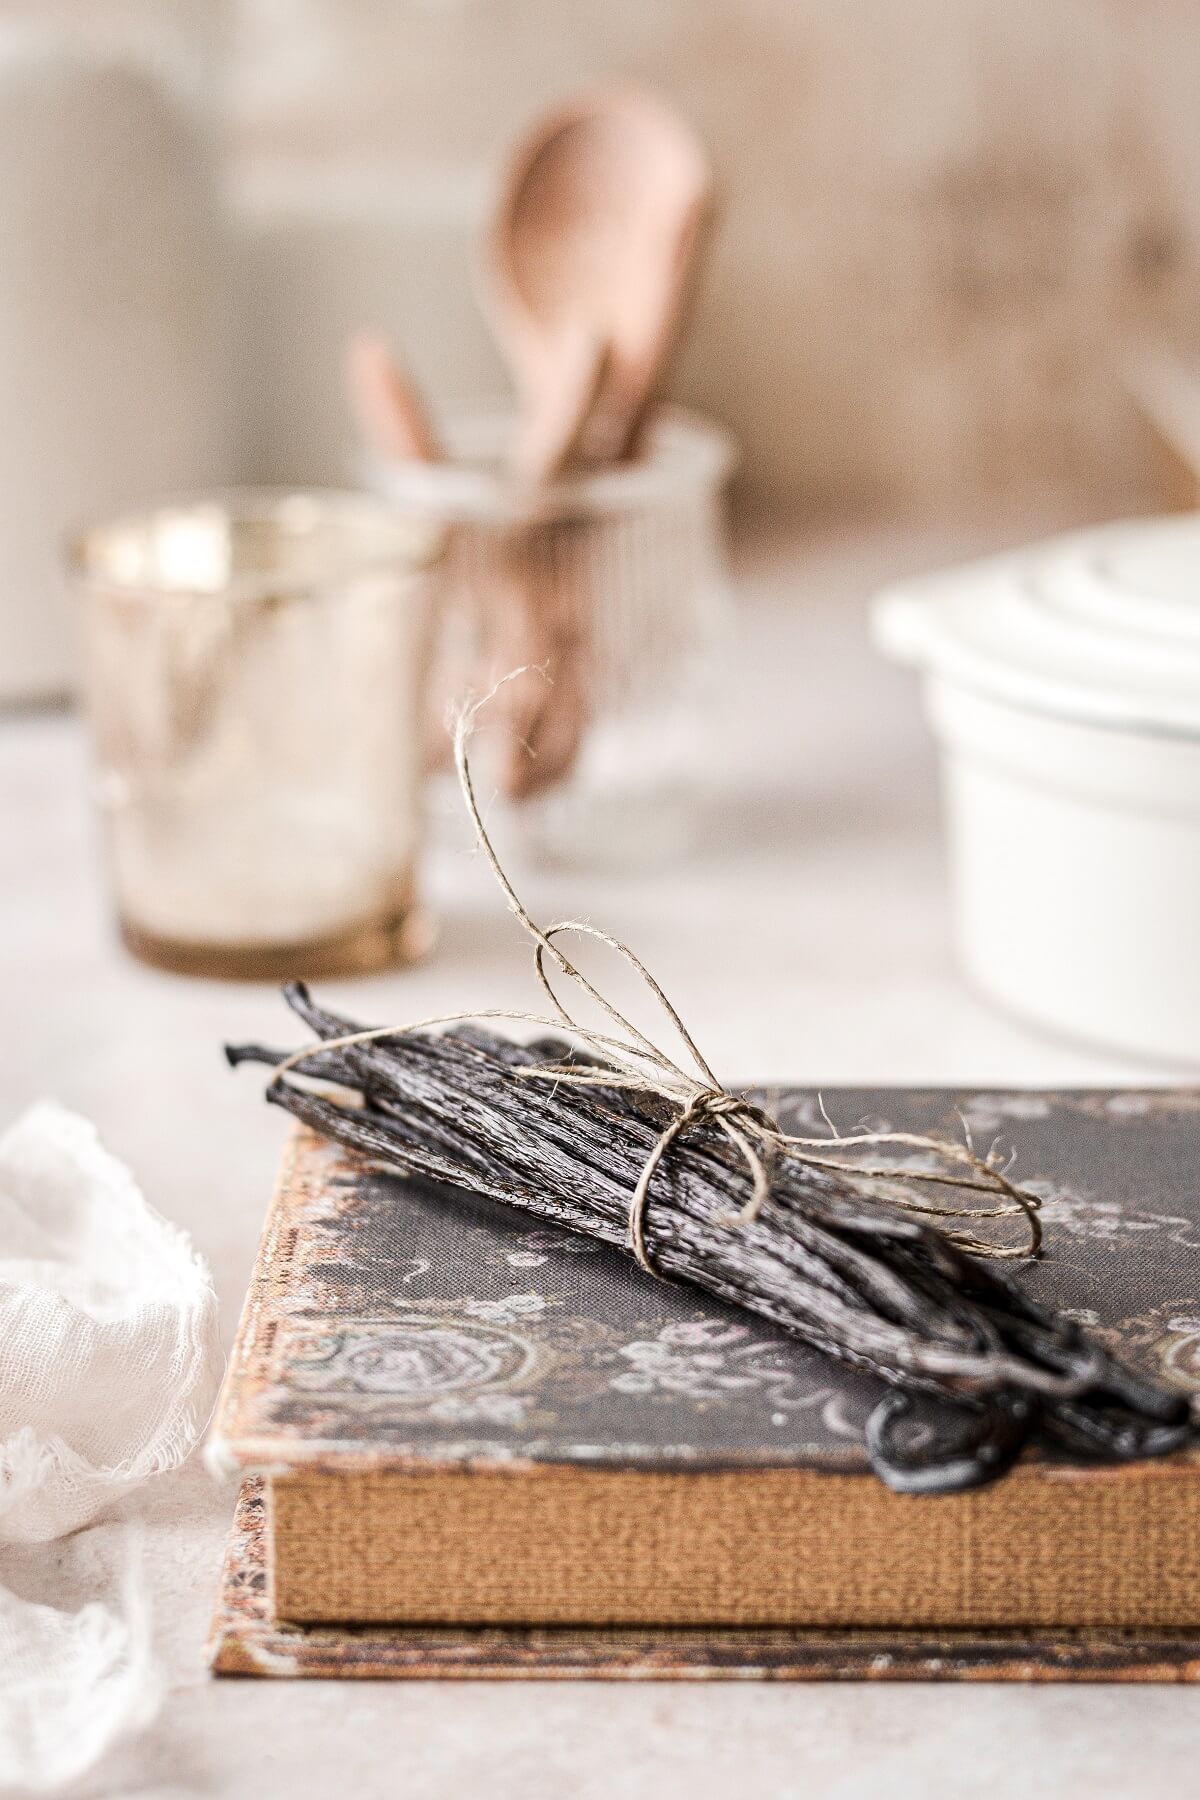
There’s nothing quite like the flavor and aroma of real vanilla beans. When you split open a vanilla bean and scrape out the seeds, the scent is intoxicating. In my vanilla cake recipe, I rub the vanilla bean seeds into the sugar before mixing up the cake batter, which infuses the sugar with as much vanilla flavor as possible.
I’ve been buying Tahitian vanilla beans online, and they are actually quite affordable at the moment, much more so than what you’d find at your local grocery store or spice shop. The Grade A Tahitian Vanilla Beans will be bigger and plumper, with more seeds inside. Grade B Tahitian Vanilla Beans won’t be quite as big and plump, but are still quite decent for the price.
Vanilla bean isn’t just for cakes, either. I use it in homemade ice cream, custards and cream pies, and the black specks of vanilla bean look just beautiful. After scraping out the seeds, there are a few ways you can use up the empty pod, but definitely don’t throw it away!
- Steep the scraped vanilla beans in vodka to make your own vanilla extract. I’d recommend about 8-10 beans inside of a pint jar of vodka. You’ll need to let it steep for at least 8 weeks, but 6 months will make it even more flavorful.
- Place the bean in a canister of sugar to infuse the sugar with vanilla flavor. Or place it in a bottle of vanilla extract so any trace amounts of vanilla seeds can add extra flavor to the extract.
- Dry the bean, then grind it into a vanilla powder. This is my favorite use, and what I always do with my scraped vanilla pods. I’ll add the ground vanilla powder right into cake batter, or sprinkle it on top of baked goods for a wonderful vanilla flavor.
Vanilla Bean Paste
Vanilla bean paste is a rich, thick paste that contains a blend of scraped vanilla bean seeds and vanilla extract, as well as sugar, water and thickening ingredients. It’s a great option when you want to add real specks of vanilla bean to your baked goods, but don’t want to bother with using vanilla beans.
Pure Vanilla Extract
Vanilla extract is the most affordable type of vanilla. Some extracts are made from whole beans, while others are made from the pods after the specks are removed. The vanilla is macerated with alcohol and water, infusing its flavor into the liquid and stretching it to make it last longer. Be sure to look for the words “real” and “pure” on bottles of vanilla extract. Imitation vanilla extracts or vanillin has an inferior flavor to the real thing.

See the recipe card at the end of the post for the full ingredients list and instructions.
Ingredients
Cake
- Granulated Sugar. Adds sweetness and moisture to cakes. With high altitude baking, too much sugar can lead to a gummy texture in your cakes, so the sugar has to be perfectly balanced with the other ingredients.
- Vanilla Bean. Adds incredible flavor, especially when you rub the seeds into the sugar.
- Vanilla Extract. I use a combination of both vanilla bean seeds and vanilla extract. You can use both, or just one of them, whichever you like.
- Cake Flour. Cake flour makes a very soft, light and fluffy vanilla cake, as it contains a lower percentage of protein than all-purpose flour.
- Baking Powder. Leavens the cake, making it rise.
- Coarse Kosher Salt. Balances the sweetness.
- Eggs + Egg Whites. I use 2 eggs, plus 2 egg whites, in my vanilla cake, which adds structure and richness, while the extra whites make it nice and fluffy. Save the leftover 2 egg yolks for another use.
- Buttermilk. Adds richness and acidity for a light, fluffy, tender cake crumb.
- Melted Butter + Vegetable Oil. A combination of both butter and oil gives this vanilla cake the best flavor as well as a soft, moist texture.
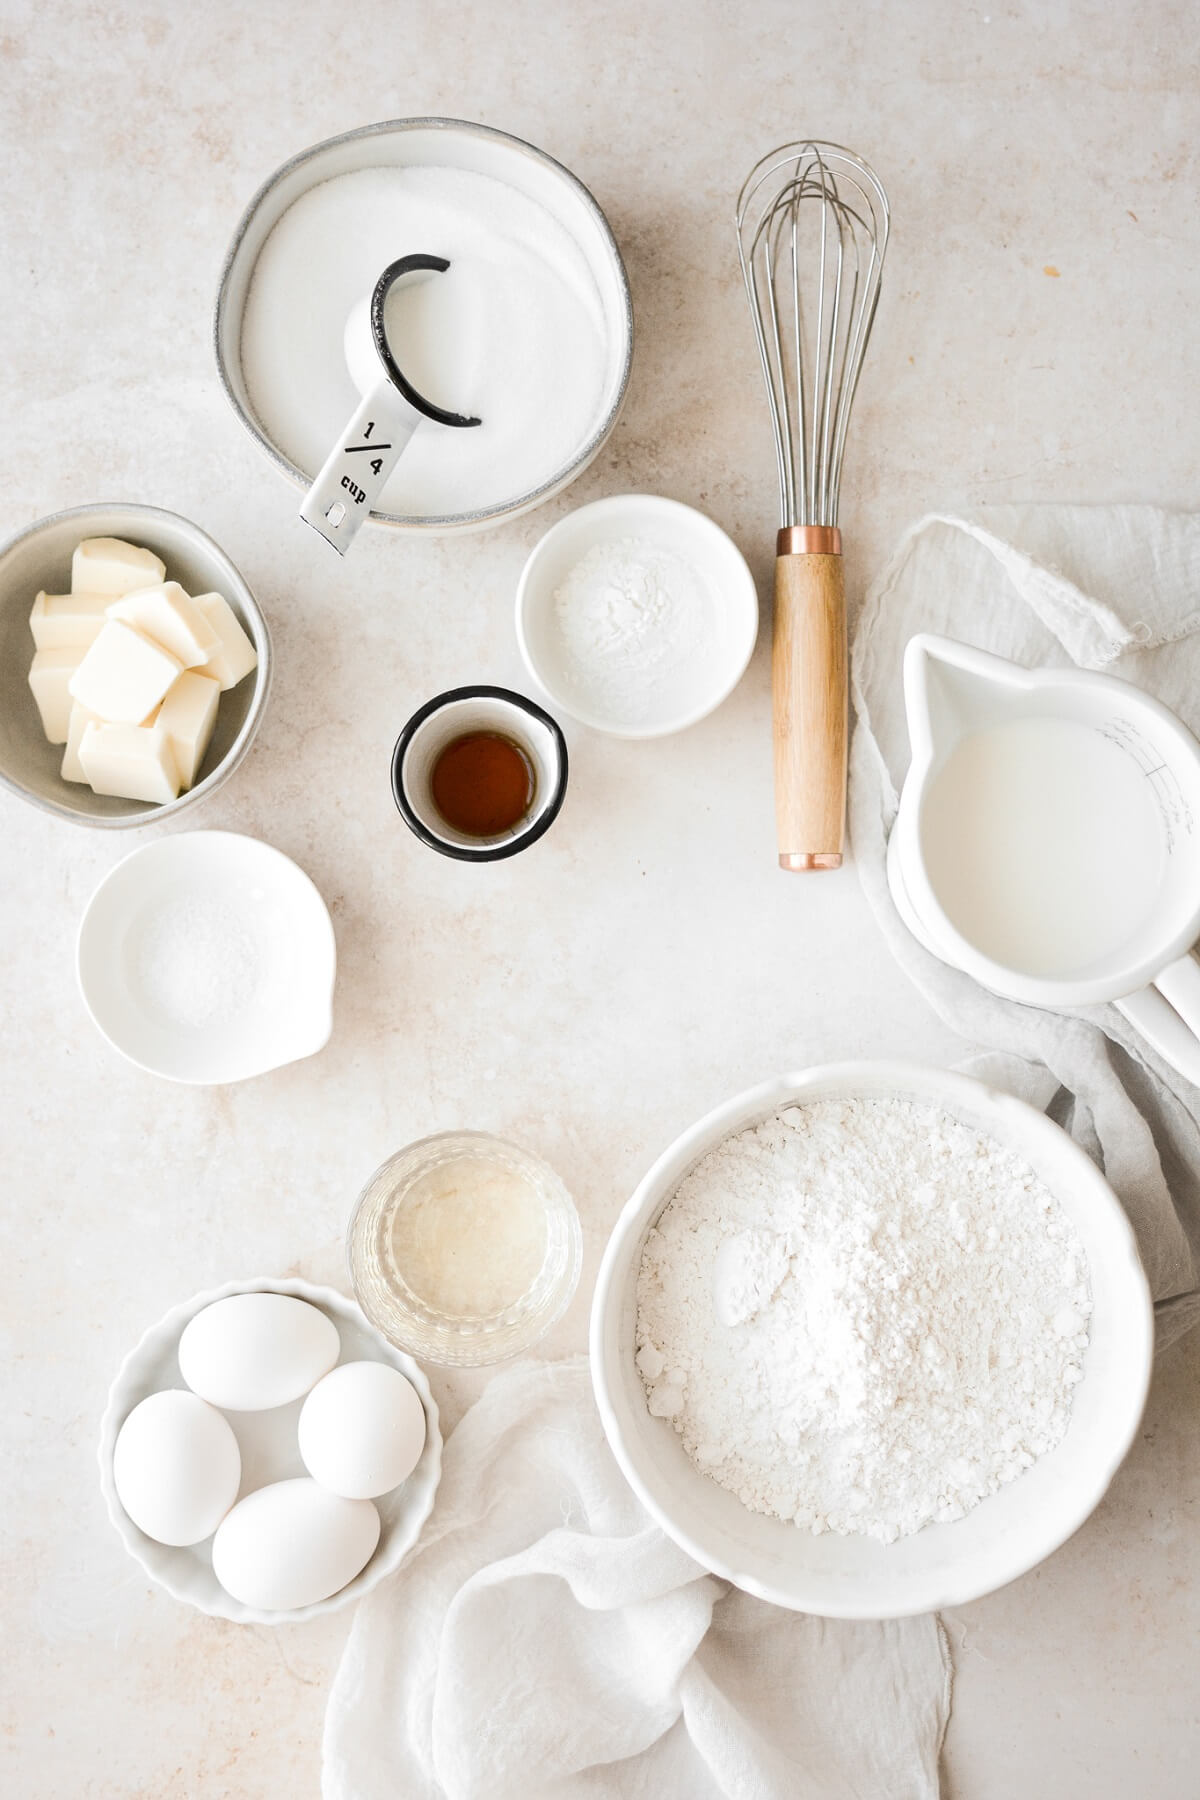
Buttercream
- Butter. I use unsalted butter and then add a pinch of salt. But if you prefer to use salted butter, that’s totally fine. Just omit the extra salt in the recipe.
- Vanilla. You can scrape a vanilla bean and use the seeds, or use vanilla bean paste or just vanilla extract.
- Powdered Sugar. Sweetens and thickens the buttercream.
- Meringue Powder. Adds stability and improves the texture.
- Salt. Balances the sweetness.
Instructions
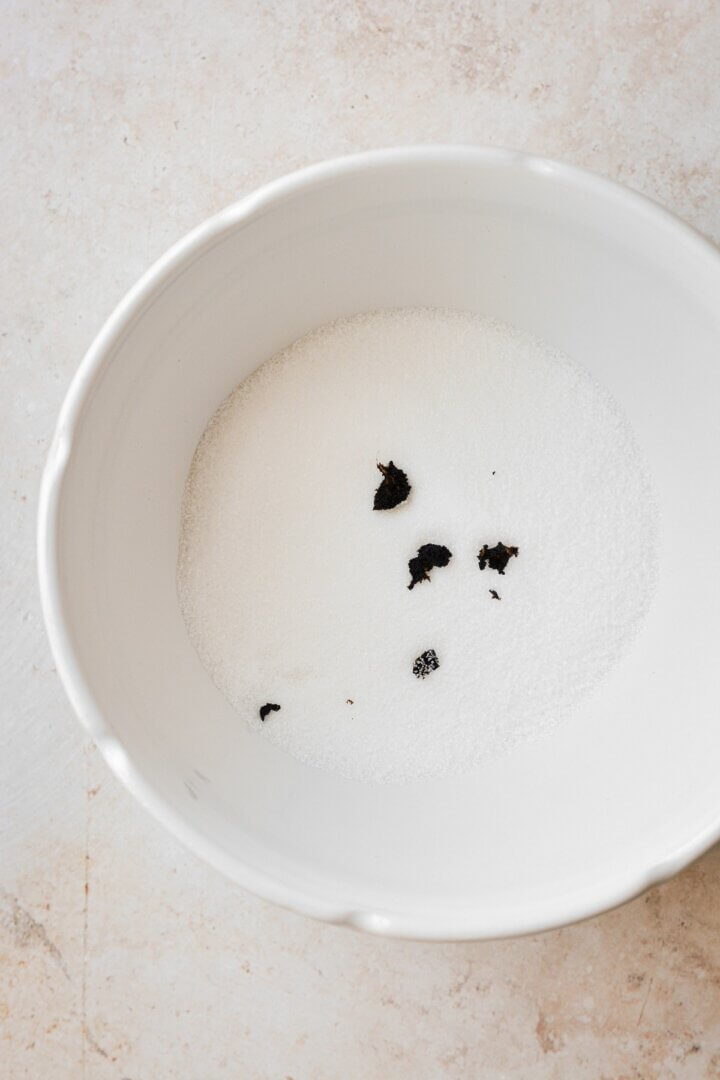
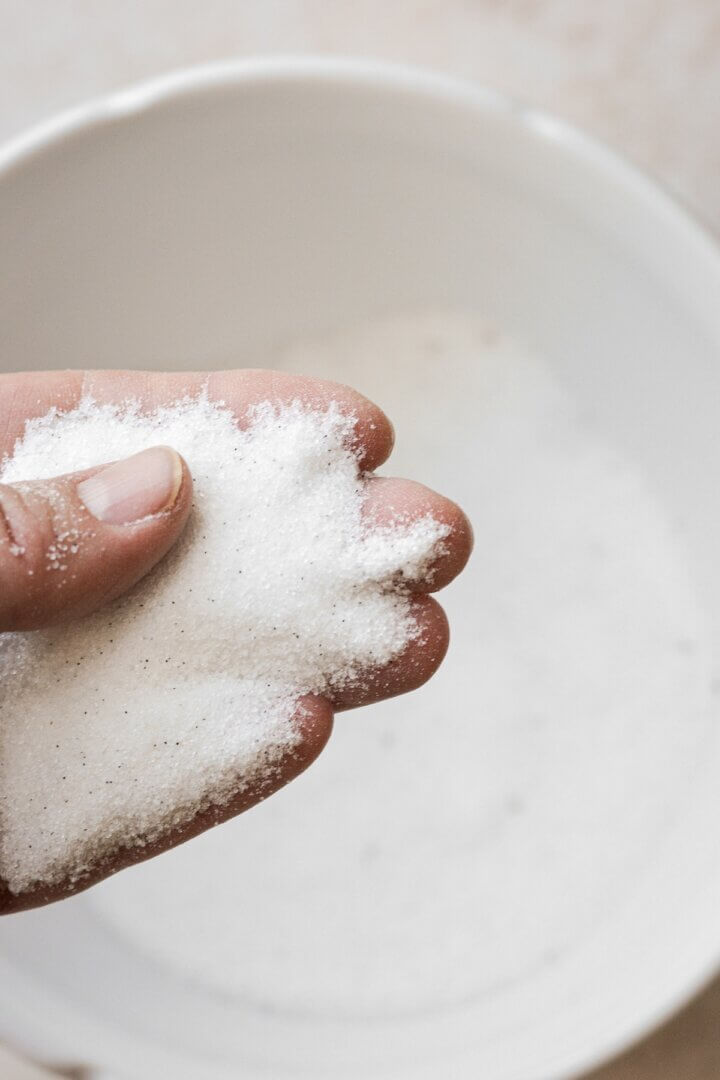
Rub the Vanilla Bean Seeds into the Sugar.
- Preheat the oven to 350F, position a rack in the center of the oven, and spray the bottoms of three 8-inch cake pans with non-stick spray.
- In a large bowl, measure out the sugar. Scrape the seeds from the vanilla bean pod and use your fingers to rub the seeds into the sugar until very fragrant and the seeds are evenly dispersed throughout the sugar.
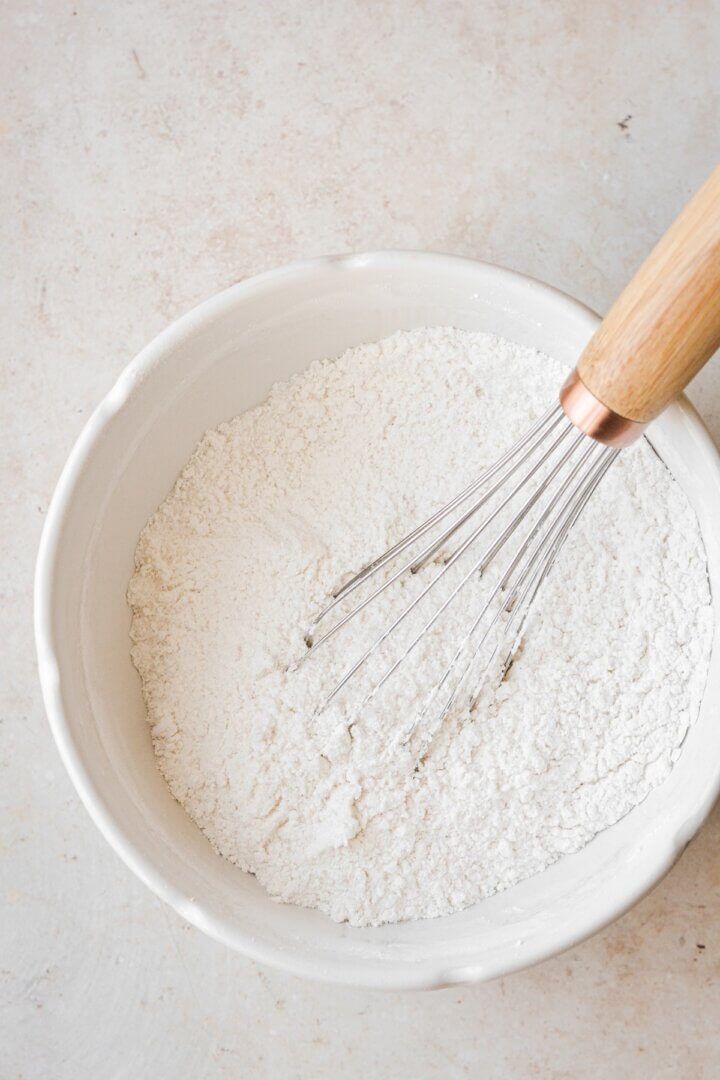
Sift Together the Dry Ingredients.
- Set a fine mesh sifter over the bowl of sugar, and sift in the cake flour, baking powder and salt.
- Use a whisk to combine the dry ingredients well.
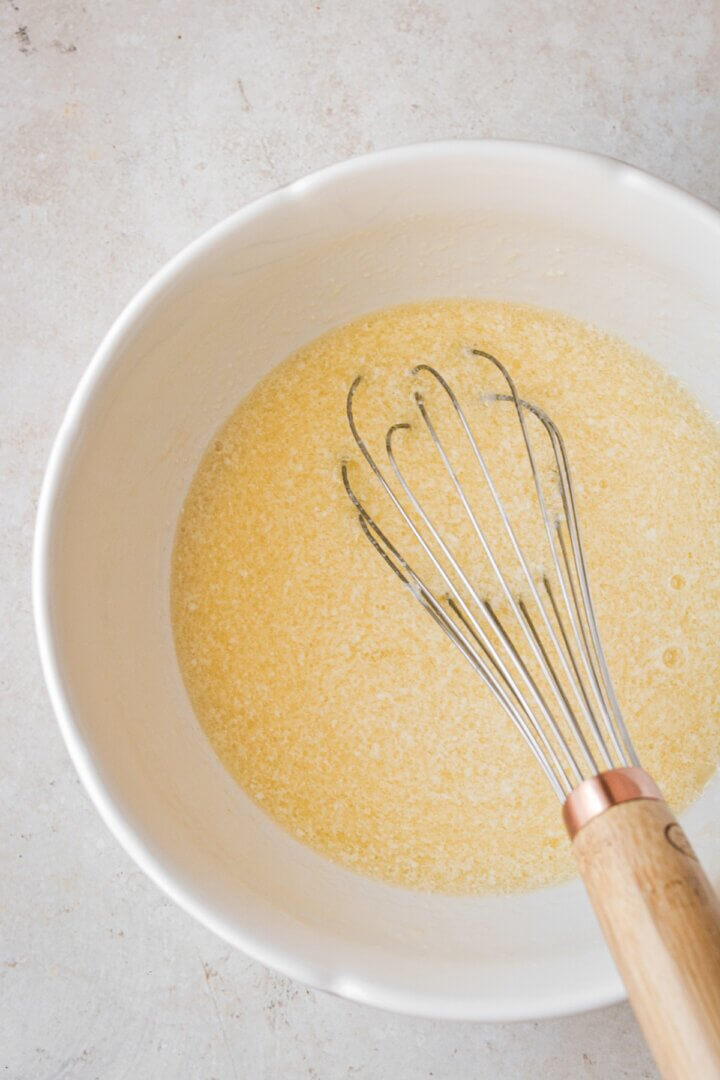
Whisk in the Liquid Ingredients.
- In another large bowl, whisk together the eggs, egg whites, buttermilk, melted butter, oil and vanilla extract until smooth.
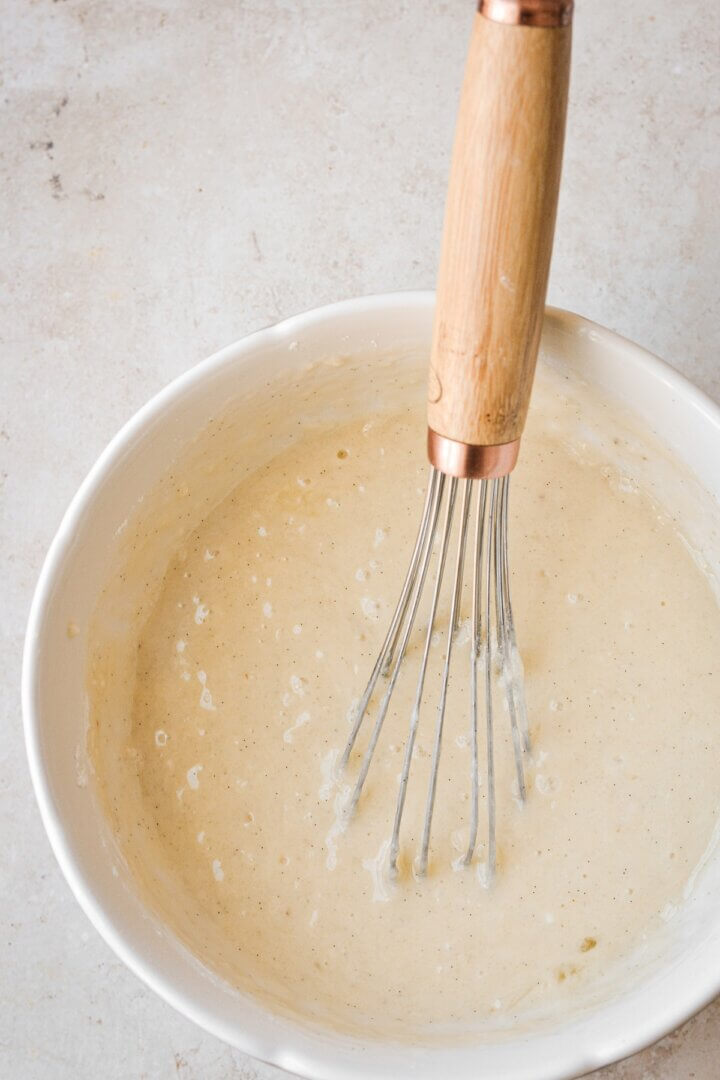
- Add the dry ingredients to the wet, and whisk until combined, about 10-15 seconds. A few lumps in the batter are okay; take care not to over mix.

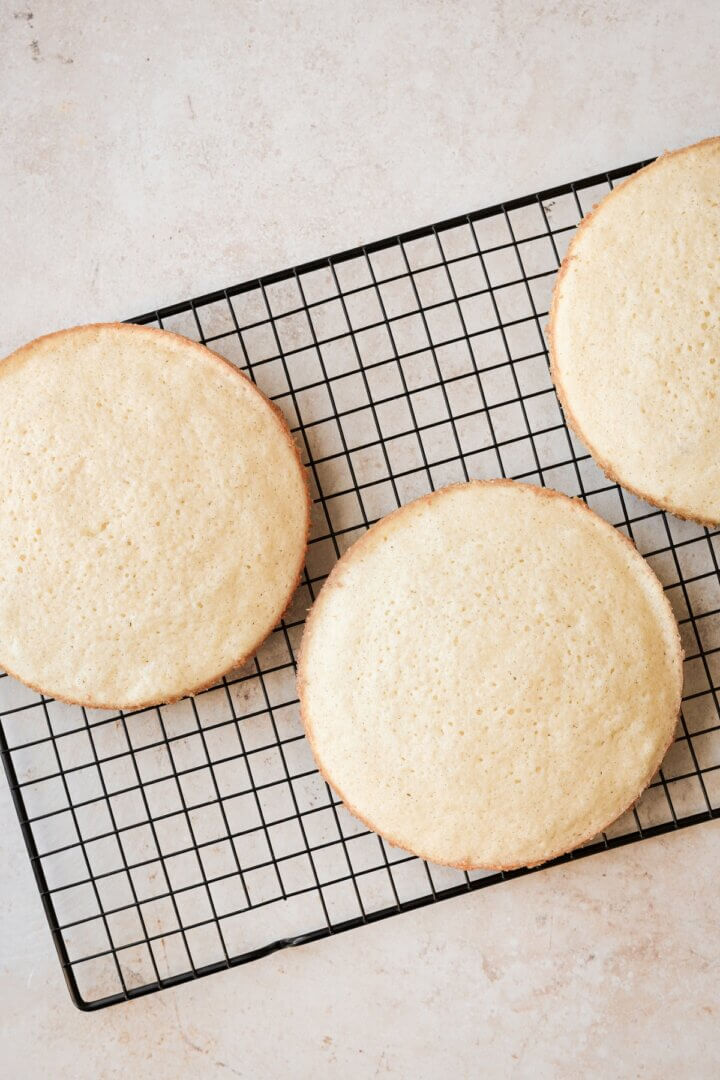
Bake and Cool.
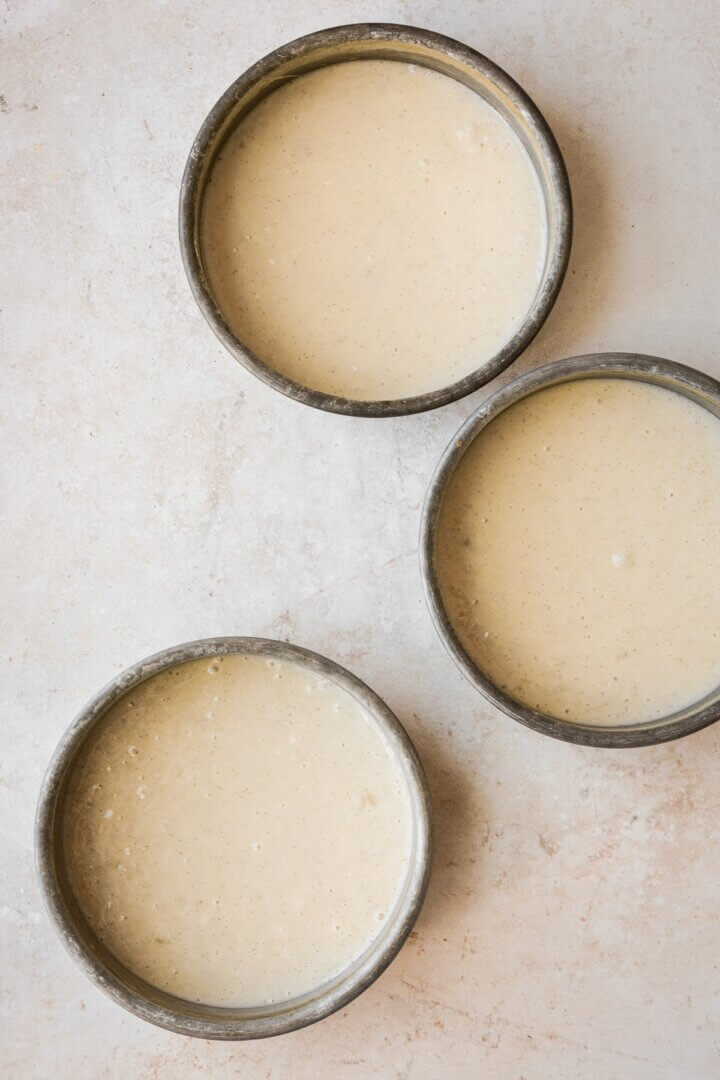
- Divide the batter between the cake pans. Tap a few times against the counter to pop any large air bubbles.
- Bake the cakes for about 21-25 minutes, or until a cake tester or a toothpick comes out clean, and the tops spring back when lightly touched.
- Set the pans on a wire rack, cover them loosely with a clean kitchen towel, and cool completely before frosting. When ready to frost and assemble the cake, remove the cakes from the pans.
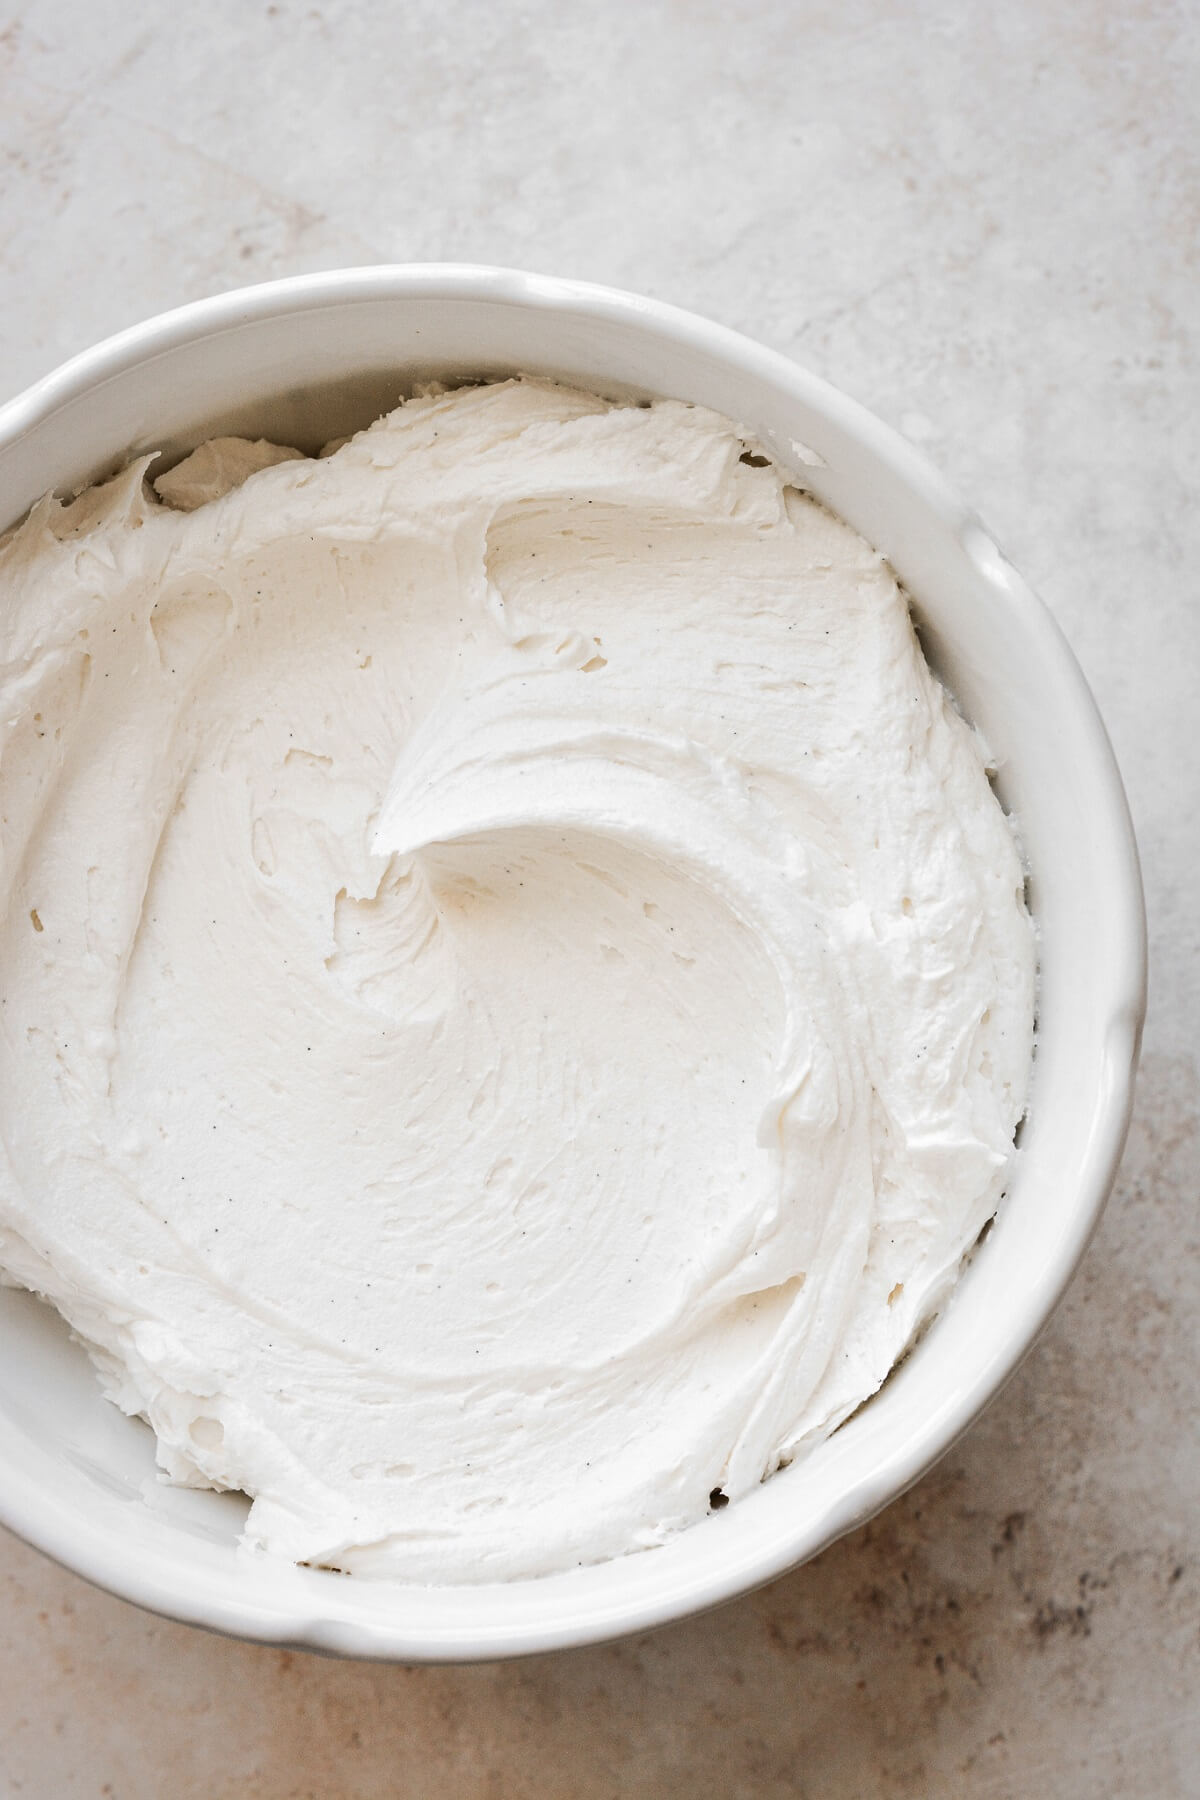
Make the Buttercream.
- In the bowl of your stand mixer fitted with the whisk attachment, beat the butter and vanilla bean seeds for 1 minute until smooth.
- With the mixer running on low, add the powdered sugar by spoonfuls, the meringue powder and the salt, mixing until thick and combined.
- Add the vanilla and the milk; increase speed to medium and whip for 4-5 minutes, scraping the bowl down several times, until light and fluffy.
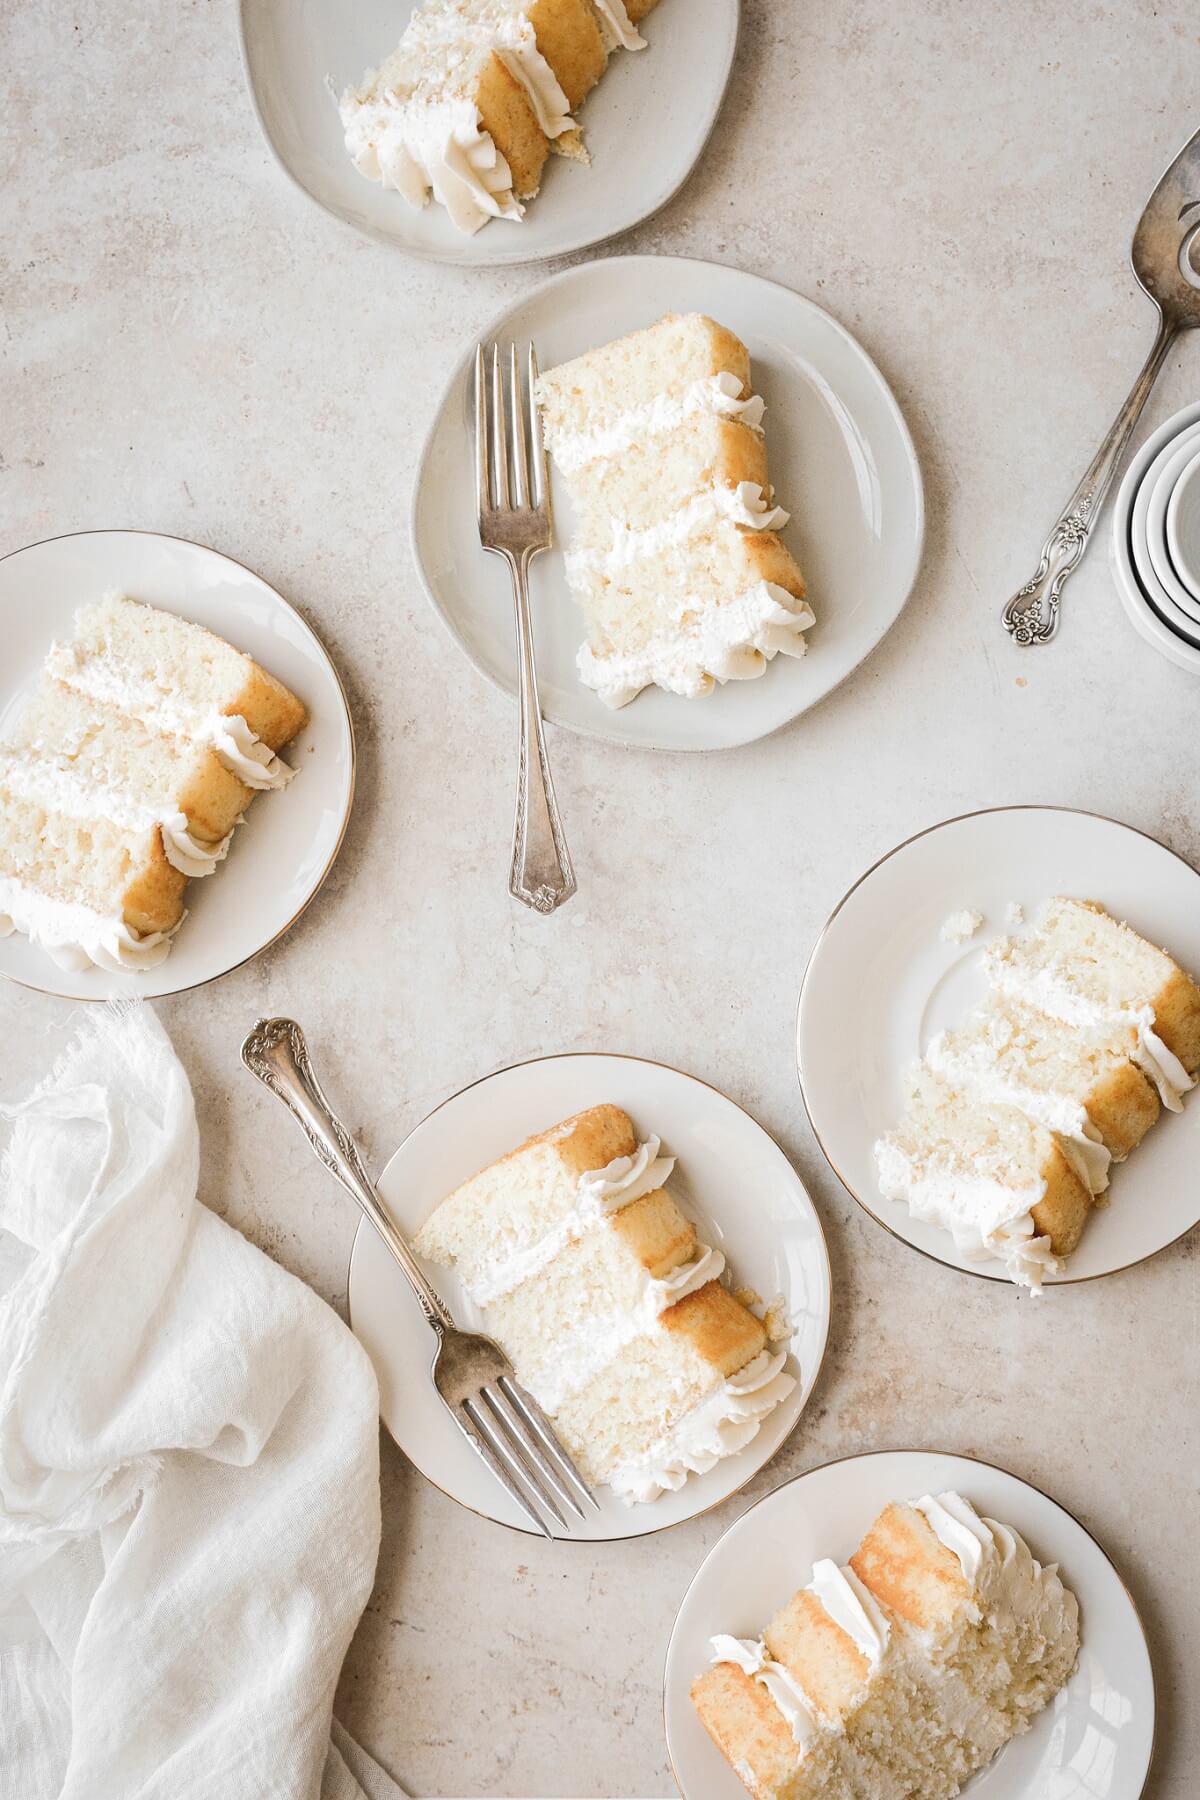
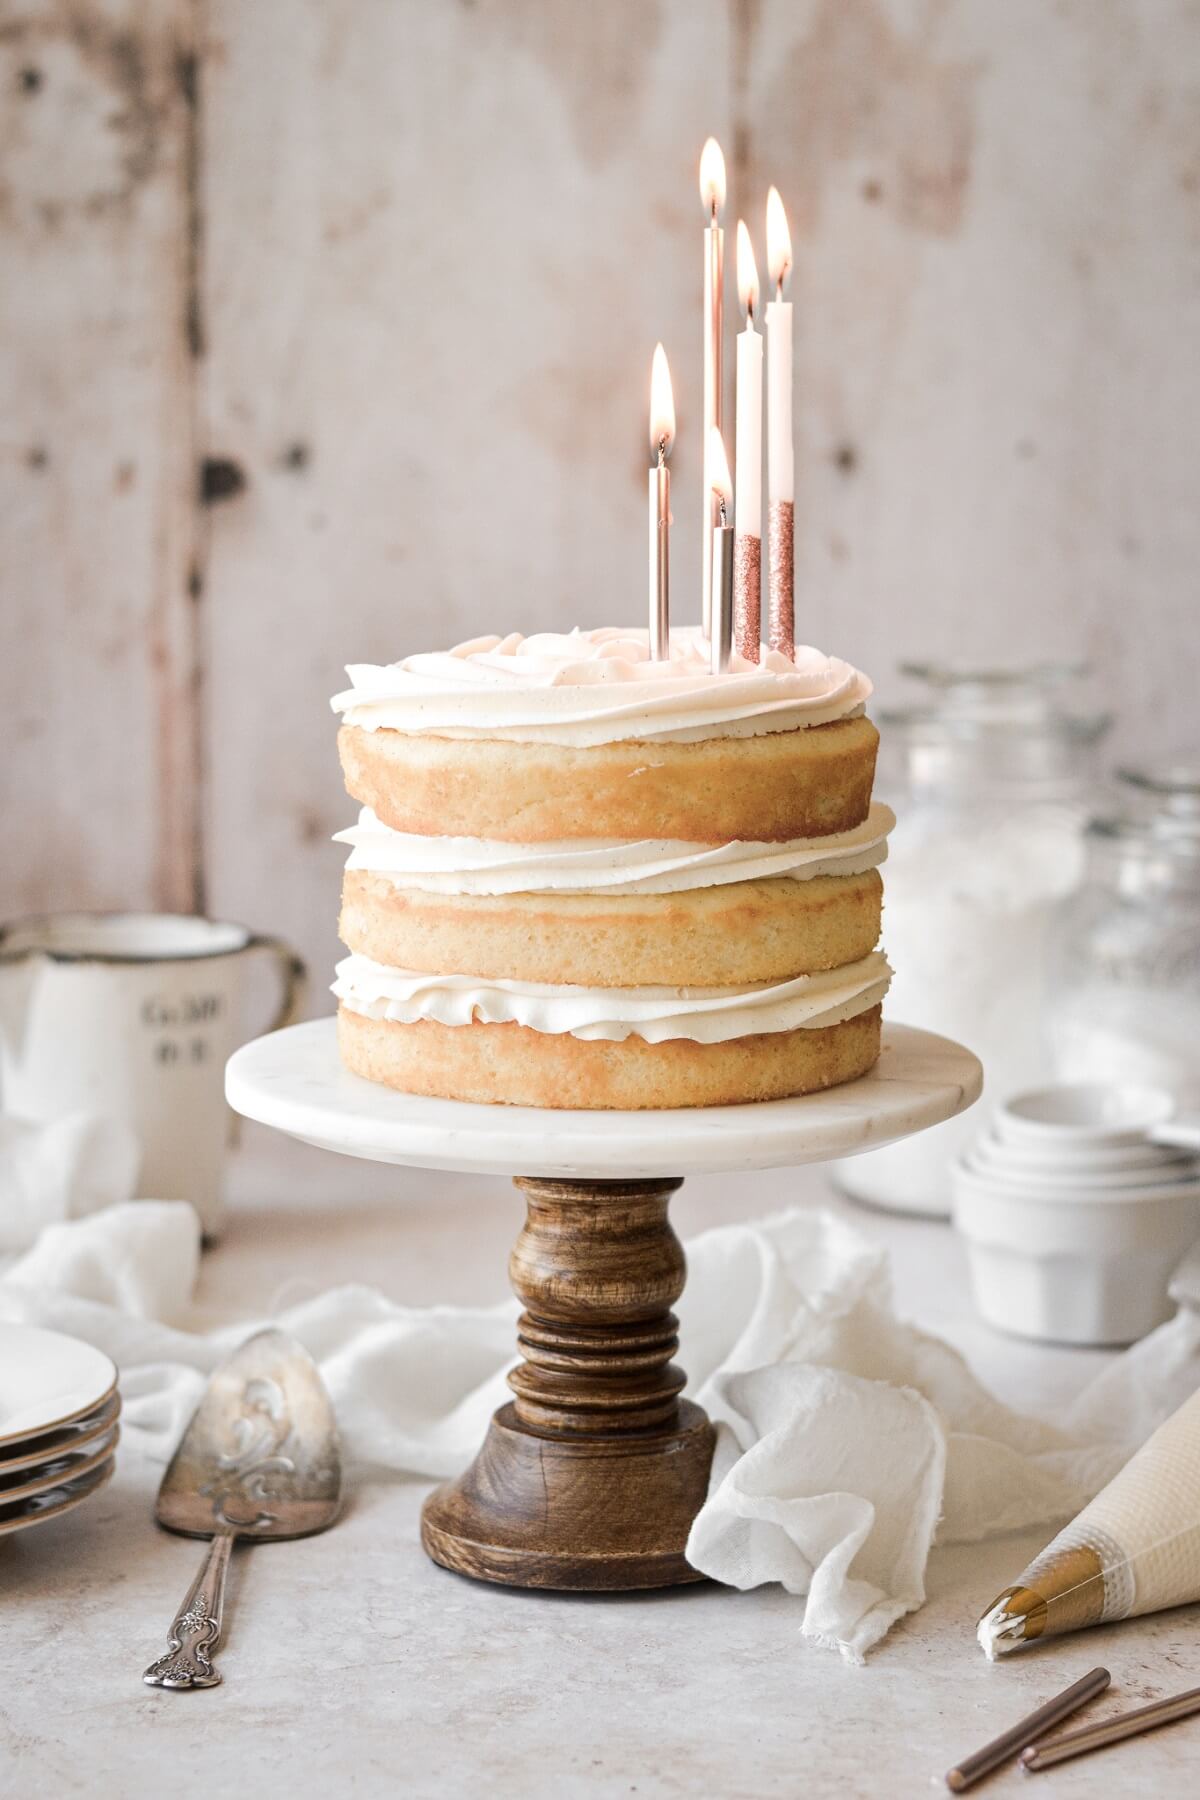
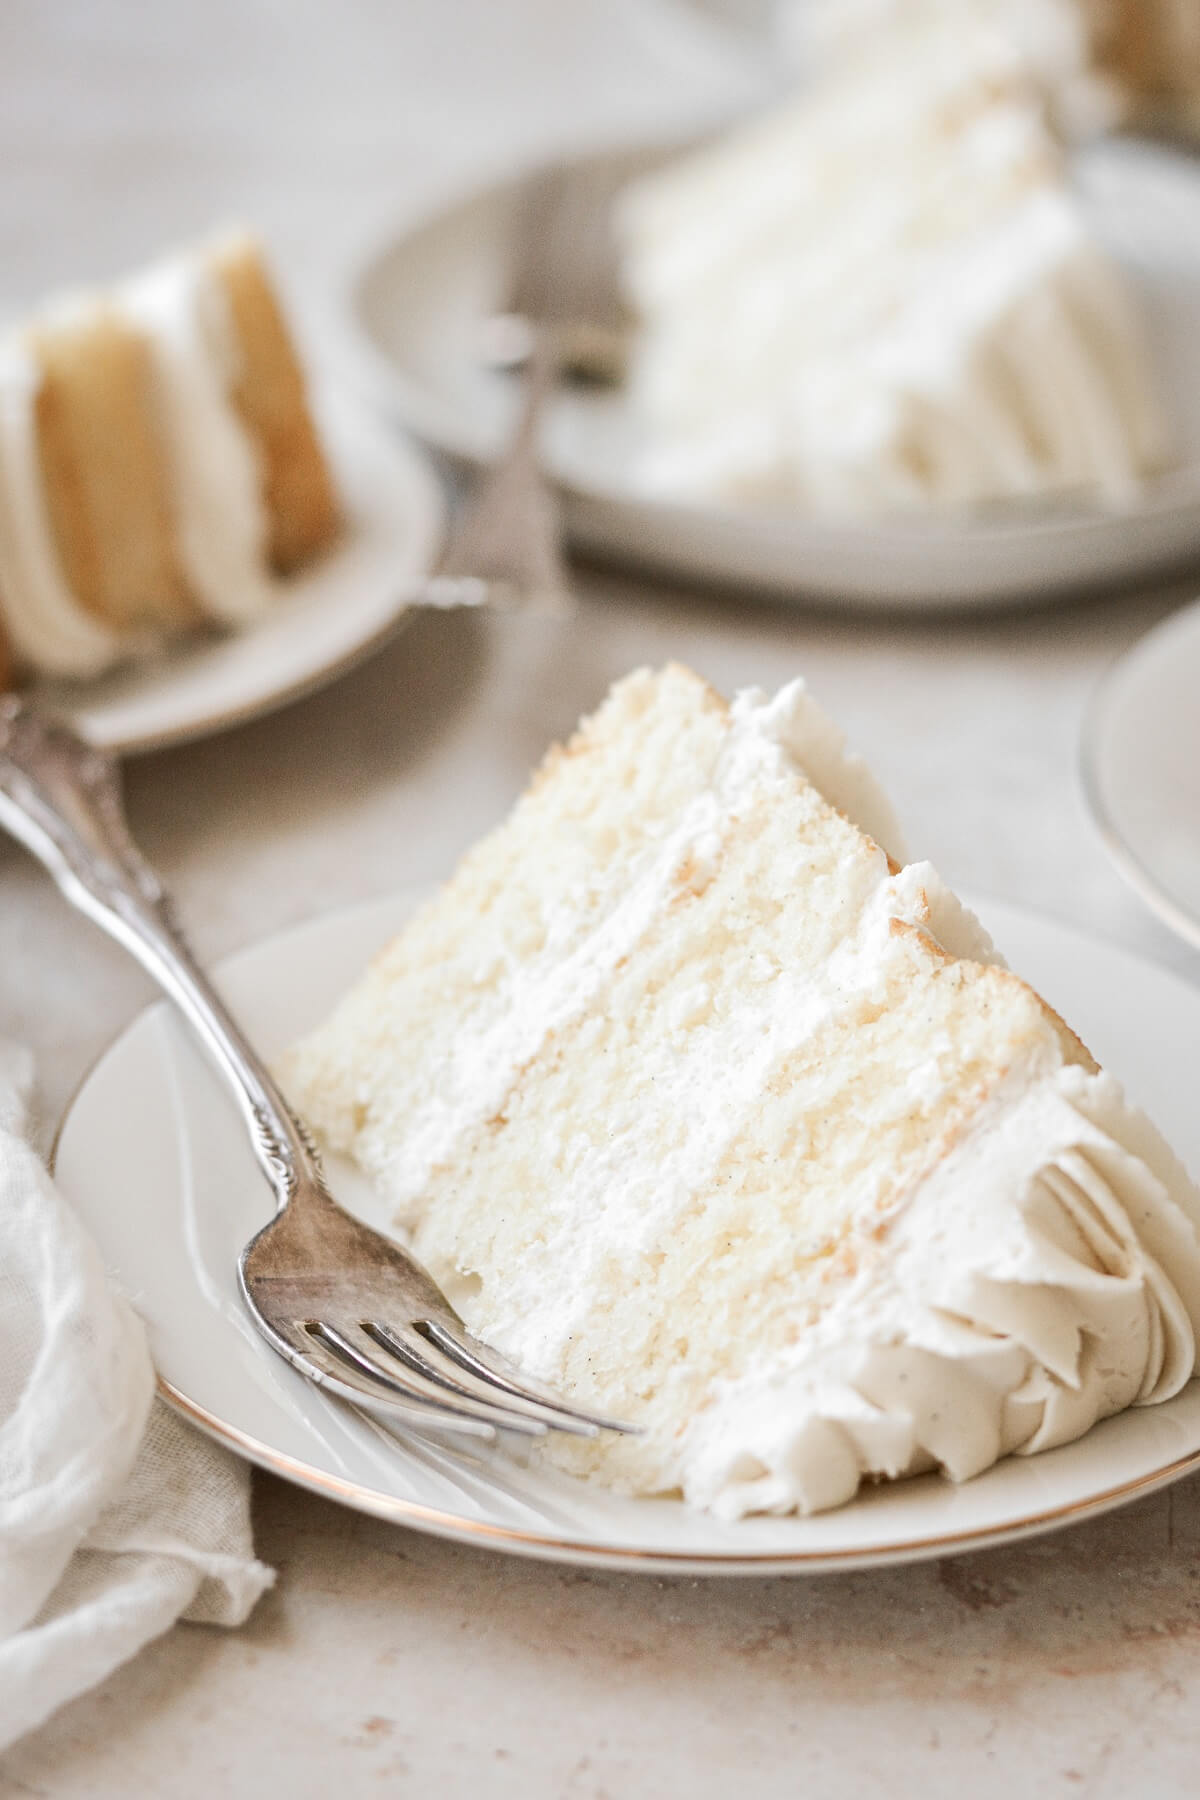
- Fill and frost the cooled cakes with the buttercream.
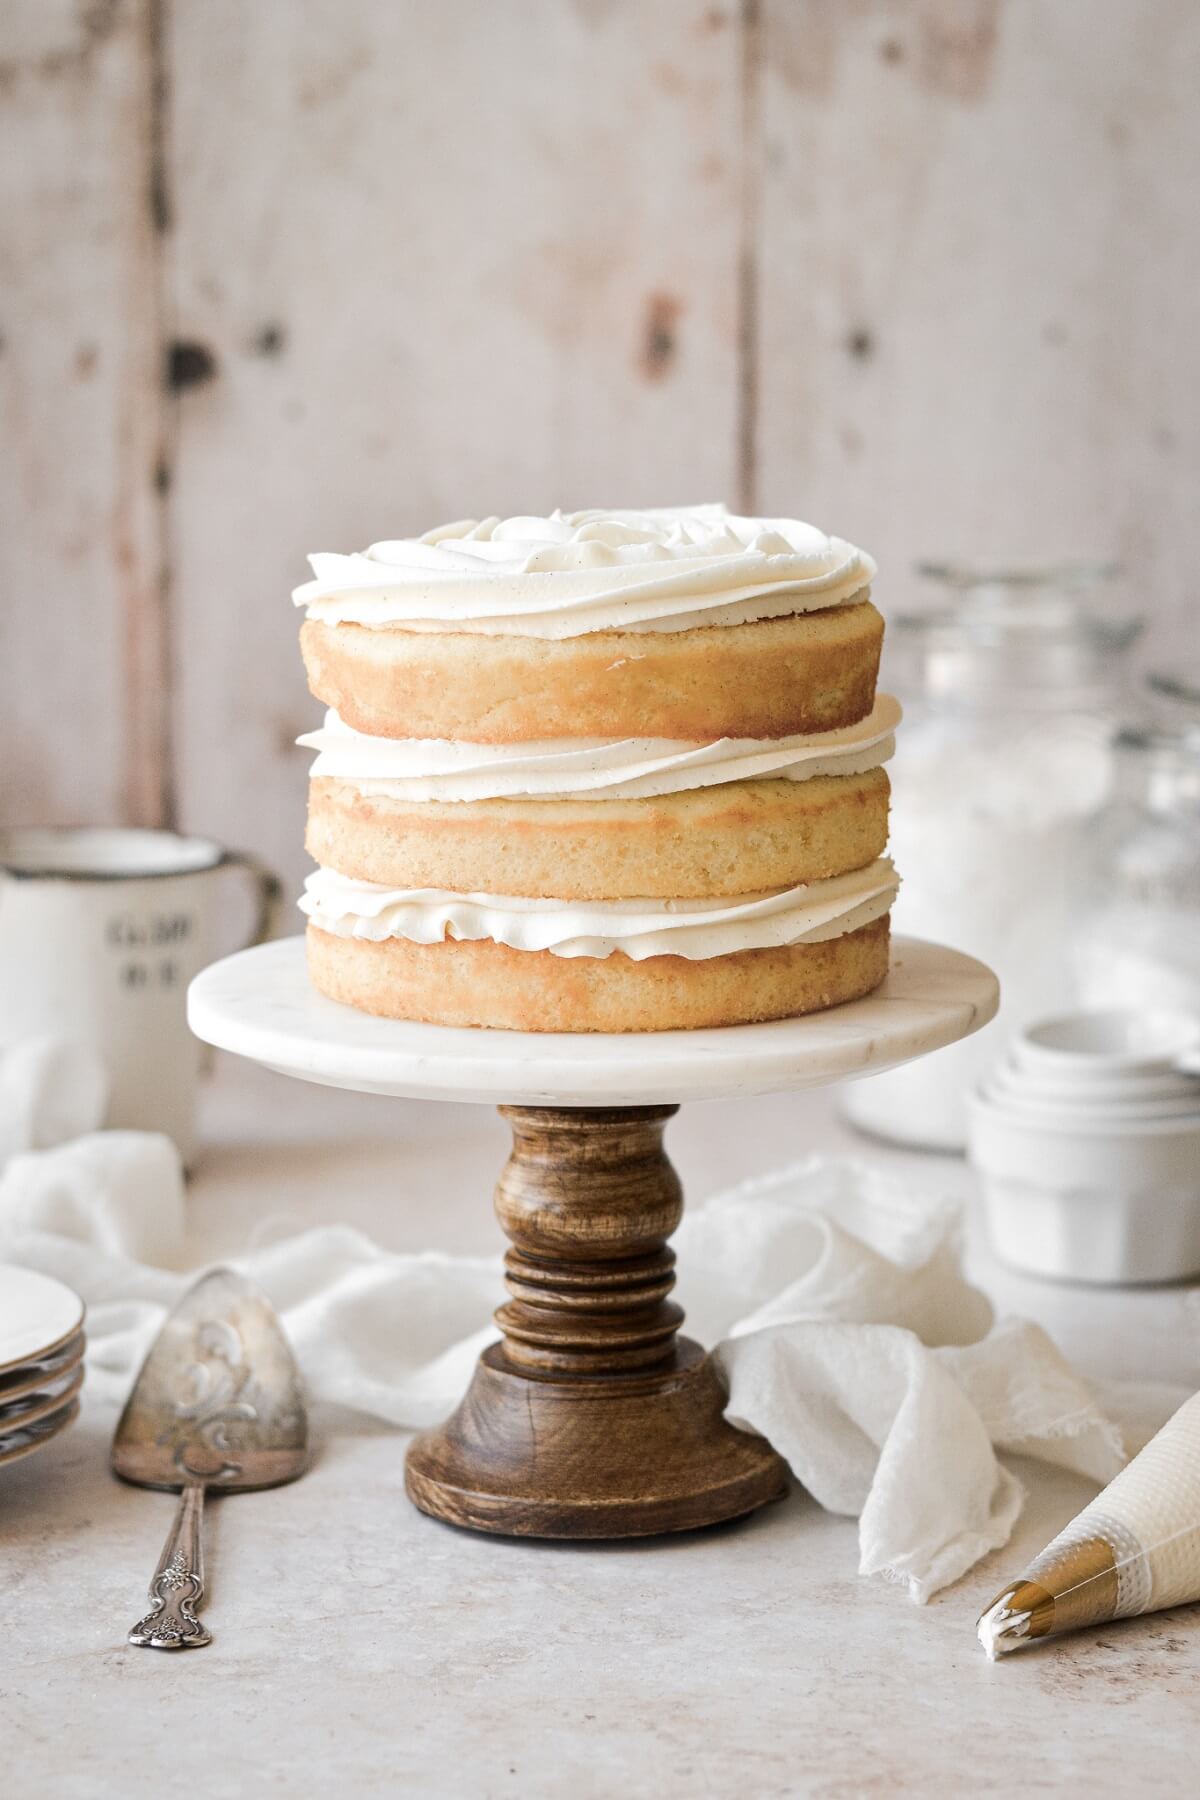
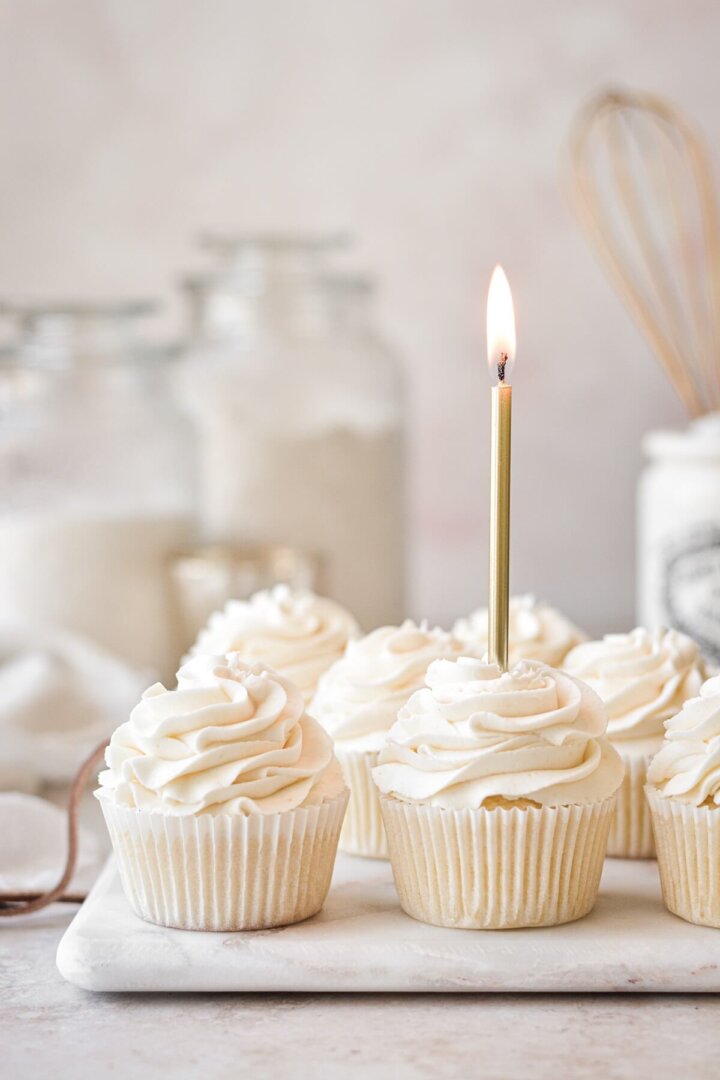
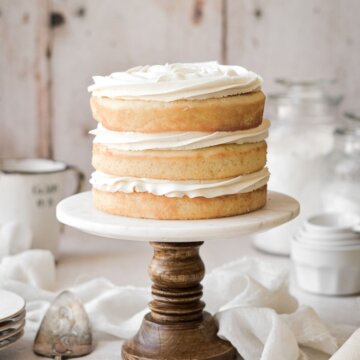
- For the naked cake pictured in today’s post, fit a piping bag with tip 1M and fill with buttercream. Place one layer of cake on your cake stand or cake board. Starting at the center of the cake, pipe a swirl from the center to the outer edge, to form a large rosette. Place another cake layer on top, and repeat. You’ll have leftover buttercream if you leave the sides unfrosted, which you can freeze in a freezer bag for another baking project.
- Note that naked cakes can dry out faster, since they aren’t covered in buttercream to keep the sides moist. So be sure to keep the cake tightly covered in an airtight container until ready to serve.

Recipe Variations
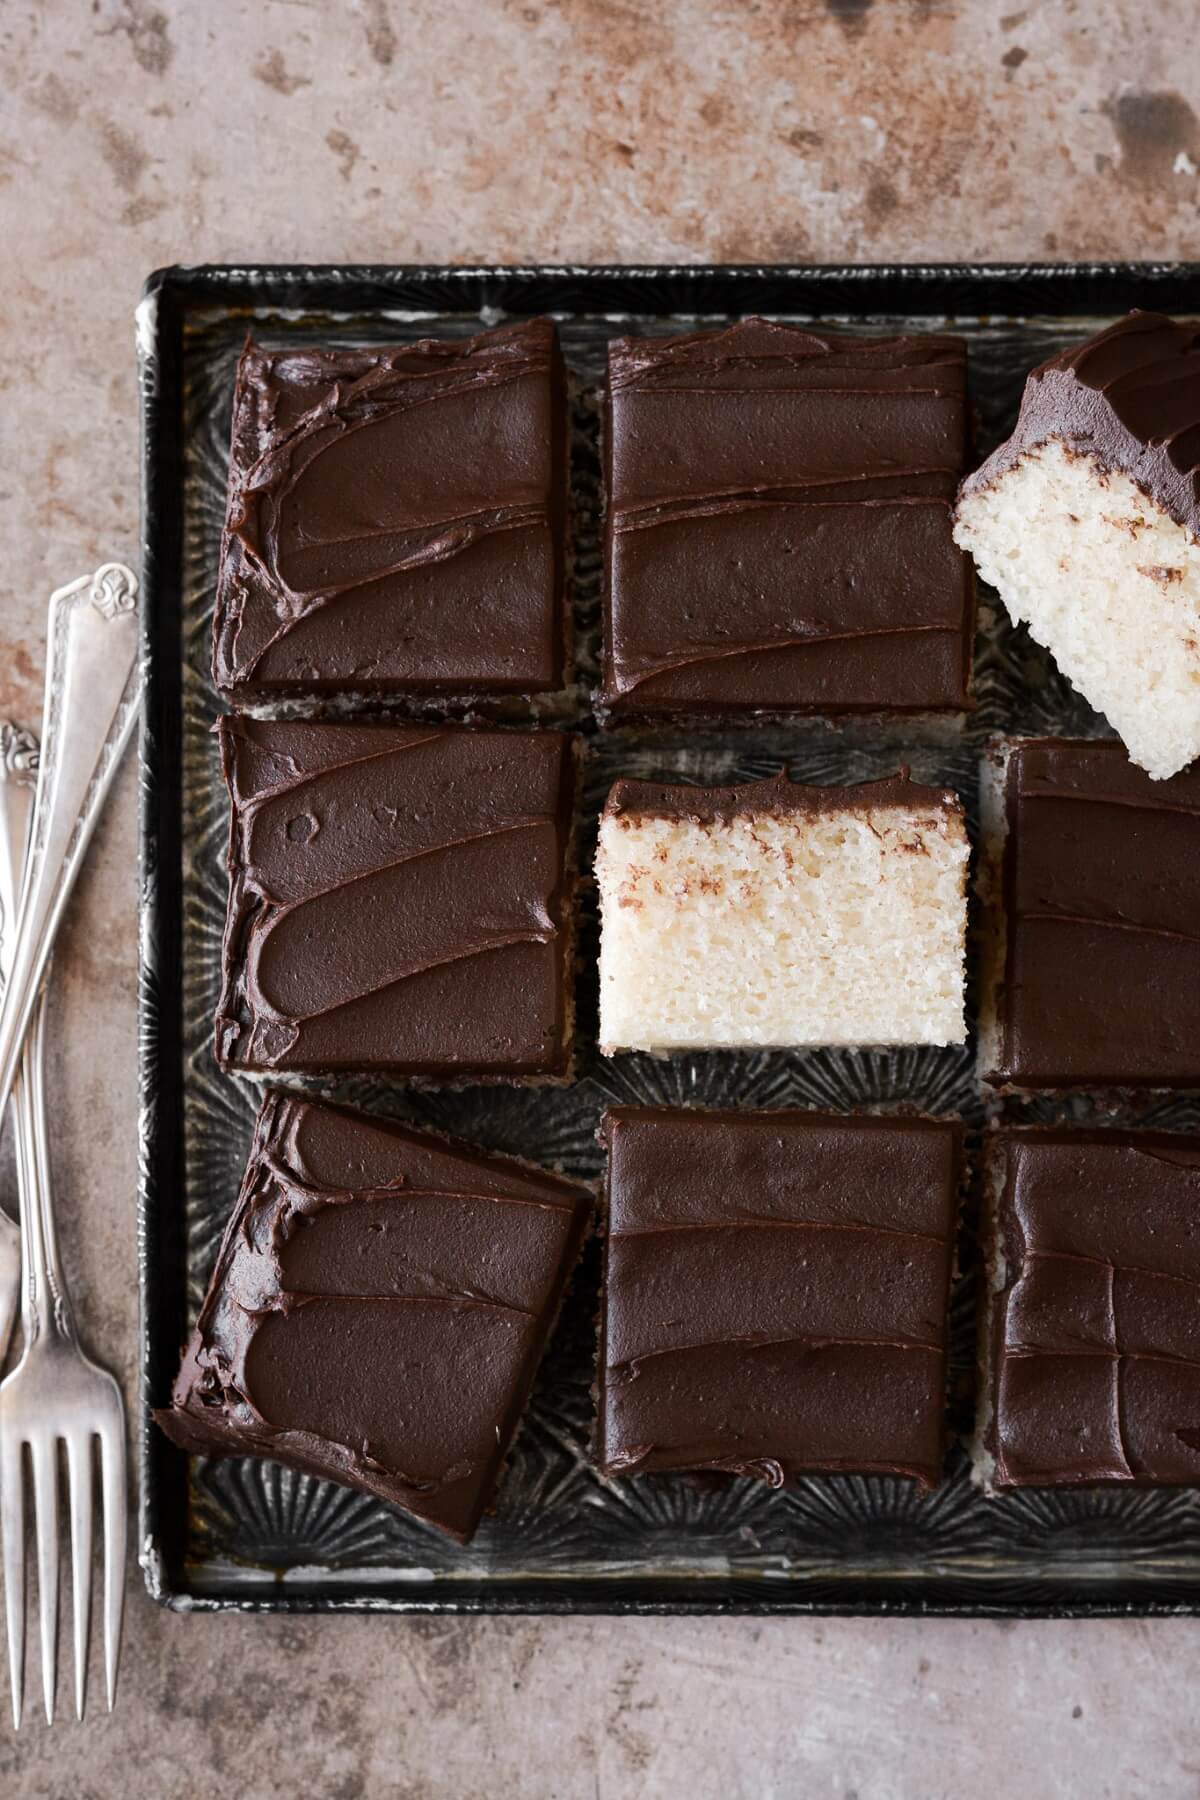
Sheet Cake. Make the full cake recipe in a 9×13 inch baking pan, or half the cake recipe in one 8-inch square baking pan.
Eggless Vanilla Cake. For a high altitude eggless vanilla cake, you only need to make a few minor adjustments. Eggs are expensive these days, so I wanted to create an eggless variation of this cake that’s just as perfect as the original recipe. Whether the price of eggs is a factor, or you’re baking for someone with an egg allergy, or you’ve simply run out of eggs, it’s great to have other options. The eggless cake is just as soft, moist and fluffy, and baked absolutely perfectly when I tested half the recipe in an 8 inch square pan. It was totally delicious frosted with chocolate buttercream.
- Replace the 2 whole eggs with 2 tablespoons corn starch and 6 tablespoons water (add the corn starch to the dry ingredients and the water to the wet ingredients).
- Replace the 2 egg whites with 5 tablespoons sour cream (added to the wet ingredients).
- Increase the baking powder from 3 teaspoons to 3 1/2 teaspoons.
Be sure to read all of my BAKING FAQs where I discuss ingredients, substitutions and common questions with cake making, so that you can be successful in your own baking! I also suggest reading these comprehensive posts on making Perfect American Buttercream, How to Stack, Fill, Crumb Coat and Frost Layer Cakes and How to Use Piping Bags.
Frequently Asked Questions
What should I use if I don’t have cake flour?
If you can’t find cake flour at your local grocery store or Walmart, you can also buy cake flour online. In a pinch, you can make your own cake flour. Measure out 1 cup of all-purpose flour using the spoon and sweep method. Remove 2 tablespoons of flour, and replace with 2 tablespoons of corn starch. Whisk together until thoroughly combined.
Can I make this recipe with gluten free flour?
Yes, I’ve had feedback from people who have made this recipe successfully with gluten free flour. I’d recommend using your favorite measure-for-measure gluten free flour, although the cake will likely have a slightly coarser texture.
What can I substitute for the buttermilk?
While I prefer whole buttermilk, I’ll also use lowfat buttermilk if it’s the only thing available at my grocery store. The next best thing is to make your own sour milk by stirring together 1 1/2 tbsp white distilled vinegar or lemon juice with 1 1/2 cups whole milk. Let sit for 15 minutes to curdle before mixing your cake batter.
Why did you change this recipe from the original vanilla cake recipe on your blog?
I felt like the original cake was too oily, and didn’t bake consistently for high altitude. See the next section below for details on my recipe updates.
Can I make the cake ahead of time and freeze it?
Yes, after baking and cooling the cakes, wrap each layer individually in plastic wrap and freeze for 3-6 months until you’re ready to frost your cake. You can also freeze the fully assembled and frosted cake in an airtight container for up to 3 months.
How long will this cake stay moist?
If you keep it in an airtight container, it will stay moist for days and days! If it lasts that long.
How should I store the leftover cake?
Store leftover vanilla cake in an airtight container or cake carrier at room temperature for up to 3-5 days.
Can I bake this cake recipe as cupcakes instead?
I have a slightly modified version of this recipe to make vanilla cupcakes.
Do I need to use 8-inch cake pans, or can I use 9-inch cake pans?
I love my 8-inch cake pans, since they make tall, pretty cakes. You can certainly bake this recipe in 9-inch pans, though, and your assembled cake will be a little wider and shorter.
Will this recipe work as a sheet cake?
This recipe will certainly work as a sheet cake. Bake the batter in a greased 9×13 pan, and bake for a little longer, watching the center for doneness.
Can I cut this recipe in half?
Yes, you can easily halve this vanilla cake recipe, and bake the batter in three 6-inch pans for about 18-20 minutes.
Can I make this recipe even if I don’t live at high altitude?
Yes, many people who are not at high altitude have tried and loved my vanilla cake recipe. If you’re at sea level, you may need to make a few slight modifications, such as reducing the flour by 2-4 tablespoons, and increasing the baking powder from 3 tsp to 4 tsp. I live in Denver, which has an altitude of 5,280 feet, so if you live significantly higher than that (more than 1,000 feet higher), you might need to make a few minor adjustments, such as increasing the flour a bit more, and decreasing the baking powder a little. Please read this post on guidelines for adjusting cake recipes for various altitudes.
What flavor of buttercream should I frost a vanilla cake with?
In my recipe card below, I’ve included my recipe for vanilla buttercream. But honestly, you can use absolutely any flavor of buttercream and filling that you like – everything is good with vanilla! See my comprehensive post on Perfect American Buttercream to read all about how I make my buttercream, as well as ideas for other flavors.
Recipe Updates
I originally published this vanilla cake recipe almost 6 years ago, so many of you have tried and loved it over the years. However, I felt there were a few areas that needed improving, especially for high altitude bakers, to ensure a delicious and perfect vanilla cake. If you still love and prefer the original recipe, though, you can find the original ingredients list in the notes section of the recipe card at the bottom of this post.
- Cake flour for a fluffier cake crumb. First, I swapped the all-purpose flour for cake flour, which makes a lighter, fluffier, more tender cake crumb. I also increased the amount of cake flour, as the flour to sugar to leavening ratio seemed a little off. The increase in flour stabilizes the batter for a much better rise.
- Butter + oil for better flavor and less oily texture. In my original recipe, I used a whole cup of vegetable oil. Over time, I really felt like that was far too much oil, and the flavor of the oil overwhelmed the flavor of the vanilla. For a much better flavor, but a cake that’s still very moist, I now use 1/2 cup melted butter + 1/2 cup vegetable oil.
- Using only baking powder. In my original recipe, I used both baking soda and baking powder. Baking soda is stronger than baking powder, and it seems to leaven this vanilla cake too aggressively, which can lead to a fallen center for high altitude bakers. To stabilize the leavening process, I now use only baking powder for a slower, steadier rise that ensures the cake won’t fall.
You Might Also Like


Please check out my Amazon Shop for a curated collection of some of my favorite cake pans from trusted brands, baking tools, ingredients, pretty things and fashion finds. I recommend products that I buy and use every day!
Did you love today’s recipe? Please rate the recipe and let me know in the comments what you thought! Also, be sure to follow Curly Girl Kitchen on Instagram, and tag me when you try one of my recipes so I can see all your delicious creations!
High Altitude Vanilla Cake
All recipes on Curly Girl Kitchen are developed for high altitude at 5,280 feet. See FAQs for adjusting to higher or lower elevations.

Equipment
- Stand Mixer with Paddle Attachment
Ingredients
Cake
- 1 ½ cups granulated sugar
- ½ vanilla bean, seeds scraped
- 3 ¼ cups cake flour, spooned and leveled, then sifted
- 3 tsp baking powder
- 1 tsp coarse Kosher salt (if using table salt, use half the amount)
- 2 large eggs, room temperature
- 2 large egg whites, room temperature
- 1 ½ cups whole buttermilk, room temperature
- ½ cup unsalted butter, melted, and then cooled for 10 minutes
- ½ cup vegetable oil
- 2 tsp vanilla extract
Buttercream
- 2 cups unsalted butter, softened to room temperature
- ½ vanilla bean, seeds scraped
- 4 cups powdered sugar
- 1 tbsp meringue powder (optional)
- ¼ tsp coarse Kosher salt (if using table salt, use half the amount)
- 2 tsp vanilla extract
- 2-4 tbsp milk or cream, only if needed for consistency
Instructions
Cake
- Preheat the oven to 350F, position a rack in the center of the oven, and spray the bottoms of three 8-inch cake pans with non-stick spray.
- In a large bowl, measure out the sugar. Scrape the seeds from the vanilla bean pod and use your fingers to rub the seeds into the sugar until very fragrant and the seeds are evenly dispersed throughout the sugar.
- Set a fine mesh sifter over the bowl of sugar, and sift in the cake flour, baking powder and salt. Use a whisk to combine the dry ingredients well.
- In another large bowl, whisk together the eggs, egg whites, buttermilk, melted butter, oil and vanilla extract until smooth.
- Add the dry ingredients to the wet, and whisk until combined, about 10-15 seconds. A few lumps in the batter are okay; take care not to over mix. Divide the batter between the cake pans. Tap a few times against the counter to pop any large air bubbles.
- Bake the cakes for about 21-25 minutes, or until a cake tester or a toothpick comes out clean, and the tops spring back when lightly touched.
- Set the pans on a wire rack, cover them loosely with a clean kitchen towel, and cool completely before frosting. When ready to frost and assemble the cake, remove the cakes from the pans.
Buttercream
- In the bowl of your stand mixer fitted with the paddle attachment, beat the butter and vanilla bean seeds for 1 minute until smooth.
- With the mixer running on low, add the powdered sugar by spoonfuls, the meringue powder and the salt, mixing until thick and combined.
- Add the vanilla; increase speed to medium and whip for 4-5 minutes, scraping the bowl down several times, until light and fluffy. Add the milk only if needed for desired consistency. Note that in warmer weather, when the butter is softer, you'll rarely need to add the milk.
- Fill and frost the cooled cakes with the buttercream.
- For the naked cake pictured in today's post, fit a piping bag with tip 1M and fill with buttercream. Place one layer of cake on your cake stand or cake board. Starting at the center of the cake, pipe a swirl from the center to the outer edge, to form a large rosette. Place another cake layer on top, and repeat. You'll have leftover buttercream if you leave the sides unfrosted, which you can freeze in a freezer bag for another baking project.Note that naked cakes can dry out faster, since they aren't covered in buttercream to keep the sides moist. So be sure to keep the cake tightly covered in an airtight container until ready to serve.
Video
Notes
- 2 3/4 cups all-purpose flour
- 1 3/4 cups granulated sugar
- 1 1/4 tsp baking soda
- 1 1/4 tsp baking powder
- 1 tsp coarse Kosher salt
- 2 large eggs + 2 egg whites
- 1 1/2 cups buttermilk (or 1 1/2 cups whole milk + 1 1/2 tbsp white distilled vinegar)
- 1 cup vegetable oil
- 2 tsp vanilla extract.
 https://curlygirlkitchen.com/
Did this used to be a different recipe with vinegar because I remember these exact instructions but it had no butter milk.
It's the exact same recipe, just noted as 1 1/2 cups of buttermilk instead of 1 1/2 cups whole milk + 1 tablespoon vinegar. People just kept getting so confused about that, even though it's essentially the same thing.
If so can you write down the original recipe because it was so delicious!!
Thanks so much!
Hello, I don't have baking soda,how can I substitute
Do you not have access to buy some baking soda? There's no simple answer to your question, since the cake needs leavening to rise. You could increase the amount of baking powder to make up for no baking soda, but the two are not exactly interchangeable, and do not react the same in baked goods, so it would take some experimenting on your part to come up with the right amount if you only used baking powder. My guess would be somewhere between 3-4 teaspoons of baking powder for this recipe, if you're omitting the baking soda.
I don't currently have access to buying some baking soda, I don't think I've come across it in stores around me. But I guess I'll wait till I can get some to try your recipe, thank you.
Hello I’m wondering exactly how to
Use the egg yolks then the egg whites ?
Two whole eggs, plus two extra whites are called for (so you will have two yolks leftover that you can use for another recipe). The eggs and whites are just mixed right into the wet ingredients.
Ok thank you so much for your speedy response ! Can’t wait to make this 😊
I have made this cake several times and love it so much! However, lately when ive made it it has come out a little spongy with air holes throughout the layers. I am wondering if you had any idea what would be causing this and how to fix it? I am sifting my dry ingridients-do you recommend this or think this would contribute to this problem?
Caroline, texture issues are usually from over-mixing cake batter, so I would just advise to be careful not to overmix, and also, after filling the cake pans, tap the pans on the counter a few times to release any large air bubbles before baking. I always sift the dry ingredients – that's a good practice!
Just baked this cake: smells delicious. However, I baked 2×8” and 1×6”. There is no way that it would make 3 8” layers unless they were very thin. My layers are about 1.75” thick at the highest point. Followed recipe meticulously. If I make it again, only 2×8” for sure, so that the cake is a decent size.
I’ve always baked this in three 8-inch pans, and the cake is nice and tall. Even if your cake layers were 1 1/2 inches tall each, that’s about right for a cake layer. Put together, that would be 4 1/2 inches of cake, plus the buttercream in between and on top, which would add another inch over all, for a cake that’s over 5″ tall, so that’s a perfectly standard height for a layer cake. Happy baking!
Hi, I’m wanting to make a cake into a train shape for my sons 1st bday. So my first question is, can I bake this in loaf pans? And if so, what adjustments would you do? And secondly, do you think this cake is dense enough to handle/cut it into train/train car shapes? And if not, would you recommend going 100% butter instead of the butter/oil combo?
Thank you so much,
Kaitlin
Kaitlin,
I’ve never baked this cake in loaf pans, but I don’t see why it wouldn’t work. As far as carving it into shapes, though, I’m honestly not sure. Using more butter would make it more dense, and it will probably work if you’re not trying to carve it too intricately.
Thank you so much for your response. I have one more question, I’m having trouble tracking down whole buttermilk. Would it be better to used low fat buttermilk, or whole milk and vinegar?
Lowfat buttermilk will work just fine – I often use it when I can’t get whole buttermilk. For the milk/vinegar combo, I usually combine 1 tablespoon of vinegar with every 1 cup of milk, adding the vinegar to the measuring cup first, and then filling with milk up to the 1 cup line.
Also, if I should use the whole milk/vinegar instead of the low fat buttermilk, how much of each of these should I use for this recipe?
I love this cake but everytime I make it it falls what am I doing wrong.
Kelly, I’m sorry to hear that! My first question would be, what altitude do you live at? All of my recipes are tested for high altitude, so if you don’t live at a similar altitude, you would need to make some adjustments. I have lots of baking faqs in these two posts – please give them a read and let me know if you have any questions that aren’t answered there! 🙂
https://curlygirlkitchen.com/baking-faqs/
https://curlygirlkitchen.com/white-velvet-cake/
Wow. It looks delicious. I love vanilla cakes. So, I will try to make it. Your recipe will help me. Thanks for sharing.
I just took my three 6-inch layer cakes out of the oven and they smell amazing. And the batter tasted amazing. However…they fell in the middle. I do not think this recipe should be labeled high altitude. I’m at 7000 feet and, admittedly, that’s very high, so maybe that’s the problem. Anybody have any ideas how I might tweak this recipe so it’s actually high altitude? It’s so tasty, that I would like to use it. But the fallen centers are going to make decorating hard.
Karen, I live in Denver, which is at 5,280 feet, so that is certainly high altitude, although that doesn’t mean it will work for EVERY elevation above sea level. Since you’re 2,000 feet higher, you would need to make a few further adjustments to make sure your cake doesn’t fall. I’d suggest you read this article, which has very specific guidelines for increased elevation. You’ll probably need to reduce the baking powder/baking soda a little, reduce the sugar, and add a little more flour.
https://www.kingarthurbaking.com/learn/resources/high-altitude-baking
You might also try completely eliminating the baking soda, which can sometimes be less reliable for high altitude cake baking than baking powder is. So instead of 1 1/4 tsp baking soda + 1 1/4 tsp baking powder, I would try using 3 teaspoons baking powder (since baking powder isn’t as strong as baking soda). At your altitude, I’d suggest 2 1/2 – 2 3/4 tsp baking powder. I hope that helps!
Wow, thank you so much, Heather! I will try all of that, as I love the taste of your recipe and would like to continue to use it for decorating ventures.
Thanks so much for this recipe. I live in CO and it came out beautifully. More importantly, the texture and taste were perfect. I added sprinkles to make it funfetti. I also added “birthday cake crumbs” on top, from Momofuku Milkbar recipe. Yum!
I’m so glad you loved it, Laura!
I’m so glad I came across this website for high-altitude baking. I always use the King Arthur Flour high altitude guide to change recipes, but I’m excited to try your perfected recipes. I have a questions about how you measure your flour since you don’t list the weights. Most cake recipes I find include a weighted flour amount, which always ends up seeming a lot less than the amount I measure out, even with the spoon and scoop method. I just want to use your same method to get the intended result. Thanks.
Hi Sam,
Good question! I’m working on putting together a chart of “my” weights according to how I measure ingredients, for those who prefer to use a scale. I’ve been using measuring cups for so long, that my method yields very consistent results for me, but I want to be as helpful as possible to everyone else. So first I aerate the flour a little in the canister with a spoon to loosen it up, and then I spoon it lightly into the measuring cup and sweep it off the top with the back of a butter knife to level it. For all-purpose flour, I consistently get 4.6 ounces per cup, and for cake flour, I get 4.2 ounces per cup. I hope that helps!
Please help! In the instructions you say to soft together the all of the dry ingredients including baking soda but there is none listed in the ingredients. Was that a typo in the instructions or did you forget to list it in the ingredients? I’m getting ready to make this but don’t want the soupy middle I’ve seen others say they got and I’m wondering if it’s due to not adding soda.
Thanks for catching that! The updated recipe does NOT include baking soda, so the ingredients list is correct. I’ve fixed the instructions.
I live in Northern Colorado and made this cake today for my mother in law’s birthday. Turned out beautifully. Thank you!
I made this at 7,200 feet and they came out great! I halved the recipe for 6” pans.
I couldn’t find whole butter milk but i found 1.5 with 56% less fat. What adjustments do i need to make so the cake still come out great?
Lowfat buttermilk will work just fine!
This cake was delicious! My only question was how can I make it not so dry? I like that it was dense but it was a bit too dry. How could I fix it? Thanks in advance!
This cake shouldn’t be dense at all, or dry. It’s very light, fluffy and moist. Did you measure your flour using the “spoon and sweep” method, where you lightly spoon it in, then use a knife to sweep it off the top? If you use your measuring cups to scoop flour out of the canister, it packs too much flour into the cups, resulting in dry, dense cakes. Over-baking also results in dry cakes.
Can I add sprinkles to make it a funfetti cake or would other adjustments need to be made too?
I think you probably can without it affecting how the cake bakes, but I haven’t personally tested it. There might be a comment on this post from someone who tried it and said it worked well! You might also want to check out my Funfetti Cake post: https://curlygirlkitchen.com/funfetti-cake/
I followed the recipe to a tee (in Denver as well) except for the buttermilk part, but I did the milk and vinegar you recommended. The taste and texture is great, I’m just not sure why mine didn’t plump up like yours. Mine are fairly thin layers. Your picture suggests otherwise, do you know why this could be? I had all three pans on the same rack.
Did you bake the cakes in 8-inch pans or 9-inch? Using 9-inch pans will result in thinner cake layers. Also, you might need to check the expiration on your baking powder to make sure it’s still good.
Hi, is the cake flour recipe or your first one APFlour recipe ok for 8,000 feet of altitude ?
So I need to still
Adjust or is that already set for 8,000
1 ½ cups granulated sugar
½ vanilla bean, seeds scraped
3 ¼ cups cake flour, sifted
3 tsp baking powder
1 tsp coarse Kosher salt
2 large eggs
2 large egg whites
1 ½ cups whole buttermilk
½ cup unsalted butter, melted
½ cup vegetable oil
2 tsp vanilla extract
I test all of my recipes at Denver’s altitude of 5,280 feet, so you’ll probably need to make a few more adjustments for 8,000 feet.
Ahh I thought you had revised the recipe. I remember your original recipe was on a pretty turquoise coloured cake stand it looked quite stunning. I thought I was on the wrong blog for a moment. I notice also in the revised recipe there’s only 1/2 cup oil. Can I use that measurement instead of the full cup in your original recipe or will that change the cake? I do like the addition of baking soda which I notice you have omitted in the revised one.
Actually, the original photo pictured the cake on a black and white stand, but yes, I updated both the recipe and the photos. 🙂 If you’re looking for the original ingredients list, check the notes section of the recipe card at the bottom of the post. Personally, I wouldn’t use a full cup of oil, which is why I updated the recipe, since I think the revised version is much better.
I do remember the recipe I bookmarked the cake was on a pretty pale turquoise cake stand I think that’s what caught my eye first (I’m a sucker for cake stands). I haven’t tried your revised recipe but I need to make a birthday cake soon so I’ll be making it and will let you know how it goes.
Thanks for sharing!
This might be the one you’re thinking of! 🙂
https://curlygirlkitchen.com/white-velvet-cake/